Table of Contents >> Show >> Hide
- Why Painting A Room Is Mostly About Preparation
- Tools And Supplies You Need To Paint A Room
- Step-By-Step Guide: How To Paint A Room
- Step 1: Choose The Right Paint Finish
- Step 2: Clear The Room And Protect Everything
- Step 3: Clean The Walls
- Step 4: Repair Holes, Cracks, And Dents
- Step 5: Tape Trim, Windows, And Edges
- Step 6: Prime When Needed
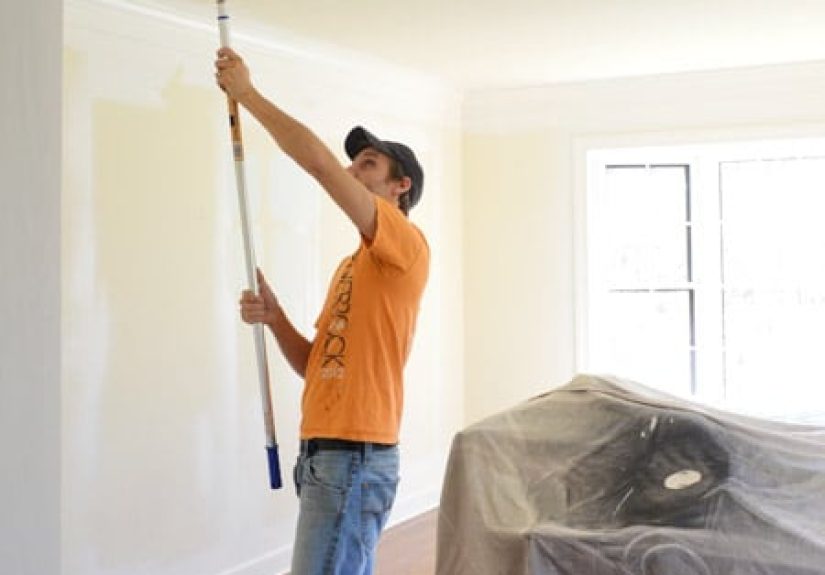
- Step 7: Cut In Around Edges
- Step 8: Load The Roller Correctly
- Step 9: Roll The Walls In Sections
- Step 10: Apply A Second Coat
- Step 11: Remove Tape And Clean Up
- Safety Tips Before You Paint
- Common Room Painting Mistakes To Avoid
- How To Make Your Paint Job Look Professional
- How Long Does It Take To Paint A Room?
- Real-World Experiences: What Painting A Room Teaches You
- Conclusion
Painting a room is one of those home projects that looks simple until you are standing in the middle of the floor, holding a roller, wondering why the wall suddenly has the texture of a nervous orange peel. The good news? You do not need to be a professional painter to get a clean, smooth, beautiful finish. You just need the right prep, the right tools, and the patience to avoid treating your wall like a giant coloring book.
This guide explains how to paint a room from start to finish, including planning, wall preparation, priming, cutting in, rolling, drying, cleanup, and the little mistakes that can turn a weekend refresh into a comedy show. Whether you are repainting a bedroom, giving your living room a new personality, or trying to cover a mysterious wall color chosen by a previous homeowner with “bold taste,” this step-by-step guide will help you paint with confidence.
Why Painting A Room Is Mostly About Preparation
Here is the secret professional painters know: the actual painting is only part of the job. The finish depends heavily on what happens before the paint can even gets opened. Clean walls, repaired holes, smooth surfaces, good tape lines, and proper primer can make a budget-friendly DIY room painting project look far more polished.
If you skip prep, the paint may peel, bubble, streak, or highlight every bump and dent like it is auditioning for a drama series. If you prep properly, the paint has a better surface to grip, the color looks more even, and your edges stay crisp. In short, prep is not glamorous, but neither is repainting the same wall twice because dust and grease ruined the first coat.
Tools And Supplies You Need To Paint A Room
Before you begin, gather your supplies. A little organization now prevents the classic mid-project panic of discovering your roller cover is missing while your paint tray is already full.
Basic Painting Tools
- Interior wall paint
- Primer, if needed
- Paint rollers and roller covers
- Angled paintbrush for cutting in
- Paint tray and tray liner
- Painter’s tape
- Drop cloths or plastic sheeting
- Extension pole
- Spackling compound or wall filler
- Putty knife
- Fine-grit sanding sponge or sandpaper
- Microfiber cloths or tack cloth
- Mild soap and water
- Ladder or sturdy step stool
- Gloves and safety glasses
How Much Paint Do You Need?
A common rule of thumb is that one gallon of paint covers about 350 to 400 square feet, depending on the product, wall texture, color change, and surface condition. If you are painting over a dark color with a light one, plan for primer and possibly two coats of paint. If the walls are thirsty, textured, or previously unpainted drywall, they may need more product than smooth, already-painted walls.
To estimate, measure the length of each wall, add those numbers together, and multiply by the room height. Subtract large windows and doors if you want a closer estimate. When in doubt, buy a little extra from the same batch. Running out halfway through a wall is not a crisis, but it is the kind of inconvenience that makes people say dramatic things to paint cans.
Step-By-Step Guide: How To Paint A Room
Step 1: Choose The Right Paint Finish
Paint finish affects both the look and durability of your room. Flat and matte finishes hide imperfections well, which makes them useful for ceilings and low-traffic areas. Eggshell and satin finishes are popular for bedrooms, living rooms, and hallways because they offer a soft glow and are easier to clean than flat paint. Semi-gloss is often used for trim, doors, and areas that need more scrubbing power.
For most walls, eggshell or satin is the friendly middle ground. It is attractive, practical, and less likely to make every little wall flaw wave hello under bright light.
Step 2: Clear The Room And Protect Everything
Move furniture out of the room if possible. If not, push it to the center and cover it with plastic or canvas drop cloths. Remove wall art, outlet covers, switch plates, curtain hardware, and anything else that might get in your way. Label screws and small parts in bags so future-you does not have to play detective.
Cover the floor with drop cloths. Canvas drop cloths are excellent because they stay in place better than thin plastic. Plastic can still work, especially for furniture, but it may slide around under your feet. Nobody wants to accidentally invent “paint skating.”
Step 3: Clean The Walls
Walls collect dust, fingerprints, cooking residue, pet rub marks, and mysterious smudges no one in the house will admit to causing. Paint does not stick well to dirt or grease, so cleaning is essential.
Use a mild soap-and-water solution and a soft sponge or cloth. Focus on corners, trim edges, and areas around light switches. In kitchens or high-touch spaces, you may need a little extra cleaning power. After washing, wipe with clean water and let the walls dry completely before moving on.
Step 4: Repair Holes, Cracks, And Dents
Inspect the walls closely. Nail holes, dents, cracks, and chipped spots should be repaired before painting. Apply spackling compound with a putty knife, smooth it level with the wall, and allow it to dry according to the product instructions.
Once dry, sand the patched areas until smooth. Run your hand lightly over the surface. If you can feel a bump, the paint will probably show it. After sanding, remove dust with a microfiber cloth or tack cloth. Dust left behind can create a gritty finish, and gritty walls are rarely part of anyone’s design vision.
Step 5: Tape Trim, Windows, And Edges
Painter’s tape helps protect baseboards, trim, window frames, door frames, and other edges. Apply tape in short, controlled strips, pressing the edge down firmly to reduce bleeding. Do not stretch the tape too much, because stretched tape can lift or curve.
For the cleanest lines, remove painter’s tape while the final coat is still slightly wet or carefully score the edge with a utility knife before pulling it off. Pull slowly at an angle. This is not the moment for speed. Your wall is not impressed by confidence; it wants precision.
Step 6: Prime When Needed
Primer is not always required, but it is very useful in certain situations. Use primer when painting new drywall, covering stains, changing from a dark color to a light color, painting glossy surfaces, or dealing with patched areas that absorb paint differently.
Primer helps create a more uniform base, improves adhesion, and can reduce the number of paint coats needed. Think of primer as the polite introduction between your wall and your paint. Without it, the relationship may still work, but things can get awkward.
Step 7: Cut In Around Edges
“Cutting in” means painting the edges and corners with a brush before rolling the larger wall areas. Use an angled brush and work around ceilings, baseboards, corners, windows, doors, and trim.
Dip the brush about one-third of the bristle length into the paint, then tap off excess instead of wiping hard. Wiping too much removes paint from the brush and makes the job slower. Paint a narrow band along the edges, usually two to three inches wide, so your roller can blend into it.
Step 8: Load The Roller Correctly
Pour paint into the tray and roll the roller through the paint, then over the tray’s ridged area to remove excess. The roller should be evenly loaded but not dripping. If paint is sliding down the roller handle, you have entered “too much enthusiasm” territory.
A well-loaded roller gives smoother coverage and fewer splatters. Use the roller cover nap recommended for your wall texture. Smooth walls usually need a shorter nap, while textured walls need a thicker one to reach into the surface.
Step 9: Roll The Walls In Sections
Work in manageable sections, roughly three feet by three feet. Start near the top and roll in a “W” or “M” pattern, then fill it in with overlapping strokes. Keep a wet edge as you move across the wall, which helps prevent lap marks.
Use light, even pressure. Pressing harder does not magically create better coverage; it usually creates roller lines and tired arms. Let the roller do the work. Reload it when coverage becomes thin instead of squeezing every last molecule of paint onto the wall.
Step 10: Apply A Second Coat
Most rooms look best with two coats of paint. The first coat builds coverage; the second coat evens everything out and deepens the color. Follow the paint manufacturer’s recommended drying time before applying the next coat.
Do not rush this step. Painting too soon can pull up the first coat or create tacky, uneven texture. Waiting may feel boring, but it is much less boring than sanding a wall you just painted.
Step 11: Remove Tape And Clean Up
After the final coat, remove painter’s tape carefully. Touch up small spots with a brush if needed. Clean brushes and rollers according to the type of paint used. Latex paint usually cleans up with soap and water, while oil-based products may require specific solvents listed on the label.
Seal leftover paint tightly and label the can with the room name and date. Store it in a safe, temperature-stable place. A little leftover paint is extremely useful for future touch-ups, especially after furniture, backpacks, pets, or enthusiastic vacuuming attack your walls.
Safety Tips Before You Paint
Painting is a manageable DIY project, but safety still matters. Ventilate the room by opening windows and using fans when appropriate. Take fresh-air breaks, especially if the paint smell becomes strong. Keep children, pets, and people with breathing sensitivities away from freshly painted rooms until the air is clear and the paint has dried properly.
If your home was built before 1978, be careful with peeling or sanding old paint. Older homes may contain lead-based paint, and disturbing it can create hazardous dust. If you are unsure, consider lead testing or hiring a certified professional before sanding, scraping, or renovating painted surfaces.
Use ladders wisely. Place the ladder on a flat surface, avoid overreaching, and keep your body centered. Move the ladder instead of leaning like a human question mark. It takes a few extra seconds, but it is far better than turning a room refresh into an emergency room refresh.
Common Room Painting Mistakes To Avoid
Skipping Wall Cleaning
Paint over dust and grime, and you may get peeling, streaking, or poor adhesion. Clean first, paint later. Your walls deserve a bath before their makeover.
Using Cheap Tape Incorrectly
Low-quality tape or poorly pressed tape can allow paint to bleed underneath. Use painter’s tape designed for the surface and press the edge firmly.
Painting In Bad Lighting
Poor lighting hides missed spots, roller marks, and thin areas. Use natural light plus portable lighting if needed so you can see what you are doing.
Overloading The Brush Or Roller
Too much paint causes drips, splatter, and uneven texture. Multiple smooth coats beat one heavy coat every time.
Ignoring Dry Time
Paint needs time to dry between coats. Read the label and follow the recommended schedule. The wall may look dry before it is ready for another coat.
How To Make Your Paint Job Look Professional
Professional-looking painting is about consistency. Keep your strokes even, maintain a wet edge, use quality tools, and do not rush the edges. A good angled brush can make trim lines cleaner. A roller extension pole helps you apply smoother pressure and avoid bending your wrist into strange shapes.
Also, stir your paint thoroughly before starting and occasionally during the project. Paint ingredients can settle, and uneven mixing may affect color and sheen. If using more than one gallon, consider combining them in a larger bucket, a process often called boxing paint. This helps prevent tiny color differences between cans from showing up on the wall.
How Long Does It Take To Paint A Room?
For a standard bedroom, expect the project to take a full day or a weekend, depending on prep work, drying time, and your experience. Cleaning, patching, sanding, taping, priming, painting two coats, and cleanup all take time. The actual rolling may be fast, but the full process rewards patience.
A simple room with clean walls and a similar color may be finished faster. A room with repairs, dark paint, textured walls, lots of trim, or dramatic color changes will take longer. Plan realistically, and do not start at 9 p.m. unless you enjoy making questionable life choices under a ceiling light.
Real-World Experiences: What Painting A Room Teaches You
After painting a few rooms, most people discover that the wall is not the hardest part. The hardest part is everything around the wall. Moving furniture, removing outlet covers, taping trim, finding the missing screwdriver, and keeping the dog from inspecting wet paint with its tail can take more energy than expected. A successful room painting project often begins with accepting that preparation is not “extra.” It is the project.
One useful experience is to test the paint color before committing. A color that looks soft and warm on a tiny store card can look completely different on a large wall at home. Morning light, afternoon light, lamps, flooring, and furniture all change how paint appears. A beige can turn pink, a gray can turn blue, and a trendy green can suddenly make the room feel like a fancy salad. Paint a sample area and observe it for a day or two before buying gallons.
Another lesson is that edges matter more than you think. A wall can be beautifully rolled, but messy ceiling lines and paint on the baseboards will steal attention immediately. Take your time cutting in. If your hand is not steady, use tape, but still do not rely on tape as magic. Press it down, paint carefully, and remove it at the right time. Clean lines make the entire room look more expensive, even if your budget was held together with coupons and determination.
People also learn quickly that cheap tools can make painting harder. A low-quality brush may shed bristles into the paint. A poor roller cover can leave lint on the wall. Thin drop cloths can slide around and expose the floor at exactly the wrong moment. You do not need the most expensive supplies in the store, but decent tools are worth it. They save time, reduce frustration, and help the finish look smoother.
One of the most overlooked experiences is the emotional roller coaster of the first coat. The first coat often looks patchy, scary, and deeply unconvincing. Do not panic. Many colors need a second coat to look rich and even. The first coat is like the rehearsal; the second coat is the performance. Wait for proper drying time, apply the second coat evenly, and the wall usually transforms from “uh-oh” to “I meant to do that.”
Finally, cleanup is part of the victory. Label the leftover paint, save a small amount for touch-ups, clean your tools, and reinstall outlet covers only after the paint is dry. Step back, admire the room, and enjoy the strange but satisfying feeling of having changed an entire space with a brush, a roller, and a little patience. Painting a room teaches you that home improvement does not have to be complicated to be powerful. Sometimes one fresh color is enough to make a room feel new again.
Conclusion
Learning how to paint a room is one of the most useful DIY skills for homeowners and renters alike. The process is straightforward: choose the right paint, protect the room, clean and repair the walls, tape carefully, prime when needed, cut in with a brush, roll evenly, apply a second coat, and clean up properly. The difference between a rushed paint job and a polished one is rarely luck. It is preparation, patience, and a willingness to let the paint dry before declaring yourself the Michelangelo of the guest room.
With the right approach, painting a room can refresh your home, improve your mood, and make old spaces feel brand-new without requiring a major renovation. Take your time, use good tools, respect safety basics, and remember: every great paint job begins before the first roller stroke touches the wall.