
Table of Contents >> Show >> Hide
- Before You Start: Know What Kind of Mirror You Have
- Tools and Supplies You Will Need
- Safety First: Do Not Skip This Part
- Step 1: Prepare the Room
- Step 2: Tape the Mirror
- Step 3: Check for Mirror Clips or Brackets
- Step 4: Test Whether the Mirror Moves
- Step 5: Soften the Adhesive With Heat
- Step 6: Use Wire or Fishing Line to Cut Through Glue
- Step 7: Insert Wood Shims Gradually
- Step 8: Remove the Mirror From the Wall
- Step 9: Remove Adhesive From the Wall
- Step 10: Repair the Wall
- Step 11: Dispose of or Reuse the Mirror
- Common Mistakes to Avoid
- When to Call a Professional
- Helpful Experience Notes From Real-World Mirror Removal
- Conclusion
Removing a wall mirror sounds simple until you realize the mirror has been clinging to your wall like it signed a 30-year lease. Maybe it is held up with clips. Maybe it is glued on with mirror mastic. Maybe it was installed by someone who believed “more adhesive” was a personality trait. Either way, taking it down requires patience, protection, and a plan that does not involve yelling, “Catch it!” at the last second.
This step-by-step guide explains how to remove a wall mirror safely, whether it is a bathroom vanity mirror, a builder-grade mirror, or a frameless mirror glued directly to drywall. You will learn what tools to gather, how to protect yourself, how to loosen adhesive, how to remove mirror clips, and what to do after the mirror comes off. The goal is simple: remove the mirror without turning your bathroom into a sparkly disaster zone.
Before You Start: Know What Kind of Mirror You Have
Not all wall mirrors are installed the same way. Before you touch a tool, take a few minutes to inspect how the mirror is attached. This step can save your wall, your patience, and possibly your favorite pair of shoes.
Mirror Held With Clips
Some mirrors are secured with small metal or plastic clips around the edges. These are common on bathroom vanity mirrors. Usually, the bottom clips support the weight while the top clips prevent the mirror from tipping forward. In many cases, clip-mounted mirrors are easier to remove because the mirror may not be heavily glued to the wall.
Mirror Glued to the Wall
A glued wall mirror is more challenging. Installers often use mirror mastic or construction adhesive behind the glass. The adhesive may be in dots, vertical strips, or large patches. When you pull too hard, the drywall paper can tear. When you rush, the glass can crack. When you panic, the mirror seems to sense it and becomes even more dramatic.
Mirror With Clips and Adhesive
Some mirrors use both clips and glue. This is common with large builder-grade bathroom mirrors. The clips hold the mirror in place while the adhesive bonds it to the wall. For this type, you must remove the clips first, then slowly work on the adhesive.
Tools and Supplies You Will Need
Gathering the right tools before you begin keeps the project calm and controlled. You do not want to be halfway through the job, holding a loose mirror with one hand, and searching for gloves with the other. That is how home improvement turns into interpretive dance.
- Safety glasses or goggles
- Heavy-duty work gloves
- Long sleeves, long pants, and closed-toe shoes
- Duct tape, painter’s tape, or packing tape
- Drop cloth, cardboard, or old towels
- Screwdriver or drill
- Putty knife or drywall knife
- Plastic pry tool or thin wood shims
- Hair dryer or heat gun
- Piano wire, picture-hanging wire, or strong fishing line
- Suction cups, if available
- Trash container or cardboard box for broken glass
- Spackle, joint compound, sanding sponge, primer, and paint for wall repair
Safety First: Do Not Skip This Part
A wall mirror is not just decor; it is a large sheet of glass. Even a small bathroom mirror can be heavier than it looks. A large frameless mirror can be awkward, slippery, and surprisingly stubborn. Before you begin, protect your eyes, hands, arms, legs, and feet. Glass does not care that you “just want to do one quick project before dinner.”
Wear safety glasses, thick gloves, long sleeves, long pants, and sturdy shoes. Clear the area around the mirror, especially the sink, vanity, toilet, shelves, and floor. If you are working in a bathroom, remove toothbrushes, soaps, candles, tiny decorative jars, and anything else that could become a glass-dust collector.
If the mirror is very large, cracked, installed above electrical outlets, or located in a tight space, consider hiring a professional. The same goes if you are uncomfortable handling glass. A professional mirror removal service may cost more than DIY, but it costs less than repairing major damage or dealing with an injury.
Step 1: Prepare the Room
Start by giving yourself space to work. Move rugs, trash cans, stools, baskets, and bathroom accessories out of the way. Place a drop cloth, cardboard, or old towels beneath the mirror. This protects the floor and makes cleanup easier if small pieces of glass or drywall debris fall.
Next, cover nearby surfaces. If the mirror is above a vanity, place cardboard or a thick towel over the countertop and sink. This prevents scratches and cushions anything that drops. If you have a faucet directly below the mirror, cover it too. Faucets are very good at catching falling objects and very bad at forgiving them.
Step 2: Tape the Mirror
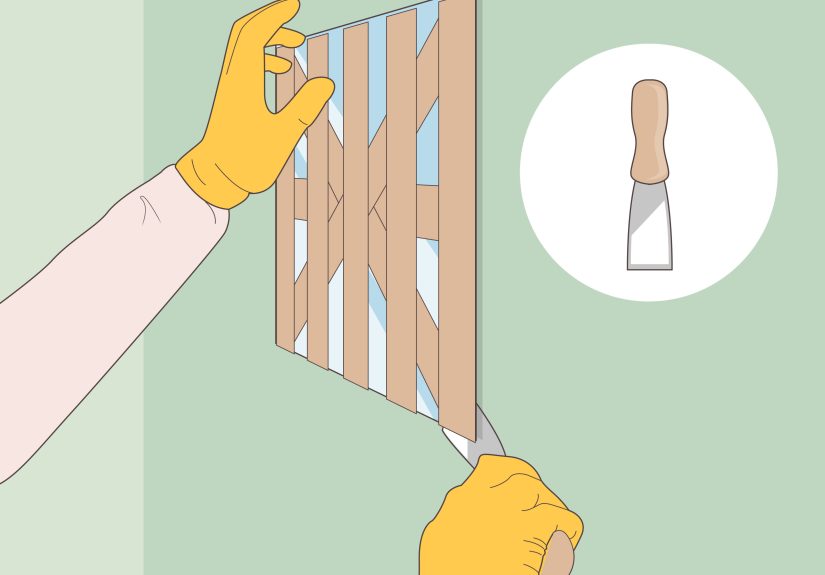
Apply tape across the mirror in a crisscross pattern. Use long strips vertically, horizontally, and diagonally. You are not trying to make the mirror stronger; you are trying to reduce how far shards may spread if it cracks. Think of it as putting a seat belt on the glass.
For a small mirror, a few strips may be enough. For a large wall mirror, use more tape and cover a greater portion of the surface. Some DIYers use carpet protection film for large mirrors because it covers the glass more completely. Whatever you use, press the tape firmly so it sticks well.
Step 3: Check for Mirror Clips or Brackets
Look around the top, bottom, and sides of the mirror for clips, brackets, screws, or trim. If clips are present, identify which ones are fixed and which ones move. Often, the top clips slide upward or unscrew, allowing the mirror to tilt forward. The bottom clips may remain in place until the mirror is lifted out.
Use a screwdriver or drill to remove screws carefully. Have a helper hold the mirror while you remove the last clip. Even if you think the mirror is glued, never assume the adhesive will hold it once the clips are gone. Adhesive can fail suddenly, and mirrors have terrible comedic timing.
Step 4: Test Whether the Mirror Moves
Once clips are removed, gently test the mirror. Do not yank it. Do not pry aggressively. Place gloved hands near the sides and apply light pressure. If the mirror moves easily, it may not be glued very strongly. If it does not move at all, adhesive is likely doing the heavy lifting.
If the mirror begins to separate from the wall, stop and ask your helper to support it. A loose mirror can shift quickly. Use suction cups if you have them. They make it easier to control the glass and reduce the chance of dropping it.
Step 5: Soften the Adhesive With Heat
For a glued wall mirror, heat can help soften the adhesive behind the glass. Use a hair dryer or heat gun on a low or moderate setting. Start near one top corner and warm a small section at a time. Keep the heat moving rather than holding it in one spot.
A hair dryer is slower but safer for beginners. A heat gun works faster but can get very hot, so use it carefully. Too much heat may damage paint, drywall, or the mirror backing. The goal is to soften the adhesive, not audition for a home-renovation volcano scene.
After warming a section, gently insert a putty knife, plastic pry tool, or thin wood shim behind the mirror. Work slowly. If you meet strong resistance, apply more heat and try again. Patience matters more than muscle here.
Step 6: Use Wire or Fishing Line to Cut Through Glue
If the mirror is firmly glued, a wire-saw method can help. Use piano wire, picture-hanging wire, or strong fishing line. Slip it behind one edge of the mirror and use a slow back-and-forth sawing motion to cut through the adhesive.
This works best when the adhesive has been softened with heat. Keep the wire as close to the wall as possible to reduce stress on the glass. A helper should support the mirror while you work. If the wire catches, stop and reposition it rather than forcing it.
For wider mirrors, you may need to work from more than one side. Go slowly and listen for changes. A mirror may start to loosen suddenly once enough adhesive has been cut. That moment feels exciting, but it is also when you need to stay calm and keep control.
Step 7: Insert Wood Shims Gradually
Wood shims can help create steady pressure behind the mirror. Insert thin shims around the edges, especially where adhesive has started to loosen. Tap them gently with your hand or a small tool. Do not hammer them aggressively. You are encouraging the mirror to separate, not challenging it to a duel.
Place shims evenly so the pressure is spread out. If you force one area too much, the mirror may crack. Add heat, slide the wire, insert shims, and repeat. This slow rhythm is the safest approach for many glued mirrors.
Step 8: Remove the Mirror From the Wall
When the adhesive is loosened enough, have your helper support one side while you support the other. Tilt the mirror slightly away from the wall and lift it carefully. If bottom clips are still supporting it, lift the mirror up and out of the clips.
Carry the mirror vertically, not flat. Large sheets of glass are stronger when carried upright. Move slowly and avoid bumping walls, countertops, or door frames. Set the mirror on a padded surface, such as cardboard or a thick blanket, away from foot traffic.
If the mirror cracks during removal, do not try to catch falling pieces with bare hands. Step back, let the taped surface do its job, and handle fragments only with gloves. Place broken glass into a sturdy container, not a flimsy trash bag.
Step 9: Remove Adhesive From the Wall
After the mirror is down, you will probably see adhesive spots on the wall. Some may peel off. Some may cling like they are emotionally attached. Use a putty knife or drywall knife to scrape carefully. If adhesive is still rubbery, warming it slightly may make removal easier.
Try not to gouge the drywall. If the drywall paper tears, do not panic. Minor wall damage is common after removing a glued mirror. The repair process is straightforward: trim loose paper, seal damaged areas if needed, apply joint compound, sand smooth, prime, and paint.
Step 10: Repair the Wall
Most mirror removal projects leave behind at least a few battle scars. Small holes from clips can be filled with spackle. Larger torn areas need joint compound. Apply thin coats rather than one thick blob. Thick compound takes longer to dry and can look lumpy under paint.
Once the patch is dry, sand it lightly until smooth. Wipe away dust with a damp cloth. Apply primer before painting, especially over torn drywall paper or joint compound. Primer helps the paint look even and prevents patched areas from flashing through.
Step 11: Dispose of or Reuse the Mirror
If the mirror came off in one piece, you may be able to reuse it. Clean the back carefully and inspect it for cracks, chips, or damaged silvering. If it is in good condition, it can be framed, reinstalled, donated, or used in another room.
If the mirror is broken, check your local disposal rules. Many areas require glass to be boxed, taped, or labeled before trash pickup. Never toss loose mirror shards into a regular garbage bag. Broken mirror glass can cut through the bag and injure sanitation workers.
Common Mistakes to Avoid
Pulling Too Hard Too Soon
The biggest mistake is trying to rip the mirror off the wall. This can shatter the glass or tear away large sections of drywall. Use heat, wire, shims, and time. If the mirror is not moving, it is not ready.
Skipping Protective Gear
Safety glasses and gloves are not optional. Even careful mirror removal can produce chips, cracks, or sharp edges. Dress like someone who respects glass, because glass has absolutely no sense of humor.
Working Alone on a Large Mirror
Large mirrors are awkward and heavy. A helper can support the glass, watch for movement, and keep the mirror from dropping unexpectedly. If nobody is available, postpone the project or hire a pro.
Using Metal Pry Bars Directly Against Drywall
A metal pry bar can crush drywall or crack the mirror if used carelessly. If you need leverage, protect the wall with wood shims or a wide putty knife. Spread pressure over a larger area.
When to Call a Professional
DIY mirror removal is possible, but it is not always the best choice. Call a professional if the mirror is extremely large, already cracked, installed over tile, mounted near electrical fixtures, or attached with heavy construction adhesive. You should also call a pro if the mirror is antique, expensive, or sentimental.
Professional glass installers and handymen have suction cups, specialty wire tools, protective equipment, and experience reading how a mirror is attached. Sometimes the smartest DIY move is knowing when not to DIY. Your wall will understand.
Helpful Experience Notes From Real-World Mirror Removal
Here is the honest truth about removing a wall mirror: the instructions sound neat, but the real job often feels like a slow negotiation with a shiny rectangle. The first thing you learn is that preparation makes the whole project less stressful. Taping the mirror, clearing the room, covering the vanity, and putting on protective gear may feel like overkill at first. Then the mirror makes one tiny cracking sound, and suddenly you become a big fan of preparation.
One practical experience is to start earlier in the day than you think you need to. Mirror removal is not always difficult, but it can be unpredictable. A clip-mounted mirror may come down in fifteen minutes. A glued bathroom mirror may take hours of warming, slicing, shimming, and whispering polite encouragement. If you begin late in the evening, you may end up tired, rushed, and tempted to force it. That is exactly when mistakes happen.
Another useful lesson is to keep your tools simple and close. A hair dryer, putty knife, wood shims, tape, gloves, and a helper can do a lot. You do not need to attack the mirror with every tool in the garage. In fact, aggressive tools usually create aggressive problems. The best progress often comes from repeating small, careful actions: heat a section, test the edge, slide in a shim, cut adhesive with wire, and move to the next area.
It also helps to accept that drywall damage may happen. Many glued mirrors were installed with strong adhesive directly on painted drywall. When that adhesive comes off, it may take paint or drywall paper with it. This is normal. Do not let a few torn patches make you think the project failed. A smooth wall repair with joint compound, primer, and paint can make the area look fresh again. In many bathroom updates, the wall looks better after repair than it did behind the old mirror.
If you plan to install a new mirror, measure before removing the old one. Check the width of the vanity, the height of the faucet, the placement of lights, and the distance to outlets or side walls. Many homeowners remove a giant builder mirror and then realize the replacement mirror needs different anchors, a centered position, or a slightly higher placement. A little measuring now saves a lot of “why does this look weird?” later.
Finally, do not underestimate cleanup. Even when the mirror comes off in one piece, there may be adhesive crumbs, drywall dust, old screws, and tiny glass flakes. Vacuum carefully, wipe surfaces, and inspect the floor with good lighting. If the mirror broke, take extra time. Wrap or box glass securely and label it according to local disposal rules. Your future barefoot self will thank you.
The best wall mirror removal experience is boring in the best possible way: no shattered mess, no emergency hardware store run, no dramatic crash, and no surprise hole in the wall shaped like regret. Go slowly, protect yourself, and treat the mirror like a heavy glass object that deserves respect. With patience and the right method, you can remove a wall mirror safely and get your space ready for a cleaner, brighter upgrade.
Conclusion
Learning how to remove a wall mirror is really about learning how to slow down. The safest method is not the fastest; it is the one that protects you, controls the glass, and minimizes wall damage. Start by identifying how the mirror is mounted. Prepare the room, tape the glass, remove clips, soften adhesive with heat, use wire or shims carefully, and lift the mirror with help. Afterward, scrape adhesive, repair drywall, and dispose of glass responsibly.
Whether you are updating a bathroom, replacing an outdated vanity mirror, or finally saying goodbye to a builder-grade mirror that has seen too many toothpaste splatters, the process is manageable with the right tools and mindset. Respect the glass, respect the wall, and do not rush. Your reward is a cleaner space, a fresh design opportunity, and the quiet satisfaction of completing a DIY project without turning it into a cautionary tale.


