
Table of Contents >> Show >> Hide
- What Is Door Trim and Why Replace It?
- Tools and Materials You Will Need
- How to Replace a Door Trim: Step by Step
- Step 1: Prepare the work area
- Step 2: Remove the old trim carefully
- Step 3: Clean and inspect the opening
- Step 4: Mark your reveal lines
- Step 5: Measure the side pieces
- Step 6: Measure the head casing
- Step 7: Cut the new trim
- Step 8: Dry-fit everything before nailing
- Step 9: Install the first side piece
- Step 10: Install the head casing and second side piece
- Step 11: Fill nail holes and caulk the gaps
- Step 12: Sand, prime, and paint or stain
- Common Mistakes to Avoid
- How Long Does It Take to Replace Door Trim?
- Real-World Experiences and Lessons Learned
- Final Thoughts
- SEO Tags
Door trim does not get much love. It just stands there, framing your doorway like a polite theater usher, until one day it is cracked, dented, split, or so covered in paint blobs that it looks like a frosting accident. The good news is that replacing door trim is a very manageable DIY project. The better news is that it makes a room look cleaner, sharper, and more finished in a single afternoon.
If you have been staring at scuffed casing for months and telling yourself you will “deal with it eventually,” consider this your nudge. In this step-by-step guide, you will learn how to remove old trim, measure new casing correctly, cut clean joints, install the pieces so they look intentional instead of haunted, and finish everything with caulk, filler, and paint. We will focus mainly on interior door trim, but many of the same basics apply to exterior trim too.
This guide is written in plain American English, with real-world advice, beginner-friendly explanations, and enough detail to help you avoid the classic mistakes. In other words, this is not the version where someone says “just cut and nail it up” as if trim carpentry is powered by vibes.
What Is Door Trim and Why Replace It?
Door trim, also called door casing, is the decorative molding installed around a door frame. It covers the gap between the wall and the jamb, helps create a finished look, and can tie the room’s style together. In older homes, trim can be ornate and traditional. In newer homes, it is often simple and flat. Either way, when trim is damaged or dated, the whole doorway looks tired.
You may want to replace door trim if it is cracked, swollen from moisture, loose at the wall, full of bad patch jobs, or simply out of sync with the rest of your home. Replacing casing is also a smart upgrade if you are remodeling a room, installing new doors, changing baseboards, or aiming for a more custom style such as farmhouse, Craftsman, or modern flat stock trim.
Tools and Materials You Will Need
Basic tools
- Utility knife
- Putty knife
- Flat pry bar
- Hammer or nail puller
- Tape measure
- Combination square or reveal gauge
- Level
- Miter saw or miter box
- Finish nailer or hammer and finish nails
- Nail set
- Caulk gun
- Sanding sponge or fine-grit sandpaper
Materials
- New door casing or trim boards
- Wood filler or putty
- Paintable acrylic-latex caulk
- Primer
- Paint or stain
- Drop cloth
- Optional wood glue for miter joints
Before you start, inspect the jamb and wall condition. If the drywall is crumbling, the jamb sits too far back from the wall, or the floor slopes noticeably, you may need a few adjustments before the new trim goes on. That is normal. Homes love being “unique” at the exact moment you want something square.
How to Replace a Door Trim: Step by Step
Step 1: Prepare the work area
Move furniture out of the way, lay down a drop cloth, and remove anything that might get bumped or covered in dust. If the old trim is caulked or painted to the wall, score along the edges with a sharp utility knife before prying. This small step helps prevent torn drywall paper and chipped paint from turning a trim project into a wall repair project.
If your home was built before 1978 and the trim has old paint on it, be cautious. Disturbing painted trim in older homes can create dangerous lead dust. In that case, follow lead-safe practices or bring in a certified professional. Safety is not glamorous, but neither is accidental toxic dust.
Step 2: Remove the old trim carefully
Slip a putty knife behind the trim first to protect the wall, then use a flat pry bar to gently work the casing loose. Start near one end and move gradually along the board instead of trying to rip the whole piece off in one heroic yank. Use a small scrap of wood behind the pry bar as a fulcrum so you do not dent the drywall.
Once the trim is off, pull any remaining nails from the wall or the back of the casing. If you are saving the old trim as a cutting template, remove the nails carefully so the wood stays intact. Otherwise, congratulate it on its service and let it retire.
Step 3: Clean and inspect the opening
With the old trim removed, inspect the jamb, wall edge, and floor. Scrape off dried caulk, old adhesive, or paint ridges. Fill damaged drywall areas if needed and let the patch dry. If the jamb sits noticeably proud of or recessed from the wall, address that before installation. New trim looks best when it lies flat without twisting or floating over gaps.
This is also a good time to check whether the floor is level where the trim legs will land. Many are not. If one side of the floor is slightly higher, one trim leg may need to be trimmed differently so the top corners line up properly.
Step 4: Mark your reveal lines
Instead of installing the trim flush with the inside edge of the jamb, mark a consistent reveal line around the jamb. A reveal is the small visible strip of jamb between the inside edge of the trim and the opening. On many interior trim jobs, a reveal around 3/16 inch looks balanced and professional, though the exact number can vary by trim style.
Use a combination square to mark the reveal on both side jambs and across the head jamb. This line becomes your installation guide. It is a tiny detail that makes a big visual difference. Without it, the trim can look crowded, uneven, or as if it was installed during a mild earthquake.
Step 5: Measure the side pieces
Hold a side casing in place with its inside edge aligned to the reveal line. Mark the point where it meets the head jamb reveal. If you are using mitered corners, that mark will guide the long point of your miter cut. If you are using a butt-joint or Craftsman-style casing, it will guide a straight cut.
Do this on both sides instead of assuming both legs are identical. In real houses, “same size” often means “close enough to annoy you later.” Measuring each side separately is one of the easiest ways to avoid gaps at the top.
Step 6: Measure the head casing
Next, measure the top piece. For mitered trim, the head casing length is determined by the distance across the head jamb plus the trim profile and reveal on both sides. The simplest beginner method is to hold the board in place, transfer your reveal marks directly, and cut one side at a time. For butted trim, measure the distance you want the head piece to span and account for any planned overhang or decorative side blocks.
If you are installing plain modern casing, a clean mitered head looks classic. If you want a more Craftsman or farmhouse style, a straight head casing over square side pieces also looks great and is easier for many beginners.
Step 7: Cut the new trim
Use a miter saw for the cleanest cuts. For standard mitered casing, cut 45-degree angles at the top of each side piece and both ends of the head casing. Dry-fit as you go. If your trim profile is delicate or prefinished, support the board carefully and cut slowly to reduce splintering.
For square or butted trim, make clean straight cuts and test the fit against your reveal marks. When possible, cut slightly long and trim down in small increments. You can always remove more material. You cannot add it back unless you have developed a close personal friendship with wood filler, and even that relationship has limits.
Step 8: Dry-fit everything before nailing
Place all three pieces around the opening without fastening them yet. Check the reveal lines, corner joints, floor contact, and wall fit. If a miter opens at the face, your cut angle or length may need a small adjustment. If the trim rocks against the wall, the surface behind it may need to be shimmed or flattened.
This step saves time. Beginners often want the emotional victory of hearing the nail gun immediately. Resist that urge. Dry-fitting is what separates a clean install from a doorway that whispers “I tried my best” every time you walk by.
Step 9: Install the first side piece
Start with one side casing and align its inside edge to the reveal line. Make sure it sits correctly at the floor and remains straight. Fasten it with finish nails, aiming some nails into the jamb side and others into the wall framing side so the trim pulls in tight. Keep fasteners back from the edges to reduce the risk of splitting.
If you are using a nail gun, choose nails appropriate for your trim thickness. If you are hand-nailing, set the heads slightly below the surface with a nail set. Either method works. One is simply louder and makes you feel more dramatic.
Step 10: Install the head casing and second side piece
Set the head casing next, aligning it to the reveal line and fitting the first corner tightly. If you are working with mitered trim, a small dab of wood glue on the joint can help keep the corner tighter over time. Tack the head piece in place, then install the second side casing and adjust the final miter until the joints close neatly.
Once you are happy with the fit, finish nailing all pieces securely. Check with a level if anything looks suspicious. Your eyes are useful, but trim has a special talent for making tiny crooked lines look much bigger after the paint dries.
Step 11: Fill nail holes and caulk the gaps
Fill nail holes with wood filler or putty and smooth it with a putty knife or fingertip. Use paintable acrylic-latex caulk where the trim meets the wall and, if needed, at small joints that will be painted. A thin, smooth bead works better than a giant blob that looks like toothpaste applied during a car chase.
Do not use non-paintable silicone if the trim will be painted. It may seal well, but paint generally does not stick to it the way you want. Also, if the trim is bare wood, prime it before final paint for better adhesion and a more even finish.
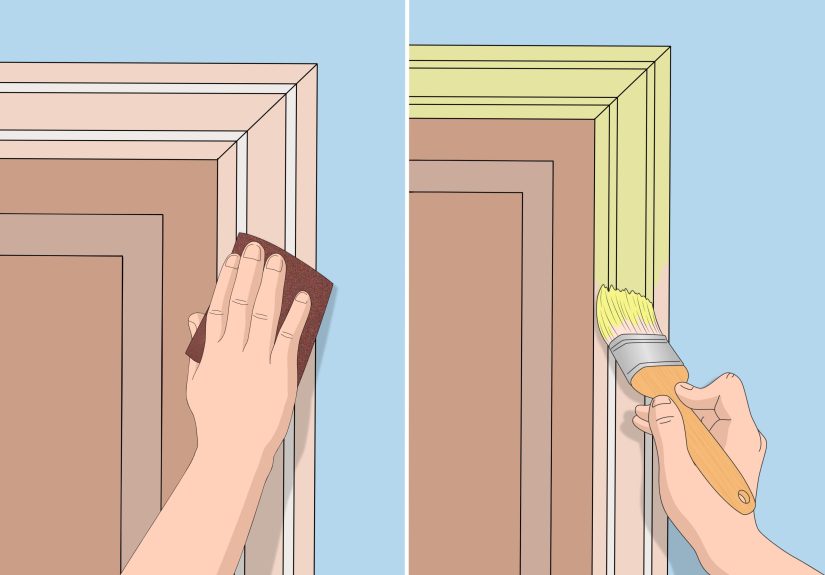
Step 12: Sand, prime, and paint or stain
Once filler and caulk are dry, sand lightly until everything feels smooth. Prime any bare wood, patched areas, or filler spots. Then apply paint or stain based on the look you want. Painted trim gives you the most forgiveness. Stained trim looks beautiful but demands cleaner joints and more careful prep.
For a polished result, use the same sheen on all matching trim in the room. Satin, semi-gloss, and gloss are all common choices for interior trim because they are durable and easier to clean than flat paint.
Common Mistakes to Avoid
- Skipping the reveal line: This is one of the fastest ways to get uneven-looking trim.
- Not checking the floor: An out-of-level floor can throw off the top joints.
- Cutting all pieces from one measurement: Measure each side separately.
- Nailing before dry-fitting: Test first, fasten second.
- Using too much caulk: Caulk should hide small gaps, not become the trim’s entire personality.
- Painting bare wood without primer: That often leads to uneven absorption and a dull finish.
How Long Does It Take to Replace Door Trim?
For a simple interior door with standard casing, a beginner can often finish the project in a few hours, especially if the trim comes pre-primed. More ornate profiles, stained wood, badly uneven walls, or repairs to the jamb and drywall can stretch the project longer. The actual trim installation is not usually the slowest part. The sneaky time thief is prep, test-fitting, and finish work.
Real-World Experiences and Lessons Learned
One of the most common experiences people have when replacing door trim is discovering that the old trim was hiding all sorts of nonsense. The wall is not flat. The jamb is not perfectly square. The floor slopes just enough to make one casing leg look a little taller. None of that means you are doing anything wrong. It means you are officially doing carpentry in a real house instead of inside a computer-generated showroom where every surface behaves.
A very typical first-time mistake is assuming the left and right trim legs should be identical because the door opening itself looks symmetrical. Then you cut both pieces exactly the same, lift them into place, and wonder why one miter looks tight while the other looks like it is trying to escape the building. The lesson is simple: measure both sides. Homes shift. Floors settle. Doorways get tweaked over time. Precision matters, but so does accepting that your tape measure is dealing with reality, not theory.
Another common experience is underestimating how much better the job looks when you slow down during removal. People get impatient, pry hard, and then end up patching torn drywall paper around the jamb. Those extra wall repairs take longer than the careful removal would have. A putty knife, a pry bar, and a scrap block of wood can make the process much cleaner. In trim work, gentle is often faster than aggressive once you add up the repair time.
Many DIYers also learn that the reveal line is the secret sauce. Before they know about reveals, they try to push the trim tight to the jamb edge. It seems logical, but the result often looks slightly off, especially once paint exaggerates every inconsistency. A small, consistent reveal creates a cleaner shadow line and makes the whole doorway feel more intentional. It is one of those details that reads as “professional” even if nobody in the room can explain why.
Miters teach their own life lessons too. They look easy until you cut a pair and realize wood has grain, profiles have curves, and walls rarely meet at perfect angles. The best habit is to dry-fit constantly. Trim a hair off. Test again. Sneak up on the fit. People who rush this step usually spend more time later trying to hide gaps with filler and caulk. That can work for paint-grade trim, but it is still better to start with cleaner cuts.
Then there is the finishing stage, which many people treat as an afterthought right up until they see the final result. Nail holes, caulk lines, primer coverage, and paint sheen matter more than expected. Even a well-installed casing can look average if the finish work is sloppy. On the other hand, a modest builder-grade trim can look custom when the holes are neatly filled, the caulk line is crisp, and the paint is smooth.
Perhaps the most encouraging experience is realizing that door trim replacement is one of those projects that permanently improves your eye. After doing one doorway well, you start noticing reveals, miters, casing profiles, and paint lines everywhere. It becomes easier to spot what looks good and why. That confidence carries into baseboards, window trim, and even bigger carpentry jobs. Replacing door trim may not sound glamorous, but it is one of those gateway projects that quietly levels up your whole DIY game.
Final Thoughts
Replacing door trim is a practical project with a surprisingly big payoff. It sharpens the look of a room, hides rough edges around the frame, and gives you a chance to match your home’s style more intentionally. The keys are simple: remove the old casing carefully, mark clean reveal lines, measure each piece accurately, dry-fit before nailing, and do not rush the finishing details.
If this is your first trim project, start with one interior doorway in a low-stakes area. By the time you finish, you will understand the rhythm of measuring, cutting, fitting, fastening, and finishing. And once you see the before-and-after difference, there is a decent chance you will start eyeing every other doorway in the house like a producer scouting for a makeover show.


