
Table of Contents >> Show >> Hide
- What Does It Mean to Roll a Bowling Ball Correctly?
- Step 1: Choose the Right Bowling Ball
- Step 2: Hold the Ball with a Relaxed Grip
- Step 3: Set Up Your Stance
- Step 4: Learn the Four-Step Bowling Approach
- Step 5: Start the Swing Smoothly
- Step 6: Aim at a Target, Not the Pins
- Step 7: Release the Bowling Ball Correctly
- Step 8: Follow Through Toward the Target
- Common Mistakes When Rolling a Bowling Ball
- Simple Practice Drills for Beginners
- How to Roll a Bowling Ball Straight
- How to Roll a Bowling Ball with a Hook
- Beginner Bowling Strategy: Aim for Consistency First
- Experience Section: What Actually Helps When Learning to Roll a Bowling Ball
- Conclusion
Learning how to roll a bowling ball looks simple from the snack bar: pick up ball, walk forward, let it go, celebrate like you just won a championship. Then you actually try it, and the ball drifts into the gutter with the confidence of a shopping cart with one bad wheel.
The good news? Bowling is not about brute strength, dramatic wrist flicks, or launching the ball like you are trying to scare the pins into surrender. A good bowling roll comes from timing, balance, a relaxed grip, a smooth arm swing, and a release that lets the ball do its job. Once those basics click, bowling becomes less random and a lot more fun.
This step-by-step guide explains how to roll a bowling ball correctly, whether you are a complete beginner, a casual weekend bowler, or someone who wants to stop apologizing to the lane next to you. We will cover ball selection, grip, stance, footwork, targeting, release, follow-through, common mistakes, and practice tips you can use right away.
What Does It Mean to Roll a Bowling Ball Correctly?
Rolling a bowling ball correctly means delivering the ball smoothly onto the lane so it travels toward your target with control. The key word is roll. Beginners often throw, drop, muscle, or shove the ball. Those moves create noise, lost accuracy, and sometimes a look from nearby bowlers that says, “Please do not break the floor.”
A proper bowling roll has several simple qualities:
- The ball fits your hand comfortably.
- Your grip is relaxed, not squeezed.
- Your feet and swing move in rhythm.
- Your eyes stay on a target, usually the lane arrows.
- Your thumb exits the ball before your fingers.
- Your follow-through continues toward the target.
- You finish balanced at the foul line.
When these pieces work together, the ball feels like it rolls off your hand instead of being forced out. That smooth release is the foundation for better accuracy, stronger pin action, and fewer “I meant to do that” gutter balls.
Step 1: Choose the Right Bowling Ball
Before you worry about fancy technique, choose a ball you can control. The right bowling ball should feel secure in your hand and comfortable during your swing. If it is too heavy, you may squeeze, drop your shoulder, or slow down awkwardly. If it is too light, you may overpower it and lose consistency.
Pick a Weight You Can Swing Smoothly
A common beginner guideline is to start with a ball close to 10% of your body weight, then adjust based on strength, comfort, and control. Many adult beginners do well somewhere between 10 and 14 pounds, while stronger bowlers may prefer 14 to 16 pounds. The best test is simple: can you hold the ball comfortably, swing it freely, and finish without strain?
If your shoulder complains before you even reach the lane, go lighter. Bowling is a game, not a medieval strength trial.
Check the Finger Holes
For house balls, your thumb should slide in and out without sticking, while your middle and ring fingers should fit snugly but not painfully. If you have to squeeze like you are protecting the last slice of pizza, the ball does not fit. A poor fit makes it harder to release the ball cleanly.
Beginners often use a conventional grip, where the fingers go into the ball up to around the second knuckle. More experienced bowlers may use a fingertip grip, which allows more rotation and hook potential. If you are just learning how to roll a bowling ball, start with comfort and control first.
Step 2: Hold the Ball with a Relaxed Grip
A relaxed grip is one of the biggest secrets in bowling. Many beginners squeeze the ball because they are afraid of dropping it. Unfortunately, squeezing creates tension in the wrist, forearm, shoulder, and swing. That tension makes the release late, jerky, and unpredictable.
Place your thumb fully into the thumb hole first. Then place your middle and ring fingers into their holes. Support the ball with your non-bowling hand while you stand in your starting position. Your bowling hand should feel secure, but not locked. Think “firm handshake,” not “crushing a walnut.”
Where Should the Ball Sit?
Hold the ball around waist to chest height, slightly to the side of your bowling shoulder. Keep your elbow relaxed and close to your body. Your non-bowling hand should help carry the weight before the swing starts. This keeps your bowling arm loose and ready to swing naturally.
If you hold the ball too high, your swing may become stiff. If you hold it too far away from your body, the swing may loop around instead of moving straight. A simple setup creates a simple swing.
Step 3: Set Up Your Stance
Your stance is the starting point for every good bowling shot. Stand on the approach area facing the lane. Your feet should be about shoulder-width apart, knees slightly bent, and body relaxed. Keep your shoulders square to your target and lean forward just enough to feel athletic.
Right-handed bowlers often begin with the right foot slightly behind the left. Left-handed bowlers usually do the opposite. This small stagger helps you start the approach smoothly.
Use the Lane Dots and Arrows
Bowling lanes include dots on the approach and arrows on the lane. Instead of aiming directly at the pins, most bowlers aim at the arrows about 15 feet past the foul line. Why? Because the arrows are closer and easier to hit. Trying to aim at pins 60 feet away is like trying to text a tiny button from across the room.
For many beginners throwing a straight ball, the second arrow from the right works well for right-handed bowlers, while the second arrow from the left works well for left-handed bowlers. You may need to adjust based on your natural ball path.
Step 4: Learn the Four-Step Bowling Approach
The four-step approach is beginner-friendly because it gives you enough time to build rhythm without making footwork feel like a dance audition. The exact foot order depends on whether you bowl right-handed or left-handed.
Four-Step Approach for Right-Handed Bowlers
- Step 1: Move your right foot forward and gently push the ball out.
- Step 2: Step with your left foot as the ball swings down.
- Step 3: Step with your right foot as the ball reaches the backswing.
- Step 4: Slide on your left foot and release the ball near your ankle.
Four-Step Approach for Left-Handed Bowlers
- Step 1: Move your left foot forward and gently push the ball out.
- Step 2: Step with your right foot as the ball swings down.
- Step 3: Step with your left foot as the ball reaches the backswing.
- Step 4: Slide on your right foot and release the ball near your ankle.
The first step should be short and controlled. Do not rush. Bowling timing is like good music: if the rhythm is off, everyone notices, even if they politely keep eating nachos.
Step 5: Start the Swing Smoothly
The swing begins with a small pushaway. As your first step starts, move the ball gently forward and slightly downward. Avoid shoving the ball straight out or lifting it upward. The goal is to let gravity help the ball swing naturally.
Once the ball begins moving, your arm should stay loose. The bowling ball is heavy enough to create its own momentum. Your job is to guide it, not wrestle it. A free arm swing helps the ball stay on line and makes your release more consistent.
Keep the Swing Close to Your Body
During the swing, keep the ball close to your body and near your slide foot at release. If the ball swings far away from your body, you may pull it across the lane or send it wide. A compact swing is easier to repeat.
Imagine your arm as a pendulum. It swings back and forward on the same path. No loops, no chicken wings, no dramatic helicopter motion. Save the special effects for the scoreboard animation.
Step 6: Aim at a Target, Not the Pins
One of the fastest ways to improve bowling accuracy is to aim at a target on the lane instead of staring at the pins. The arrows are closer, clearer, and easier to use. Pick one arrow or board and keep your eyes on it through the release.
For a straight shot, line up your feet so your swing path sends the ball over your chosen arrow and toward the pocket. The pocket is the space between the 1 and 3 pins for right-handed bowlers and between the 1 and 2 pins for left-handed bowlers. Hitting the pocket gives the pins a better chance to scatter properly.
Make Small Adjustments
If the ball consistently misses right, move your feet or target slightly. If it misses left, adjust the other way. Make one small change at a time. Changing your feet, target, speed, grip, breakfast order, and emotional outlook all at once makes it impossible to know what worked.
Step 7: Release the Bowling Ball Correctly
The release is where many beginners either panic or get too fancy. A clean bowling release should feel smooth and natural. As the ball reaches the bottom of your swing near your slide ankle, let your thumb come out first. Your fingers should exit after the thumb, helping the ball roll forward.
For a straight roll, keep your palm facing toward the pins and your wrist firm but relaxed. Let the ball roll off your hand. Do not drop it early. Do not loft it halfway down the lane. The ball should meet the lane quietly, like it has manners.
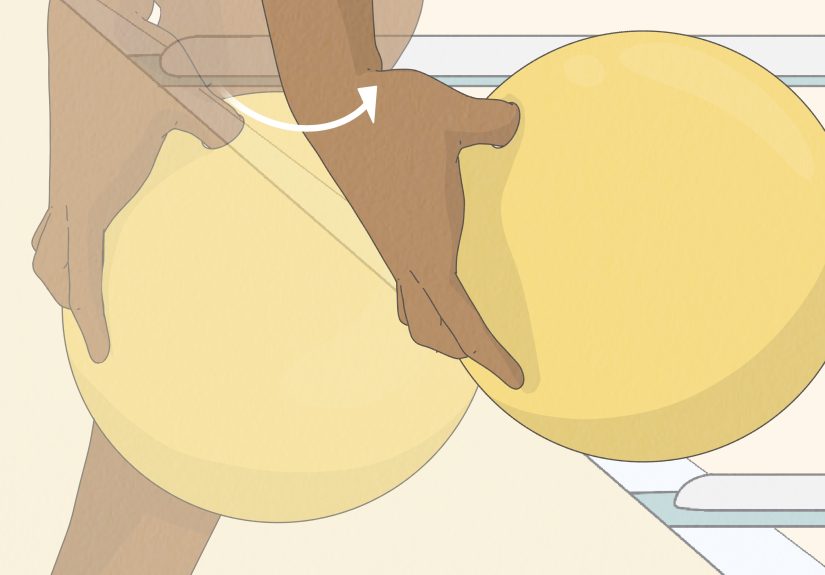
How to Add Gentle Rotation
Once you can roll a straight ball consistently, you can experiment with a slight hand rotation. Right-handed bowlers may rotate the fingers slightly counterclockwise through release. Left-handed bowlers may rotate slightly clockwise. The motion should feel like a smooth unrolling of the hand, not a violent twist.
For beginners, the priority is not a giant hook. The priority is repeatability. A small, controlled roll that hits your target is better than a dramatic hook that visits three zip codes before reaching the pins.
Step 8: Follow Through Toward the Target
Your shot does not end when the ball leaves your hand. Follow-through matters because it keeps your swing moving through the target line. After release, let your hand continue upward toward the pins. Your palm should finish naturally, and your arm should not stop suddenly.
A good follow-through helps your forearm stay on the intended path. If your arm swings across your body, the ball may miss left for right-handers or right for left-handers. If your arm flies outward, the ball may drift away from the pocket.
Hold Your Finish
After releasing the ball, stay balanced at the foul line until the ball reaches the pins. This is called posting the shot. It helps you see what the ball does and makes your approach more repeatable.
If you fall off balance, your shot was probably rushed, forced, or poorly aligned. Balance is feedback. Listen to it. It is cheaper than a coach and less likely to judge your socks.
Common Mistakes When Rolling a Bowling Ball
Using a Ball That Is Too Heavy
A heavy ball may seem powerful, but only if you can control it. If it makes your arm tense or causes you to drop the ball, choose a lighter one. Control beats ego every frame.
Squeezing the Ball
Excessive grip pressure ruins timing and release. If you feel like you must squeeze to keep the ball on your hand, try a different house ball or consider a properly fitted ball from a pro shop.
Looking at the Pins Too Early
Keep your eyes on your target arrow until after the ball rolls over it. Looking up too soon can pull your shoulders and swing off line.
Rushing the Approach
Fast feet often create late timing and poor balance. Start slow, keep the first step short, and let the swing match your steps.
Forcing the Release
Do not twist, yank, or flick the ball. Let your thumb exit first and your fingers finish the roll. Smooth beats aggressive.
Simple Practice Drills for Beginners
The One-Step Drill
Stand close to the foul line with the ball in your hand. Take one controlled slide step and release the ball. This drill helps you focus on balance, release, and follow-through without worrying about full footwork.
The No-Target Roll
Roll several shots focusing only on a quiet landing and relaxed hand. Do not worry about strikes. Your goal is to make the ball touch the lane smoothly and roll forward.
The Arrow Challenge
Pick one arrow and try to roll five shots over it. Count how many times you hit or nearly hit your mark. This builds accuracy and teaches you to use the lane’s visual guides.
The Hold-Your-Finish Drill
After every shot, freeze at the foul line until the ball hits the pins. If you cannot hold your finish, slow down and focus on balance.
How to Roll a Bowling Ball Straight
To roll a bowling ball straight, choose a comfortable ball, use a relaxed grip, keep your palm facing the pins, swing the ball like a pendulum, release near your slide ankle, and follow through toward your target. Avoid rotating your wrist too much. A straight ball is excellent for beginners and useful for spare shooting at all skill levels.
For many new bowlers, a straight roll is the best starting point. It teaches aim, balance, and clean release. Once you can hit your target consistently, learning a hook becomes much easier.
How to Roll a Bowling Ball with a Hook
A hook is created by rotation, lane friction, and ball design. To learn a basic hook, keep your hand behind and slightly under the ball during the swing. As your thumb exits, let your fingers rotate gently through the side of the ball. Your fingers should feel like they are lifting and rolling the ball, not spinning it like a top.
A reactive bowling ball with a fingertip grip makes hooking easier, but equipment cannot replace fundamentals. If your approach, balance, and release are inconsistent, a hook ball may simply miss with more personality.
Beginner Bowling Strategy: Aim for Consistency First
Beginners often chase strikes immediately. Strikes are wonderful, but spares build scores. A bowler who rolls the ball consistently and converts easy spares will usually improve faster than a bowler who occasionally throws a lucky strike and then donates the next ball to the gutter.
Focus on repeating your setup, footwork, target, release, and finish. After each shot, ask one useful question: “Did I hit my target?” If the answer is yes and the result was bad, adjust your position. If the answer is no, work on execution before changing strategy.
Experience Section: What Actually Helps When Learning to Roll a Bowling Ball
The first experience most beginners have with bowling technique is discovering that “harder” does not mean “better.” It is tempting to launch the ball with extra force, especially when the pins are sitting there looking smug. But the best beginner shots often come from slowing down. A controlled 10-pound ball that rolls smoothly into the pocket will usually outperform a 14-pound ball thrown with tension, wobble, and mild panic.
One helpful real-world habit is to develop a simple pre-shot routine. Before each roll, stand behind the approach, pick your target arrow, take a breath, and visualize the ball crossing that mark. Then step onto the approach and repeat the same setup. This little routine keeps your brain from trying to solve every bowling problem at once. Bowling rewards repeatable actions, and a routine gives your body a familiar starting signal.
Another practical lesson is that comfort matters more than looking advanced. New bowlers sometimes copy high-rev bowlers on nearby lanes, adding wrist turns and dramatic releases before they can roll straight. That is like learning to drive by starting with a stunt ramp. Build a reliable straight roll first. Once your ball consistently travels over your target, you can add controlled rotation. The bowler who learns in layers usually improves faster than the bowler who tries to download an entire professional game in one night.
It also helps to pay attention to the sound of the ball landing. A ball that slams onto the lane is often being dropped too early or released from too high. A smooth roll sounds softer and starts closer to the foul line. If your bowling center sounds like someone is moving furniture every time you release the ball, work on lowering your hand and releasing near your slide ankle.
Finally, do not underestimate the value of watching your ball after release. Many beginners turn around immediately, either to celebrate or to avoid emotional damage. Stay at the line and observe. Did the ball cross your target? Did it drift? Did it hook early? Did it skid too far? The lane gives feedback every shot. The more you watch, the faster you learn. Bowling improvement is not magic. It is observation, adjustment, and repeating the boring basics until they become beautifully automatic.
Conclusion
Learning how to roll a bowling ball is about building a smooth, repeatable motion from start to finish. Choose a ball you can control, use a relaxed grip, set up with good posture, follow a simple four-step approach, aim at the arrows, release the ball near your slide ankle, and follow through toward your target. Keep your finish balanced and watch the ball so you can make smart adjustments.
Once you stop trying to overpower the lane, bowling becomes much easier. The ball already has weight. The lane already has markings. The pins are already waiting. Your job is to put the ball in motion with rhythm, direction, and confidence. Do that, and the scoreboard will start being a little friendlier. It may even stop laughing.


