Table of Contents >> Show >> Hide
- What Microsoft Authenticator Actually Does
- Before You Start
- Step 1: Download Microsoft Authenticator
- Step 2: Choose the Type of Account You Want to Add
- Step 3: Set Up Microsoft Authenticator for a Personal Microsoft Account
- Step 4: Set Up Microsoft Authenticator for a Work or School Account
- Step 5: Add Other Websites and Apps to Microsoft Authenticator
- Step 6: Test It Before You Log Out Everywhere
- How to Use Microsoft Authenticator Day to Day
- Back Up Your Authenticator Before You Change Phones
- Common Microsoft Authenticator Problems and How to Fix Them
- Smart Security Habits After Setup
- Why Microsoft Authenticator Is Worth the Effort
- Experiences Using Microsoft Authenticator in Real Life
- Conclusion
Passwords are like house keys from a cartoon: easy to lose, weirdly easy to copy, and somehow always missing when you need them most. That is exactly why Microsoft Authenticator has become such a popular extra layer of security. Instead of trusting your account to one lonely password, the app adds a second proof that it is really you signing in. In plain English, it turns your phone into a tiny bouncer for your digital life.
If you have never set up Microsoft Authenticator before, do not worry. The process is easier than it sounds, and no, you do not need a computer science degree or a dramatic movie montage. In this step-by-step guide, you will learn how to install the app, connect it to a Microsoft personal account, add a work or school account, use it with other websites, and avoid the classic “I got a new phone and now I’m locked out” problem. We will also cover real-world tips, common mistakes, and a few security habits that can save you a giant headache later.
What Microsoft Authenticator Actually Does
Microsoft Authenticator is a free app for iPhone and Android that helps verify your identity when you sign in. Depending on the account and settings, it can do a few useful jobs:
- Approve sign-in requests with a notification on your phone
- Generate six-digit verification codes that refresh automatically
- Support work, school, Microsoft personal, and many non-Microsoft accounts
- Help with passwordless or passkey-based sign-ins in some Microsoft environments
For many people, the biggest benefit is simple: if someone steals your password, they still cannot get in without your phone. That is a huge upgrade from “hope for the best and maybe reuse the same password everywhere,” which, respectfully, is a terrible strategy.
Before You Start
Before jumping into the setup, make sure you have a few basics ready:
- A smartphone with internet access
- The Microsoft Authenticator app installed from the Apple App Store or Google Play Store
- Access to the account you want to protect
- Your password, because setup still begins the old-fashioned way
- Permission to use your phone camera, since many setups require scanning a QR code
If you are setting up a work or school account, keep your laptop or desktop nearby. Most organizations display a QR code on one screen while you scan it with your phone. It is a very “look at both devices and try not to blink” kind of moment, but it only takes a minute.
Step 1: Download Microsoft Authenticator
Start by installing the Microsoft Authenticator app on your phone. Once it opens, the app may ask for permission to send notifications and access your camera. Say yes to both if you plan to use push approvals and QR code setup. If you skip those permissions, the app can still work in some cases, but setup becomes more annoying than it needs to be.
Take a second to confirm you downloaded the real app. Microsoft Authenticator usually has a blue lock icon on a white background. That little visual check can save you from accidentally installing a copycat app from the wild west corner of the app store.
Step 2: Choose the Type of Account You Want to Add
Microsoft Authenticator can handle more than one kind of account, and that matters because the setup path is slightly different for each:
Microsoft Personal Account
This is the account you use for services like Outlook.com, OneDrive, Xbox, or your general Microsoft login.
Work or School Account
This is managed by an employer, university, or organization using Microsoft 365, Microsoft Entra ID, or a similar system.
Other Accounts
Many non-Microsoft services, such as Amazon, Google, Facebook, or other websites that support two-factor authentication, can also be added to the app through a QR code.
Now let’s walk through each setup path.
Step 3: Set Up Microsoft Authenticator for a Personal Microsoft Account
- On your computer, sign in to your Microsoft account security page.
- Open the section that lets you manage how you sign in or verify your identity.
- Turn on two-step verification if it is not already enabled.
- Choose the option to add Authenticator as a sign-in method.
- A QR code should appear on your screen.
- Open Microsoft Authenticator on your phone.
- Tap the plus icon, then choose Personal account.
- Select Scan a QR code and point your camera at the code on your computer.
- Follow the remaining prompts to finish setup.
If your camera is not cooperating, many setups offer a manual code entry option. It is not as fast, but it works. Think of it as the “stairs instead of elevator” version of account setup.
Once complete, Microsoft may send a test notification to your phone. Approve it, and congratulations: your account is now protected by more than vibes.
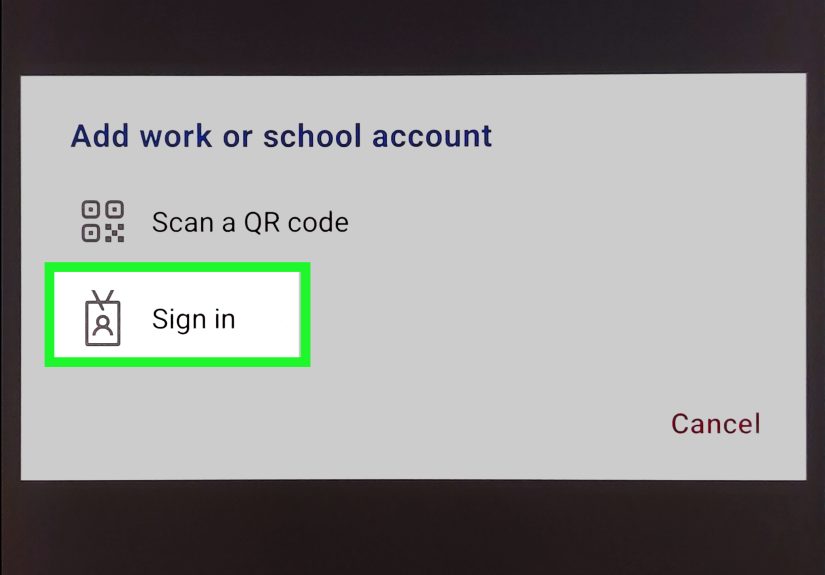
Step 4: Set Up Microsoft Authenticator for a Work or School Account
This is the setup most people run into at the office, during college registration, or five minutes before an important meeting when IT suddenly decides everyone must be “more secure.” The good news is that the process is usually straightforward.
- On your computer, sign in to your organization’s security info page.
- Select Add sign-in method.
- Choose Microsoft Authenticator.
- Open the app on your phone.
- Tap the plus icon, then select Work or school account.
- Choose Scan a QR code.
- Scan the code shown on your computer screen.
- Complete the test approval or verification step.
Some organizations also allow you to sign in directly inside the app using your work credentials instead of scanning a QR code. If your screen gives you that option, you can use it. If not, the QR route is still the standard and usually the fastest.
One important thing to know: when your workplace uses push notifications, you may be asked to complete number matching. That means the sign-in screen shows a number, and you must type that number into the app to approve the request. This extra step helps prevent accidental approvals and “MFA fatigue” attacks, which is a fancy way of saying it stops criminals from spamming you with approval prompts until you tap the wrong thing just to make them go away.
Step 5: Add Other Websites and Apps to Microsoft Authenticator
Microsoft Authenticator is not just for Microsoft. Many websites let you use it as your two-factor authentication app.
- Sign in to the website you want to secure.
- Go to its security or account settings.
- Turn on two-factor authentication or two-step verification.
- Choose the option for an authenticator app.
- The site will display a QR code.
- Open Microsoft Authenticator.
- Tap the plus icon and choose the account type or “Other account” if needed.
- Scan the QR code.
- Enter the six-digit verification code from the app into the website to confirm setup.
This is a great way to keep all your time-based codes in one place instead of playing a daily guessing game called “which app did I use for this login?”
Step 6: Test It Before You Log Out Everywhere
After setup, do one smart thing that a surprising number of people skip: test it.
Sign out of the account on one device, then sign back in. Make sure the push notification appears, or confirm that the six-digit code works correctly. If something is broken, it is much better to find out now than when you are rushing to join a meeting, file taxes, or explain to your boss why your email has gone mysteriously silent.
How to Use Microsoft Authenticator Day to Day
Once setup is complete, signing in usually works in one of two ways:
Push Notification Approval
You enter your username and password, then Microsoft sends a sign-in prompt to your phone. Open the notification, review the details, and approve it. If number matching appears, type the number shown on your sign-in screen into the app.
Verification Code
If notifications are unavailable, open the app and find the six-digit code for that account. Type it into the sign-in screen before it expires. The code refreshes every few seconds, so this is not the moment to take a snack break.
Some users also enable App Lock inside Microsoft Authenticator. This requires your phone PIN, fingerprint, or face scan before opening the app or approving a sign-in. It adds another layer of protection and is a smart move if your phone tends to travel loosely in pockets, purses, couch cushions, or the mysterious black hole between your car seats.
Back Up Your Authenticator Before You Change Phones
This section deserves bold letters, fireworks, and a marching band: back up your Authenticator before getting a new phone.
Microsoft supports cloud backup and restore, but there is a catch. Backup and restore work only on the same device type. In other words, iPhone-to-iPhone is fine, and Android-to-Android is fine, but iPhone-to-Android is not a direct restore path.
On iPhone
Enable iCloud Drive, then enable backup in Microsoft Authenticator. In some cases, iCloud Keychain also needs to be active for recovery features to work smoothly.
On Android
Open Authenticator settings and turn on cloud backup. Make sure you know which account is tied to that backup.
Also add a secondary sign-in method if your organization allows it. A backup email, phone number, alternate authenticator option, or recovery code can save you from being locked out if your device is lost, broken, or taking an unscheduled swim.
Common Microsoft Authenticator Problems and How to Fix Them
The QR Code Won’t Scan
Clean your camera lens, improve the lighting, and move your phone slightly farther back. If that still fails, choose the manual entry option if your account provider offers one.
I’m Not Getting Notifications
Check that notifications are allowed for the app, your phone has internet access, and battery-saving settings are not blocking background activity. Also make sure the app is not locked behind a PIN or biometric prompt you forgot to complete.
The Location Looks Wrong
Authenticator notifications can show an approximate or incorrect location because they rely on your phone’s operating system and GPS data. A weird location display does not automatically mean your account is under attack, but it is a good reminder to review the sign-in carefully before approving it.
I Got a New Phone and Now I’m Stuck
Try restoring from cloud backup if you set it up in advance and stayed on the same device type. If not, you may need to recover each account individually using backup methods, recovery codes, or help from your organization’s IT team.
Smart Security Habits After Setup
- Never approve a sign-in request you did not initiate
- Turn on App Lock for extra privacy
- Add at least one backup sign-in method
- Save recovery codes somewhere secure
- Update the app regularly
- Review your security settings before replacing your phone
The best Microsoft Authenticator setup is not just one that works today. It is one that still works when life gets messy, your phone disappears, or you upgrade devices in a hurry.
Why Microsoft Authenticator Is Worth the Effort
Yes, setting up two-factor authentication adds one more step to sign-in. But it is the kind of extra step that can prevent a very expensive, very annoying, and very preventable disaster. Whether you use it for your Outlook inbox, your Microsoft 365 work account, or a stack of other websites, Microsoft Authenticator adds real protection without making everyday logins unbearably complicated.
Once it is set up, most approvals take only a few seconds. That is a tiny trade for much stronger account security. Think of it as locking your front door. It takes one second, and you would feel pretty weird not doing it.
Experiences Using Microsoft Authenticator in Real Life
In real-world use, Microsoft Authenticator tends to feel most valuable the moment something unexpected happens. The first few days after setup, many people notice only the extra tap during login. Then a suspicious password reset email appears, or an approval request pops up when they are not trying to sign in, and suddenly the app makes perfect sense. That moment changes the way people think about security. It stops feeling like a corporate checkbox and starts feeling personal.
A common experience for remote workers is using Authenticator several times a day across Microsoft Teams, Outlook, SharePoint, and VPN tools. At first, that can feel mildly annoying. But after a week or two, the process becomes automatic. Open laptop, log in, approve prompt, move on with life. The bigger surprise is how fast users adapt to number matching. It sounds like an extra chore, but in practice it is simple and adds confidence because you can clearly see that the request on your screen matches the one on your phone.
Students and office employees often say the trickiest part is not the app itself, but the timing of setup. Nobody enjoys enrolling in MFA while classes are starting, a deadline is looming, or the coffee has not kicked in yet. Still, once the initial QR code is scanned and the first test prompt succeeds, most of the anxiety disappears. The setup process feels much scarier from the outside than it does in the moment.
Another very real experience involves changing phones. People who enabled cloud backup before switching devices usually feel like geniuses. People who did not tend to learn an unforgettable lesson about backup methods. That is not meant to sound dramatic, but it absolutely is. Few tech experiences produce panic quite as efficiently as realizing your old phone is gone and your work account still expects approval from it. That is why saving recovery options is not just “nice to have.” It is the digital version of packing an umbrella before the weather app starts acting suspicious.
There is also a convenience angle that often gets overlooked. Many users appreciate being able to store several accounts in one app instead of bouncing between different authenticators. Once Microsoft Authenticator holds a work account, a personal Microsoft account, and a few third-party sites, it becomes part security tool and part login control center. It is not glamorous, but neither is changing a tire, and both are wonderful when you really need them.
Overall, the user experience is best when people treat setup as a complete security project instead of a one-minute task. Install the app, test it, add a backup method, save recovery codes, and verify cloud backup before you forget. That extra five minutes pays off later. In everyday life, Microsoft Authenticator is not flashy. It is simply useful, reliable, and very good at standing between your accounts and the internet’s endless supply of bad ideas.
Conclusion
If you want stronger account security without turning your login routine into a full-time hobby, Microsoft Authenticator is a smart choice. The setup is simple once you know the steps: install the app, connect the right account type, scan the QR code, test the sign-in, and prepare for recovery before you ever need it. Do those things once, and you will make your Microsoft sign-ins safer, smoother, and far less vulnerable to stolen passwords and random approval spam.