
Table of Contents >> Show >> Hide
- Why Polymer Clay Gets Hard in the First Place
- How to Tell What Kind of “Hard” You Are Dealing With
- How to Soften Polymer Clay Without Softener
- How to Soften Polymer Clay With Softener
- Can You Use Household Substitutes Instead?
- Mistakes to Avoid When Softening Polymer Clay
- How to Know When the Clay Is Ready
- What to Do If the Clay Becomes Too Soft
- How to Prevent Polymer Clay From Getting Hard Again
- Best Approach Based on Your Situation
- Final Thoughts
- Experiences and Practical Lessons From Softening Polymer Clay
- SEO Tags
If your polymer clay feels more like a brick than a creative medium, do not panic. It is not plotting against you. Polymer clay often gets stiff, crumbly, or downright stubborn after storage, temperature swings, or just plain old shelf time. The good news is that most unbaked polymer clay can be softened and brought back to a smooth, workable texture.
In this guide, you will learn how to soften polymer clay with and without a commercial softener, when each method works best, what mistakes to avoid, and how to keep your clay from turning into a tiny colorful rock collection in the future. Whether you make earrings, miniatures, charms, or sculptures, these tips can help you rescue your stash and get back to creating.
Why Polymer Clay Gets Hard in the First Place
Before fixing hard clay, it helps to know what is going on. Polymer clay is made with PVC particles, pigments, and plasticizers. Over time, especially when clay is stored poorly or exposed to heat, it can lose flexibility. Sometimes it is only slightly firm and just needs better conditioning. Other times it becomes crumbly, resists kneading, or breaks apart when bent.
That difference matters. Clay that is merely stiff usually responds well to warmth and mechanical conditioning. Clay that is dry and crumbly may need added softener. And clay that has already partially cured from heat exposure is a much tougher case. At that point, you may be able to use it for fillers, texture experiments, or mixed-media work, but it may never return to a buttery smooth consistency.
How to Tell What Kind of “Hard” You Are Dealing With
Slightly stiff clay
This clay bends with effort, feels firm in your hands, and may show faint cracking at the edges. Usually, all it needs is warmth and proper conditioning.
Crumbly clay
This version breaks into chunks, sheds little bits, or refuses to combine into a smooth mass. It often needs both conditioning and a small amount of softener.
Rock-hard clay
This is the drama queen of the polymer clay drawer. It may need to be chopped, warmed, processed in small pieces, and blended with softener or fresh clay before it becomes usable.
How to Soften Polymer Clay Without Softener
If you do not have a clay softener on hand, start with these methods. They work especially well for clay that is firm but not fully fossilized.
1. Warm the clay first
Polymer clay becomes easier to work when it is gently warmed. Place the wrapped clay in your pocket for 15 to 30 minutes, hold it in your hands, or put it in a zip-top bag and rest that bag in warm tap water for a few minutes. The goal is gentle warmth, not heat strong enough to cure the clay.
This simple step can save your hands a lot of effort. Cold clay fights back. Warm clay at least pretends to cooperate.
2. Chop, crumble, or flatten it into smaller pieces
Large hard blocks are harder to condition than small bits. Use a craft blade to slice the clay into thin pieces, crumble it if possible, or place it inside a sturdy plastic bag and flatten it with a rolling pin. Once the clay is broken down, it is easier to knead back together.
3. Condition by hand
Roll, fold, press, and twist the clay repeatedly. This is the most basic method, but it works well for moderately stiff clay. Hand conditioning is slower, yet it gives you excellent control. Keep going until the clay is smooth, flexible, and no longer cracks when bent or rolled.
4. Use a pasta machine or clay conditioning machine
If you work with polymer clay regularly, a conditioning machine is a major upgrade. Run the clay through in one direction, fold it, rotate it, and pass it through again. Repeating this process softens the clay and improves consistency much faster than hand kneading alone.
This is one of those tools that feels optional until you use one. Then suddenly you become the kind of person who says things like, “I cannot believe I used to do this by hand.”
5. Blend it with softer fresh clay
If one block is stubborn and another is fresh and soft, combine them. Start with a small amount of softer clay and knead thoroughly. This approach helps restore flexibility without making the mixture too sticky. It is especially useful when you want to rescue older clay while staying within the same brand or color family.
6. Use a dedicated food processor for very hard clay
For clay that is extremely hard or crumbly, a food processor reserved only for craft use can help break it into tiny particles quickly. After that, you can combine the bits and condition them by hand or machine. Never use a processor meant for food. Your future salsa deserves better.
How to Soften Polymer Clay With Softener
When physical conditioning is not enough, a polymer clay softener can help restore pliability. These products are designed to add back softness without changing the clay too dramatically.
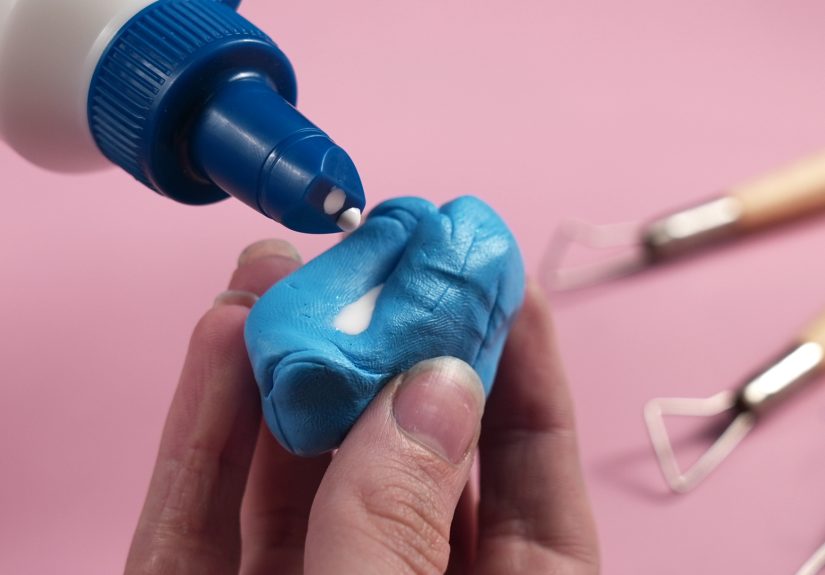
Liquid softener
Liquid clay softener is easy to control and works well for crumbly clay. Add a few drops at a time, knead thoroughly, then reassess. Resist the urge to pour like you are dressing a salad. Too much at once can make the clay sticky, weak, or greasy.
Solid softener or conditioner bar
Solid softeners are also effective. Pinch off a very small piece, mix it into chopped or flattened clay, and continue conditioning. This method gives you more physical control and can be less messy than liquid products.
Best method for using softener
- Break the hard clay into small pieces.
- Add a tiny amount of softener.
- Seal the clay in a plastic bag and let it sit for a little while if needed.
- Knead or run it through a conditioning machine.
- Repeat only if the clay still feels too stiff.
Softener works best when you are patient. Add too much and you will swing from “This clay is impossible” to “Why is it suddenly pudding?” faster than you would like.
Can You Use Household Substitutes Instead?
Yes, but carefully. Some crafters use tiny amounts of mineral oil, baby oil, petroleum jelly, or liquid polymer clay when commercial softener is not available. These can help in a pinch, but they are less predictable than purpose-made clay softeners.
The biggest risk is overdoing it. Too much oil can weaken the clay, change the surface finish, or leave the baked piece looking shiny or slightly oily. If you go the substitute route, use the smallest possible amount and mix thoroughly before deciding whether the clay needs more.
If you want the safest, most consistent results, dedicated polymer clay softener is still the better choice.
Mistakes to Avoid When Softening Polymer Clay
- Adding too much softener too fast: Start small. You can always add more, but reversing a sticky mess is much harder.
- Using too much heat: Gentle warmth helps. Excessive heat can begin curing the clay before you are ready.
- Skipping conditioning time: Some clay seems dry when it is actually just under-conditioned.
- Mixing random additives without testing: Not every DIY shortcut behaves well after baking.
- Using kitchen tools for craft clay: Keep clay tools dedicated to crafting only.
How to Know When the Clay Is Ready
Properly softened polymer clay should feel smooth, bend without cracking, and form clean sheets or shapes without crumbling at the edges. It should not feel greasy, soupy, or overly sticky. In other words, you want soft and workable, not slime-adjacent.
A simple test is to roll the clay into a rope and bend it gently. If it stays smooth with little or no cracking, you are in good shape. If it still splits apart, keep conditioning or add a tiny bit more softener.
What to Do If the Clay Becomes Too Soft
Yes, this can happen. The line between “perfectly workable” and “why is this melting into my fingerprints?” is sometimes thinner than expected.
If you over-soften the clay, try these fixes:
- Mix in firmer clay.
- Let the clay rest for a while before using it.
- Roll it into sheets and place it briefly between clean sheets of paper to absorb a little excess plasticizer.
This is why gradual adjustments matter. Polymer clay rewards patience and punishes overconfidence with surprising speed.
How to Prevent Polymer Clay From Getting Hard Again
Once you rescue your clay, store it properly so you do not have to repeat the whole operation next month.
Storage tips that actually help
- Keep clay in airtight bags or compatible containers.
- Store it in a cool, dark place away from direct sunlight.
- Avoid leaving it near radiators, windows, hot cars, or lamps.
- Wrap partially used clay well before placing it back in storage.
- Label older clay so you use it sooner instead of rediscovering it in three years like a tiny crafting time capsule.
Good storage is one of the easiest ways to protect both texture and usability. It is not glamorous, but neither is wrestling with brick clay on a Sunday afternoon.
Best Approach Based on Your Situation
If the clay is only a little firm
Warm it and condition it thoroughly by hand or machine.
If the clay is crumbly
Break it up, warm it, then use a small amount of liquid or solid softener while conditioning.
If the clay is extremely hard
Chop it into small pieces, use a dedicated processor or heavy rolling to break it down, then combine with softener or softer fresh clay.
If the clay feels sticky after softening
Mix in firmer clay or rest it before working.
Final Thoughts
Knowing how to soften polymer clay can save money, reduce waste, and rescue materials you thought were headed for the craft graveyard. In many cases, hard polymer clay is not ruined at all. It simply needs warmth, time, proper conditioning, and sometimes a little help from a softener.
If you have no softener, start with warmth, chopping, kneading, a conditioning machine, or blending with fresh soft clay. If you do have softener, use it sparingly and build up slowly. The goal is not just softer clay, but workable clay that still holds shape, detail, and strength after baking.
So the next time your polymer clay behaves like a stale candy bar, do not toss it immediately. Give it a second chance. With the right method, that stubborn lump can still become earrings, miniatures, ornaments, or whatever brilliant idea is currently living in your sketchbook.
Experiences and Practical Lessons From Softening Polymer Clay
One of the most common experiences people have with polymer clay is opening a half-used pack after a few months and discovering that it no longer feels soft and cooperative. Instead, it snaps at the edges, crumbles into little bits, or refuses to blend with other colors. That moment is frustrating, especially when you sat down to create something relaxing and ended up feeling like you are trying to knead a chalky kitchen tile.
In real crafting situations, the biggest lesson is that not all hard clay needs the same fix. Many beginners assume crumbly clay is ruined, then add too much oil too quickly. The result is a greasy mess that smears more than it sculpts. A better experience usually comes from slowing down. First warm the clay. Then chop it up. Then condition it longer than feels necessary. Only after that should you decide whether it truly needs softener.
Another common experience is realizing that different brands and even different colors behave differently. Some clays start out firmer by design and are meant to hold detail better. Others are naturally softer and easier for beginners. This means one person may say, “My clay was perfect after ten passes through the machine,” while another says, “Mine needed softener, fresh clay, and a motivational speech.” Both can be true.
Many crafters also learn through experience that tools save hands. Trying to revive very hard polymer clay only by hand can be tiring and discouraging. A pasta machine, acrylic roller, or dedicated processor can make the job much faster and more even. That does not mean hand conditioning is useless. It just means that for bigger batches or older clay, your wrists will appreciate some backup.
Storage habits also become very real, very fast. Once someone successfully rescues a few blocks of clay, they usually become much more serious about wrapping leftovers well, keeping them out of heat, and separating old stock from fresh stock. In other words, softening hard polymer clay is often the craft room lesson that turns casual storage into strategic storage.
The most encouraging practical takeaway is this: softening polymer clay is usually less about a miracle product and more about matching the method to the condition of the clay. Slightly firm clay needs patience. Crumbly clay needs support. Extra-hard clay needs a full rescue plan. Once you understand that, the process becomes far less mysterious and much more manageable.


