Table of Contents >> Show >> Hide
- Before You Start: What “USB 2.0” Really Means (In Human Terms)
- The 8 Steps to Identify USB 2.0 Ports
- Step 1) Look for physical clues (color and icons)
- Step 2) Check for “Hi-Speed” vs “SuperSpeed” hints (the branding tells on itself)
- Step 3) Windows: Use Device Manager to spot USB 2.0 controllers
- Step 4) Windows: Use a “known fast” USB 3 device as a detective
- Step 5) macOS: Check “System Information” (and read the Bus Speed)
- Step 6) Linux: Use lsusb and the speed shown in the USB tree
- Step 7) Confirm using your computer’s official specs (model number beats guesswork)
- Step 8) Do a real-world transfer test (the “stop guessing” finale)
- Quick Cheat Sheet: Signs You’re Looking at USB 2.0
- Real-World Experiences: What People Learn After the “Why Is This So Slow?” Moment (Extra )
- Conclusion
USB ports are like socks: you swear you only own one kind, yet somehow you keep finding mysterious versions in the drawer.
If you’ve ever plugged in an external drive and watched it transfer a single folder like it’s moving house one paperclip at a time,
you’ve probably wondered, “Is this… USB 2.0?”
The good news: you don’t need a lab coat, a microscope, or a séance with the ghost of “High-Speed” branding.
With a few checksphysical clues, built-in system tools, and one practical speed testyou can confidently identify whether your computer
has USB 2.0 ports (and which ones they are).
Quick refresher: USB 2.0 is the “Hi-Speed” generation with a maximum signaling rate of 480 Mbps. In real life,
you’ll see lower numbers depending on the device, file type, and overheadso don’t panic if you don’t hit sci-fi speeds.
Before You Start: What “USB 2.0” Really Means (In Human Terms)
USB names can be confusing because connector shape doesn’t equal speed. A rectangular USB-A port might be USB 2.0 or faster.
A USB-C port might be blazing fastor it might run at USB 2.0 speeds. Yes, that’s legal in the USB universe, and yes, it’s rude.
Typical USB speed landmarks
| USB generation | Common marketing label | Max signaling rate | What it feels like |
|---|---|---|---|
| USB 2.0 | Hi-Speed | 480 Mbps | Fine for keyboards, mice, printers, basic flash drives |
| USB 3.x | SuperSpeed (SS) | 5 Gbps and up | Much better for external SSDs, big backups, video files |
| USB-C | Connector type (not a speed) | Can be USB 2.0 to very fast | Could be amazing… or could be a trap |
Your goal in this guide is to identify whether your computer has USB 2.0 ports and, if it has a mix of ports, to pinpoint which ones are USB 2.0.
The 8 Steps to Identify USB 2.0 Ports
Step 1) Look for physical clues (color and icons)
Start with the easiest check: look closely at the ports on your laptop/desktop (front panel, back panel, sides). Use a flashlight if needed.
- “SS” marking near a port typically means USB 3.x (SuperSpeed), not USB 2.0.
- A plain USB trident symbol without “SS” often indicates a basic USB port and may be USB 2.0.
-
Port color can helpbut it’s not a law of physics. Many manufacturers use blue inserts for USB 3.x and black for USB 2.0,
but color isn’t mandatory, and newer computers may use black inserts for everything.
Translation: color and icons are a great first guess, but not the final verdict. Some systems mark USB 3 ports clearly, while others make you work for it.
Step 2) Check for “Hi-Speed” vs “SuperSpeed” hints (the branding tells on itself)
USB 2.0 is commonly associated with Hi-Speed. If you see “Hi-Speed” mentioned in a spec sheet, manual, or on-device labeling,
that’s your big clue. USB 2.0’s Hi-Speed mode is 480 Mbps.
If you see “SuperSpeed” or “SS” in specs, that points to USB 3.x or later. When in doubt, remember:
USB 2.0 = Hi-Speed; USB 3.x = SuperSpeed.
Bonus sanity check: USB-C ports can run at USB 2.0 speeds in some products, so don’t assume “USB-C = fast.” (USB-C is a connector shape, not a promise.)
Step 3) Windows: Use Device Manager to spot USB 2.0 controllers
On Windows 10/11, Device Manager can tell you a lotespecially if you view devices “by connection.”
- Right-click the Start button and open Device Manager.
- Go to the View menu and choose Devices by connection.
- Expand until you find USB controllers and hubs (look for “Host Controller” / “Root Hub”).
How to interpret what you see
-
EHCI (Enhanced Host Controller Interface) is the classic indicator for USB 2.0.
If you see an EHCI controller and its hubs, those ports are operating in USB 2.0 territory. -
xHCI (eXtensible Host Controller Interface) is typically associated with USB 3.x and later.
Devices plugged into the xHCI tree can negotiate higher speedsif the device and cable support it.
If you’re trying to identify a specific physical port: plug a device into that port, refresh Device Manager,
then find where that device appears in the connection tree. The controller/hub chain it’s under is the clue.
Step 4) Windows: Use a “known fast” USB 3 device as a detective
This step is simple and surprisingly effective: plug a known USB 3.x device (like an external SSD or a USB 3 flash drive)
into the port you’re testing.
What you’re looking for
-
If Windows warns that the device “can perform faster” if plugged into a SuperSpeed port, that suggests the port you used is not SuperSpeed
(often meaning USB 2.0). - If there’s no warning and the device performs well, the port may be USB 3.x. (Not guaranteedbut it’s a useful clue.)
Don’t treat this as courtroom evidence; treat it as a strong hint. Some drivers, hubs, and cables can muddy the waters.
Which is why you’ll also do a transfer test in Step 8.
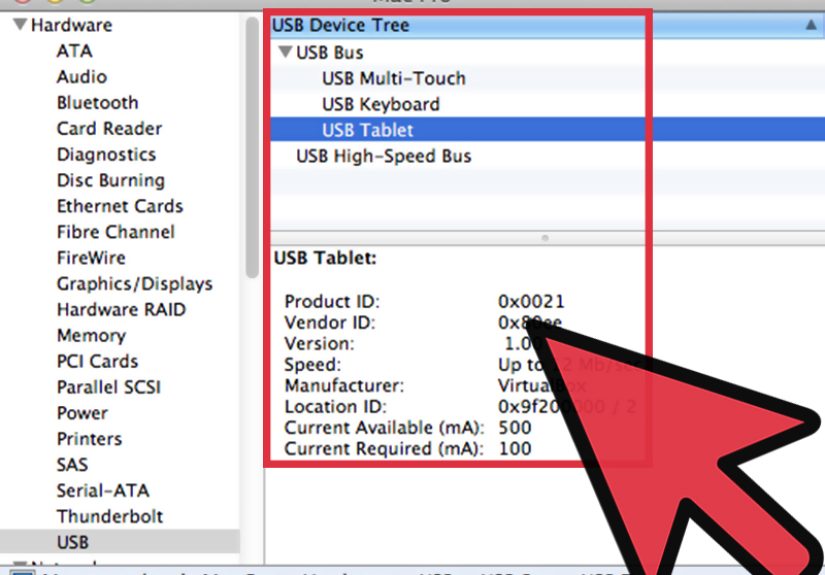
Step 5) macOS: Check “System Information” (and read the Bus Speed)
On a Mac, the cleanest check is the built-in System Information report. It shows the Bus Speed your USB devices are using.
USB 2.0 commonly appears as Up to 480 Mb/sec (Hi-Speed).
How to do it
- Click the Apple menu → About This Mac.
- Click More Info (or System Report, depending on macOS version).
- Open System Information and select USB in the sidebar.
- Click a connected USB device and look for Speed / Bus Speed.
A very 2025+ note (because macOS keeps evolving)
Some users report that terminal-based USB profiling commands can change across macOS versionsso if you rely on command line output,
you may need to use the newer USB host data types depending on your system.
If the graphical System Information view is available, it’s usually the least drama.
Step 6) Linux: Use lsusb and the speed shown in the USB tree
On Linux, you can often identify negotiated USB speeds via the USB device tree.
You’re looking for high-speed (USB 2.0) indicators like 480M in a port’s reported speed.
Two quick approaches
-
Tree view: run a USB topology command (commonly
lsusb -t) and check the reported speed for the device or hub line.
A speed around 480M typically indicates a USB 2.0 link. -
Kernel messages: after plugging in a device, check kernel logs (often via
dmesg) for lines describing
whether it’s “high-speed” vs “super-speed.”
Tip: plug the same USB 3-capable device into different ports and compare the reported speeds. If one port consistently negotiates at high-speed (480M)
while another negotiates faster, you’ve found your USB 2.0 port(s).
Step 7) Confirm using your computer’s official specs (model number beats guesswork)
If your ports aren’t clearly labeled (or color-coded in a helpful way), the most definitive answer is the device’s official documentation.
Find your exact model number (laptop underside sticker, Windows “System Information,” or macOS “About This Mac”), then check the manufacturer’s specs.
What to look for in specs
- USB 2.0, Hi-Speed, or 480 Mbps
- USB 3.0/3.1/3.2, SuperSpeed, or SS
- USB-C entries that explicitly state “USB 2.0” (yes, it happens)
This step is especially useful for desktops with multiple front/back ports, or laptops where every port looks identical.
Specs often reveal exactly how many of each port type you have.
Step 8) Do a real-world transfer test (the “stop guessing” finale)
If you want the most practical, everyday confirmation, measure performance with a file transfer test.
This doesn’t require special softwarejust consistency.
How to run a clean test
- Use a USB 3-capable external SSD or flash drive (and a known-good cable if it’s USB-C).
- Pick a single large file (like a 5–10 GB video) rather than thousands of tiny files. Small files are slower for reasons unrelated to USB version.
- Copy from internal drive → external drive, and note the stable transfer speed once it settles.
- Repeat on another port and compare.
What results typically suggest USB 2.0?
USB 2.0’s maximum signaling rate is 480 Mbps (about 60 MB/s on paper), but real-world sustained transfers are usually far lower.
If you consistently see speeds in the “this feels like 2009” range and swapping ports dramatically changes the result,
you’ve likely found the USB 2.0 port.
Once you identify which port is USB 2.0, you can assign it to low-bandwidth gear (mouse, keyboard, printer, dongles),
and reserve faster ports for external storage, capture devices, or anything that moves big files.
Quick Cheat Sheet: Signs You’re Looking at USB 2.0
- Specs mention “USB 2.0,” “Hi-Speed,” or “480 Mbps.”
- No “SS” marking near the port (often a clue, not a guarantee).
- Device Manager shows the device under an EHCI controller path (Windows).
- System Information shows “Up to 480 Mb/sec” for the connected device (macOS).
- Linux USB tree shows “480M” for the negotiated speed.
- Transfer tests are consistently much slower than your device’s advertised performanceespecially compared to other ports.
Real-World Experiences: What People Learn After the “Why Is This So Slow?” Moment (Extra )
In the real world, most “USB 2.0 mysteries” begin the same way: you plug in a shiny external drive that claims it can move data at warp speed,
then watch your computer copy files like it’s carefully hand-delivering them one at a time. At that point, people usually blame the drive,
then blame the computer, then blame the universebefore finally realizing: the port, cable, hub, and device are all part of one big speed chain.
One common experience: someone buys an external SSD and assumes any port labeled “USB” is basically the same. They connect it to a front-panel port
on a desktop case, run a big backup, and get underwhelming speeds. Then they try a rear port on the motherboard and suddenly performance jumps.
The lesson? Front-panel ports are sometimes wired differently, routed through different headers, or limited by the case’s designso ports that look
identical from the outside can behave very differently. That’s why the “plug it in, then check where it lands in the USB controller tree” trick is so useful.
Another classic: the “USB-C disappointment.” USB-C feels modern, so people expect it to be fast by default. But USB-C is a connector shape, and a USB-C
port can operate at USB 2.0 speeds on some devices. So a user connects a fast SSD with a random cable from a drawer and gets speeds that scream “USB 2.0.”
After some frustration, they swap to a certified data cable and the drive finally stretches its legs. The lesson: with USB-C especially, the cable can be the
bottleneck, and not all cables are created equaleven if they all fit.
Then there’s the hub/dock surprise. People build a clean setupone cable to the laptop, everything connected to a dockand performance tanks.
Many docks and inexpensive hubs use USB 2.0 for certain ports (or for the upstream connection), which is totally fine for keyboards and mice,
but it can quietly kneecap storage devices. The experience here is less “I don’t have USB 3” and more “I accidentally inserted a USB 2.0 middleman.”
That’s why Step 8’s port-by-port transfer test is so revealing: it helps you see where the slow link is hiding.
Finally, a surprisingly wholesome experience: once people map their ports, they start using them smarter. USB 2.0 becomes the home for dongles,
printers, and input devicesstuff that doesn’t care about speed. Faster ports become “VIP lanes” for drives, cameras, audio interfaces, and backups.
It’s a small change that makes a big difference, because the goal isn’t to eliminate USB 2.0it’s to stop accidentally using it for the one task
where it hurts: moving lots of data.