Table of Contents >> Show >> Hide
- First, Know What “Australian Tea Tree” Usually Means
- Why Trimming Australian Tea Trees Matters
- Best Time to Trim Australian Tea Trees
- Tools You Need Before You Start
- How to Trim Australian Tea Trees Step by Step
- How Much Should You Cut Back?
- How to Trim Different Types of Australian Tea Trees
- Common Mistakes to Avoid
- Aftercare: What to Do Once You Finish Trimming
- A Simple Example Pruning Plan
- Experiences Gardeners Commonly Have When Trimming Australian Tea Trees
- Final Thoughts
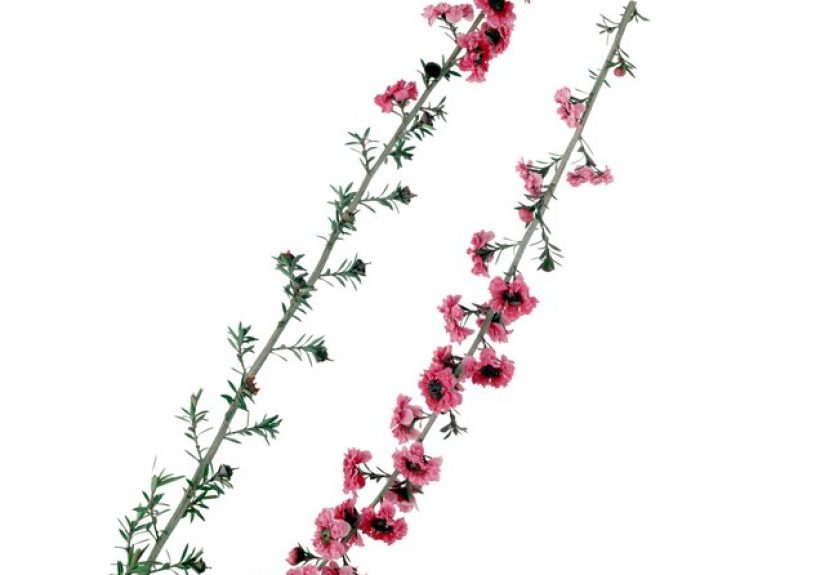
Australian tea trees look like the kind of shrub a landscape designer sketches when they want “coastal drama, but make it elegant.” With their wiry branches, small evergreen leaves, papery bark, and clouds of flowers, they can be stunning focal points. They can also turn into a shaggy, overgrown tangle if nobody steps in with pruners and a little courage.
The good news is that trimming Australian tea trees is not complicated. The bad news is that they are not the kind of plant that appreciates random haircut energy. Cut them the right way, and they reward you with better shape, denser growth, and more charm. Cut them the wrong way, and they can sulk, thin out, or leave you staring at bare wood that refuses to bounce back.
This guide walks you through exactly how to trim Australian tea trees, when to do it, what tools to use, and which mistakes to avoid so your plant keeps its graceful form instead of looking like it lost a fight with a weed trimmer.
First, Know What “Australian Tea Tree” Usually Means
In U.S. gardening circles, Australian tea tree often refers to Leptospermum laevigatum, a coastal Australian shrub or small tree with twisted branches, spring flowers, and a naturally loose, airy habit. You may also see related Leptospermum species sold under tea tree names, including Leptospermum scoparium and lemon-scented tea tree. Their pruning needs are very similar: they prefer light shaping, good timing, and a gentle hand.
One quick bonus fact, because plant names enjoy being chaotic: Australian tea tree is not the same plant grown for tea tree oil. Tea tree oil comes from a different genus, Melaleuca. That matters because pruning advice online often gets mixed together. For landscape tea trees in the Leptospermum group, the safest rule is simple: trim after flowering and avoid cutting into old bare wood.
Why Trimming Australian Tea Trees Matters
Pruning is not just about making the plant look tidy for the neighbors. A smart trim can help your Australian tea tree:
Maintain a balanced shape, stay dense instead of leggy, show off its sculptural branching, improve air movement, reduce weak or crossing growth, and keep a shrub form or tree form depending on your design goals. If your plant is still young, proper trimming also helps build a stronger framework that will look better for years.
In other words, pruning is part beauty treatment, part structure training, and part damage control. Very efficient.
Best Time to Trim Australian Tea Trees
Trim right after the main flowering period
For most Australian tea trees grown in landscapes, the best time to trim is right after they finish flowering. That timing lets you enjoy the blooms first, then shape the plant before it puts too much energy into unruly new growth.
This is especially important because many tea trees are treated like spring-blooming shrubs. If you prune too early, you can remove flower buds. If you prune too late, you may sacrifice part of next season’s bloom or stimulate late soft growth that is less desirable.
Light touch-ups can happen later
If you only need to snip a few stray shoots, remove dead tips, or correct one awkward branch, a light touch-up in early or mid-summer is usually fine. Keep it modest. Think “refinement,” not “renovation.”
Avoid heavy fall pruning
Major trimming in fall is a poor choice. It can trigger tender new growth at the wrong time, reduce cold resilience, and leave the plant more vulnerable if weather swings arrive. In mild climates, the damage may be minor. In less forgiving spots, your shrub may respond with a dramatic performance called “Why did you do that to me?”
Tools You Need Before You Start
You do not need a garage full of gear. A few clean, sharp tools are enough:
Hand pruners for small stems, loppers for thicker branches, and a pruning saw for older woody limbs. Keep blades sharp so cuts are clean rather than crushed. If your plant has dead, diseased, or suspicious-looking branches, sanitize tools between plants and, when needed, between cuts. Rubbing alcohol works well and is easier on tools than turning them into a bleach spa day.
How to Trim Australian Tea Trees Step by Step
1. Start with the obvious cleanup cuts
Before shaping anything, remove what clearly does not belong. That includes dead wood, damaged branches, diseased growth, rubbing stems, and shoots that cross through the center of the plant. This cleanup alone often improves the plant dramatically.
Make each cut back to a healthy side branch, a branch junction, or the base of the stem. Avoid leaving stubs. Stub cuts are unattractive, slow to seal, and generally unhelpful.
2. Step back and identify the plant’s natural silhouette
Australian tea trees are not naturally tight little green meatballs. Their beauty comes from movement: slightly weeping branches, fine foliage, and a soft, airy outline. So before you prune for shape, stand back and look at the whole shrub.
Ask yourself what you want:
Do you want a dense shrub, a relaxed screen, or a small multi-trunk tree? The answer changes the cuts you make. Good pruning supports the plant’s natural habit instead of forcing it into a form it hates.
3. Use thinning cuts, not random shearing
This is the biggest secret to trimming tea trees well. Use thinning cuts. That means removing selected branches at their point of origin or cutting a long stem back to a smaller side branch. Thinning keeps the plant looking natural and lets light reach the interior.
What you want to avoid is blanket shearing across the outer surface unless you are intentionally maintaining a formal hedge. Repeated shearing can make the outer shell dense while the inside gets shaded, weak, and bare. It is fast, yes. It is also the botanical version of sweeping dirt under the rug.
4. Never cut deep into bare wood unless you truly have no alternative
This point deserves flashing lights. Many Australian tea trees do not reliably push new growth from old, leafless wood. If you cut a branch back past the leafy area into a bare section, that stem may stay bare or die back further.
So when shortening branches, leave some healthy leafy growth behind. If you need major size reduction, do it gradually over more than one season rather than hacking the whole plant back at once.
5. Reduce size gradually
If your tea tree has outgrown its space, resist the urge to “fix” everything in one dramatic weekend. A safer approach is to reduce height and width a little at a time by removing selected long branches back to side shoots. This keeps the plant functional, leafy, and attractive while it adjusts.
As a rule, severe pruning is best spread over multiple seasons. That is slower, but it is also how you avoid turning a graceful shrub into a collection of regrets.
6. Remove lower branches only if you want a tree form
Some gardeners love Australian tea trees as informal shrubs. Others want to show off the twisting trunks and sculptural bark by training them into a small tree form. If that is your goal, gradually remove selected lower branches after flowering.
Do this selectively and patiently. You are revealing structure, not starting a lumber business. Too much removal at once can make the plant top-heavy or sparse.
How Much Should You Cut Back?
For routine trimming, light to moderate pruning is best. In practical terms, that usually means removing enough to control shape and density without stripping the plant or cutting into its leafless framework.
If the plant is badly overgrown, spread heavier work over two or three seasons. A gradual renovation gives you much better odds of keeping living foliage where you need it and preserving the shrub’s natural beauty.
How to Trim Different Types of Australian Tea Trees
Young plants
Focus on shaping, not shrinking. A young tea tree benefits from light tip pruning and selective thinning to encourage branching and a fuller habit. Remove awkward, overly upright shoots and keep the framework balanced.
Mature shrubs
Concentrate on dead wood, crossing branches, interior congestion, and any stems stretching too far beyond the rest of the canopy. Thin rather than shear. The goal is a cleaner, healthier version of the plant you already have.
Tea tree hedges
If your Australian tea trees are planted as a hedge or screen, you can shear more than you would on a specimen plant, but even then, occasional selective thinning is smart. Keep the hedge slightly wider at the bottom than the top so light reaches the lower branches. Otherwise, the base can thin out over time.
Overgrown or bare-bottomed plants
If the lower portion is sparse, start by removing some of the oldest stems or the most awkward tall shoots to let in more light. Combine that with careful shortening of leafy branches higher up. This will not produce overnight magic, but it can improve balance and encourage better regrowth where foliage still exists.
Common Mistakes to Avoid
Cutting into leafless wood
This is the most common tea tree mistake and the hardest to reverse.
Pruning at the wrong time
If you trim before flowering, you may lose the bloom show you were waiting for.
Using hedge shears on a specimen shrub
Fast does not equal good. Over-shearing creates an unnatural shell and often worsens interior thinning.
Ignoring plant placement
If your tea tree constantly needs drastic pruning to stay off the walkway, the plant may be in the wrong place. Pruning should guide the plant, not endlessly fight its mature size.
Leaving stubs
Stub cuts are untidy and not useful. Cut cleanly back to a branch union or just above a live lateral.
Aftercare: What to Do Once You Finish Trimming
Once your pruning is done, give the plant a quick check for moisture and mulch. Australian tea trees appreciate good drainage, not soggy roots. Newly established plants benefit from more consistent watering than mature ones, especially during dry weather. Older established specimens are often fairly drought tolerant, but they still perform better when not pushed to extremes.
You do not usually need to fertilize heavily after trimming. In fact, overfeeding can cause weak, overly lush growth. A light layer of compost in spring is often enough in average garden soil.
If your plant drops flowers or seed capsules, clean up the debris around the base. This keeps the area tidier and, in self-seeding species, can reduce surprise volunteer seedlings. Surprise tomatoes are charming. Surprise shrubs, less so.
A Simple Example Pruning Plan
Let’s say you have a 7-foot Australian tea tree shrub that flowered in spring and now looks a little wild on one side.
Here is a smart plan:
First, remove all dead and damaged tips. Next, cut out two or three crossing branches near the center. Then shorten the longest side shoots by cutting each one back to a leafy side branch inside the canopy. Remove one or two upright shoots that ruin the outline. If you want more trunk visibility, take off a small number of lower branches. Stop there.
The plant will still look like itself, just better. That is excellent pruning.
Experiences Gardeners Commonly Have When Trimming Australian Tea Trees
One of the most interesting things about trimming Australian tea trees is how often gardeners start the job thinking it will be quick and simple, then realize the plant has a lot more personality than expected. At first glance, tea trees can look wispy and forgiving, almost like they would tolerate any haircut. Then you get closer and notice the branching pattern is fine, tangled, and surprisingly architectural. That is usually the moment people slow down and stop pruning like they are shaping a hedge.
A common experience is discovering that the plant looks much better after a few selective cuts than after a major chop. Gardeners often remove a couple of dead twigs, one crossing branch, and a handful of long shoots, then step back and suddenly the whole plant feels more elegant. The twisted branches become visible, the canopy opens up, and the shrub starts to look intentional again. It is a good reminder that Australian tea trees are not “more is more” plants. They are “less, but smarter” plants.
Another frequent lesson comes from dealing with leggy growth. Many people wait too long, especially with fast-growing young plants, then try to solve everything in a single afternoon. The result is often disappointment because branches cut too far back may not refill the way expected. Gardeners who have gone through that once usually become much more patient the next time. They start trimming lightly every year after flowering, and the plant responds far better. Small yearly adjustments almost always beat one dramatic rescue mission.
There is also the very relatable experience of trying to decide whether the plant should be a shrub or a small tree. Tea trees often sit right on that line. Some gardeners begin by treating them as full shrubs, then notice the trunks getting more interesting each year. Eventually they start lifting the canopy little by little to show off the bark and branching. Others go the opposite direction and keep the plant dense because they want privacy or wind protection. Neither choice is wrong. The success usually comes from picking one direction and pruning consistently toward it.
People growing Australian tea trees near patios or entryways also talk about how satisfying it is to remove a few vigorous upright stems and instantly improve the silhouette. The plant often goes from messy to graceful in about ten minutes. On the other hand, gardeners who attack the whole outside with shears often end up with a plant that looks neat for a week and awkward for months. That contrast teaches a useful lesson fast.
Perhaps the most valuable real-world takeaway is this: tea trees reward observation. Gardeners who pause, study the branch structure, and prune with the plant’s natural shape in mind usually love the results. Those who rush in with “I’ll figure it out as I cut” energy often create extra work. In that sense, trimming an Australian tea tree is part gardening task, part editing exercise. You are not rewriting the plant. You are just removing the lines that do not improve the story.
Final Thoughts
If you remember only three things about how to trim Australian tea trees, make them these: prune after flowering, use selective thinning cuts, and never cut deep into bare wood unless you are prepared for a poor response. Those three rules will save you from most pruning disasters.
Australian tea trees are naturally graceful, so your job is not to bully them into submission. Your job is to guide them, reveal their best structure, and keep them healthy enough to put on that airy, flower-filled show again next season. Treat them like artists with slightly dramatic tendencies, and they usually return the favor.