Table of Contents >> Show >> Hide
- The Big Truth: Great Phone Photos Aren’t About Phones
- The 60-Second Setup That Makes Every Shot Better
- The 24-Photo Proof (With What I Did and Why It Worked)
- Set 1: Light You Can’t Buy (Photos 1–4)
- Set 2: Composition That Does the Heavy Lifting (Photos 5–8)
- Set 3: People and Pets (Photos 9–12)
- Set 4: Motion and Action (Photos 13–16)
- Set 5: Night and Low Light (Photos 17–20)
- Set 6: Tiny Details and Big Scenes (Photos 21–24)
- Editing: The 5-Minute Upgrade That Still Looks Like Real Life
- The “Phone Photo” Problems Most People Can Fix Today
- Conclusion: Your Smartphone Is EnoughIf You Drive It
- Bonus: of Real-World Smartphone Photo Experiences (The “24-Photo Field Notes”)
If you’ve ever caught yourself thinking, “I’ll start taking better photos as soon as I buy a real camera,” I have wonderful news: your bank account can unclench. The best camera is still the one you actually have with youand most of us have a pretty serious camera living in our pocket next to old receipts and a rogue French fry.
So I ran a simple experiment: I took 24 photos using only a smartphone. No fancy lens attachments. No studio lights. No “I swear this filter is subtle” situation. Just a phone, some curiosity, and a determination to stop blaming my gear for my questionable creative decisions.
This article breaks down what worked, why it worked, and how you can repeat itwhether you’re shooting kids, food, street scenes, travel memories, pets who refuse to pose, or that perfect sunset that never looks right when you show it to someone else.
The Big Truth: Great Phone Photos Aren’t About Phones
Smartphones have gotten ridiculously good. But the magic isn’t “more megapixels.” The magic is a simple combo of light, composition, focus/exposure control, stability, and tasteful editing. When those are working, your phone can produce images that look clean, intentional, and scroll-stopping.
Even pro photographers will tell you the fundamentals don’t change: a strong subject, decent light, and a composition that guides the eye will beat expensive equipment used without intention. The phone just makes it easier to practice constantly.
The 60-Second Setup That Makes Every Shot Better
1) Clean the lens (seriously)
Your phone lives an adventurous life: pockets, purses, gym bags, countertops, and occasionally the floor. A tiny smudge can turn “crisp” into “mysterious fog of vibes.” A quick wipe with a soft cloth (or, in emergencies, a clean shirt) boosts sharpness and contrast immediately.
2) Turn on the grid
Grid lines help you straighten horizons and compose faster. They also make the “rule of thirds” effortlessplacing your subject on a third line or intersection often creates a more dynamic photo than dead-center everything.
3) Tap to focus, then adjust exposure
Phones make a lot of decisions for you. Take back one of the most important ones: tap the screen where you want focus, then nudge brightness up or down with the exposure control. On iPhone, you can also lock focus/exposure (AE/AF Lock) so your settings don’t jump around mid-shot.
4) Avoid digital zoom (use your feet)
Digital zoom usually means “crop now, regret later.” If you can, move closer or switch to a real lens option (like 2x/3x) instead of pinching to zoom. Your future self will thank you when you’re not editing a pixelated witness sketch.
The 24-Photo Proof (With What I Did and Why It Worked)
I grouped my 24 shots into six mini-challenges. Each one is a repeatable “recipe” you can try today. Imagine these as captions you’d put under the photoswhat you’d notice, what you’d tweak, and what you’d do again next time.
Set 1: Light You Can’t Buy (Photos 1–4)
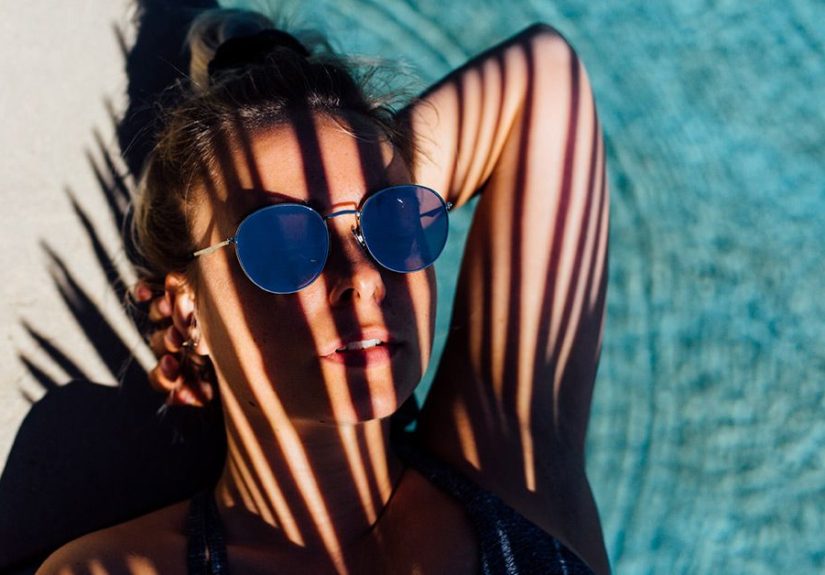
Photo 1: Golden-hour sidewalk portrait
What I shot: A friend walking past a wall that caught warm evening light.
What I did: Placed them near the edge of the frame, tapped to focus on their face, and slightly lowered exposure to keep highlights from blowing out.
Why it worked: Soft directional light adds shape. Lower exposure preserves skin detail and keeps the photo from looking “flat.”
Photo 2: Window-light coffee mug
What I shot: A mug on a table near a windowno lamps, no flash.
What I did: Turned the mug so the light skimmed across it, creating a gentle shadow. Cropped tighter for simplicity.
Why it worked: Side light reveals texture. Phones love simple scenes with clear highlights and shadows.
Photo 3: Backlit leaves with “exposure down”
What I shot: Leaves glowing in sunlight.
What I did: Tapped the brightest leaf and pulled exposure down so the highlights kept detail instead of turning white.
Why it worked: Phones can over-brighten bright scenes. Underexposing slightly protects detail and looks more intentional.
Photo 4: Overcast street scene
What I shot: A quiet street on a cloudy day.
What I did: Focused on color and geometry instead of “dramatic light.” Boosted contrast slightly later in editing.
Why it worked: Overcast light is basically a giant softboxgreat for even exposure and clean color.
Set 2: Composition That Does the Heavy Lifting (Photos 5–8)
Photo 5: The rule-of-thirds dinner plate
What I shot: A meal (the kind you want to brag about).
What I did: Put the main item on a thirds intersection and left some empty space for “breathing room.”
Why it worked: A little negative space makes your subject feel deliberate instead of cramped.
Photo 6: Leading lines at a parking garage
What I shot: Repeating lines of a garage ramp.
What I did: Lowered my angle and lined the rails so they guided the eye toward a single bright point.
Why it worked: Leading lines create depth and make even boring places look cinematic.
Photo 7: Frame-within-a-frame through a doorway
What I shot: A person standing in a doorway with light behind them.
What I did: Used the doorway edges as a natural frame; tapped focus on the person, then nudged exposure up just a touch.
Why it worked: The frame tells your viewer what matters, fast.
Photo 8: Symmetry in a hallway
What I shot: A long hallway with repeating lights.
What I did: Centered it on purpose (yes, sometimes centered is correct) and kept the phone level with the grid.
Why it worked: Symmetry is satisfying. The grid prevents “oops, it’s crooked” syndrome.
Set 3: People and Pets (Photos 9–12)
Photo 9: Portrait modeused carefully
What I shot: A head-and-shoulders portrait outdoors.
What I did: Positioned the subject a few feet from the background so blur looked natural. Tapped the eye for focus.
Why it worked: Separation creates depth. Portrait mode looks best when the background is already a bit distant.
Photo 10: Candid laugh (burst mode)
What I shot: A friend mid-laugh.
What I did: Used burst/rapid shots and picked the best expression later.
Why it worked: Great expressions happen between “say cheese” moments. Burst helps you catch them.
Photo 11: Pet at eye level
What I shot: A dog looking suspiciously intelligent.
What I did: Dropped to the pet’s eye level and tapped focus on the eyes.
Why it worked: Eye-level feels intimate. Sharp eyes make the whole photo feel sharp.
Photo 12: Silhouette at sunset
What I shot: A person against a bright sky.
What I did: Exposed for the sky (tap the bright area, pull exposure down), letting the person go dark.
Why it worked: Silhouettes are a cheat code: you get drama without needing perfect facial light.
Set 4: Motion and Action (Photos 13–16)
Photo 13: A running kidshutter timing over settings
What I shot: A kid sprinting toward the camera.
What I did: Held the phone steady with two hands and shot a short burst right as they hit good light.
Why it worked: Timing beats tech. Good light plus steadiness reduces blur.
Photo 14: “Panning” a cyclist
What I shot: A cyclist passing by.
What I did: Followed the cyclist smoothly while shooting; kept them roughly centered as the background streaked slightly.
Why it worked: A little motion blur can feel energetic when the subject stays relatively clear.
Photo 15: Splash moment (tap focus early)
What I shot: A drink being poured over ice.
What I did: Tapped focus where the splash would happen, lowered exposure a hair, then shot multiple takes.
Why it worked: Pre-focusing reduces “the phone hunted focus and missed the moment.”
Photo 16: Low-light motionembrace the mood
What I shot: A dim indoor scene with people moving.
What I did: Avoided flash, accepted a little blur, and focused on storytelling (gestures, atmosphere).
Why it worked: Not every photo needs to be clinically sharp. Sometimes “real” looks better than “blasted by flash.”
Set 5: Night and Low Light (Photos 17–20)
Photo 17: Night mode city lights (hold still)
What I shot: Streetlights and storefronts after dark.
What I did: Used the phone’s night mode and held still until the capture finished.
Why it worked: Night modes often combine multiple frames; steadiness equals sharper detail.
Photo 18: Night Sight “brace the phone” trick
What I shot: A very dark corner with a little ambient light.
What I did: Braced my phone against a wall to reduce shake, then let Night Sight do its thing.
Why it worked: Stability is basically free image qualityespecially when exposures get longer.
Photo 19: Restaurant portrait (no flash, exposure down)
What I shot: A friend at a table lit by warm overhead lights.
What I did: Tapped the face, then lowered exposure slightly to keep highlights from going shiny.
Why it worked: Warm light feels cozy; a small exposure tweak prevents blown highlights on skin.
Photo 20: Neon signprotect the highlights
What I shot: A neon sign at night.
What I did: Exposed for the neon (drag exposure down), then lifted shadows later in editing.
Why it worked: Once highlights blow out, they’re gone. Saving them keeps the photo “expensive.”
Set 6: Tiny Details and Big Scenes (Photos 21–24)
Photo 21: Macro-ish texture (get close, steady)
What I shot: The texture of a leaf and the tiny veins.
What I did: Moved closer until the detail popped, tapped focus carefully, and held still.
Why it worked: Phones can capture stunning detail when you treat them like a magnifying glass, not a telescope.
Photo 22: Flat-lay “organized chaos”
What I shot: A few objects on a table (keys, notebook, sunglasses).
What I did: Shot from directly above, kept lines straight with the grid, and simplified the color palette.
Why it worked: Flat-lays live and die by alignment. The grid helps you look intentional instead of accidental.
Photo 23: Landscape with foreground interest
What I shot: A wide scene with a rock or plant in the foreground.
What I did: Positioned the foreground element low in frame and let it lead into the distance.
Why it worked: Foreground gives scale and depth, making a phone landscape feel less “postcard-ish.”
Photo 24: Panorama (slow, level, consistent)
What I shot: A wide city view.
What I did: Panned slowly and kept the phone level, following on-screen guides.
Why it worked: Panoramas reward patience. Smooth movement prevents weird seams and warped buildings.
Editing: The 5-Minute Upgrade That Still Looks Like Real Life
Editing isn’t cheating. Editing is the digital version of “standing where the light is better.” The key is to enhance, not disguise. If your photo starts looking like a video game cutscene, you’ve gone too far (unless that’s your brand, in which case: go off).
My simple edit stack (works in Apple Photos, Google Photos, Lightroom, etc.)
- Crop & straighten first. If it’s crooked, it reads as “snap,” not “photo.”
- Exposure next. Make sure the subject looks right before touching anything else.
- Highlights down, shadows up (gently). This brings back sky detail and opens dark areas without turning everything gray.
- Color temperature lightly. Warm up a sunset, cool down a fluorescent office scene.
- Clarity/sharpness sparingly. Overdoing sharpness makes people look like they’re made of sandpaper.
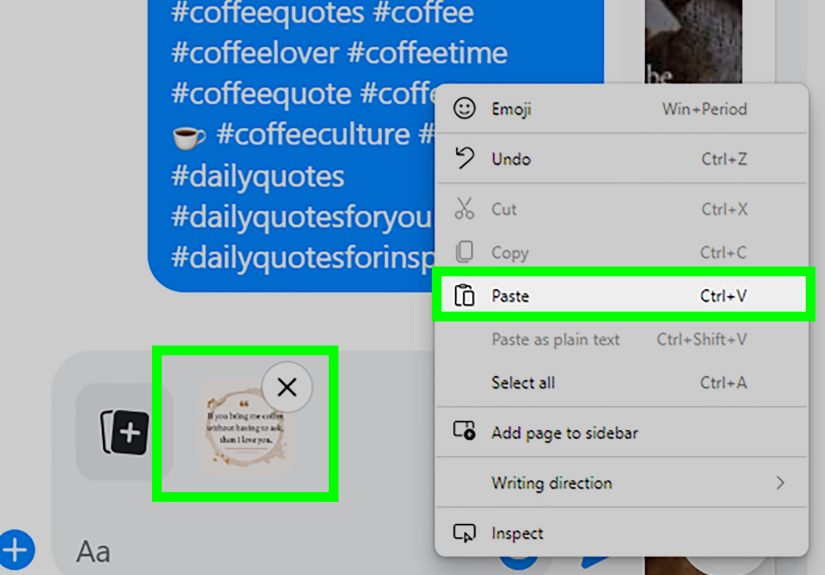
Removing distractions (use it like seasoning)
If you have tools like object removal (think “magic eraser” style features), use them to remove the one thing ruining an otherwise great shota stray cup, a random cone, a photobombing elbownot to rebuild reality from scratch. The best edits are the ones nobody notices.
The “Phone Photo” Problems Most People Can Fix Today
Problem: Everything looks blurry
Fix: Clean the lens, stabilize the phone, and make sure you’re tapping focus on the subject. In low light, brace your arms, lean on a wall, or use a timer to avoid shake.
Problem: The sky is white (aka “I photographed the sun’s evil twin”)
Fix: Lower exposure. Save highlights. You can lift shadows later, but blown highlights are basically gone forever.
Problem: People look washed out indoors
Fix: Avoid flash when possible. Use window light, a brighter corner, or simply turn your subject toward the light source. Then nudge exposure slightly down to preserve skin tones.
Problem: My photo looks fine… until I zoom in
Fix: Stop pinch-zooming. Move closer. Or use an optical lens option if your phone has one. Digital zoom is the shortcut to regret.
Conclusion: Your Smartphone Is EnoughIf You Drive It
After 24 shots, the verdict is clear: you don’t need more gear to capture a great image. You need a quick lens wipe, better light, stronger composition, and the confidence to tap-to-focus like you mean it.
Make it a game: pick one idea (like “exposure down” or “leading lines”) and shoot 10 photos with that single goal. Your camera roll will get better fastand you’ll start seeing photographs everywhere, which is both a blessing and a mild inconvenience at brunch.
Bonus: of Real-World Smartphone Photo Experiences (The “24-Photo Field Notes”)
I didn’t set out to “prove” anything with these 24 photos as much as I set out to stop making excuses. You know the excuses: the lighting wasn’t right, the moment was too fast, the room was too dark, my phone “isn’t that good,” Mercury was in retrogradewhatever helps us sleep at night. But once I treated my phone like a tool instead of a toy, the results got weirdly consistent.
The first surprise was how much a lens wipe feels like leveling up. I took two near-identical shots of a coffee cup by a windowsame angle, same light, same everything. The only difference was that before the second shot, I cleaned the lens. The “after” image didn’t just look sharper; it looked more expensive. Contrast popped. The highlights looked clean instead of hazy. It was the easiest improvement I’ve ever made in photography, and it required exactly zero artistic talent.
The second surprise was how often I was underestimating exposure control. Phones are enthusiastic optimists. They see a scene and think, “Let’s brighten this so everyone can see!” which is sweet, but it can also turn sunsets into flat orange pancakes and night scenes into noisy mush. Once I got in the habit of tapping my subject and pulling exposure slightly down, my photos started looking intentional. It’s like the difference between someone telling a story calmly and someone yelling it through a megaphone. Same message, very different vibe.
Then there was the “angle problem.” I realized I’d been shooting almost everything from standing heightbecause I’m lazy and my knees have opinions. But when I crouched for a pet photo, the image instantly felt more personal. When I lowered the phone near the ground for leading lines in a parking garage (the most glamorous location on earth), the scene gained depth and drama. It wasn’t a phone upgrade; it was a perspective upgrade. The phone just made it easy to try angles I’d never bother with on bigger gear.
Night mode was its own lesson in patience. The phone can absolutely pull detail out of darkness, but it’s not magicit’s math. The moment I accepted that “hold still” is a creative skill, my low-light shots improved. I started bracing against walls, using tables as makeshift tripods, and taking a breath before pressing the shutter. It felt silly at first, like I was treating my phone as if it were a delicate instrument. But the photos rewarded me, and I stopped caring how I looked to strangers who were probably filming their own lives anyway.
Finally, editing became less about filters and more about finishing. A small crop here, highlights down there, a tiny color tweak, and suddenly the photo matched what the moment felt like. That’s the real goal. Not “perfect,” not “professional,” not “viral.” Just honest images that look the way you remember themonly a little cleaner, a little clearer, and a lot more you.