
Table of Contents >> Show >> Hide
- Why TARVA Is the Perfect “Glow-Up” Dresser
- What Makes an “Apothecary Cabinet” Look Like an Apothecary Cabinet?
- Project Planning: Choose Your TARVA and Your Target “Pottery Barn” Vibe
- Tools and Materials You’ll Actually Use
- Step-by-Step: Turn TARVA Into an Apothecary-Style Cabinet
- Step 1: Assemble smart (and slightly differently than the manual)
- Step 2: Add a chunkier base (the “instant expensive” move)
- Step 3: Create the faux apothecary drawer grid
- Step 4: Sand, fill, sand again (the unglamorous magic)
- Step 5: Stain or paint with a plan (pine likes to surprise you)
- Step 6: Hardware that sells the illusion
- Step 7: Add “antique” details (without looking artificially distressed)
- Design Variations That Look Custom (Not Cookie-Cutter)
- Where This Piece Looks Best in a Home
- Mistakes to Avoid (So You Don’t Hate Your Future Self)
- of Real-World Experience: What It’s Actually Like to Do This Hack
- Conclusion
Some furniture pieces walk into your home and politely do their job. Others show up like a blank notebook, whispering, “Turn me into something expensive.” The IKEA TARVA dresser is absolutely that second type. It’s solid pine, intentionally simple, and basically begs to be stained, painted, trimmed, and dramatically upgraded. And if you’ve ever admired that Pottery Barn apothecary cabinet lookvintage pharmacy vibes, lots of “little drawers” energy, labels for things you may or may not actually storethen you’re in the right place.
This guide breaks down how to transform a TARVA dresser into an apothecary-style statement piece that looks high-end without requiring you to sell a kidney on Facebook Marketplace. You’ll get practical steps, real-world finishing advice (pine can be… spirited), and a few design options depending on whether you want “old-world charm” or “curated antique that definitely wasn’t bought flat-packed.”
Why TARVA Is the Perfect “Glow-Up” Dresser
The TARVA line is popular for one major reason: it’s unfinished solid wood, which means you’re not fighting a glossy factory finish the entire time. It’s simple, sturdy, and easy to customize with trim, stain, paint, and hardware. The 6-drawer TARVA is also a great size for a credenza-style apothecary look (wide, not too tall), while the 5-drawer version works beautifully when you want a taller “cabinet” silhouette.
In other words: TARVA is the furniture equivalent of a plain bagel. Not exciting on its ownbut hand it to the right person and suddenly it’s an everything bagel with smoked salmon, capers, and a tiny sprig of dill like it’s starring in a lifestyle photoshoot.
What Makes an “Apothecary Cabinet” Look Like an Apothecary Cabinet?
Classic apothecary cabinets were designed for storing and sorting: herbs, medicines, spices, tiny mysteries. The signature details usually include:
- A grid-like drawer-front pattern (lots of small “drawers,” real or faux)
- Label-holder pulls (those little frames that make everything feel organizedeven if it’s just batteries)
- A vintage finish with depth: stain in grooves, darker edges, rubbed corners
- Chunkier base trim that feels more “antique cabinet” than “modern dresser”
The trick is that you don’t necessarily need to build 30 functional drawers. You just need the illusion of themlike a stage set, but for your living room.
Project Planning: Choose Your TARVA and Your Target “Pottery Barn” Vibe
Option A: TARVA 6-drawer dresser (wide credenza look)
This version is great if you want a piece that can work as a buffet, media console, entry statement, or dining room storage. It’s also the easiest shape to “read” as an apothecary cabinet once you add trim and drawer-front detail.
Option B: TARVA 5-drawer dresser (taller cabinet feel)
If you want the apothecary effect but need a smaller footprint, the taller version gives you vertical presence. You can still create a grid pattern on the drawer fronts; it just becomes more “tower of organization” than “vintage shop counter.”
Pick your finish direction
- Warm stained wood + antique bronze hardware: the most classic apothecary look
- Painted body + stained drawer fronts: high contrast, very Pottery Barn-inspired
- Moody, dark stain: dramatic, library vibes, looks expensive instantly
- Light, weathered finish: coastal antique shop energy
Tools and Materials You’ll Actually Use
Must-haves
- Drill/driver, measuring tape, pencil, level
- Wood glue + brad nailer (or finish nails + patience)
- Sandpaper (120/180/220) or sanding blocks
- Wood filler (and a putty knife)
- Primer (especially if painting) + paint or stain + topcoat
- Hardware: label-holder pulls (and screws that fit)
Nice-to-haves
- Edge banding or thin trim to cover seams
- Pre-stain conditioner (helpful on pine for more even stain)
- Wax or glaze for an aged look
- A simple hardware template (store-bought or DIY from cardboard)
Step-by-Step: Turn TARVA Into an Apothecary-Style Cabinet
Step 1: Assemble smart (and slightly differently than the manual)
Assemble the dresser carefully and square it up. If you’re planning to add base trim or legs, consider whether you’ll remove or shorten the existing legs/feet. Some popular approaches include trimming the legs down and adding a wider base skirt so the piece looks heavier and more “cabinet-like.”
Pro tip: Before final assembly, decide if you want to upgrade the back panel or reinforce anything. If the piece will hold heavier items (like dinnerware), an extra brace or a sturdier back can be a good idea.
Step 2: Add a chunkier base (the “instant expensive” move)
Pottery Barn-inspired pieces often have a more substantial base than minimalist Scandinavian furniture. Adding a skirt using baseboard trim (mitered corners, glued and nailed) visually transforms the TARVA from “dresser” to “cabinet.” This is also where you can add a small toe-kick look or layered trim detail.
Fill nail holes, sand smooth, and don’t rush this partthe base is what makes the whole piece look intentional rather than “I glued stuff on and hoped for the best.”
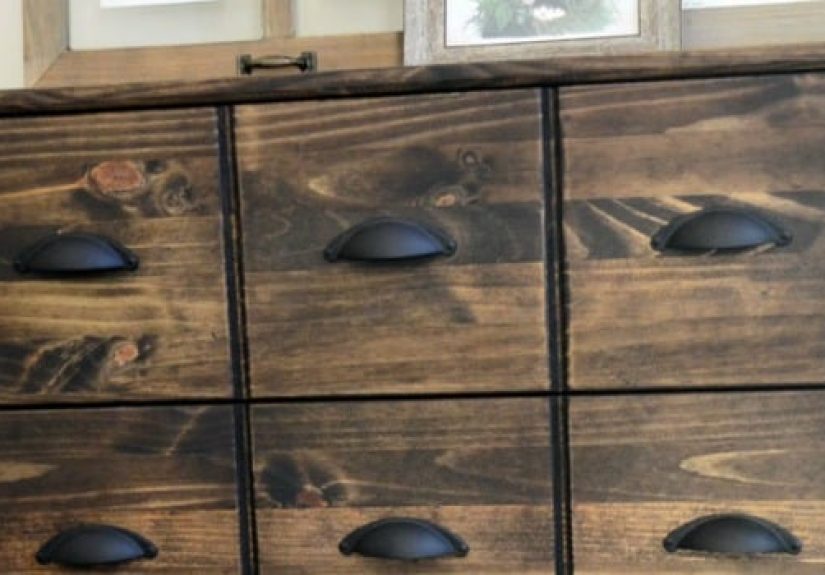
Step 3: Create the faux apothecary drawer grid
This is the star of the show. The goal is to make each large TARVA drawer front look like it’s made of smaller drawers.
Two common methods:
- Trim-grid method: Use thin lattice trim or wood strips to create a grid on top of each drawer front. This adds raised lines that “separate” faux drawers.
- Overlay-square method: Add evenly sized wood squares/rectangles to each drawer front, then add a pull to each square. This creates the illusion of many small drawers even more strongly.
Whichever method you choose, take time to measure and map your layout. A clean, even grid is what makes people say, “Wait… that’s IKEA?” instead of “Wait… did your ruler survive?”
Step 4: Sand, fill, sand again (the unglamorous magic)
Lightly sand the entire piece to remove roughness and prep for finish. Fill seams, holes, and any imperfections. Sand again once the filler dries. This step is the difference between “Pinterest-worthy” and “I promise it looks better from across the room.”
Step 5: Stain or paint with a plan (pine likes to surprise you)
TARVA is pine. Pine can stain unevenly (hello, blotchiness), and knots can sometimes bleed through paint over time. Choose a finish system that matches your goal:
If you’re staining
- Consider a pre-stain conditioner for a more even look.
- Test stain on a hidden area first.
- For a Pottery Barn-inspired “aged” look, many DIYers apply darker stain in grooves first, then stain the main surface, wiping back quickly to keep variation and depth.
If you’re painting
- Use a quality primer, especially to manage potential knot bleed.
- Light sanding between coats helps you get that smooth, furniture-grade finish.
- Topcoat matters for durabilityespecially if it’s going in a high-traffic area.
Style idea: Paint the dresser body a soft neutral and stain the drawer fronts for contrast. Add antique bronze label pulls, and suddenly you’ve got the apothecary look without committing to a full dark stain.
Step 6: Hardware that sells the illusion
Label-holder pulls are the “apothecary accent” that makes the whole piece believable. The key is consistent placement:
- Mark center points carefully for each faux drawer square.
- Use a template (even painter’s tape can help you line things up).
- Drill pilot holes to avoid splitting wood and to keep spacing accurate.
Yes, installing dozens of pulls can feel like you’ve joined a tiny-hardware assembly line. Put on music. Bribe yourself with snacks. You’re building character and a cabinet.
Step 7: Add “antique” details (without looking artificially distressed)
The best vintage-inspired finishes have subtle, believable wearlike the piece lived a full life before it moved into your dining room and started holding reusable grocery bags.
Try one or two of these techniques:
- Glaze in grooves and corners for depth
- Rubbed edges (light sanding on corners after curing)
- Dark wax to tone down newness
- Matte or satin topcoat for an “old wood” feel (high gloss screams “brand new”)
Design Variations That Look Custom (Not Cookie-Cutter)
1) The “Vintage Pharmacy” look
Dark stain, heavy base trim, antique bronze pulls, optional stenciled numbers on faux drawer fronts. Works beautifully in an office, library, or dining room.
2) The “Modern Apothecary” look
Painted body (charcoal, deep green, warm white), drawer-front grid in the same color, sleek label pulls in a matching metal finish. Cleaner and more contemporary.
3) The “Collected Antique” look
Layered stains or a slightly uneven wash that mimics age. Add a darker glaze to seams and trim. This is for people who want “I found this in a quaint shop” energy.
Where This Piece Looks Best in a Home
- Dining room: buffet storage, linens, serving pieces
- Entryway: keys, mail, seasonal accessories (aka the life admin zone)
- Living room: media console or board game headquarters
- Home office: craft storage, paperwork, printer supplies
- Bedroom: statement dresser that looks like a heirloom
Mistakes to Avoid (So You Don’t Hate Your Future Self)
Skipping layout planning
If the grid spacing is off, your eyes will notice forever. Measure, mark, and dry-fit trim pieces before committing.
Using the wrong screws for hardware
Too long and they poke through. Too short and the pull wobbles like a loose tooth. Match screw length to drawer-front thickness.
Rushing the finish
Dry-to-touch is not the same as cured. Give paint and topcoat proper time so your “vintage” look doesn’t accidentally become “fingerprint impressionism.”
Not accounting for pine quirks
Pine knots can be dramatic. The right primer or sealing approach helps keep your finish consistent over time.
of Real-World Experience: What It’s Actually Like to Do This Hack
Let’s talk about the part no one glamorizes: the middle. The part where you’ve assembled the dresser, your floor is covered in sawdust confetti, and you’re staring at a drawer front thinking, “How did I become the kind of person who voluntarily installs 36 tiny pulls?”
Here’s what the experience usually feels like in real life: the first hour is pure optimism. You’re measuring your grid lines like a confident architect, telling yourself you’re “just going to do a quick sand.” By hour two, you realize sanding is not an activityit’s a lifestyle. You sand the drawer fronts. You sand the sides. You sand the trim you haven’t even attached yet because now everything looks suspiciously rough. Then you wipe the dust away, step back, and feel proud… until you notice one corner that still has a splintery vibe. Back to sanding.
The grid step is the moment of truth. If you’re doing the trim-grid method, you learn that tiny pieces of wood develop personalities. Some sit perfectly. Some warp slightly. Some mysteriously shift when you look away. Dry-fitting becomes your best friend. So does a simple trick: work in sections, and label everything. If you cut 24 identical strips, they will not remain identical once real life enters the chat.
Then comes finishing, where pine reminds you that it grew in a forest and is not obligated to behave like a cooperative spreadsheet. If you stain, you may see areas drink the color like they’ve been thirsty since 1997 while other areas barely change. Testing, conditioning, and wiping technique matter a lot here. If you paint, you may feel like you’re done after coat one, but coat two is where it starts to look “furniture” instead of “craft project.” A light sand between coats is annoying in the moment and glorious afterward. (This is true of many things, including personal growth, but let’s stay on topic.)
Hardware installation is oddly satisfyingonce you accept that it’s repetitive. The first pull feels like progress. The tenth pull feels like commitment. The thirtieth pull makes you consider outsourcing your life. But when you finish, step back, and the drawer front suddenly looks like a wall of little apothecary drawers? That’s the dopamine moment. That’s when you start texting people photos with captions like, “DON’T LOOK TOO CLOSE BUT ALSO LOOK AT THIS.”
Finally, there’s the best part: living with the piece. Because the apothecary style doesn’t just look goodit makes everyday clutter feel intentionally stored. You can put remotes in a “drawer” and feel organized. You can hide charger cords and feel virtuous. You can label something “Screws” and pretend you’re the kind of person who doesn’t have a random jar of mystery hardware. This hack isn’t just a furniture makeover. It’s a small, daily illusion of having your life togetherand honestly, that might be the most Pottery Barn thing of all.
Conclusion
Turning an IKEA TARVA dresser into a Pottery Barn-inspired apothecary cabinet is one of those rare DIY projects that delivers real impact: it looks custom, feels elevated, and gives you storage with serious style. The keys are simple: build a convincing drawer-grid pattern, choose a finish with depth, and commit to the label-holder hardware that makes the whole piece sing. Take your time on layout and finishing, and you’ll end up with a piece that looks like it cost far more than it didand feels like you outsmarted the entire furniture industry (in a friendly, sawdust-covered way).
Sources used for factual grounding (not displayed on page):


