
Table of Contents >> Show >> Hide
- What a “Plastic Bender” Really Is (and Why It Works)
- The Safer DIY Move: Build the Bending Station, Not the Heater
- Getting Heat the Smart Way (Without the DIY Danger)
- Choose the Right Plastic (Because Not All Plastic Behaves the Same)
- Safety and Air Quality: The Unsexy Part That Saves Your Day
- How to Get Cleaner Bends (Without Turning This Into a Chemistry Experiment)
- Project Ideas That Actually Make Sense for a Home Setup
- Troubleshooting: When Your Plastic Has Opinions
- FAQ
- Wrap-Up: Your Best “DIY Plastic Bender” Is a Great Jig + Safe Heat
- Real-World Experiences: What People Learn After Their First Few Bends (500+ Words)
If you’ve ever looked at a crisp acrylic corner on a sign holder or a neat little electronics enclosure and thought,
“I could totally make that,” you’re right. The trick isn’t magical talentit’s controlled heat, a straight bend line,
and a setup that keeps your plastic from doing the sad “melted taco” thing.
One important note up front: a true “plastic bender” usually involves a heating element hot enough to burn skin and
overheat plastics. So this article focuses on a safer, smarter approach: build the fixture (the bending
station) from stuff you already have, and get the heat from a certified strip heater, a supervised shop,
or a makerspace. That way you get clean bends without turning your workbench into a science fair volcano.
What a “Plastic Bender” Really Is (and Why It Works)
Most hobby plastic bending is about thermoplasticsmaterials that soften when heated and stiffen
again when cooled. Acrylic (often called Plexiglas), PETG, and polycarbonate are common sheet plastics that can be
formed this way. When you heat a narrow line across the sheet, you create a soft “hinge” that can be folded to a
precise angle. Cool it down, and the angle stays put.
The best bends come from three things working together:
- Consistent heat along a straight line (the bend line warms evenly).
- Support on both sides (so the sheet doesn’t warp or sag in weird places).
- A reliable angle stop (so your “90° bend” doesn’t end up at “maybe 83-ish?”).
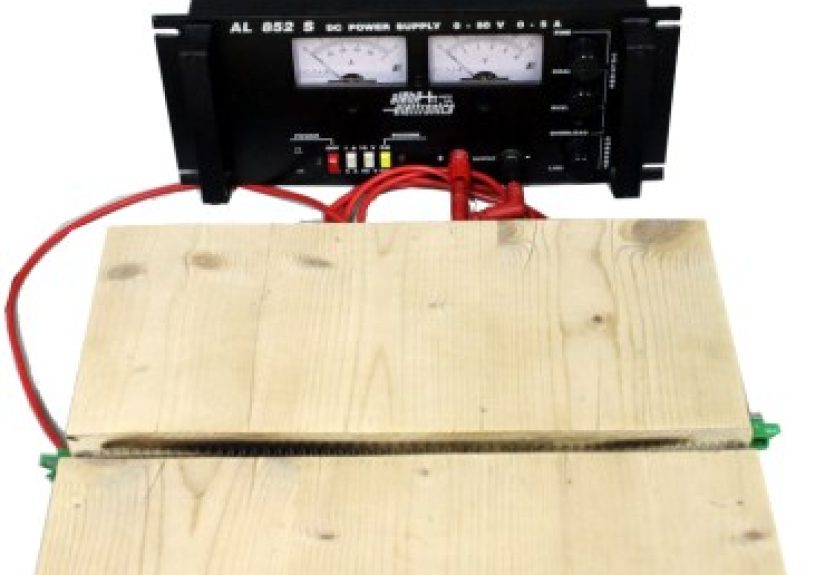
The Safer DIY Move: Build the Bending Station, Not the Heater
When people say “DIY plastic bender,” they often mean a strip-heater build with wiring and high-temperature parts.
That’s not the safest project to improviseespecially indoors, and especially without supervision. The good news:
the fixture matters just as much as the heat source for clean results, and you can make that fixture with
basic household tools.
What You Can Make from Stuff You Already Have
Here’s a simple, practical “bending station” concept you can assemble with common items. No special parts required,
no wiring requiredjust solid support and good alignment.
- A flat base: a scrap board, a sturdy shelf offcut, or a thick piece of plywood.
- A straight fence: a straight piece of wood, a level, or a metal ruler (anything reliably straight).
- Clamps: spring clamps, C-clamps, or even binder clips for thin sheets.
- Angle guides: a speed square, carpenter’s square, or a printed angle template you tape down.
- Soft padding: cardboard, craft foam, or a clean towel to prevent scratches.
The goal is to hold the sheet flat, keep the bend line exactly where you want it, and give yourself a consistent
“stop” angle when you fold.
How to Set Up Your DIY Bending Station (No Heat Yet)
-
Mark your bend line clearly. Use a fine-tip marker on protective film, painter’s tape, or masking
tape. (Marking directly on bare acrylic can be harder to clean later.) -
Clamp a straight fence behind the bend line. Your fence should run parallel to the bend line and
act like a “registration edge” so the sheet doesn’t drift while you work. -
Protect the surface. Put cardboard or a clean towel under the sheet to avoid scratches. If your
plastic still has its protective film and the manufacturer allows it during forming, leave it on as long as possible. - Add an angle stop. Tape down a square or an angle guide so you can fold to the same angle every time.
-
Do a dry run. Before any heating happens, practice the motion: lift the “fold” side smoothly up to
your angle stop without twisting.
That’s the core of a plastic bending jig: straight alignment, stable support, and repeatable angles. People often
underestimate how much that alone improves results.
Getting Heat the Smart Way (Without the DIY Danger)
For the actual softening step, use one of these safer paths:
Option A: Use a Makerspace, School Lab, or Local Plastics Shop
Many community makerspaces and school shops have strip heaters or thermoforming tools designed for this job. Local
plastics suppliers and sign shops may also offer line-bending services. This is the easiest route if you want clean
bends and minimal riskplus you get access to proper ventilation and someone who can sanity-check your setup.
Option B: Use a Certified Strip Heater (Follow the Manufacturer’s Instructions)
If you’re bending at home, a commercial strip heater is built for controlled line heating. The key is to use it as
intended and avoid improvising heat sources that can scorch plastic or create indoor air problems. If you’re a minor,
this is a “get an adult involved” momenthot tools aren’t the place to freestyle.
Your DIY bending station still helps here: it keeps your sheet aligned, helps you hit your bend angle, and reduces
warping.
Choose the Right Plastic (Because Not All Plastic Behaves the Same)
“Plastic” is a whole universe, and some types bend beautifully while others respond like a potato chip in a campfire.
Picking the right sheet material is half the battle.
Acrylic (Plexiglass / PMMA): The Clean-Corner Favorite
Acrylic makes sharp, glossy bends that look professionalgreat for display stands, sign holders, desk organizers, and
clear guards. The tradeoff: it can crack if stressed, especially if you bend too sharply, heat unevenly, or expose the
stressed bend area to certain chemicals afterward. If your project needs “crystal-clear and classy,” acrylic is a top pick.
PETG: The Forgiving, Beginner-Friendly Option
PETG is often more impact-resistant and more flexible than acrylic. It tends to be easier to form without stress
crazing, making it popular for protective shields and durable covers. If you want a smoother learning curve and
fewer “why did it crack?” moments, PETG is worth considering.
Polycarbonate: Tough Stuff, But Plan Carefully
Polycarbonate is famously tough and impact resistant. It can be formed, but it’s less “forgiving” about process
control and can require more careful heating and handling. It also shows up in consumer products where heating may
not be recommended. In other words: don’t assume a random sheet from a random source is safe to heat just because it
feels like plastic.
Plastics to Avoid Heating (Especially Indoors): PVC and Mystery Plastic
Some plastics can release irritating or hazardous decomposition products when overheated. PVC, for example, can
release hydrogen chloride gas if heated beyond certain conditions. Also, “mystery plastic” (unknown type, unknown
additives) is unpredictable. If you can’t identify it and confirm it’s suitable for forming, don’t heat it.
Safety and Air Quality: The Unsexy Part That Saves Your Day
Clean bends are great. Clean lungs are even better. Any setup that heats plastic has three main risk categories:
burns, fire, and fumes. Treat this like a real shop operation, even
if you’re working in a garage with a playlist and a snack.
Ventilation Isn’t Optional
Heating plastics can release vapors, especially if overheated. Good ventilation means moving air out, not just
“the vibes are breezy.” If you’re indoors, think in terms of source control and exhausting pollutants, not just
cracking a window and hoping for the best.
PPE That Actually Helps
- Eye protection: a simple pair of safety glasses prevents a lot of bad stories.
- Heat-resistant gloves: hot plastic can burn, and it’s sneaky because it still looks harmless.
- Long sleeves and closed-toe shoes: because gravity is undefeated.
Burn Prevention: Treat Hot Surfaces Like They’re Hot (Because They Are)
The most common injuries in hot-tool projects are contact burnstouching something you forgot was hot. Set up a
“hot zone,” keep clutter away, and don’t let anyone (including you) wander into the workspace unannounced.
How to Get Cleaner Bends (Without Turning This Into a Chemistry Experiment)
Even with a good heater, your results depend on technique and planning. Here’s what experienced fabricators focus on.
Uniform Heating Beats “More Heat”
Most bending defectsbubbles, haze, ripples, and scorch markscome from uneven heating or overheating. The goal is
consistent softening along the bend line, not maximum temperature bragging rights.
Support the Sheet to Prevent Warping
Long, thin sheets can warp if only one small line is heated while the rest is rigid and unsupported. Your bending
station helps: keep the sheet flat, support both sides, and avoid twisting during the fold.
Plan for Stress (Especially with Acrylic)
Line bending can introduce stress in the bend area. That stress can show up later as cracking or “crazing”
(fine crack-like lines), especially if the bent area contacts certain cleaners, polishes, solvents, or harsh
chemicals. If your project will be cleaned often (like a kitchen guard or a frequently handled display), choose
materials and cleaners thoughtfully.
Project Ideas That Actually Make Sense for a Home Setup
Once you’ve got a bending station, you can create practical pieces that look surprisingly professional:
1) Desk Sign Holder
A simple L-shaped acrylic or PETG holder can display a printed name card or mini menu. Great for events, craft fairs,
or the classic “I just want my desk to look like I have my life together.”
2) Cable Organizer / Charging Shelf
A couple of bends can create a stand that routes cables neatly, keeps adapters off the floor, and reduces the
“tech spaghetti” situation.
3) Small Electronics Enclosure
For Arduino or Raspberry Pi projects, a bent-sheet enclosure can be lighter than wood and easier to wipe clean.
Add ventilation holes (drilled, not melted) and you’ve got a tidy case.
4) Splash Guard or Mini Shield
PETG is commonly used for guards because it’s durable and impact resistant. These projects are also a good excuse
to practice “clean bends” without needing tight tolerances.
Troubleshooting: When Your Plastic Has Opinions
Problem: Bubbles or Blisters
Usually a sign of overheating or uneven heating. Reduce heat intensity, improve uniformity, and follow the sheet
manufacturer’s forming guidance. Some plastics also need careful moisture control before forming to avoid defects.
Problem: White Lines or Crazing After Cooling
Often stress-related. Acrylic can show stress if bent too sharply or cooled under tension. Also watch what touches
the bend afterward: some cleaners and solvents can make stress defects worse.
Problem: The Bend Isn’t Straight
That’s usually alignment. Your fence may not be straight, the sheet shifted during heating, or the fold motion was
twisted. Do a dry run, add better clamping, and make sure your bend line is fully supported.
Problem: The Angle Isn’t Consistent
Add a physical angle stop (a square, a block, or a jig piece) so you’re not eyeballing it. Eyeballing is great for
pizza slices. Not for precision fabrication.
FAQ
Can I bend plastic without a strip heater?
Some plastics can be formed with other heat sources, but improvised heating increases the chance of uneven results
and indoor air quality problems. If you want repeatable, crisp bends, a proper strip heater (or a supervised shop tool)
is the most reliable option.
Is it safe to heat plastic indoors?
It depends on the plastic, the temperature control, and the ventilation. Overheating can create fumes. If you can’t
ventilate well or you can’t confidently identify the plastic and confirm it’s meant for forming, don’t do it indoors.
What’s the biggest beginner mistake?
Rushing. People often push for a bend before the heat is uniform, then compensate with more force (which introduces
stress and warping). Slow down, support the sheet, and focus on even softening rather than brute strength.
Wrap-Up: Your Best “DIY Plastic Bender” Is a Great Jig + Safe Heat
You don’t need a complicated homemade machine to start making clean plastic bends. Build a solid bending station
from things you already haveflat base, straight fence, clamps, and an angle stopthen use a proper, supervised,
manufacturer-recommended heat source. That combination gives you safer work habits, cleaner results, and fewer
“why does it smell like regret?” moments.
Real-World Experiences: What People Learn After Their First Few Bends (500+ Words)
The first time someone tries bending plastic, it usually goes one of two ways: either it works and you feel like a
wizard, or it goes sideways and you learn that plastic is basically a toddlersweet when it’s happy, chaotic when it’s not.
What’s funny is that most “mistakes” aren’t dramatic. They’re small, sneaky, and totally fixable once you know what to watch for.
One of the earliest lessons is that straightness is earned. People assume that if they draw a line with a marker,
they’ve created a bend line. But the plastic doesn’t care about your marker. It cares about where the heat actually is and
whether the sheet stayed perfectly aligned while warming. That’s why the bending stationyour fence and clampssuddenly feels like
the MVP. After a couple tries, most makers start clamping more carefully, measuring twice, and doing a dry run like they’re
rehearsing for a Broadway show called “Bend at 90 Degrees: The Musical.”
The next “aha” moment is that patience beats power. Beginners often try to bend too soon, when only the surface
has softened. Then they push harder, and the plastic responds with warping, stress, or a bend that looks like it had a bad day.
With a little experience, you start to recognize the difference between “soft enough to fold” and “soft enough to fold cleanly.”
That’s also where consistent setup pays off: when the sheet is supported, the bend happens smoothly instead of fighting you.
Another common experience is realizing that plastic has memoryand not the forgiving kind. If you heat and bend,
then later reheat in the wrong way, it can try to relax or shift. Makers learn to plan the order of operations: drill holes
when it’s flat (if the design allows), keep protective film on as long as practical, and avoid rough handling of the bend area.
People who do display pieces start noticing that tiny scuffs show up under certain lighting like they’re auditioning for a
high-definition close-up.
There’s also the “nose knows” lessonwithout getting dramatic: if something smells sharp, harsh, or “too plasticky,” that can
be a sign you’re pushing the process too hard or using the wrong material. Experienced folks become cautious about unknown plastics.
They label scraps, keep original packaging when possible, and stop treating “random leftover sheet” as a reliable supply chain.
That shift alone prevents a lot of bad outcomes.
People also learn the joy of small wins. Your first successful project probably isn’t a museum-grade acrylic case
with perfect corners. It might be a simple sign holder, a cable stand, or a little shelf bracket. But those small projects teach
you control. And once you can reliably hit a clean, consistent angle on a modest piece, you’re suddenly confident enough to scale up.
That’s when makers start experimenting with better templates, cleaner finishing, and designs that look “store-bought” in the best way.
Finally, the most underrated experience: finding the right place to do the work. A lot of people start at home,
then realize a makerspace or a local shop makes the whole process easierbetter tools, better ventilation, and someone who can say,
“Hey, maybe don’t do that.” Even if you only use a shop tool a few times, the learning curve shrinks fast. You go from guessing to
understanding. And once you understand, your DIY bending station becomes even more powerful, because it turns a basic heat source into
a repeatable, confidence-building process.
In short: building a plastic bender “from stuff you already have” is less about inventing a dangerous heater and more about building
a smart, stable setup. The best makers aren’t the ones who take the biggest risksthey’re the ones who get consistent results and still
have all their eyebrows at the end.


