
Table of Contents >> Show >> Hide
- What “Melt-in-Your-Mouth” Actually Means (and How We Get It)
- The Best Melt-in-Your-Mouth Sugar Cookies (Drop-Style)
- Step-by-Step Instructions (With “Look For This” Cues)
- 1) Prep the oven and pans
- 2) Cream butter + sugars (the softness starts here)
- 3) Add egg, yolk, and extracts
- 4) Whisk dry ingredients separately
- 5) Combine wet + dry gently
- 6) Chill briefly (non-negotiable for shape and texture)
- 7) Scoop and (optional) roll for a smooth top
- 8) Add sparkle
- 9) Bake just until set
- 10) Cool properly (yes, it matters)
- Flavor and Texture Upgrades (Without Wrecking the Recipe)
- Simple Vanilla Glaze (Optional but Highly Encouraged)
- Troubleshooting: If Your Cookies Don’t Melt, Here’s Why
- Make-Ahead, Freezing, and Keeping Cookies Soft
- Serving Ideas (So You Don’t Eat Them All Standing Over the Sink)
- FAQ: Quick Answers for Better Cookies
- Real Kitchen Experiences: The “Melt-in-Your-Mouth” Moments (and Mishaps)
- Conclusion
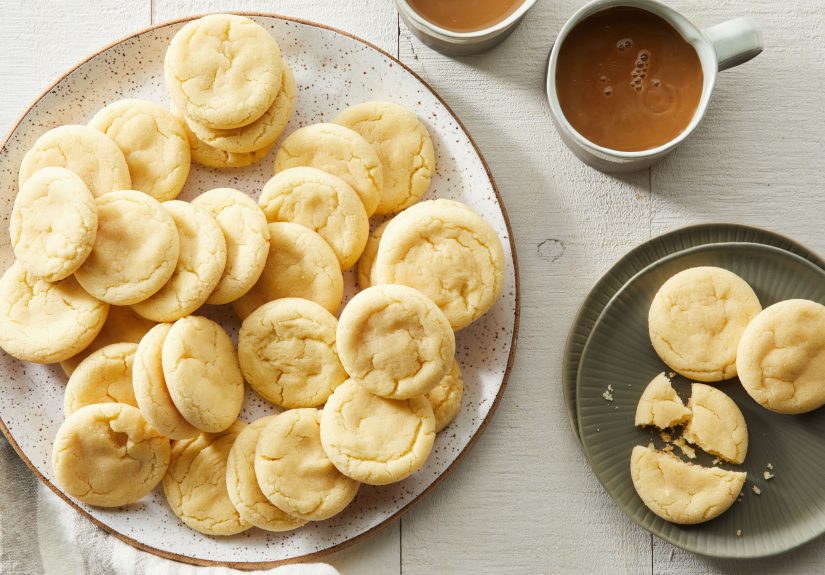
Let’s talk about melt-in-your-mouth sugar cookiesthe kind that barely needs teeth. One bite and they go from “cookie” to “sweet buttery cloud” like they were late for an appointment. They’re not crunchy. They’re not cakey. They’re that magical in-between: tender, fine-crumbed, and soft, with a vanilla-forward flavor that tastes like childhood but with better technique.
This recipe is built for real life: it works in a normal home kitchen, uses everyday ingredients, and gives you clear “what to look for” cues so you don’t have to play Oven Roulette. You’ll get a dependable base cookie, plus texture “dials” for making them even softer, slightly chewier, or perfect for light frosting.
What “Melt-in-Your-Mouth” Actually Means (and How We Get It)
“Melt-in-your-mouth” isn’t just poeticit’s a texture strategy. Here’s the short version of what makes a sugar cookie dissolve instead of crunch:
- Lower gluten development (so the cookie stays tender, not bready).
- High butter-to-flour comfort ratio (a.k.a. richness that reads as softness).
- Powdered sugar + cornstarch (both help create a finer, more delicate crumb).
- Short bake time (you pull them before browning turns them crisp).
- Gentle mixing (because over-mixing is how tenderness gets replaced by “why are these so tough?”)
The recipe below uses a blend of granulated sugar and powdered sugar. Granulated sugar brings structure and classic sugar-cookie flavor; powdered sugar contributes that soft, plush bite. A little cornstarch is the secret handshakeit helps keep the crumb delicate and “melty.”
The Best Melt-in-Your-Mouth Sugar Cookies (Drop-Style)
These are easy drop sugar cookies (no rolling pin required), with a soft center and a tender edge. They’re ideal for: weeknight baking, cookie swaps, lunchbox treats, and anyone who thinks cut-out cookies are suspiciously similar to craft time.
Quick Recipe Snapshot
- Yield: about 22–26 cookies (2 tablespoons dough each)
- Total time: ~45 minutes (including chilling)
- Oven: 350°F
- Texture: soft, tender, fine-crumbed, “melts” as you chew
Ingredients
- 1 cup (2 sticks) unsalted butter, softened to cool room temp
- 3/4 cup granulated sugar
- 1/2 cup powdered sugar, sifted if lumpy
- 1 large egg, cool (not icy, not warm)
- 1 large egg yolk (extra tenderness and richness)
- 2 teaspoons pure vanilla extract
- 1/4 teaspoon almond extract (optional, but gives “bakery sugar cookie” vibes)
- 2 1/2 cups all-purpose flour
- 2 tablespoons cornstarch
- 1 1/2 teaspoons baking powder
- 1/2 teaspoon fine salt
Optional Finishes (Pick Your Adventure)
- Vanilla sugar: 2 tablespoons sugar + 1/2 teaspoon vanilla bean paste (or a pinch of vanilla powder)
- Simple sparkle: sanding sugar, colored sugar, or sprinkles
- Light glaze: powdered sugar + a splash of milk + vanilla (drizzle once cooled)
Equipment
- Stand mixer or hand mixer
- Mixing bowls
- Sheet pans
- Parchment paper
- Cookie scoop (2 Tbsp) or tablespoon measure
Step-by-Step Instructions (With “Look For This” Cues)
1) Prep the oven and pans
Preheat your oven to 350°F. Line two baking sheets with parchment. (Parchment helps prevent over-browning and keeps bottoms tender.)
2) Cream butter + sugars (the softness starts here)
In a large bowl, beat the softened butter, granulated sugar, and powdered sugar on medium speed until light and fluffy, about 2–3 minutes.
Look for this: The mixture should turn paler and look a bit airylike it could hold a tiny grudge against gravity.
3) Add egg, yolk, and extracts
Beat in the egg, then the egg yolk, then vanilla (and almond extract if using). Mix just until combined. Scrape the bowl.
4) Whisk dry ingredients separately
In a separate bowl, whisk together the flour, cornstarch, baking powder, and salt. Whisking distributes leavening evenly so you don’t get “random puff pockets.”
5) Combine wet + dry gently
Add the dry ingredients to the butter mixture in two additions, mixing on low speed just until you don’t see flour streaks. If needed, finish with a spatula.
Golden rule: Stop mixing as soon as the dough comes together. Over-mixing = tougher cookies.
6) Chill briefly (non-negotiable for shape and texture)
Cover and chill the dough for 20–30 minutes. This firms the butter so the cookies don’t spread into thin, crispy regret.
7) Scoop and (optional) roll for a smooth top
Scoop dough into 2-tablespoon portions and place 2–3 inches apart. For a smoother, bakery-style top, roll each scoop quickly between your palms (cold hands help).
8) Add sparkle
Lightly press the tops into sanding sugar, colored sugar, or sprinkles. Or leave plain and glaze later.
9) Bake just until set
Bake for 9–11 minutes, rotating the pan at the halfway mark if your oven has hot spots. You want the cookies to look set with pale tops and only the faintest hint of color at the edges.
Look for this: The centers should lose their wet shine. If the edges are getting golden-brown, you’re drifting toward “crisp.” Pull them earlier next time.
10) Cool properly (yes, it matters)
Let cookies cool on the pan for 5 minutes (they’re finishing their texture journey), then transfer to a rack.
Flavor and Texture Upgrades (Without Wrecking the Recipe)
Make them even more tender
- Add 2 ounces cream cheese with the butter (slightly tangy, extra soft). Reduce butter by 2 tablespoons.
- Swap 1/2 cup flour for cake flour (lower protein = softer crumb).
- Keep them pale: bake to “set,” not to “tan.”
Make them slightly chewier (still soft)
- Replace 2 tablespoons of granulated sugar with light brown sugar.
- Underbake by 30–60 seconds and cool on the pan.
Make them bakery-style frosted
If you want thick, soft cookies that hold frosting well, keep the dough chilled a little longer (30–45 minutes) and scoop slightly larger portions (about 2 1/2 tablespoons). Cool fully before frosting so it doesn’t melt into a puddle of sugary sadness.
Simple Vanilla Glaze (Optional but Highly Encouraged)
Whisk together 1 cup powdered sugar, 1–2 tablespoons milk, and 1/2 teaspoon vanilla until smooth and drizzle-able. Start with less liquid; you can always add more.
For a brighter flavor, add a tiny pinch of salt or a few drops of lemon juice. (Not enough to taste “lemon cookie,” just enough to make vanilla pop.)
Troubleshooting: If Your Cookies Don’t Melt, Here’s Why
Problem: They spread too much
- Butter was too warm → Chill dough longer; start with cool room-temp butter, not greasy-soft butter.
- Pan was warm → Use a cool sheet pan for each batch.
- Not enough flour → Spoon-and-level flour; don’t pack it.
Problem: They’re dry or crumbly
- Overbaked → Pull them when pale and just set; they finish on the pan.
- Too much flour → Measure carefully; flour is sneaky.
- Storage → Airtight container, or they’ll dry out fast.
Problem: They’re tough (the opposite of melt)
- Over-mixed dough → Mix just until combined after adding flour.
- Too much flour + too much mixing → The double-whammy of cookie toughness.
Make-Ahead, Freezing, and Keeping Cookies Soft
Make-ahead dough
Refrigerate dough (covered) for up to 2–3 days. If it feels too firm to scoop, let it sit at room temp for 10 minutes.
Freeze dough balls
Scoop dough into balls, freeze on a tray until firm, then store in a freezer bag for up to 2 months. Bake from frozenjust add 1–2 minutes.
Store baked cookies
Keep cookies in an airtight container at room temperature for 3–5 days. If you live somewhere dry (or your cookies are starting to firm up), tuck a slice of bread in the container to help maintain softness. Swap the bread if it gets stale.
Serving Ideas (So You Don’t Eat Them All Standing Over the Sink)
- Holiday-lite: Dip half in white chocolate and sprinkle crushed peppermint.
- Birthday mode: Frost with vanilla buttercream and add rainbow sprinkles.
- Coffee-shop vibe: Add almond extract and a quick vanilla glaze.
- Ice-cream sandwich: Pair with vanilla bean ice cream and freeze 15 minutes before serving.
FAQ: Quick Answers for Better Cookies
Can I skip the chilling?
You can, but you’ll likely trade “melt-in-your-mouth” for “flat and crispy.” A short chill helps control spread and improves texture consistency.
Do I have to use cornstarch?
It’s highly recommended for that delicate, tender bite. If you don’t have it, the cookies will still be goodjust a touch less “melty.”
Why use both powdered and granulated sugar?
Granulated sugar gives classic flavor and structure; powdered sugar helps create a softer texture and fine crumb. Together they hit the sweet spot.
Real Kitchen Experiences: The “Melt-in-Your-Mouth” Moments (and Mishaps)
Here’s something you’ll notice the first time you make melt-in-your-mouth sugar cookies: they don’t announce themselves as “done” with dramatic golden edges. They’re subtle cookies. Quiet cookies. Introvert cookies. If you’re used to waiting for color, you’ll be tempted to give them “just one more minute.” And that, friend, is how tender cookies turn into “accidentally crisp, still delicious, but not the vibe.”
In many home kitchens, the biggest difference-maker is temperature. A warm kitchen (or a mixer that’s been running long enough to generate heat) can take butter from “softened” to “melting into the dough.” When that happens, the dough looks looser, scoops too easily, and bakes into cookies that spread fast and thin. The fix is refreshingly low-drama: chill the dough a bit longer, andthis is underrated use a cool sheet pan for each batch. If you only have two pans, rotate: one bakes while the other cools.
Another common experience: someone decides to “improve” the recipe by adding more flour because the dough feels sticky. Totally understandable. Also totally how a cookie becomes dry. Sticky dough is often just warm dough. Give it that 20–30 minute chill and it usually becomes scoopable without turning into a flour brick. If you truly need help, dust your hands lightly or use a cookie scoopboth are safer than adding extra flour.
Then there’s the mixing trap. Sugar cookies are friendly… until they aren’t. People often keep mixing after the flour is added because the dough looks slightly shaggy for a moment. But the dough finishes coming together as it rests. Over-mixing can make cookies tougher because it encourages gluten development. A helpful real-life habit is to stop the mixer early and finish with a spatula. It feels almost too easywhich is exactly why it works.
Flavor-wise, home bakers often report a “bakery” taste difference when they add a tiny bit of almond extract. It doesn’t scream almond; it adds a soft, sweet aroma that reads like a professional sugar cookie. Another crowd favorite is rolling the tops in sugar before baking: you get a delicate sparkle and the faintest crunch on top, while the inside stays pillowy. It’s the cookie equivalent of wearing sneakers with a fancy outfit: comfort, but make it cute.
Finally, the most relatable experience: these cookies get even better after they’ve cooled completely. Fresh from the oven, they’re soft but fragile. After 30–60 minutes, the crumb settles and becomes that signature “melt” texture. Many bakers end up making a double batch because once people try them, they stop saying “thank you” and start saying, “So… when are you making these again?” Which is both a compliment and a scheduling problem.
Conclusion
If you want a cookie that tastes classic but feels luxurious, this melt-in-your-mouth sugar cookies recipe is the move. Use the powdered sugar + cornstarch combo for that delicate crumb, keep the dough cool, and bake just until set. Once you nail the timing, you’ll have a go-to soft sugar cookie you can dress up with sprinkles, glaze, or frostingwithout losing the “melty” magic.


