
Table of Contents >> Show >> Hide
- What “mobility and access” actually means (and why it matters)
- Step 1: Do a quick “mobility inventory” (no lab coat required)
- Step 2: Build your mobility team (you don’t have to do this solo)
- Step 3: Choose the right mobility tools (and avoid the “random gadget drawer”)
- Step 4: Make your home “access-friendly” (think: smooth runway, not obstacle course)
- Step 5: Transportation and community access (because your world is bigger than your living room)
- Step 6: Workplace and public-space rights (practical, not preachy)
- Step 7: Paying for changes (so the plan survives contact with your budget)
- A practical 30–60–90 day plan you can actually follow
- Experiences that bring it all to life (what people often learn the hard way)
Mobility changes rarely show up with a marching band. They usually arrive like a “minor update” on your phonequiet, inconvenient, and suddenly everything you used to do on autopilot requires a workaround. One week you’re hopping off a curb like it’s nothing. The next, your knee votes “no,” your balance feels a little suspicious, and the front steps start looking like Mount Everest (but with worse lighting).
The good news: you can prepare for mobility and access changes without turning your life into a construction zone or your calendar into a medical drama. With the right plan, you can stay safe, independent, and in controlwhether your mobility shift is temporary (injury, surgery) or long-term (arthritis, neurologic conditions, chronic pain, aging, or disability).
What “mobility and access” actually means (and why it matters)
“Mobility” is the ability to move through your day: standing up, walking, climbing stairs, carrying groceries, getting in and out of a car, navigating a workplace, or moving around your home safely. “Access” is whether the environment cooperatesdoor widths, steps, lighting, transportation options, bathroom layouts, workplace setups, and public spaces that either help you… or make everything harder.
If you plan ahead, you’re not just buying grab bars or picking a walker. You’re designing a life that stays functional when your body’s “settings” change. Think of it as future-proofinglike putting extra outlets in a remodel because you know you’ll want them later.
Step 1: Do a quick “mobility inventory” (no lab coat required)
Before you shop, renovate, or stress-scroll mobility gadgets, take 20 minutes to figure out what you actually need. Try this three-list method:
List A: What’s hard right now?
- Getting up from low chairs or the toilet
- Stairs, curbs, uneven sidewalks
- Carrying laundry, groceries, or a bag while using a cane
- Showering, stepping into a tub, or balancing on wet floors
- Standing in the kitchen long enough to cook
List B: What feels risky?
Falls are a big deal in the U.S., especially for older adultsmillions of emergency department visits each year and significant hospitalizations are linked to falls. That’s not meant to scare you; it’s meant to motivate the “small fixes that prevent big problems” mindset.
List C: What would you hate to lose?
Independence isn’t one thing. It’s driving to meet friends, walking the dog, going to work, traveling, gardening, chasing a toddler, or simply not needing a committee meeting every time you want to take a shower. Write down what you want to protectbecause that becomes your plan’s north star.
Step 2: Build your mobility team (you don’t have to do this solo)
Mobility prep works best when you combine real-world “how I live” knowledge with clinical “how your body works” expertise. Consider involving:
- Primary care clinician to assess underlying causes (pain, medication side effects, dizziness, vision, strength changes).
- Physical therapist for balance, strength, gait training, and safer movement patterns.
- Occupational therapist for practical home-and-life solutions (transfers, bathing, kitchen setup, energy conservation).
- Home modification professional for ramps, railings, lighting upgrades, and layout changes that make movement safer.
A lot of the most effective steps are surprisingly unglamorous: better lighting, clearing pathways, stabilizing rugs, and adding supports where you transfer (bed, toilet, shower). Unsexy? Yes. Powerful? Absolutely.
Step 3: Choose the right mobility tools (and avoid the “random gadget drawer”)
Mobility aids work best when they match your actual needsand when they’re fitted correctly. If your device doesn’t fit, it won’t feel helpful. It’ll feel like you’re pushing a shopping cart with trust issues.
Canes: light support, better balance
A cane can help with mild balance issues or pain on one side. Clinicians often recommend learning proper technique rather than guessing it from watching a movie character “dramatically limp.” (Hollywood is not a mobility instructor.)
Walkers: more stability, less wobble
Walkers can provide more support, especially if you feel unsteady or have decreased endurance. Fit matters: guidance for walker setup often includes matching grip height to your wrist crease and aiming for a comfortable elbow bend (around 15 degrees) when holding the handles.
Wheelchairs and powered options: mobility on your terms
Some people use manual or power wheelchairs; others use “other power-driven mobility devices” depending on needs and environments. In many public-facing settings, wheelchairs and manually powered mobility aids must be allowed where the public can go, and other powered options may be permitted unless they can’t be used safely in that space. The practical takeaway: know your device, know the setting, and be ready to explain what you need without oversharing personal medical details.
Tech that quietly makes life easier
- Fall-detection wearables and emergency alert systems (especially if you live alone).
- Video doorbells so you’re not racing to the door like it’s a game show.
- Smart lighting (motion-activated night lights in hallways and bathrooms).
- Voice assistants for hands-free calls, reminders, and controlling lights or thermostats.
Step 4: Make your home “access-friendly” (think: smooth runway, not obstacle course)
Many falls happen at home. The goal isn’t to pad your entire house like a toddler playroomit’s to remove the predictable hazards and improve the places where your body has to do complicated balancing acts.
Entryways: give yourself a step-free win
- Create at least one step-free entrance (ramp if needed, with sturdy handrails).
- Improve lighting at doors and walkways.
- Use non-slip surfaces where rain or humidity turns the world into a skating rink.
Bathrooms: the “high-stakes” room
Bathrooms combine water, hard surfaces, and awkward movements. Translation: they deserve VIP attention.
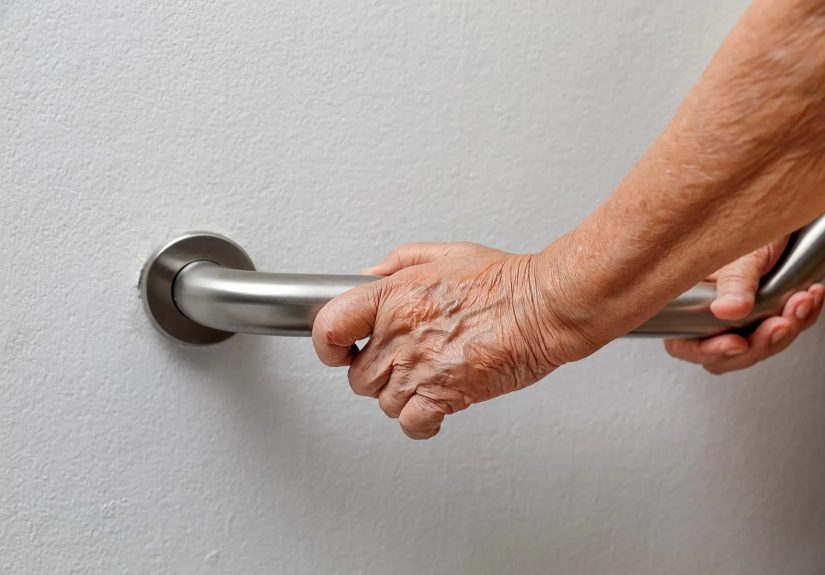
- Install grab bars near the toilet and in the shower/tub area.
- Add non-slip strips or mats in wet zones.
- Consider a shower chair/bench and a handheld shower head for safer bathing.
- Use a night light so midnight trips don’t become an obstacle-course speedrun.
Floors, rugs, and pathways: the silent troublemakers
- Remove loose throw rugs (or secure them like they owe you money).
- Keep cords out of walkways.
- Rearrange furniture to create clear, wide routesespecially to the bathroom and kitchen.
- Fix uneven thresholds and transitions between rooms.
Stairs: make them boring (boring is safe)
- Add secure handrails (ideally on both sides).
- Improve lighting at the top and bottom.
- Use contrasting tape on edges if depth perception is an issue.
- If stairs are becoming a daily negotiation, explore a main-floor bedroom setup or a stair lift.
Universal design: prepare once, benefit forever
Universal design is a framework that aims to make spaces usable by as many people as possible, without needing special adaptation. Its classic principles include ideas like equitable use, flexibility, simplicity, tolerance for error, low physical effort, and enough space for approach and use. You don’t need to memorize themyou can just apply the spirit:
- Choose lever-style door handles instead of round knobs.
- Use brighter, even lighting (fewer shadows, fewer surprises).
- Opt for a curbless shower during remodels if possible.
- Plan wider pathways and easier-to-reach storage.
Step 5: Transportation and community access (because your world is bigger than your living room)
Mobility isn’t just “can you walk?” It’s “can you get where you want to go?” That includes driving, riding with others, public transit, and paratransit.
Public transit accessibility (what to know)
Many U.S. transit systems have accessibility requirements, including accessible buses and complementary paratransit for eligible riders. Paratransit service areas are commonly described using a three-fourths-of-a-mile corridor around fixed routes (and radius around rail stations), which helps define where service must be provided.
Make “leaving the house” easier
- Keep a small “go kit” by the door: meds list, charger, ID, emergency contact card.
- Use a bag that works with your mobility aid (crossbody or backpack can beat a hand-carried tote).
- If you use rideshare, add notes in your profile about pickup needs (curbside vs. door, extra time).
- Practice one new route at a calm time, not during rush hour with a melting frozen yogurt in hand.
Step 6: Workplace and public-space rights (practical, not preachy)
If you workor want to keep workingmobility planning includes your workplace setup. In the U.S., “reasonable accommodations” can include physical changes and assistive technologies that help you do your job. Examples often include accessible workstations, workspace redesign, ramps or lifts where elevators aren’t available, and planning for emergency evacuation needs.
Workplace accommodations that actually help
- Reserved parking closer to the entrance
- Automatic door openers
- Adjustable-height desks or work surfaces
- Relocating a workstation closer to restrooms or elevators
- Flexible scheduling to accommodate PT appointments or fatigue patterns
- Evacuation planning and devices when needed
Tip: Focus your request on the task and the solution (“I need an adjustable workstation so I can work safely”) rather than the diagnosis. It keeps the conversation practical and protects your privacy.
Step 7: Paying for changes (so the plan survives contact with your budget)
Mobility supports and home modifications range from cheap-and-cheerful to “this used to be a bathroom.” Your strategy is to prioritize high-impact, lower-cost fixes firstand then layer in bigger projects.
Medicare and durable medical equipment (DME)
Medicare coverage rules vary by situation, but Medicare Part B generally covers medically necessary durable medical equipment (like certain walkers, wheelchairs, hospital beds, oxygen equipment) when eligibility requirements are met. Costs can include deductibles and coinsurance, and suppliers often have specific requirements.
Veterans benefits for home modifications
If you’re a Veteran, the VA has benefits that may help fund medically necessary home improvements and structural alterations for accessibility and safety. (Translation: help with the “make the house work” part, not just the “buy a device” part.)
Community resources (often underused, surprisingly helpful)
- Area Agencies on Aging and local programs may offer home modification support or referrals.
- Eldercare Locator can help connect you to local services for older adults and caregivers.
- Nonprofits and local grants sometimes fund ramps, railings, and safety upgrades.
Budgeting tip: treat mobility spending like car maintenance. You don’t wait for smoke to come out of the hood before you check the oil. A $40 night light and a $20 non-slip mat can prevent a fall that costs far morein money, time, and confidence.
A practical 30–60–90 day plan you can actually follow
Days 1–30: Stabilize and reduce risk
- Schedule a check-in with a clinician and ask about balance, meds, vision, pain, and strength training.
- Clear pathways; remove loose rugs; add night lights.
- Install basic supports: grab bars, non-slip strips, railings where needed.
- Try PT/OT for gait, transfers, and safe-movement training.
Days 31–60: Upgrade the environment
- Plan a step-free entrance if stairs are becoming limiting.
- Evaluate bathroom access (shower chair, handheld shower, toilet height).
- Make one “mobility lane” in the home that’s wide, bright, and clutter-free.
- Test a mobility aid with professional guidance (fit matters).
Days 61–90: Expand your world safely
- Review transportation options (accessible transit, paratransit eligibility, rideshare routines).
- Create an emergency plan (contacts, medical info, devices charged, easy-to-reach supplies).
- At work, identify the one accommodation that would make the biggest difference and start the process.
- Build a maintenance habit: strength and balance work, footwear checks, home “hazard scan” once a month.
Experiences that bring it all to life (what people often learn the hard way)
Here’s the part nobody puts on the glossy brochure: mobility changes are emotional as much as they are practical. Many people describe an early phase of “I’m fine, I’m fine, I’m fine” followed by one inconvenient momentmissing a step, wobbling in a parking lot, getting stuck in a too-tight restroom stall that flips a switch from denial to determination. The shift isn’t always fear. Sometimes it’s pure annoyance. (“Why is the only entrance up three stairs? Is this building allergic to ramps?”)
One common experience is the confidence gap. Your muscles might be capable, but your brain becomes cautious after a near-fall. People often say they start walking slower, scanning the ground like it’s a puzzle, and avoiding places they used to enjoynot because they can’t do it, but because the risk feels unpredictable. That’s why small home upgrades can feel like a big psychological win: brighter lighting, clear paths, and reliable grab points reduce the mental load. When your environment stops surprising you, you spend less energy bracing for “what if.”
Another theme is the “device stigma” that evaporates the moment a device actually helps. Many people resist canes or walkers because they worry it makes them “look old” or “look sick.” Then they try one that’s properly fitted and realize it doesn’t take independence awayit gives independence back. The first trip to the mailbox without white-knuckling the fence can feel like a tiny victory parade. It’s not about surrendering; it’s about choosing support on purpose.
Home changes can also bring surprising relationship dynamics. When family members get involved, their intentions are often loving but sometimes… loud. People describe feeling talked over (“You should stop driving immediately!”) or pushed into big changes before they’re ready. A practical trick that often helps is turning the conversation into a shared project with clear goals: “We’re doing this so I can shower safely and keep hosting Sunday dinner.” When the goal is independence, not restriction, everyone tends to calm down.
Then there’s the learning curve. Installing grab bars is easy; remembering to use them is an art. People often say it takes a few weeks to build new movement habitsstanding up with a stable base, turning slowly, using the rail every time instead of “just this once.” The best approach is gentle consistency: practice the safer method when you’re not tired, not rushed, and not carrying three bags like a contestant on a game show.
Finally, many people mention the unexpected pride that comes from making a plan. Once the basics are in placesafer bathroom, clearer hallways, a mobility aid that fits, a transportation backup planthe anxiety tends to shrink. Mobility changes don’t feel like a cliff; they feel like a slope with guardrails. And that’s the real goal: not a perfect body, not a perfect house, but a life that stays livable through changewith dignity intact and the freedom to say, “I’m still me. I just travel with better equipment now.”


