
Table of Contents >> Show >> Hide
- Why We Wanted a Backyard Greenhouse in the First Place
- Step 1: Pick the Right Spot (This Matters More Than Paint Color)
- Step 2: Choose a Greenhouse Style That Matches Your Climate and Budget
- Step 3: Pick the Best Glazing Material for Your Needs
- Step 4: Build a Solid Base and Think About Flooring Early
- Step 5: Ventilation Is Not Optional (It’s the Whole Game)
- Step 6: Plan Water and Irrigation Before the Plants Move In
- Step 7: Control Humidity Before It Controls You
- Step 8: Sanitation and Pest Prevention (Boring, But Powerful)
- Step 9: Layout, Workflow, and the “Can I Reach That?” Test
- Step 10: Be Realistic About Year-Round Growing
- What I’d Tell Anyone Whose Hubby Is About to Build a Greenhouse
- Experience Add-On (500+ Words): What It Was Really Like Living Through “My Hubby Built a Greenhouse”
- Conclusion
The day my husband announced, “I think I can build us a greenhouse,” I heard two things at once: fresh tomatoes in spring and we are absolutely about to buy 47 things from the hardware store. Both turned out to be true.
But here’s the thing: a backyard greenhouse can be one of the most rewarding home-and-garden projects you’ll ever doif you plan it like a gardener and build it like a realist. A greenhouse is not just “a cute glass house for plants.” It’s a tiny climate system. It needs sunlight, airflow, water, drainage, and just enough structure to survive weather, heat, and your enthusiastic attempt to grow twelve tomato plants in a space designed for six.
In this guide, I’m sharing the practical lessons behind the headline “My Hubby Built a Greenhouse,” including planning, materials, ventilation, watering, pest prevention, and the real-life stuff nobody tells you until you’re standing in a gravel pile wearing one glove and holding a level upside down.
Why We Wanted a Backyard Greenhouse in the First Place
Before talking screws and polycarbonate, let’s talk purpose. A hobby greenhouse can do a lot: start warm-season seedlings, protect tender plants from frost, extend the growing season, propagate cuttings, andif designed wellsupport a much longer production window for herbs and vegetables.
The mistake many beginners make is building first and deciding later what they want to grow. That’s like buying a giant stockpot before deciding whether you cook soup or just boil eggs. Your greenhouse size, glazing, ventilation, and layout all depend on your goals.
Questions We Asked Before Building
- Are we using it for seed starting only, or year-round growing?
- Do we need shelving, in-ground beds, containers, or a mix?
- How much time can we realistically spend on daily watering and venting?
- Do we need electricity for fans, heat mats, or lights?
- Will summer heat in our area make cooling a bigger issue than winter heating?
If you answer these honestly, you’ll save money, reduce frustration, and avoid building a greenhouse that looks adorable but behaves like a solar-powered sauna.
Step 1: Pick the Right Spot (This Matters More Than Paint Color)
We originally wanted to tuck the greenhouse near a fence because it “looked cute there.” It also happened to be the shadiest, soggiest part of the yard. Lovely for moss. Less lovely for peppers.
A good greenhouse site should be bright, level, and well-drained, with convenient access to water and electricity. Sunlight is the big oneespecially in winter, when the sun angle is lower and nearby trees or structures can block more light than you expect. It’s smart to watch the area at different times of day before committing.
Site Selection Tips
- Choose a sunny location with strong morning-to-afternoon light.
- Avoid low spots where water collects after rain.
- Plan for hose access (and future irrigation upgrades).
- Leave room to move around the greenhouse and possibly expand later.
- Keep distance from trees that drop branches, leaves, and shade.
We also learned that wind exposure matters. Some extension guidance for high tunnel placement emphasizes considering nearby obstacles and airflow, not just sun. Translation: don’t build your greenhouse where it becomes a kite with shelves.
Step 2: Choose a Greenhouse Style That Matches Your Climate and Budget
Greenhouses come in several common forms: lean-to, A-frame, Quonset/hoop style, gothic arch, and pitched roof. Each can work, but not each works equally well in every climateor for every spouse with a weekend timeline and a confidence level of “I watched three videos.”
What We Learned About Common Styles
- Lean-to greenhouse: Saves space, but moisture management near the house becomes important.
- A-frame: Often budget-friendly, but interior space can be less efficient.
- Quonset/hoop: Good for season extension and simpler builds.
- Gothic arch or pitched roof: More usable interior space and better headroom.
We ended up choosing a simple freestanding structure with enough height for shelving and hanging baskets. If you’re on the fence about size, go a little bigger than you think you need. Every gardener says, “This is plenty,” exactly once.
Step 3: Pick the Best Glazing Material for Your Needs
“Glazing” is the transparent (or semi-transparent) covering material. This was our longest debate because each option has trade-offs: cost, light transmission, durability, insulation, and maintenance.
Common Greenhouse Glazing Options
- Glass: Excellent light transmission and classic look, but heavier, more expensive, and breakable.
- Polyethylene film: Affordable and lightweight, great for lower-cost builds and hoop houses, but shorter lifespan.
- Fiberglass reinforced panels (FRP): Lightweight and better heat retention than glass, with quality differences by product.
- Polycarbonate panels: Popular for hobby greenhouses because they’re durable and insulating, though light transmission can be lower than glass depending on panel type.
We chose twin-wall polycarbonate because we wanted a balance of durability and insulation without turning the budget into a family meeting. It’s not the “fancy magazine” option, but it’s a very practical backyard greenhouse material.
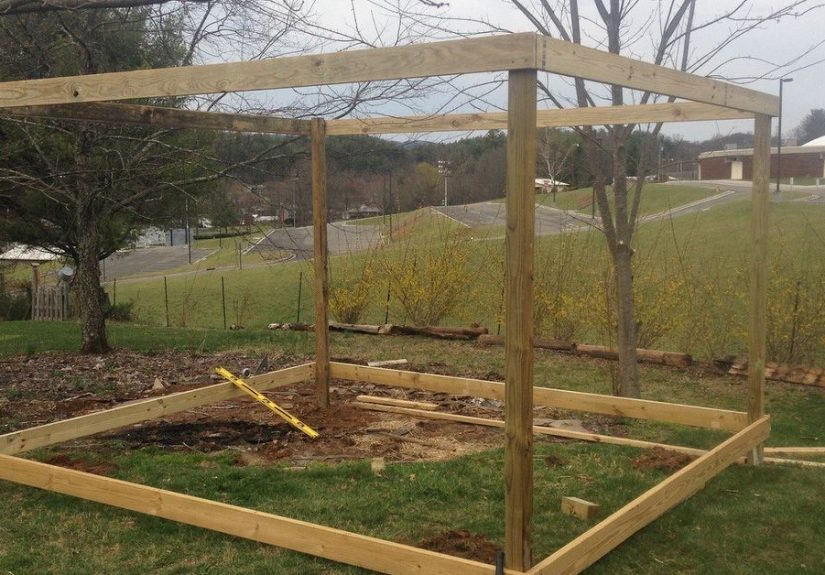
Step 4: Build a Solid Base and Think About Flooring Early
I cannot emphasize this enough: the greenhouse base is not the boring part. It is the difference between “cozy plant haven” and “crooked damp mystery shed.”
A stable foundation helps with squareness, longevity, and weather resistance. Some guides recommend permanent foundations, especially for stronger structures. Flooring choices also affect drainage, cleanliness, weeds, and disease pressure.
Flooring Options (And Why We Chose Gravel)
- Gravel: Great drainage and relatively low cost; easy to hose down.
- Concrete: Easy to sanitize and move carts on, but can be more expensive.
- Soil floor: Affordable, but can increase weeds, mud, and sanitation challenges.
- Weed barrier fabric + gravel: A practical combo for hobby setups.
We used compacted base material, a weed barrier, and gravel. Not glamorous. Extremely effective. Also very satisfying to hear your boots crunch in there like you own a tiny botanical hardware store.
Step 5: Ventilation Is Not Optional (It’s the Whole Game)
The first warm day after we finished the frame, we stepped inside and immediately understood greenhouse physics. Outside: pleasant spring afternoon. Inside: warm salad spinner filled with humidity.
A greenhouse needs active and/or passive ventilation to control heat, humidity, and air movement. Extension sources consistently point out that poor airflow contributes to plant stress, disease, and disappointing results. In hot climates, vents and shade cloth alone may not be enough for summer growing.
Greenhouse Ventilation Basics
- Natural ventilation: Best when warm air can escape high (ridge/roof vents) and cooler air enters low (side vents).
- Forced ventilation: Exhaust fans move air reliably and are often needed in warmer conditions.
- Shade cloth: Helps reduce solar heat gain during peak heat.
- Evaporative cooling: Helpful in hot, dry climates where simple venting won’t keep temperatures in range.
We installed roof vent openers and added a fan setup because we didn’t want to babysit the temperature every hour. If you plan to grow through summer, ventilation and cooling capacity should be treated like core infrastructurenot “maybe later” accessories.
Step 6: Plan Water and Irrigation Before the Plants Move In
At first, we watered by hand with a hose and a lot of optimism. It worked for seedlings. It did not work once the greenhouse got fuller, warmer, and busier. Uneven watering became the villain in our little plant drama.
Drip irrigation is one of the best upgrades for a backyard greenhouse because it delivers water efficiently, helps keep foliage dry, and makes consistency easier. Soaker hoses can work too, especially for simple layouts, but you’ll still need to monitor performance and moisture.
A Simple Greenhouse Irrigation Setup
- Timer
- Backflow preventer
- Filter
- Pressure regulator
- Main tubing and emitters or drip lines
We also started checking soil moisture more often instead of watering on vibes alone. Plant needs change with growth stage, weather, and container size. A greenhouse rewards consistency, not guesswork.
Step 7: Control Humidity Before It Controls You
Heat gets all the attention, but humidity is often the sneakier problem. Condensation on glazing and constantly damp foliage can create ideal conditions for disease.
The fix is not a single gadgetit’s a routine: proper spacing, good airflow, watering at the right time, and avoiding wet leaves late in the day. In other words, don’t create a tropical spa if you’re trying to grow healthy tomatoes.
Humidity-Management Habits That Help
- Water early enough for surfaces to dry
- Avoid unnecessary overhead watering
- Space plants for air movement
- Vent regularly, even when the weather feels “not that hot”
- Use fans to prevent stagnant pockets of humid air
Step 8: Sanitation and Pest Prevention (Boring, But Powerful)
I wanted the greenhouse to be all charming pots and happy basil. Real life added fungus gnats, the occasional aphid, and one mysterious pest that apparently hitchhiked in on a “healthy” plant from somewhere else.
The good news: sanitation and basic IPM (integrated pest management) do a lot of the heavy lifting. Research-based greenhouse guidance repeatedly emphasizes prevention, monitoring, and clean growing practices over last-minute panic spraying.
Our Greenhouse IPM Routine
- Start with clean pots, trays, and benches
- Keep walkways and floors free of plant debris and spilled media
- Quarantine new plants before they join the main group
- Use sticky traps for monitoring insect activity
- Inspect plants weekly (more often during warm, busy growth periods)
- Keep weeds down inside and around the greenhouse
Weed control sounds minor until you learn how quickly weeds can seed and spread. In a greenhouse, tiny neglect becomes a full-time hobby if you let it.
Step 9: Layout, Workflow, and the “Can I Reach That?” Test
Here’s a classic greenhouse mistake: filling every inch with plants and then realizing you can’t access the back row without performing interpretive dance.
A good greenhouse layout balances growing space with workflow. Leave an aisle you can actually use. Place your most frequent taskswatering controls, potting supplies, hand toolswhere you can reach them quickly. Use vertical space wisely with shelving and hanging baskets, but don’t block light and airflow.
Practical Layout Ideas
- Center aisle for access and airflow
- Bench space on one or both sides
- Lower shelves for trays and supplies
- Hooks for tools, pruners, and gloves
- A designated “quarantine corner” for new plants
My husband calls this “efficiency.” I call it “not stepping on a seed tray while carrying a watering can.”
Step 10: Be Realistic About Year-Round Growing
A backyard greenhouse can absolutely extend your season and improve your growing success, but “year-round growing” means different things in different climates. In some places, heating is the main challenge. In others, summer cooling is the real budget buster.
If your goal is full four-season production, plan for operating costs, not just build costs. Fans, cooling, heating, supplemental lighting, and irrigation upgrades can all add up. Start with a greenhouse that solves your biggest problem first (frost protection, seed starting, shoulder-season growing), then upgrade as your skills and plant ambitions grow.
What I’d Tell Anyone Whose Hubby Is About to Build a Greenhouse
Do it. But do it with a notebook, a tape measure, and a shared understanding that the first version may not be perfect.
The best greenhouse projects are not the fanciest ones. They’re the ones that match your climate, your budget, and your gardening habits. A well-ventilated, thoughtfully placed, easy-to-clean greenhouse will outperform a beautiful but poorly planned setup every single season.
And yes, there will be trial and error. You will overwater something. You will under-ventilate something else. You may buy one extra tray of seedlings and then somehow buy twelve more. That’s not failure. That’s greenhouse ownership.
Experience Add-On (500+ Words): What It Was Really Like Living Through “My Hubby Built a Greenhouse”
If you want the honest version, building our greenhouse felt like a cross between a home improvement show and a family comedy. On paper, it was a neat plan: choose a site, build a base, assemble the frame, install panels, and start growing. In reality, it was more like: choose a site, change the site, discover the ground is not level, buy more gravel, realize we forgot a connector, and eat takeout while staring at a half-built frame in the yard like it was modern art.
The first major lesson was that planning time is not “wasted time.” My husband wanted to jump straight to building because that’s the fun part. I wanted to measure the sun, make a supply list, and think about where the hose would go. We were both right, but the project went more smoothly once we stopped treating planning like a speed bump. Once we mapped out the footprint, walkway, bench space, and door swing, every later decision became easier. We argued less, which I highly recommend as a greenhouse strategy.
The second lesson was that climate control starts on day one, not after you add plants. We assumed we could “figure out ventilation later.” Then we stepped inside on a mild sunny afternoon and it was shockingly hot. That moment changed how we thought about the greenhouse. It wasn’t just a structure; it was an environment. We added venting and airflow improvements earlier than planned, and I’m convinced that decision saved us from a season of crispy seedlings and dramatic disappointment.
The third lesson was about watering consistency. At the beginning, hand watering felt relaxing. A few pots, a gentle spray, birds chirpingvery cinematic. Then the greenhouse filled up. Suddenly, watering became a daily puzzle: which containers dried out faster, which corners stayed damp, and whether I had actually watered that tray or just emotionally supported it. Once we switched to a more organized irrigation setup, plant health improved and my stress dropped. I still hand water sometimes, but now it’s a choice, not a rescue mission.
Another surprise was how much we enjoyed the routine. The greenhouse became our shared reset button. In the morning, he checks vents and airflow. I check seedlings and look for any signs of pests or disease. In the evening, we compare notes like two tiny farm managers with a very small operation and very big opinions about basil. It turned into less of a “project” and more of a rhythm.
We also made mistakes. We overcrowded it the first spring. We brought in one plant without checking it carefully and spent the next week hunting pests like detectives in gardening gloves. We underestimated how useful vertical space would be and had to reorganize shelves mid-season. None of those mistakes ruined the greenhouse, but each one taught us something important: greenhouse success is mostly systems, not luck.
My favorite part, though, is the way the greenhouse changed our growing confidence. Starting seeds became easier. We experimented more. We tried plants that felt a little too fussy for open garden beds. We extended the season and got a head start on spring. And honestly, there is something deeply satisfying about stepping into a warm greenhouse on a chilly morning and seeing healthy green growth when the rest of the yard still looks half asleep.
So yes, “My Hubby Built a Greenhouse” sounds like a cute story title. It is. But it’s also a reminder that a greenhouse can be a practical, joyful investment in your garden lifeespecially when you build it with patience, adapt as you learn, and keep a sense of humor when the hardware store becomes your second home.
Conclusion
A backyard greenhouse is one of the best ways to level up your gardening game, but the real secret is simple: build for function first, then make it pretty. Start with sunlight, drainage, ventilation, and water access. Choose materials that fit your budget and climate. Use sanitation and monitoring to stay ahead of problems. And leave room for the inevitable upgrades that come after your first season of “We should totally grow more peppers.”
If your hubby built a greenhouseor you’re building one togetheryou’re not just making a structure. You’re creating a growing space, a learning lab, and possibly your favorite spot in the yard.


