
Table of Contents >> Show >> Hide
- Why a skillet focaccia works so well
- Ingredients
- Equipment
- The no-knead skillet focaccia method
- Topping ideas (pick a personality)
- Troubleshooting (because bread has opinions)
- How to serve skillet focaccia
- Storage and reheating
- Make it yours: small upgrades that feel fancy
- Extra: of real-life skillet focaccia experiences
- Conclusion
Focaccia is the friendliest bread on the planet. It doesn’t demand a stand mixer, it doesn’t ask you to bench-rest like you’re training for the Bread Olympics, and it definitely doesn’t require you to wrestle a tight dough ball into submission. Instead, it leans into what bread does best: time + hydration + a little yeast = magic.
This no-knead skillet focaccia bakes up with a crackly, olive-oil-kissed bottom (thank you, cast iron), a soft, airy middle, and those iconic dimples that hold little puddles of flavor like tiny edible swimming pools. It’s the kind of bread that makes soup feel fancier, salad feel less lonely, and sandwiches feel like they pay rent.
Why a skillet focaccia works so well
A cast-iron skillet is basically a cheat code for great focaccia. It stores heat like it’s hoarding sunshine, which helps the bottom crisp and brown while the interior stays pillowy. A high-hydration dough (meaning it’s wetter and stickier than typical sandwich bread dough) encourages bigger bubbles and an open crumbaka that “bakery-style” look without the bakery-style effort.
“No-knead” doesn’t mean “do nothing.” It means you’re letting water and time do most of the gluten work. A few quick bowl folds (think: tucking a blanket, not punching a bag) give the dough strength so it can trap gas and rise proudly instead of spreading like a sleepy pancake.
Ingredients
This recipe is written for a 10-inch cast-iron skillet. A 12-inch skillet works tooyou’ll just get a slightly thinner focaccia (still delicious, just more “snack board” and less “sandwich slab”).
Dough
- Bread flour: 500g (about 4 cups) all-purpose flour works, but bread flour gives better chew and structure
- Warm water: 400g (about 1 2/3 cups), around 95–105°F (warm, not hot)
- Kosher salt: 10g (about 1 3/4 tsp)
- Instant yeast: 7g (2 1/4 tsp) for same-day OR 2g (1/2 tsp) for overnight dough
- Honey or sugar (optional): 5g (1 tsp) helps browning and flavor
- Extra-virgin olive oil: 60–90g total (about 1/4 to 1/3 cup), divided
Classic topping idea
- 1–2 tbsp olive oil for drizzling
- 1–2 tsp flaky salt
- 1–2 tbsp chopped fresh rosemary (or 2 tsp dried)
Equipment
- 10-inch cast-iron skillet (or other ovenproof skillet)
- Large mixing bowl
- Rubber spatula or bowl scraper (helpful for sticky dough)
- Plastic wrap or a damp towel
- Measuring tools (a kitchen scale is ideal, but not required)
- Wire rack for cooling (keeps the bottom crisp)
The no-knead skillet focaccia method
Step 1: Mix the dough (5 minutes)
In a large bowl, whisk together the flour, salt, yeast, and (if using) honey/sugar. Pour in the warm water and stir with a spoon or spatula until no dry flour remains. The dough will look shaggy and stickythis is correct. If your dough looks neat and polite, it’s lying.
Drizzle about 1 tablespoon of olive oil over the top of the dough and turn it once or twice in the bowl so the surface gets lightly coated. Cover the bowl.
Step 2: Rest + bowl folds (about 1 hour total)
Let the dough rest for 20 minutes. Then do your first set of folds: wet your fingers, grab one edge of the dough, stretch it up gently, and fold it over itself. Rotate the bowl and repeat 4 times (north, south, east, west).
Repeat this folding set 3 more times every 15 minutes (so: 4 sets total). These quick folds build structure without kneading. Each round takes maybe 30 secondsless time than it takes to find a good playlist.
Step 3: Choose your schedule (same-day or overnight)
Option A: Same-day rise (about 1–2 hours)
After the last fold, cover the bowl and let the dough rise at room temperature until noticeably puffy and about doubled, usually 60–120 minutes depending on your kitchen.
Option B: Overnight rise (8–24 hours, better flavor)
After the last fold, cover the bowl and refrigerate the dough for 8 to 24 hours. Slow fermentation develops deeper flavor and makes the dough easier to handle. When you’re ready to bake, let it sit at room temp for 30–60 minutes before moving on.
Step 4: Oil the skillet like you mean it
Pour 2 tablespoons olive oil into your skillet and tilt to coat the bottom and sides well. Focaccia loves oil. If you’re being shy, it will stick. (And then you’ll say words your future self doesn’t want on the internet.)
Step 5: Transfer, stretch, and proof in the pan
Scrape the dough into the oiled skillet. Flip it once so both sides get glossy with oil. Gently press and stretch it toward the edges. If it springs back, let it rest for 10–15 minutes and try again. Dough is like a cat: you can’t force affection, but you can wait it out.
Cover the skillet and let the dough rise until it looks airy and jiggly, usually 45–90 minutes. You’re looking for a dough that feels alivelike it would sigh if it could.
Step 6: Preheat the oven
Heat the oven to 450°F. Place a rack in the lower third of the oven so the bottom gets the heat it deserves.
Step 7: Dimple + top
Drizzle another 1–2 tablespoons olive oil over the dough. Oil your fingertips and press deep dimples all overgo confidently. Those dimples are where flavor collects and bubbles form around.
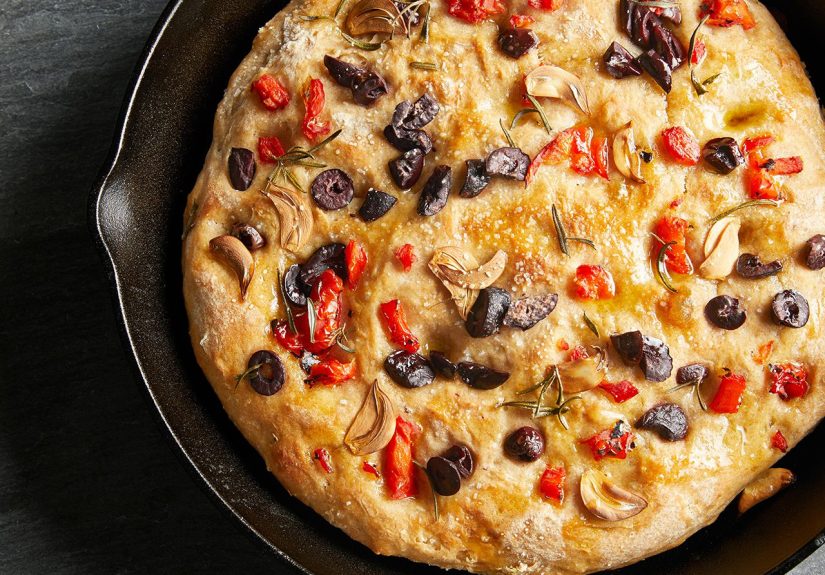
Sprinkle with flaky salt and rosemary (or your toppings of choice). If you want a more traditional Ligurian vibe, you can add a quick brine: stir together 2 tablespoons warm water + 1 teaspoon salt until dissolved, then spoon it into the dimples before baking.
Step 8: Bake
Bake for 22–28 minutes, until the top is deeply golden and the edges look crisp. If you want extra crunch, carefully lift it out of the skillet after 5 minutes and return the focaccia to the oven rack for another 3–5 minutes.
Cool on a wire rack for at least 10 minutes before slicing. If you cut too early, the crumb can compress and go gummy. Bread needs a moment to collect itselfsame.
Topping ideas (pick a personality)
Focaccia is basically a blank canvas that tastes like olive oil and good decisions. Here are topping combos that work especially well in a skillet:
1) Classic rosemary + flaky salt
Simple, timeless, and suspiciously impressive for how easy it is.
2) Cherry tomato + garlic + thyme
Press halved cherry tomatoes cut-side up into the dough. Add thinly sliced garlic, thyme, and a pinch of red pepper flakes.
3) Olive + red onion
Kalamata olives (halved) + thin red onion slices + rosemary. Salty and snackable.
4) Parmesan + black pepper
Add a shower of finely grated Parmesan before baking. Finish with fresh cracked pepper after.
5) “Pizza night” focaccia
Bake the focaccia plain, then top with marinara, mozzarella, and pepperoni (or veggies) and broil briefly. It’s like pizza’s fluffier cousin who went to therapy.
Troubleshooting (because bread has opinions)
My dough is super sticky
Normal. High hydration dough is sticky by design. Use wet or oiled hands, a bowl scraper, and patience. The folds will help it gain strength.
It didn’t rise much
Check yeast freshness, water temperature (too hot can damage yeast), and room temp. Cooler kitchens simply take longer. Give it timefocaccia isn’t a microwavable relationship.
The bottom isn’t crispy
Use the lower oven rack, make sure the skillet is well-oiled, and consider baking a few minutes longer. Cooling on a rack matters toocooling in the skillet can trap steam and soften the crust.
It stuck to the pan
More oil next time, and be generous on the sides. Cast iron seasoning helps, but oil is the real insurance policy.
How to serve skillet focaccia
- Soup sidekick: dunkable with tomato soup, minestrone, chicken noodleanything cozy.
- Sandwich hero: slice horizontally and fill with turkey, mozzarella, arugula, and pesto.
- Party move: cut into small squares, serve with whipped ricotta, olive tapenade, or a simple balsamic dip.
- Breakfast upgrade: toast a slice, add scrambled eggs and hot sauce.
Storage and reheating
Focaccia is best the day it’s baked, but leftovers still have a good life ahead of them. Store at room temperature for up to 2 days (paper bag or loosely wrapped). Reheat at 300°F for about 8–12 minutes until warm and crisp again. For longer storage, freeze slices and reheat straight from frozen.
Make it yours: small upgrades that feel fancy
If you want the kind of focaccia that makes people say, “Wait… you made this?” try one of these easy upgrades:
- Better olive oil: use a flavorful extra-virgin olive oil for finishing. It actually shows up in the taste.
- Flaky salt: it adds crunch and little bursts of salinity in the dimples.
- Cold ferment: even 8 hours in the fridge noticeably improves flavor and texture.
- Brine in the dimples: creates that signature savory, slightly blistered top.
Extra: of real-life skillet focaccia experiences
Making no-knead skillet focaccia is one of those kitchen experiences that quietly rewires your confidence. The first time you mix the dough, it looks like a sticky mess and feels like it’s plotting against you. Then, almost unfairly, time does most of the work. You walk away, come back, and suddenly your bowl contains something puffier, glossier, and far more cooperative than you expectedlike the dough had a personality growth arc while you were answering emails.
One common “aha” moment is realizing how much handling matters even when you’re not kneading. Those quick folds can feel too simple to matter, but they’re the difference between a focaccia that rises tall with big bubbles and one that bakes up dense. If you’ve ever wondered why some homemade focaccia looks a little shy, it’s often because the dough never got enough strength to trap air. The folds are basically structure in 30-second installmentsbread’s version of doing a few push-ups every so often instead of one brutal workout.
Another very relatable experience: the dough that refuses to stretch to the edges of the skillet. This is where most people assume they’ve done something wrong. Usually, the dough just needs a short rest. Gluten tightens when it’s stressed (honestly, same), and a 10–15 minute pause lets it relax so you can gently press it outward without tearing. The skillet focaccia process teaches patience in tiny, rewarding ways: rest, stretch, rest again, and suddenly the dough behaves like it’s been taking yoga classes.
Then there’s the moment you dimple the dough. It’s oddly satisfyinglike bubble wrap, but edible and socially acceptable at dinner parties. Deep dimples help hold olive oil and salt, and they also encourage uneven pockets where steam and gas expand, creating that signature focaccia texture. If you’re nervous, remember: focaccia is meant to look rustic. Perfectly symmetrical dimples are not the goal. Delicious is the goal.
The skillet adds its own storyline. Cast iron tends to give you that dramatic, golden, crisp bottom that makes focaccia feel like it came from a serious bakery. But it also teaches a practical lesson: cooling on a rack matters. Leave the bread in the hot skillet too long and steam can soften the crust you worked for. Slide it out, let air circulate, and suddenly you’ve got that crisp-chewy contrast that makes people hover near the cutting board “just for a small piece.”
And finally, focaccia has a sneaky way of becoming a repeat habit. Once you’ve made it once, it’s hard not to see opportunities everywhere: soup night, sandwich prep, potlucks, brunch boards, “I forgot to buy bread,” “I bought too many cherry tomatoes,” “I need a win today.” It’s low effort, high reward, and it turns regular meals into something that feels a little celebratorywithout requiring you to become a full-time bread person. (Unless you want to. In which case: welcome. We have dimples.)
Conclusion
A great no-knead skillet focaccia recipe is less about perfection and more about understanding the few things that matter: a wet dough, enough time to rise, generous olive oil, and confident dimples. Do that, and you’ll get a focaccia that’s crisp underneath, fluffy inside, and ridiculously flexiblesnack, sandwich, side dish, or center-of-the-table showoff.


