Table of Contents >> Show >> Hide
- What Are Pastes (Mexican Pasties)?
- How Pastes Differ From a Cornish Pasty (and From Empanadas)
- Pastes (Mexican Pasties) Recipe: Papa con Carne (Potato + Beef)
- Step-by-Step Instructions
- Step 1: Make the dough (keep it cold, keep it calm)
- Step 2: Mix the filling (small dice = even cooking)
- Step 3: Roll and cut
- Step 4: Fill, fold, and seal like you’re guarding treasure
- Step 5: Chill the assembled pastes (yes, again)
- Step 6: Egg wash + vents
- Step 7: Bake
- Step 8: Cool briefly and serve
- Pro Tips for Flaky Crust and Zero Leaks
- Flavor Variations: 6 Filling Ideas That Still Feel Like “Pastes”
- Make-Ahead, Freezing, and Reheating
- FAQ
- Kitchen Tales: of Paste-Making “Experience” (a.k.a. What Usually Happens)
- Wrap-Up: Your New Favorite Portable Meal
- SEO Tags
If a Cornish pasty and a Mexican street snack fell in love somewhere between a mine shaft and a salsa bar, you’d get a paste (plural: pastes).
It’s a hearty, hand-held pastry stuffed with a full meal’s worth of goodnessdesigned to travel, survive a lunch break, and make you feel like a culinary genius even if you still Google how to “crimp” every single time.
In this guide, you’ll learn how to make classic papa con carne (potato + beef) pastes with a flaky, sturdy dough, plus pro-level tips to avoid soggy bottoms, busted seams, and “why is my filling leaking like a sad soap opera?”
You’ll also get several filling variations, make-ahead/freezer tricks, and a big, satisfying dose of paste-related kitchen storytelling at the end.
What Are Pastes (Mexican Pasties)?
Pastes are a signature food from the Mexican state of Hidalgo, strongly associated with the mining town of Mineral del Monte (often called Real del Monte). The name comes from the English “pasty,” adapted into Spanish as “paste.”
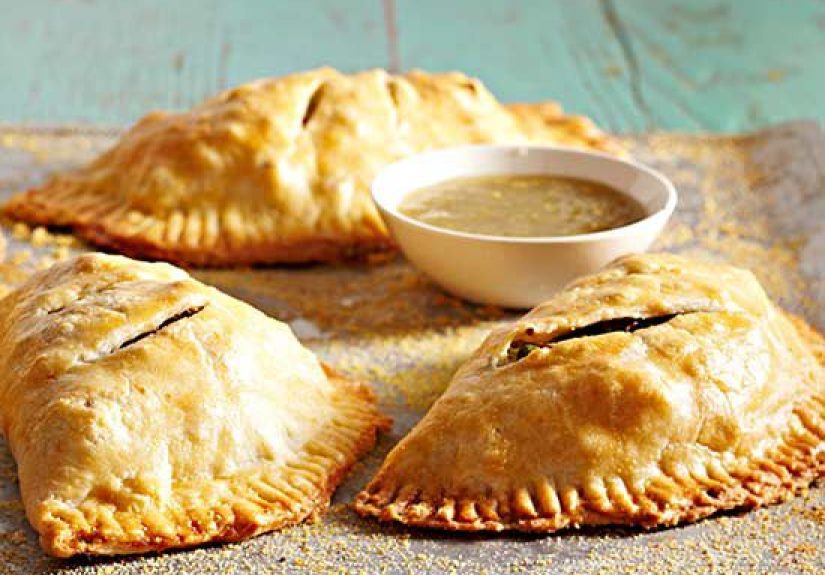
Traditionally, they’re baked half-moon pastries with a crimped edge, filled with combinations like potato and meat, then enjoyed hot, warm, or straight-from-the-bag when you “accidentally” skip lunch.
The origin story is one of the best in food history: Cornish miners traveled to Hidalgo in the 1800s to work in the mines and brought their practical, portable pasties with them.
Over time, local cooks “Mexicanized” the idealeaning into chiles, herbs, and new fillings (including sweet options)until pastes became their own beloved tradition.
How Pastes Differ From a Cornish Pasty (and From Empanadas)
1) Flavor: Hidalgo brings the “zing”
While Cornish pasties are famously straightforward, pastes often nod to Mexican flavor habits: fresh herbs, peppers, and bolder seasonings. Even the classic versions can include parsley and a gentle chile warmth.
And modern shops go way beyond the basicsthink mole-style fillings, pineapple-and-ham combos, and other “rules are optional” creations.
2) Dough: sturdy, flaky, and built for the job
A good paste crust should be flaky but also strong. You’re not making a delicate tart; you’re building edible packaging.
That’s why many recipes use a shortcrust-style dough with plenty of fat and a good rest in the fridgeso it rolls easily and bakes up crisp rather than tough.
3) Technique: seal well, vent smart, bake hot
Hand pies and pasties share the same success rules: keep everything cool, seal the edges like you mean it, and vent the top so steam can escape.
A quick egg wash also helps create that golden finish that screams, “Yes, I do deserve compliments.”
Pastes (Mexican Pasties) Recipe: Papa con Carne (Potato + Beef)
Yield: 10–12 pastes (depending on size)
Prep time: ~45 minutes (plus chilling)
Bake time: 35–55 minutes
Skill level: Home-cook friendly (with a tiny bit of “trust the process” energy)
Ingredients: Dough
- 4 cups all-purpose flour (plus extra for rolling)
- 1 1/2 teaspoons fine salt
- 2 teaspoons baking powder (optional, for a slightly lighter bite)
- 10 tablespoons cold unsalted butter, cubed
- 10 tablespoons cold lard or vegetable shortening, cubed (or use all butter if preferred)
- 1 to 1 1/4 cups ice-cold water (start smaller; add as needed)
- 1 large egg + 1 tablespoon water or milk (for egg wash)
Ingredients: Classic Papa con Carne Filling
- 1 1/4 pounds Yukon Gold or russet potatoes, peeled and diced small (about 1/4-inch)
- 3/4 to 1 pound ground beef (or finely diced beef chuck for a more traditional texture)
- 1 small white or yellow onion, finely chopped
- 2 cloves garlic, minced
- 1 jalapeño or serrano, minced (optional, adjust to taste)
- 1/3 cup chopped fresh parsley
- 1 1/4 teaspoons kosher salt (plus more to taste)
- 1 teaspoon ground black pepper
- 1/2 teaspoon ground cumin (optional but helpful)
- 1 tablespoon all-purpose flour (helps absorb juices)
- 2–3 tablespoons beef broth or water (just to lightly moisten)
- 2 tablespoons cold butter, cut into 10–12 tiny cubes (for dotting inside)
Optional serving ideas
- Salsa roja or salsa verde
- Lime wedges
- Pickled onions or jalapeños
- Mexican crema or sour cream
Step-by-Step Instructions
Step 1: Make the dough (keep it cold, keep it calm)
- In a large bowl, whisk flour, salt, and (if using) baking powder.
-
Add cold butter and cold lard/shortening. Use your fingertips or a pastry cutter to work the fat into the flour until you have a mix of pea-size pieces and some flatter flakes.
(Those flakes = future flakiness.) -
Drizzle in ice-cold water a little at a time, mixing gently with a fork until the dough holds together when squeezed.
It should look shaggy, not wet. -
Divide dough into two disks, wrap, and chill at least 1 hour (2 hours is even better).
This rest makes rolling easier and helps prevent a tough crust.
Step 2: Mix the filling (small dice = even cooking)
- In a bowl, combine diced potatoes, beef, onion, garlic, chile (if using), parsley, salt, pepper, cumin, and flour.
- Add broth/water just to lightly moisten the mixture. You’re not making soup; you’re making “juicy enough to cook nicely without flooding the pastry.”
Step 3: Roll and cut
- Heat oven to 425°F. Line 2 baking sheets with parchment paper.
- On a lightly floured surface, roll chilled dough to about 1/8-inch thick.
-
Cut circles 6 1/2 to 7 1/2 inches wide (a plate works as a template).
Re-roll scraps once if needed.
Step 4: Fill, fold, and seal like you’re guarding treasure
-
Place a mound of filling on one half of each circle, leaving a 3/4-inch border.
Don’t overfillfuture you will thank present you. - Dot the filling with a few tiny cubes of butter (this adds richness and helps the filling stay tender).
- Lightly brush the border with water (or a touch of egg wash), fold into a half-moon, and press to seal.
- Crimp the edge firmly. You can braid it for a classic look or use a fork for a simpler sealjust press with confidence.
Step 5: Chill the assembled pastes (yes, again)
Place formed pastes on baking sheets and chill 15–20 minutes. Cold dough holds its shape better and is less likely to leak.
This tiny pause is the difference between “bakery vibes” and “why is the filling on my pan?”
Step 6: Egg wash + vents
- Whisk 1 egg with 1 tablespoon water or milk.
- Brush pastes lightly with egg wash for shine and color.
- Cut 1–2 small slits on top of each paste to vent steam.
Step 7: Bake
- Bake at 425°F for 15 minutes.
-
Reduce oven to 375°F and bake another 20–35 minutes, until deeply golden and the filling is cooked through.
(If you made very large pastes, you may need closer to the longer end.) - If the tops brown too quickly, tent loosely with foil for the final stretch.
Step 8: Cool briefly and serve
Let pastes cool 10 minutes before eating. The filling will be extremely hot (the interior is basically a delicious steam room).
Serve with salsa, lime, and something crunchy/pickled to cut the richness.
Pro Tips for Flaky Crust and Zero Leaks
Keep ingredients cold (especially the fat)
Flakiness comes from cold bits of fat melting in the oven and creating layers. If the dough gets warm while rolling, pause and chill it.
This one habit fixes an amazing number of pastry problems.
Dice potatoes small
Pastes are thick and cozy, which means the filling needs to cook evenly. Small dice helps the potatoes tenderize before the crust over-browns.
If you want extra insurance, you can microwave diced potatoes for 60–90 seconds, then cool before mixing (not traditional, but extremely practical).
Use a little flour in the filling
A tablespoon of flour absorbs some juices and helps prevent sogginess. If your filling includes extra-wet ingredients (like cooked salsa),
drain or reduce them first.
Seal in two steps
Press the seam closed, then crimp. Think of it like locking a door and then adding a deadbolt. You’re not being dramaticyour filling is.
Flavor Variations: 6 Filling Ideas That Still Feel Like “Pastes”
Once you’ve nailed the dough and the seal, you can treat pastes like a delicious blank canvas. Here are crowd-pleasing options that fit the Hidalgo spirit:
1) Chorizo + potato
Brown chorizo, cool completely, then mix with diced potatoes and onions. Go easy on added saltchorizo usually brings plenty.
2) Chicken tinga
Shredded chicken in a tomato-chipotle sauce is fantastic in a pastejust reduce the sauce until thick to avoid seepage.
3) Mole-style chicken
Use a thick mole sauce and shredded chicken. The key is thick: your paste is not a swimming pool.
4) Beans + cheese
Refried beans plus Oaxaca cheese (or mozzarella) is simple, filling, and very hard to mess up.
5) Rajas con crema
Strips of roasted poblano with corn and a little crema/cheeseflavorful, slightly smoky, and a nice change from meat-heavy fillings.
6) Pineapple + ham + cheese (“Hawaiian,” paste edition)
Dice pineapple small and blot dry. Pair with ham and melty cheese. It sounds playfulbecause it isbut it’s also weirdly addictive.
Make-Ahead, Freezing, and Reheating
Make-ahead
- Dough: Make 2–3 days ahead and keep chilled.
- Formed pastes: Assemble up to 1 day ahead, cover, and refrigerate. Egg wash right before baking.
Freezing
- Unbaked: Freeze on a tray until solid, then bag. Bake from frozen (add 10–15 minutes).
- Baked: Cool completely, wrap well, freeze up to 2 months.
Reheating
- Oven (best): 350°F for 12–18 minutes (longer if frozen).
- Air fryer: 325–350°F for 6–10 minutes (watch browning).
- Microwave: Works in a hurry, but softens the crust; re-crisp in a toaster oven if possible.
FAQ
How do you pronounce “paste” in Mexico?
Many people pronounce singular “paste” close to “pah-stay,” and plural “pastes” as “pah-stes.”
If you say it confidently, your pastes will taste 12% more authentic (this is not scientifically proven, but it feels right).
Can I use store-bought pie dough?
You can, especially for a quick batch. Homemade dough is sturdier and flakier, but store-bought will still deliver tasty results.
If using store-bought, keep it cold and don’t overstuff.
Do I have to use lard?
No. Lard/shortening helps tenderness and structure, while butter brings flavor. A half-and-half mix is a nice balance, but all-butter works too.
Kitchen Tales: of Paste-Making “Experience” (a.k.a. What Usually Happens)
The first time you make pastes at home, there’s a high chance you’ll start with big confidence and end with flour on your elbow. This is normal.
Pastes are one of those foods that look deceptively simple“It’s just dough with filling!”until you realize dough has feelings, and its main feeling is
“I will punish you if you rush.”
Most home cooks have the same early paste journey. First, you roll the dough and think, “Wow, I’m basically a professional.” Then the kitchen warms up,
the dough softens, and suddenly it’s sticking to the counter like it pays rent. That’s when you learn the paste-maker’s superpower:
the chill break. Ten minutes in the fridge turns chaos into cooperation. It’s the culinary equivalent of taking a deep breath and
answering an email tomorrow.
Then comes filling confidence. You scoop a generous mound of potato and beef and think, “More filling equals more happiness.”
This is also normal. And then you fold the dough and discover physics: there’s only so much space in a half-moon universe.
If your first paste looks like it’s wearing its filling like a backpack, congratulationsyou’re officially learning the craft.
Your second one will be better. Your third one will look like it came from a friendly neighborhood bakery. By the fourth, you’ll be critiquing your crimp
like you’re judging a pastry talent show.
The best part is what happens when they bake. Your kitchen starts smelling like toasted butter and warm bread, and then the filling aroma kicks in
savory beef, onion, parsley, and that gentle peppery note if you used jalapeño. It’s the kind of smell that makes people wander in and ask questions
they don’t usually ask, like “So… when will these be ready?” and “How many did you make?” and “Is it rude if I eat two?”
Serving pastes is its own experience. They’re portable, which means they’re perfect for game day, road trips, potlucks, or that moment when you need a
meal you can eat with one hand while pretending to be “totally fine” with your inbox. They also make you look wildly prepared.
Put a basket of warm pastes on the table with salsa verde, lime wedges, and pickled onions, and suddenly you’re the person who “always hosts the best stuff.”
(You can keep it mysterious. Let them think you do this every week.)
And here’s the fun secret: pastes get even better once you’ve made them once. The next batch becomes more adventurous. You try chorizo-potato and wonder why
you ever ate plain sandwiches. You test a chicken tinga filling and realize hand pies are basically the greatest delivery system ever invented.
Maybe you even go sweetpineapple with cheese, or a jammy fruit fillingbecause at that point you understand the rules: respect the dough, control moisture,
and seal like it matters. After that, pastes stop being a recipe and become a reliable kitchen flex.
Wrap-Up: Your New Favorite Portable Meal
Pastes are comfort food with a backstoryborn from practicality, adopted by local flavor, and perfected as a handheld meal that feels both nostalgic and exciting.
Master the dough, keep the filling balanced, crimp with purpose, and you’ll have a batch of flaky, golden pastes that disappear faster than you can say,
“I’ll just have one.”