
Table of Contents >> Show >> Hide
- Why Turn a Picnic Bench into an End-of-Bed Bench?
- What You’ll Need for Your Picnic Bench Makeover
- Step-by-Step: From Picnic Bench to Cozy End-of-Bed Bench
- Styling Ideas for Your New End-of-Bed Bench
- Common Mistakes to Avoid
- Is a DIY End-of-Bed Bench Right for You?
- Real-Life Experiences: Living with a Picnic Bench Turned End-of-Bed Bench
- Conclusion
If you’ve ever stared at the empty space at the foot of your bed and thought, “You could be so much more,” this project is for you. Instead of buying a pricey designer piece, you can turn a humble picnic bench into a stylish, comfortable end-of-bed bench that looks straight out of a Remodelaholic-worthy makeover.
This DIY project is budget-friendly, beginner-friendly, and a smart way to upcycle furniture you already own. With a little upholstery foam, fabric, and a staple gun, you can transform an outdoor workhorse into a cozy bedroom bench that adds storage surface, extra seating, and a polished finishing touch to your room.
Why Turn a Picnic Bench into an End-of-Bed Bench?
Picnic benches are surprisingly perfect candidates for a bedroom bench makeover. They’re long, narrow, sturdy, and often already the right height for sitting. Instead of letting yours weather away on the patioor hunting endlessly online for “the perfect end of bed bench”you can give it a second life indoors.
Design and Function in One Piece
An end-of-bed bench does more than just look pretty. It gives you a place to:
- Sit while you put on shoes or socks
- Lay out tomorrow’s outfit or fold laundry
- Stack extra blankets, pillows, or quilts
- Create a visual “finish line” that makes the bed look intentional and complete
Designers often use benches at the foot of the bed to anchor the room and make a basic bed frame feel custom. Retailers and home-styling pros recommend choosing a bench that’s slightly shorter than the mattress width for the most balanced look, whether you’re working with a queen or king-size bed.
Save Money and Reduce Waste
Buying a new upholstered end-of-bed bench can easily cost a few hundred dollars, especially if you want something solid and stylish. By transforming a picnic bench, you:
- Reuse furniture instead of sending it to the landfill
- Customize the exact fabric, color, and texture you want
- Spend most of your budget on quality foam and durable fabric instead of new furniture
In short, you get a custom “designer” bedroom bench at a DIY price.
What You’ll Need for Your Picnic Bench Makeover
Before you start stapling anything, gather your supplies. The original Remodelaholic-style project keeps the materials list simple so the transformation stays approachable even if you’re not a pro upholsterer.
Basic Tools and Materials
- Picnic bench (or any long, sturdy wooden bench)
- Upholstery foam (usually 2–3 inches thick works well for a comfy top)
- Cotton batting to soften edges and smooth the foam
- Upholstery fabric or durable home décor fabric
- Staple gun and 1/4″–3/8″ staples (an electric stapler makes the job easier)
- Scissors or a utility knife for cutting foam and fabric
- Measuring tape or yardstick & pencil
- Optional: sandpaper, primer, and paint or stain for the wood base
If your bench has seen better days outdoors, you may also want wood filler, a sander, and a sealer to help refresh the frame before you add your new upholstered top.
Step-by-Step: From Picnic Bench to Cozy End-of-Bed Bench
Take your time with each step, and you’ll finish with a sturdy, polished bench that looks like it came from a custom furniture shopnot the backyard.
Step 1: Clean and Inspect the Bench
Start by giving your picnic bench a good cleaning. Wipe away dirt, cobwebs, and any old finish that’s flaking off. Check for:
- Loose screws or bolts tighten or replace as needed
- Splinters or rough edges sand these down
- Dented or damaged boards repair or replace if necessary
The goal is a strong, stable base. You don’t want your “new” bedroom bench to wobble every time you sit down.
Step 2: Paint or Refinish the Base (Optional but Recommended)
If the wood has weathered or doesn’t match your bedroom décor, now is the perfect time to refinish it:
- Lightly sand the entire base to remove shine and rough patches.
- Wipe away dust with a tack cloth or damp rag.
- Apply a coat of primer if you’re painting, or a pre-stain conditioner if you’re staining.
- Finish with paint or stain in your chosen colorwhite for a farmhouse look, black for modern, or warm wood tones for a cozy, classic vibe.
Let the finish dry completely before moving on. This step alone can take your bench from “old picnic table” to “hello, high-end furniture.”
Step 3: Measure and Cut the Foam
Next, it’s time to add comfort. Measure the top of your bench: length and width. Use those measurements to mark your foam. A regular density upholstery foam works well; you don’t need the super-expensive variety for a bedroom bench that won’t see heavy traffic like a sofa.
- Mark the foam using a marker and a straight edge.
- Cut the foam with a sharp utility knife or an electric carving knife, cutting slowly for clean edges.
- Dry-fit the foam on top of the bench to ensure it matches the surface.
The foam should sit flush with the edges of the bench top without hanging over or leaving gaps.
Step 4: Wrap the Foam in Batting
Batting is your secret weapon for a professional, rounded look. It softens the corners and keeps the fabric from rubbing directly against the foam.
- Lay the batting flat on your work surface.
- Place the foam on top, then position the bench (seat side down) on top of the foam.
- Pull the batting up and around the foam and bench edges, like wrapping a present.
- Staple the batting to the underside of the bench seat, starting from the center of each side and working toward the corners.
Keep the batting snug, but not so tight that it compresses the foam too much. Trim excess batting once it’s fully stapled.
Step 5: Cut and Position Your Upholstery Fabric
Now for the fun part: the fabric. This is where you lock in your bedroom style. You might choose:
- Linen or cotton for a casual, airy look
- Velvet for a rich, hotel-worthy vibe
- Performance fabric for kid- or pet-friendly durability
- Patterned fabric (like stripes or florals) to tie in with your bedding or rug
Cut the fabric so that it extends several inches past the edge of the bench on all sides. Remember: you need enough to pull and staple underneath while still keeping the top smooth.
Step 6: Staple the Fabric for a Smooth, Taut Finish
With the fabric centered and right-side down, place the bench (foam and batting side down) on top of it.
- Start on one long side: pull the fabric up and over, then staple in the center.
- Move to the opposite side, pull firmly (but not so tight that you distort the foam), and staple in the center.
- Repeat the process on the short ends.
- Work your way out toward the corners, alternating sides to keep tension even.
At the corners, fold the fabric neatly like wrapping a gift. You can choose a single pleat, double fold, or hospital-corner style depending on how tailored you want the corners to look.
Step 7: Final Touches and Placement
Once all the fabric is stapled, trim excess on the underside. Flip the bench over and inspect the top and sides. If there are minor puckers, you can remove a staple or two and restretch that area.
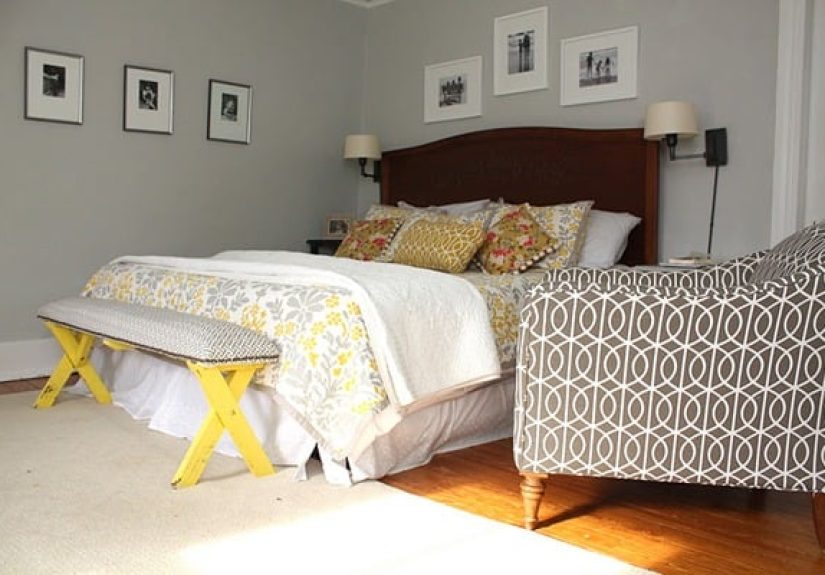
When you’re happy with the look, carry your bench into the bedroom and place it at the foot of the bed. Align it so it is centered on the mattress. Stand back and admire your workyou just transformed an outdoor staple into a cozy bedroom feature.
Styling Ideas for Your New End-of-Bed Bench
Now that your DIY end-of-bed bench is done, it’s time to style it like the pros do.
Keep It Functional
- Fold a chunky knit throw or quilt and drape it over one end.
- Stack two or three accent pillows in coordinating colors to your duvet or headboard.
- Use a decorative tray to corral a book, candle, or small plant.
If you like the idea of storage, you can slide low baskets or bins under the bench to hold slippers, magazines, or extra linensgreat for smaller bedrooms where every inch counts.
Match Your Bench to Your Bedroom Style
End-of-bed benches come in a wide range of looks in stores, from modern and minimal to rustic and traditional. Designing yours gives you a similar level of flexibility:
- Modern: Go for solid neutral fabric (like gray or taupe) and a dark painted base.
- Farmhouse: Think white or distressed wood with linen, ticking stripe, or subtle plaid fabric.
- Coastal: Choose light woods, soft blues, and sandy neutrals for a breezy, relaxed feel.
- Classic: Try rich navy or deep green upholstery with warm wood tones.
Home stylists often recommend keeping the bench in the same general color family as your bedding or rug to tie the whole room together.
Common Mistakes to Avoid
DIY projects can get a little messyliterally and figuratively. Here are a few pitfalls to watch out for when turning your picnic bench into a bedroom-ready bench.
1. Bench Too Long or Too Short
For the most polished look, aim for a bench that is about 2–6 inches shorter than the width of your mattress. A bench that’s much smaller can look undersized; one that’s longer than the bed can make the room feel crowded or oddly proportioned.
2. Skimping on Foam Quality
Very thin or low-density foam can make a bench feel hard and uncomfortable. Investing in decent upholstery foam adds comfort and helps the top keep its shape instead of sagging or going lumpy over time.
3. Using Delicate or Hard-to-Clean Fabric
That gorgeous silk or delicate open-weave fabric might look beautiful at first, but everyday use can wear it out quickly. A sturdier upholstery or home décor fabric will last longer, resist stains, and be easier to spot-clean.
4. Not Securing the Base
Make sure all screws, bolts, or joints on the bench base are tightened. If the bench wobbles when you sit down, it might need extra bracing or reinforcement, especially if it was originally built for outdoor use and has weathered over time.
Is a DIY End-of-Bed Bench Right for You?
If you like a project that’s high impact but doesn’t require advanced carpentry skills, this is a perfect weekend makeover. You’ll get:
- A custom upholstered bench that fits your bed and room exactly
- A chance to reuse and upcycle existing furniture
- Extra functionality and comfort in your bedroom
- The satisfaction of saying, “Thanks, I made it!” when people compliment your room
Whether you’re refreshing a primary bedroom, a guest room, or even a teen’s room, an end-of-bed bench is one of those pieces that instantly makes the space feel more finished, cozy, and lived-inin the best possible way.
Real-Life Experiences: Living with a Picnic Bench Turned End-of-Bed Bench
Once you’ve built your bench, the fun really starts when you begin using it every day. Here are some lived-in lessons and practical experiences that people often share after adding a DIY bedroom bench to their homes.
The Morning Routine Upgrade
One of the first things you’ll notice is how much easier your morning routine becomes. Instead of hopping around on one foot while trying to pull on socks or jeans, the bench gives you a stable place to sit. It sounds small, but over time the comfort adds upespecially if your bedroom is short on seating.
Many people find that the bench naturally becomes a “staging area” for their day. You might:
- Lay out your outfit the night before to save time in the morning
- Stack gym clothes or work bags so you can grab them on the way out
- Use the bench as a quiet spot to journal or check your planner
If you’ve ever draped clothes over a chair or the end of the mattress (guilty!), the bench gives you a more intentional, tidy landing zone.
The Blanket and Pillow Parking Lot
Another big win is blanket management. Extra quilts, comforters, and decorative pillows can easily take over your bed or disappear into a closet. With an end-of-bed bench, you have an easy spot to stack them when you’re not using them.
Some DIYers even use a firmer foam and durable fabric so they can stack hefty knit blankets or a folded duvet without worrying about the bench top sagging or creasing. If your room is chilly, you can keep a heavier blanket folded on the bench so it’s within arm’s reach on cold nights.
Guests Love It (Even If They Don’t Say So)
If your project bench ends up in a guest room, it makes a surprisingly big difference in how comfortable the space feels. Guests can put suitcases on the bench for easy access instead of bending all the way to the floor. They can sit to tie shoes without dragging a desk chair over or perching on the side of the mattress.
Even if no one comments on it directly, the bench signals: “This room was thoughtfully put together for you.” That’s a small design detail with big hospitality vibes.
Durability: How It Holds Up Over Time
The long-term success of your DIY bench comes down to two things: how solid the original picnic bench was and the quality of your materials. If you started with a sturdy, well-built bench and used decent foam and upholstery fabric, you’ll likely enjoy your new piece for years.
Over time, you may notice a few minor signs of wear: a wrinkle in the fabric, a dent where you always sit, or a scuff on the bench legs. The upside of a DIY project is that you know exactly how it was built. You can:
- Flip or replace the foam if it ever loses its bounce
- Reupholster the bench with new fabric when you change your bedroom color scheme
- Touch up paint or stain on the base when needed
Instead of being “stuck” with a factory-finished bench, you have a flexible, customizable piece that can evolve with your style.
Style Confidence Booster
There’s also a hidden benefit: making this bench can boost your confidence with DIY home projects. Once you’ve tackled upholstery, foam cutting, and simple refinishing, other décor projectslike making a headboard, building a storage bench, or re-covering dining chairsstart to feel more approachable.
You’ll walk into home stores, see high-priced benches, and think, “I can make that.” And you’ll be right.
When the Bench Becomes the Room’s Star
Finally, don’t be surprised if your transformed picnic bench becomes the unexpected star of the bedroom. Visitors may ask where you bought it. Family members might migrate to your room just to sit and chat. Pets may decide the end-of-bed bench is their new kingdom.
All from a piece of furniture that used to live outside under the sun and rain. Not bad for a weekend project, a few yards of fabric, and a trusty staple gun.
Conclusion
Turning a picnic bench into an end-of-bed bench is one of those satisfying DIY projects that hits the sweet spot: simple, affordable, and incredibly rewarding. You get a custom bedroom bench that fits your style, makes everyday routines easier, and adds a designer finish to your space.
With a sturdy bench base, good foam, some batting, and fabric you love, you can create a cozy, functional end-of-bed bench that looks like it belongs in your favorite Remodelaholic featurebecause now, it kind of does.


