
Table of Contents >> Show >> Hide
- 1) Get clear on your “why” before you pick tile
- 2) Measure the space like a skeptic (because the walls might not be square)
- 3) Plumbing: the part you can’t “Pinterest” your way through
- 4) Waterproofing: the unsexy hero of the entire conversion
- 5) Ventilation and moisture control: your shower needs an escape plan
- 6) Materials: prefab vs. tile vs. solid-surface (and why your cleaning habits should vote)
- 7) Accessibility and safety: upgrades that don’t feel like “hospital chic”
- 8) Budget and timeline: where “hidden costs” like to hide
- 9) Permits, codes, and inspections: annoying, but protective
- 10) Hiring the right help: how to avoid the “half-finished shower saga”
- Pre-demo planning checklist (so you don’t panic-buy tile mid-project)
- Real-world experiences: what people wish they’d known (extra planning wisdom)
- Experience #1: “The drain was the plot twist.”
- Experience #2: “We underestimated how much waterproofing matters.”
- Experience #3: “The shower door became our daily annoyance.”
- Experience #4: “We didn’t plan storage, and shampoo took over the floor.”
- Experience #5: “The fan was too loud, so nobody used it.”
- Experience #6: “Small comfort upgrades made the biggest difference.”
- Conclusion
A tub-to-shower conversion is one of those home upgrades that sounds simple in theory: remove the tub, add a shower, and enjoy the extra breathing room.
In real life, it’s more like, “remove the tub… discover what the tub has been hiding since 1997… then build a shower that won’t leak into your ceiling.”
(Water is patient. Water is persistent. Water keeps receipts.)
Done right, a tub-to-shower conversion can make a bathroom feel larger, easier to use, and more modernespecially if you’re craving a walk-in vibe,
better accessibility, or just fewer acrobatics stepping over a tub wall. The key is planning the unglamorous stuff up front: layout, plumbing, waterproofing,
ventilation, and the sneaky budget “surprises” that like to show up right after demolition.
1) Get clear on your “why” before you pick tile
The best design choices come from the most boring question: How will you actually use this shower?
If it’s the main bathroom for a busy household, you’ll care about durability, easy cleaning, and storage.
If it’s for aging-in-place (now or later), step-in height and grab-bar readiness move to the top of the list.
If you’re remodeling with resale in mind, you’ll want to think twice before removing the home’s only bathtub.
Resale reality check
Plenty of buyers love a beautiful shower. But many still want at least one tub somewhere in the houseespecially families with young kids.
If this is your only full bath, consider whether a tub-shower combo (or keeping a tub elsewhere) makes more sense for your market.
If you have multiple bathrooms, converting one tub to a shower is often a safer bet.
2) Measure the space like a skeptic (because the walls might not be square)
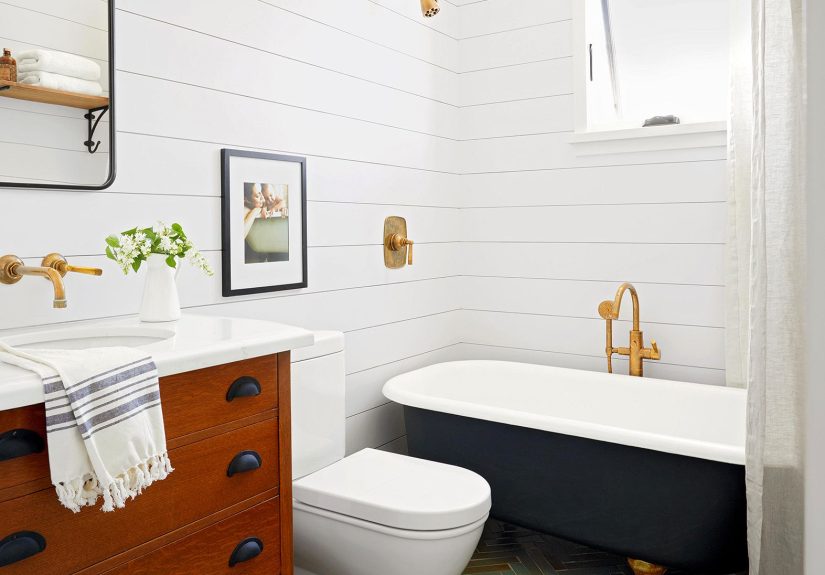
Tub alcoves are usually about 60 inches long, which makes them a natural candidate for a 60-inch shower base and a three-wall enclosure.
That said, “usually” is not a measurement. Bathroomsespecially older onesare famous for walls that lean, floors that slope, and corners that
are more “suggestion” than “right angle.”
Layout decisions that affect everything else
- Door swing: A pivoting glass door needs room. In a tight bath, a sliding door or curtain can prevent daily bruises.
- Toilet clearance: If the shower door opens into the toilet zone, you’ll regret it every morningforever.
- Shower depth: Deeper can feel luxurious, but don’t steal so much space that the bathroom becomes an obstacle course.
- Curbless vs. curb: Curbless looks sleek and improves accessibility, but it requires careful floor slope and drainage planning.
Pro tip: measure at multiple heights (near the floor and higher up). If the width changes, the walls aren’t parallelmeaning prefabricated kits may need
furring/adjustments, and custom tile work needs extra planning.
3) Plumbing: the part you can’t “Pinterest” your way through
Plumbing is where budgets and timelines either behave… or immediately stop behaving.
A simple conversion keeps supply lines and the drain roughly where they are. A more dramatic upgrademoving the drain, adding body sprays,
building a bench, or going curblesscan trigger bigger plumbing work (and sometimes more permits and inspections).
Drain location: the make-or-break detail
Many tubs drain at one end. Many shower bases drain in a different spot (center, offset, or another end).
If you buy a shower pan that doesn’t match your existing drain location, you may need to relocate the drainoften the single most disruptive plumbing change
in this project. That can mean opening the subfloor, working around joists, and potentially reconfiguring venting.
Example: You fall in love with a sleek, center-drain shower pan. Your current tub drain is tight to the left wall.
Moving that drain might be straightforward on a slab (sometimes) or complicated on a wood-framed floor (often), depending on joist direction and access
from below. Matching the pan to the existing drain can save a lot of labor.
Valve height and fixture choices: small decisions, big daily impact
The shower valve is not a “set it and forget it” choice. Consider:
- Thermostatic or pressure-balancing control: Helpful if someone flushes a toilet and your shower suddenly turns into a surprise weather event.
- Handheld shower head: Great for cleaning the shower, rinsing kids, washing the dog, or making life easier for mobility needs.
- Diverters and extra outputs: Rain head + handheld looks spa-like, but requires planning for water pressure and plumbing layout.
4) Waterproofing: the unsexy hero of the entire conversion
If you remember only one thing, let it be this: tile and grout are not waterproof.
They’re part of a system. The waterproofing is what sits behind (or under) the pretty surfaces and prevents water from turning your wall cavity into a
surprise science experiment.
Pick a system and stick with it
The safest approach is using a complete waterproofing system with clear manufacturer instructionsespecially for transitions, corners, niches,
and plumbing penetrations. Mixing random products (“this membrane + that tape + vibes”) is how leaks happen.
- Sheet membranes can provide consistent thickness and reliable seams when installed correctly.
- Liquid-applied membranes can work well but require correct thickness and cure time.
- Preformed shower pans/curbs can reduce guesswork, but only if the subfloor is properly prepared and level.
Whatever you choose, plan for waterproofing before framing the niche, installing the bench, or committing to tile layout.
A niche placed “where it looks good” is greatunless it lands on plumbing, a stud bay that can’t be moved, or a waterproofing detail that becomes a headache.
5) Ventilation and moisture control: your shower needs an escape plan
Converting a tub to a shower often increases daily steamespecially if you upgrade to a bigger shower head or enjoy longer showers.
Moisture that doesn’t get exhausted ends up in paint, drywall, trim, and eventually places you don’t want to meet.
Fan performance matters more than fan aesthetics
Choose a bathroom exhaust fan that’s appropriately sized for the space and consider a humidity-sensing model that runs long enough to actually clear moisture.
Quiet fans tend to get used more (funny how that works), and a timer switch can be a game-changer.
Lighting matters too: a shower conversion is a good time to add layered lighting (ambient + task + shower-safe lighting) so the space feels bright,
safe, and not like you’re showering in a cave.
6) Materials: prefab vs. tile vs. solid-surface (and why your cleaning habits should vote)
The best material choice is the one that matches your lifestyle. A custom tiled shower can look incredible, but it can also create more maintenance,
especially if you choose small tiles with lots of grout lines. Prefabricated surrounds can be easier to clean and quicker to install, while solid-surface
panels offer a sleek look with minimal seams.
Quick comparison
- Prefabricated kit (acrylic/fiberglass): Usually fastest, often budget-friendly, fewer grout lines, easier cleaning.
- Custom tile: Maximum design flexibility, can be very durable, but demands excellent waterproofing and good workmanship.
- Solid-surface panels: Modern look, fewer seams, typically easier maintenance than tile, can be mid-to-high cost.
Also consider slip resistance for the shower floor. “Beautiful” is great, but “beautiful and not slippery” is better.
If you’re doing tile, mosaics can provide more traction because of the grout jointsbut again, more grout means more cleaning.
7) Accessibility and safety: upgrades that don’t feel like “hospital chic”
Accessibility features can look stylish and feel luxurious when planned well. Think of them as “future-proofing,” not “giving up.”
You can add stability and ease of use without making the bathroom feel clinical.
Smart safety features
- Low-threshold entry: Reduces tripping risk and makes the shower easier to use.
- Blocking for grab bars: Add reinforcement in the walls during framing so you can install grab bars later (or now) wherever you want.
- Built-in bench or fold-down seat: Great for comfort, shaving legs, or anyone who needs to sit.
- Handheld on a slide bar: Helps users of different heights and mobility levels.
- Anti-scald protection: Worth it for kids, older adults, and anyone who hates temperature surprises.
8) Budget and timeline: where “hidden costs” like to hide
Tub-to-shower conversions can range from fairly straightforward to “we found water damage and now we’re rebuilding part of the bathroom.”
The biggest budget swings usually come from:
- Demolition discoveries: rot, mold, leaking pipes, damaged subfloor, or old plumbing that needs updates.
- Plumbing relocation: especially moving drains or changing venting paths.
- Upgraded finishes: custom tile, frameless glass, niches, benches, linear drains, premium fixtures.
- Permits and inspections: vary by location and scope of work.
- Lead times: specialty glass and certain fixtures can slow the schedule.
A good plan includes a contingency fund (because the wall behind the tub has not signed a contract agreeing to behave).
If you’re hiring a contractor, ask how they handle change orders and what happens if inspections or product delays hit the timeline.
9) Permits, codes, and inspections: annoying, but protective
Many areas require permits when you alter plumbing, electrical, or structural elements. Even if it feels like a “simple bathroom update,”
local code requirements may applyespecially if you’re relocating a drain, adding new circuits, moving a fan, or changing the waterproofing assembly.
The upside of permits (besides staying on the right side of local rules): inspections can catch issues before tile goes up, when fixes are still manageable.
Skipping this step can become a problem laterparticularly if you sell the house or discover a leak after everything is finished.
10) Hiring the right help: how to avoid the “half-finished shower saga”
The fastest way to ruin a tub-to-shower conversion is to hire someone who treats waterproofing as optional.
When you interview contractors, you’re not just hiring “a person with tools.” You’re hiring a plan, a system, and follow-through.
Questions worth asking
- What waterproofing system do you use, and why?
- Will you document waterproofing steps (photos) before tile?
- How do you handle out-of-plumb walls and uneven floors?
- What’s included in the quotedemo, disposal, repairs, permits, glass, fixtures?
- What’s the warranty on workmanship, and what does it actually cover?
Get multiple estimates, compare scopes line-by-line, and don’t be shy about asking for references or photos of similar projects.
A good contractor won’t be offended; they’ll be prepared.
Pre-demo planning checklist (so you don’t panic-buy tile mid-project)
- Decide the goal: daily convenience, accessibility, style upgrade, resale strategyor a mix.
- Confirm the layout: door type, clearances, niche/bench placement, storage, lighting.
- Lock in the drain plan: match the shower pan to the drain if possible; plan relocation if not.
- Choose the waterproofing system: and confirm who’s responsible for each step.
- Ventilation plan: fan capacity, placement, timer/humidity sensor, duct routing.
- Finalize materials: walls, floor, grout/caulk strategy, glass type, fixtures.
- Plan for surprises: set aside contingency budget and timeline slack.
- Permits/inspections: check requirements early to avoid delays.
Real-world experiences: what people wish they’d known (extra planning wisdom)
If you talk to homeowners after a tub-to-shower conversionwhen the dust has settled and they’ve showered in the new space for a few weeksyou’ll hear
the same themes pop up again and again. These aren’t “technical specs.” They’re the lived-in lessons that only show up once the shower is part of your routine.
Experience #1: “The drain was the plot twist.”
One of the most common stories goes like this: someone chooses a shower pan based on looks, only to discover the drain doesn’t match the existing plumbing.
That mismatch can trigger extra demo, subfloor work, and plumbing labor. The lesson: treat drain location like a non-negotiable constraint early.
If you truly want a different drain position (like a sleek linear drain), plan for it up front and accept that it’s a premium featurenot a casual swap.
Experience #2: “We underestimated how much waterproofing matters.”
People often assume tile is the waterproof layer because… well, it’s tile. Then they learn (sometimes the hard way) that the real protection is behind the tile:
membranes, sealed seams, correctly treated corners, and careful detailing around valves and niches. Homeowners who are happiest long-term tend to be the ones
whose installers used a clear system, didn’t rush cure times, and were meticulous about transitions. The takeaway: ask about waterproofing like you’re interviewing
someone to babysit your dog. You want specifics, not confidence.
Experience #3: “The shower door became our daily annoyance.”
A frameless pivot door looks gorgeousuntil it swings into the toilet area, clips a towel bar, or splashes water onto the bath mat because the sweep doesn’t
seal well. Many people end up wishing they’d mocked up the door swing with painter’s tape on the floor before committing.
Sliding doors can be a lifesaver in tight bathrooms, and a curtain (yes, a curtain) is still an MVP for flexibility and easy replacement.
The moral: don’t pick the door last. It’s not “an accessory.” It’s a moving part you’ll use every day.
Experience #4: “We didn’t plan storage, and shampoo took over the floor.”
A new shower feels spacious on day oneuntil you add bottles, razors, loofahs, and the mysterious collection of half-used products everyone owns.
People who planned a niche (or two) in the right place tend to love their showers more. People who didn’t… end up with corner caddies and suction-cup shelves
that fall at 2 a.m. like a tiny, slippery percussion section. Planning tip: decide where products will live and keep them reachable without bending or twisting.
If accessibility matters, include a lower niche or shelf that can be used from a seated position.
Experience #5: “The fan was too loud, so nobody used it.”
This one is surprisingly common. A loud fan becomes background noise people avoid, which means moisture lingers longer, and the bathroom feels damp more often.
Homeowners who upgraded to a quieter fan or added a timer switch report better comfort and fewer moisture worries. If your conversion increases steam output,
a fan that runs effectively (and quietly) is one of the best “invisible upgrades” you can make.
Experience #6: “Small comfort upgrades made the biggest difference.”
When people reflect on what they love most, it’s not always the fancy tile pattern. It’s often simple upgrades:
a handheld shower head, a bench that’s actually comfortable, a shelf that fits big bottles, lighting that’s bright but not harsh, and a shower floor that
feels stable underfoot. The big lesson: function is not boring. Function is luxury you feel every day.
Put together, these experiences point to the same conclusion: the best tub-to-shower conversions aren’t just “installed.”
They’re planned around real habitshow you move, what you reach for, what annoys you, and what keeps the space easy to maintain.
If you plan for the daily routine (and the unglamorous details behind the walls), your shower won’t just look good on day oneit’ll still feel great
on day 1,000.
Conclusion
A tub-to-shower conversion can be a fantastic upgrade, but it rewards careful planning.
Start with your goals (daily use, accessibility, resale), measure precisely, respect the realities of plumbing and drain location, and treat waterproofing
like the foundation it is. Add strong ventilation, choose materials that match your cleaning habits, and plan comfort features that make the shower better
every single daynot just prettier in photos.
Whether you DIY parts of the project or hire a pro, the smartest approach is the same: plan first, demo second.
Your future self (and your drywall) will be grateful.


