Table of Contents >> Show >> Hide
- Before You Start: The 60-Second Renter Reality Check
- 1) Peel-and-Stick Wallpaper (or Tile Decals) for a Statement Moment
- 2) Swap the Showerhead for a “Spa Day” Upgrade
- 3) Upgrade the “Soft Stuff”: Shower Curtain, Towels, Bath Mat
- 4) Replace Cabinet Hardware (and Maybe the Toilet Seat)
- 5) Make Lighting Feel Better (Without Rewiring Anything)
- 6) Add Storage That Doesn’t Require Holes: Over-the-Toilet, Under-Sink, and Adhesive Helpers
- 7) “Fake Built-In” Style: Removable Floor Tile, Backsplash Panels, or a Vanity Skirt
- Putting It All Together: A Quick “Pick Your Upgrade” Guide
- Conclusion
- Renter Real Talk: Experiences and Lessons From Temporary Bathroom Upgrades
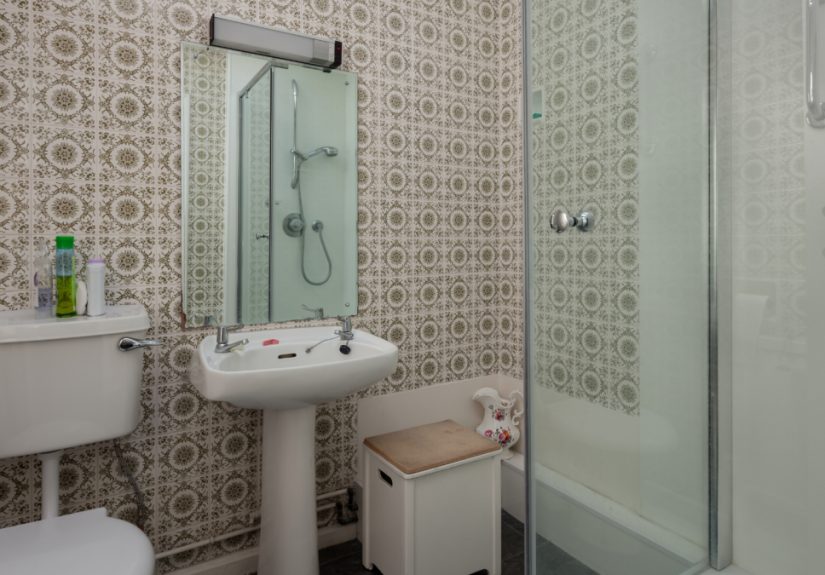
Rental bathrooms have a special talent: they can be completely functional and still feel like you’re living inside a “before” photo.
The beige. The builder-grade lighting. The mirror that looks like it was installed during the dial-up era. And yetbecause you’re renting
you can’t just start demo day like you’re starring in your own home renovation show.
The good news: you don’t need to swing a sledgehammer to make a bathroom feel cleaner, brighter, and more “you.”
The best renter-friendly bathroom upgrades are temporary, reversible, and deposit-respectingmeaning you can peel, unhook, unscrew,
and walk away like nothing ever happened (except your bathroom looks amazing in photos).
Below are seven high-impact, low-commitment upgrades that can transform a rental bathroom without permanent changes. Each idea includes
practical tips, common mistakes to avoid, and examples so you can pick the options that match your space, budget, and landlord tolerance.
Before You Start: The 60-Second Renter Reality Check
- Read your lease. Some rentals allow small hardware swaps; others want written approval.
- Save every original piece. Put the old showerhead, knobs, and screws in a labeled zip bag.
- Test first. Try adhesives in a hidden spot for 24–48 hours, especially in humid bathrooms.
- Think “remove cleanly.” Your goal isn’t just a glow-upit’s a glow-up with an exit strategy.
1) Peel-and-Stick Wallpaper (or Tile Decals) for a Statement Moment
If your bathroom walls are giving “blank hotel energy,” removable wallpaper is your fast track to personality.
It’s one of the most popular temporary bathroom makeover tools because it’s high visual impact with minimal tools:
a smoothing card, a sharp blade, and the confidence of someone who has watched exactly one DIY video.
Where it works best
- Powder rooms (less steam, fewer adhesion tantrums)
- One accent wall behind the toilet or vanity
- Cabinet sides or the back wall of open shelving for a subtle pop
Smart example
Try a small-scale pattern (thin stripes, micro florals, or soft geometric) on the wall behind your mirror. It adds depth without
making a tiny bathroom feel like a kaleidoscope is chasing you.
Pro tips for humid bathrooms
- Clean walls with mild soap and water, then let them dry fully (moisture is the enemy of “sticking”).
- Start with a small section and align carefullycrooked wallpaper screams louder than a squeaky faucet.
- Use removable options designed for repositioning; quality matters more than you think.
Common mistake: Applying on dusty, textured, or peeling paint. Adhesive products cling best to smooth, clean surfaces.
If your wall is textured like a stucco mountain range, consider tile decals, framed art, or a fabric shower curtain “wall” instead.
2) Swap the Showerhead for a “Spa Day” Upgrade
Few renter-friendly bathroom upgrades feel as instantly luxurious as a better showerhead.
A rainfall-style head, a high-pressure option, or a handheld setup can make daily showers more comfortableand yes,
it can also make your bathroom feel newer, even if the tile still looks like it’s seen things.
How to keep it renter-safe
- Unscrew the existing showerhead (usually counterclockwise). A cloth-wrapped adjustable wrench helps if it’s stuck.
- Use plumber’s tape on the threads to prevent leaks.
- Install the new showerhead by hand first, then snug gentlytight enough to seal, not tight enough to start a feud with the plumbing.
- Store the original showerhead so you can reinstall it before moving out.
Smart example
In a small shower, a handheld showerhead with multiple spray settings improves rinsing (especially if your shower’s “pressure”
is more of a “sad drizzle”). Pair it with a removable caddy for a tidy, upgraded look.
Common mistake: Overtightening. If it leaks, add tape and re-seat itdon’t Hulk-smash the connection.
When in doubt, keep the upgrade simple and avoid anything that requires drilling into tile or altering the plumbing behind the wall.
3) Upgrade the “Soft Stuff”: Shower Curtain, Towels, Bath Mat
Want the easiest rental bathroom refresh imaginable? Textiles. They’re the bathroom equivalent of a good haircut:
you look like you tried, even if you didn’t.
What to change for the biggest payoff
- Shower curtain: Choose a fabric curtain that looks intentional (linen-look, waffle weave, subtle pattern).
- Bath mat: Go thicker and plusher for a boutique hotel vibeyour feet will write you thank-you notes.
- Towels: Stick to a coordinated palette (two main colors, one accent) for a calmer look.
Smart example
A white or cream shower curtain with texture + charcoal towels + a warm wood stool (or storage bench) creates a modern, clean look
even if your bathroom fixtures are dated. It’s design camouflage, and it works.
Common mistake: Mixing too many bold patterns in a small space. If your tiles are busy, keep textiles calm.
If your bathroom is plain, let the shower curtain be the star.
4) Replace Cabinet Hardware (and Maybe the Toilet Seat)
This is the “small change, big difference” category. If your vanity has knobs that feel like they came from a clearance bin in 1998,
swapping hardware is a fast way to modernize your bathroom without touching anything structural.
What you can swap safely
- Vanity knobs and pulls (most are a simple screw swap)
- Towel bars or rings only if they’re mounted with screws you can reinstall later
- Toilet seat (often two bolts; keep the original and clean it before storing)
Smart example
Matte black or brushed nickel pulls can make a basic vanity look more custom. For a lighter look, choose warm brass
(especially if your bathroom has beige tile and needs a little “glow”).
Common mistake: Buying new hardware without measuring hole spacing. Bring a measuring tape and confirm the center-to-center distance
for pulls. For knobs, ensure the screw length works with your cabinet thickness.
5) Make Lighting Feel Better (Without Rewiring Anything)
Rental bathroom lighting can be… brave. Sometimes it’s harsh, sometimes it’s dim, and sometimes it’s both, which feels like an achievement
no one asked for.
Renter-friendly ways to improve light
- Swap bulbs: Choose bright, flattering LEDs for a cleaner look and better visibility.
- Add stick-on puck lights: Great inside cabinets or above shelving (look for moisture-appropriate options).
- Use a plug-in vanity light or sconce: If you have an outlet nearby, plug-in options can add style without electrical work.
- Cover an ugly fixture visually: Decorative valances or clever covers can hide eyesores in a reversible way.
Smart example
If your mirror area is dim, add two battery-operated puck lights under an upper shelf or medicine cabinet lip for a soft, even glow.
It’s surprisingly effective for makeup, shaving, and the existential bathroom stare.
Common mistake: Attempting electrical fixture replacement without permission or experience.
Keep it plug-in, bulb-based, or battery-powered unless your landlord approves and a qualified person handles wiring.
6) Add Storage That Doesn’t Require Holes: Over-the-Toilet, Under-Sink, and Adhesive Helpers
Many rental bathrooms aren’t smallthey’re “creative.” And by creative, we mean there’s never enough storage.
The fix isn’t renovating. It’s outsmarting the square footage.
Easy storage wins
- Over-the-toilet shelving: Uses vertical space and can look surprisingly polished.
- Under-sink organizers: Stackable drawers, turntables, and bins keep chaos contained.
- Tension rods: Add one under the sink for spray bottles or hang baskets for extra supplies.
- Adhesive hooks and strips: Hang towels, robes, or hair tools without drilling.
Smart example
Put an over-the-toilet shelf above the tank, then use matching baskets on the shelves: one for extra toilet paper, one for skincare backups,
one for cleaning supplies. Suddenly your bathroom looks organized on purpose.
Common mistake: Overloading adhesive hooks. Follow weight limits and prep the surface.
For steamy bathrooms, choose hooks made for humid environments and allow the adhesive to set fully before hanging items.
7) “Fake Built-In” Style: Removable Floor Tile, Backsplash Panels, or a Vanity Skirt
If your bathroom floor is outdated (or just offensively beige), removable solutions can create a major visual upgrade.
Peel-and-stick flooring and backsplash-style panels can modernize a rental bathroom fastwhen you choose wisely and install thoughtfully.
Options to consider
- Peel-and-stick floor tile: Great for covering old vinyl or tired-looking floors.
- Peel-and-stick backsplash panels: Add a “tile” look behind the sink or on a small feature area.
- Vanity skirt: A tension rod + fabric can hide an ugly pedestal sink area or under-sink clutter in a soft, stylish way.
Smart example
In a small bathroom, a peel-and-stick “classic” pattern (subway, marble-look, simple geometric) reads more expensive than a super busy print.
Add a matching bath mat and suddenly the entire room feels coordinated.
How to keep it removable
- Clean and dry the surface thoroughly before installing.
- If you’re worried about residue, consider a removable barrier layer strategy (especially on delicate surfaces).
- When removing, use gentle heat (like a hairdryer) and peel slowly to reduce damage risk.
Common mistake: Installing over deeply textured tile or heavy grout lines and expecting a perfectly smooth finish.
If your existing tile has big grooves, you may see the pattern telegraph through. In that case, lean into rugs, a vanity skirt,
or a smaller backsplash panel placement that avoids problem areas.
Putting It All Together: A Quick “Pick Your Upgrade” Guide
- If your bathroom feels boring: Add peel-and-stick wallpaper or a bold shower curtain.
- If it feels dingy: Upgrade lighting (bulbs + add-on lights) and swap textiles.
- If it feels cluttered: Over-the-toilet storage + under-sink organizers + adhesive hooks.
- If it feels outdated: New hardware + removable tile/flooring accents + a better mirror vibe.
- If your showers make you sad: Showerhead swap first. Always.
Conclusion
A renter-friendly bathroom upgrade isn’t about pretending you own the placeit’s about making your daily life better while you live there.
The best temporary bathroom upgrades focus on what you see and touch every day: lighting, storage, textiles, and a few strategic swaps that
feel high-end but reverse cleanly.
Start with one change that solves an everyday annoyance (no storage, bad lighting, weak shower pressure), then build from there.
When you move, take your upgrades with you, reinstall the originals, and leave behind nothing but a suspiciously improved bathroom
and a landlord who wonders, “Why doesn’t everyone do this?”
Renter Real Talk: Experiences and Lessons From Temporary Bathroom Upgrades
Renters tend to learn the same bathroom lessons the hard wayusually at 11:47 p.m. on a Tuesday, holding a crooked roll of wallpaper
and questioning every life choice that led to “DIY accent wall night.” The upgrades above work, but the experience of doing them in a real
rental bathroom (with steam, weird surfaces, and the world’s least helpful overhead light) teaches a few practical truths.
First: humidity changes the game. People often assume “removable” means “works anywhere,” but bathrooms are basically
indoor weather systems. A peel-and-stick product that behaves perfectly in a bedroom can get moody in a steamy shower space.
Many renters have their best luck using removable wallpaper in powder rooms or on walls that don’t get directly blasted with steam
like the wall behind a vanity mirrorthen relying on textiles (curtains, towels, mats) for the rest of the personality.
Second: the clean-and-dry step is not optional. The most common “why did my hook fall off?” story is also the most boring:
it was stuck to a surface with soap film, dust, or leftover cleaner residue. The fix is simple: wipe with mild soap and water, rinse,
dry fully, and wait. Several renters swear the “wait” part is the secret sauceapplying an adhesive hook and letting it set
before loading it up with wet towels.
Third: the best upgrades solve an everyday annoyance. The most loved changes aren’t always the most dramatic.
A handheld showerhead that makes rinsing quicker. A better bath mat that doesn’t slide around like it’s training for ice skating.
An over-the-toilet shelf that stops the “where do we put anything?” argument. Even swapping cabinet pulls can make a vanity feel cleaner
and more modernsmall change, big brain.
Fourth: measure twice, buy once… then keep the receipt anyway. Rental bathrooms are full of surprises:
cabinet doors with unusual thickness, towel bars mounted in inconvenient spots, vanities that look standard but aren’t.
Renters who have done this a few times tend to bring a tiny “bathroom kit” when shopping: measuring tape, a few photos on their phone,
and a note with hardware hole spacing. That little prep prevents the classic scenario of buying gorgeous pulls that don’t fit
and then aggressively negotiating with a screwdriver.
Fifth: storage upgrades improve the whole mood of the room. A bathroom can look cute on day one and chaotic by day three.
The renters who stay happiest long-term usually add storage early: a shelf, baskets, drawer organizers, and hooks for towels and robes.
It’s not glamorous, but it’s what keeps your countertops from becoming a graveyard of half-used products and open bobby pins.
Finally: the exit strategy is part of the upgrade. The most confident renters treat every change as temporary from the start:
originals go into a labeled bag, “after” photos are taken (for your joy), and removal methods are considered before installation.
That mindset makes the entire process less stressful. You’re not “risking your deposit”you’re running a reversible design experiment.
And honestly, that’s the most renter-friendly power move of all.