
Table of Contents >> Show >> Hide
- Why a DIY Gymnastics Bar Can Work
- Tools and Materials to Gather
- 15 Steps to Build a Simple Gymnastics Bar
- Step 1: Decide What Kind of Bar You Actually Need
- Step 2: Pick a Safe Location
- Step 3: Set the Target Height and Width
- Step 4: Choose the Right Bar Material
- Step 5: Buy Strong Posts and Exterior-Rated Hardware
- Step 6: Mark the Layout Carefully
- Step 7: Dig the Post Holes
- Step 8: Dry-Fit Everything Before You Pour Concrete
- Step 9: Drill Pilot Holes for Wood Fasteners
- Step 10: Install the Bar Connection Points
- Step 11: Set the Posts in Concrete
- Step 12: Mount the Bar and Tighten All Hardware
- Step 13: Add Proper Matting Under and Around the Bar
- Step 14: Test the Bar Before Any Real Training
- Step 15: Create a Routine for Inspection and Safe Use
- Common Mistakes to Avoid
- Who Should Use a DIY Gymnastics Bar?
- Real-Life Experience: What Building a Gymnastics Bar Feels Like
- Conclusion
Building a home gymnastics bar sounds wonderfully simple until you realize you are basically trying to create a piece of sports equipment that needs to survive swinging, hanging, circling, and the occasional “Watch this!” moment. The good news is that a basic low training bar for beginner drills can absolutely be built at home if you plan carefully, choose the right materials, and treat safety like the star of the show rather than an annoying side character.
This guide walks you through a practical, beginner-friendly way to build a fixed, low-height gymnastics bar for home practice. We are not talking about a full competition uneven bars setup, a giant-swing machine, or anything that belongs in an Olympic montage. We are talking about a sturdy home practice bar for simple skills, conditioning, hanging drills, casts, and beginner work.
Note: This project is for a low-height home training bar used with adult supervision, proper landing mats, and coach-approved drills. It is not a substitute for regulation competition equipment, professional installation, or advanced-skill coaching. Do not use a DIY bar for release moves, giant swings, or high-level routines.
Why a DIY Gymnastics Bar Can Work
A simple home gymnastics bar can be useful for building confidence, grip strength, core control, and repetition on basic bar work. Many commercial home bars are designed for young gymnasts and focus on lower heights, moderate working loads, and stable frames rather than elite-level tricks. That tells you something important: a home bar should prioritize stability, reasonable height, proper grip, and lots of matting, not superhero fantasy.
If your goal is everyday practice for beginner and early-intermediate drills, a DIY setup can be a solid option. If your goal is to recreate a full gym in the backyard, your wallet, your lawn, and probably your insurance company would all like a word.
Tools and Materials to Gather
Before you start cutting wood like you are starring in your own home-improvement show, gather the basics. A typical build uses two pressure-treated 4×4 posts, one properly sized bar or heavy-duty pipe, concrete mix, gravel, corrosion-resistant fasteners, a level, drill, pilot bits, tape measure, post-hole digger, wrench set, and thick gymnastics mats. If the bar will live outdoors, use exterior-rated hardware and galvanized fasteners that play nicely with pressure-treated lumber.
15 Steps to Build a Simple Gymnastics Bar
Step 1: Decide What Kind of Bar You Actually Need
Start by choosing the purpose of the bar. Is it for a young gymnast practicing hangs, pullovers, casts, and basic swing drills? Or for an older athlete who needs something more stable and coach-approved for conditioning? A simple fixed low bar is the easiest and safest DIY choice. Skip the temptation to design an adjustable contraption with too many moving parts unless you truly know what you are doing. Fancy is fun until it wobbles.
Step 2: Pick a Safe Location
Choose a flat area with plenty of clearance around the bar. You want room in front, behind, and on both sides for dismounts, stumbles, and those dramatic “I definitely meant to land like that” moments. Indoor setups need enough ceiling height to allow safe hanging and controlled swinging. Outdoor setups should stay away from fences, walls, tree branches, patios, and anything else hard enough to make a bad landing worse.
Step 3: Set the Target Height and Width
Measure the gymnast who will use the bar most often and match the height to beginner training needs, not to competition dreams. Many home training bars sit in a lower range so athletes can practice safely with mats underneath. A wider stance between the supports usually improves stability, while a moderate bar width gives enough room for comfortable grip and movement. Write down your final measurements before buying materials. Guesswork is not a structural strategy.
Step 4: Choose the Right Bar Material
The bar itself matters more than people think. Commercial gymnastics bars often use wood or wood-like surfaces because they offer a better grip feel and handle moisture more naturally than slippery metal. For a home build, the safest route is to use a purpose-made gymnastics rail if you can buy one. If you use steel pipe, choose a strong, heavy-duty option and understand that the grip will feel different from a gym bar. Never use PVC, a random closet rod, or any cracked piece of wood that looks “close enough.”
Step 5: Buy Strong Posts and Exterior-Rated Hardware
For an outdoor fixed bar, pressure-treated 4×4 posts are a common choice because they handle weather better than standard lumber. Use hot-dipped galvanized or other corrosion-resistant fasteners, washers, and bolts, especially when working with treated wood. Cheap interior screws are not your friends here. This is one of those projects where “I saved eight bucks” should not become your family’s cautionary tale for the next decade.
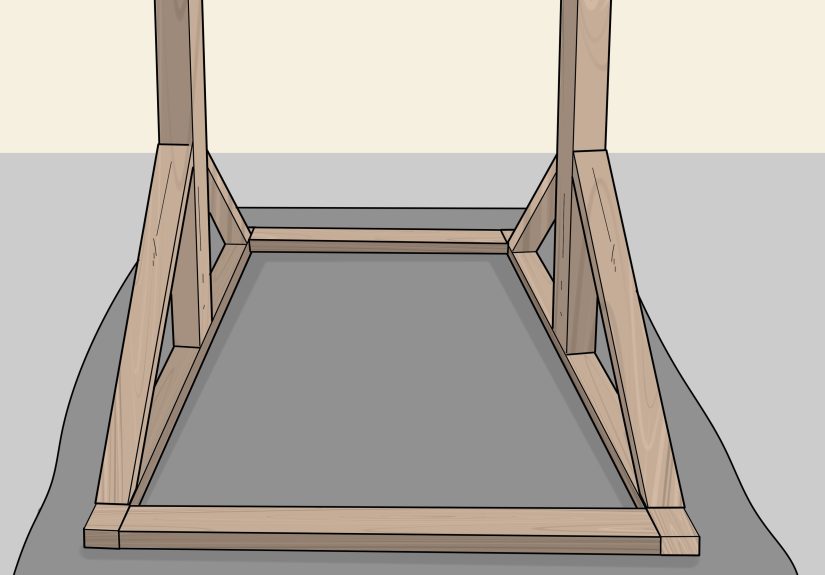
Step 6: Mark the Layout Carefully
Once you know the finished width, mark where each post hole will go. Double-check that the spacing is even and that the bar will end up level. Stand back and picture the full footprint, including mats. Make sure there is room for safe movement and that the posts are aligned exactly where you want them. This is the moment to catch mistakes while they are still pencil marks instead of concrete-filled regrets.
Step 7: Dig the Post Holes
Dig holes deep enough to create a stable base for each upright. In many outdoor builds, depth depends on soil conditions, weather, and frost concerns, but the main goal is simple: the posts should not rock, twist, or shift over time. Add a layer of gravel at the bottom to improve drainage before setting the posts. Wet soil and trapped water are wonderful for weeds and terrible for long-term stability.
Step 8: Dry-Fit Everything Before You Pour Concrete
Before any concrete goes in, place the posts in the holes and do a full dry fit. Check the spacing, bar height, and visual balance. Hold the bar where it will sit and confirm that the setup feels right for the athlete and leaves enough room for mats. This step can save you from the deeply annoying discovery that your “perfect plan” somehow produced a bar that is too high, too low, or oddly crooked.
Step 9: Drill Pilot Holes for Wood Fasteners
Whenever you drive large screws or bolts into wood, drill pilot holes first. Pilot holes reduce splitting, improve screw placement, and make the fasteners seat more cleanly. They are one of those boring details that pay off in a big way. If you skip them, the wood can crack, especially near the ends or edges. Cracked wood in a project like this is not rustic charm. It is an early warning sign.
Step 10: Install the Bar Connection Points
Depending on your design, you may mount brackets, drill through-post openings, or use heavy-duty hardware to secure the bar between the uprights. Whatever method you use, make sure the connection is symmetrical and firmly locked in place. The bar should sit centered and square. Avoid any setup that lets the bar rotate unexpectedly or loosen with repeated swinging. If a connection feels even slightly improvised, improve it before moving on.
Step 11: Set the Posts in Concrete
Once the fit looks right, plumb the posts with a level and brace them in place. Then pour concrete around each post according to the product instructions. Keep checking for plumb while the mix is still workable. It only takes a small lean for a bar to feel wrong later. Let the concrete cure fully. Yes, waiting is annoying. No, “it seems dry enough” is not the same as cured.
Step 12: Mount the Bar and Tighten All Hardware
After the posts are secure, install the bar permanently and tighten every nut, bolt, and fastener. Use washers where needed to spread pressure and reduce wear on the wood. If the bar is metal, inspect the edges and connections so there are no rough or sharp points. A gymnastics bar should feel smooth in the hands and quiet in the structure. Creaking, grinding, or visible twisting are not charming sound effects.
Step 13: Add Proper Matting Under and Around the Bar
Do not stop at the bar itself. The landing zone matters just as much. Use thick gymnastics mats under the bar and in the likely landing area, not a thin yoga mat that gives up emotionally the second someone jumps off. Lower-impact drills may work with firm folding mats, but more cushion is better when falls are possible. If the gymnast is learning new skills, use larger and thicker mats, and check that they do not slide around during practice.
Step 14: Test the Bar Before Any Real Training
Before a gymnast uses the bar, do a slow test sequence. Push on the posts from different angles. Pull down on the bar. Hang from it gently. Add light movement and listen for noise. Look for shifting in the posts, flex in the connections, or loosening in the hardware. If anything moves in a way you did not expect, fix it first. A safe build should inspire confidence, not suspicious side-eye.
Step 15: Create a Routine for Inspection and Safe Use
A gymnastics bar is not a one-and-done weekend project. Inspect it regularly. Check for rust, wood cracks, loose bolts, worn grip surfaces, concrete movement, and mat damage. Keep the area dry and clean. Make a house rule that the bar is only for supervised, coach-approved skills. That one rule can prevent a surprising amount of chaos. Home equipment works best when it comes with boundaries.
Common Mistakes to Avoid
The biggest mistake is building a bar that is stronger in your imagination than it is in real life. Another common error is underestimating mat needs. Parents often spend hours thinking about the frame and about six seconds thinking, “Eh, the grass is soft.” Grass is lovely. Grass is not a landing system.
Other problems include choosing weak materials, using untreated indoor lumber outside, skipping pilot holes, relying on cheap hardware, setting posts without checking plumb, and letting athletes attempt advanced skills because the bar “looks sturdy.” A DIY bar can be useful, but it should have a very clear job description.
Who Should Use a DIY Gymnastics Bar?
This type of build is best for families who want a simple practice station for beginner drills, conditioning, and repetition at home. It can work well for younger gymnasts, especially when a coach helps define which skills are appropriate. It is less ideal for athletes working on advanced bar routines, release skills, or anything that creates high dynamic forces. In those cases, commercial equipment or gym-based training is the smarter route.
Real-Life Experience: What Building a Gymnastics Bar Feels Like
In real life, building a gymnastics bar is a mix of practical problem-solving, mild overconfidence, and repeated trips to the hardware store for the one item you were absolutely sure you already bought. The first surprise for most people is how much the project changes once safety becomes the top priority. At the start, it seems like the bar is the star. By the end, you realize the real heroes are the post depth, the hardware, the level, and the giant mats that keep the whole setup from becoming a terrible idea.
One of the most common experiences is discovering that “sturdy enough” is not a feeling. It is a process. A bar can look great from ten feet away and still wobble the moment someone hangs from it. That is why dry-fitting the posts, checking alignment again, and testing the setup slowly matter so much. Families who rush the final assembly often end up taking the bar apart again because it leans, creaks, or feels a little too lively. And in gymnastics equipment, lively is a word best reserved for athletes, not support posts.
Another real-world lesson is that users quickly notice the difference between a bar that merely exists and a bar that feels good to practice on. Grip matters. Height matters. Landing confidence matters. A gymnast is much more likely to use the bar consistently if the height feels approachable and the mats feel secure. When the setup feels safe, practice becomes more frequent and less dramatic. When it feels sketchy, everyone suddenly becomes interested in snacks and indoor activities.
Parents also tend to learn that supervision changes everything. A simple home bar can be fantastic for structured practice with a clear plan: hangs, pullovers, casts, tap swings, and strength drills. But the same bar can become a magnet for unscheduled stunts the second nobody is watching. That is why the families who have the best experience usually create a routine. Shoes off. Mats down. Approved skills only. Quick safety check before use. It sounds strict until you realize it saves a lot of arguments and prevents the classic sentence, “I was only trying one tiny backflip.”
And then there is the emotional payoff. When the build is done right, a home gymnastics bar becomes more than a project. It becomes part practice station, part confidence builder, and part reminder that thoughtful DIY can genuinely support a child’s interests. There is something satisfying about seeing a gymnast use a bar that was carefully planned, measured, leveled, tested, and built with their safety in mind. That does not mean the project is magical or easy. It means it is worth doing carefully. And honestly, that is the most gymnastics sentence possible: progress looks simple from a distance, but the real success comes from the details.
Conclusion
If you want to build a gymnastics bar at home, keep the project simple, stable, and realistic. Focus on beginner-friendly use, strong materials, corrosion-resistant hardware, thick landing mats, and regular inspections. A DIY bar should never pretend to be elite competition equipment. Its job is to create a safer, practical place for basic skills and conditioning at home. Build it thoughtfully, test it thoroughly, supervise it consistently, and your gymnast will have a far better practice setup than a random tree branch and a heroic amount of optimism.
Note: Remove any automatic publishing artifacts, including stray citation placeholders or editor-generated reference tags, before posting this article on the web.


