
Table of Contents >> Show >> Hide
- What Is a Hanging Leg Raise?
- Benefits of Hanging Leg Raises
- Before You Start: Safety and Setup
- Simple Ways to Do a Hanging Leg Raise: 12 Steps
- Step 1: Choose a Stable Bar
- Step 2: Grip the Bar Correctly
- Step 3: Create an Active Hang
- Step 4: Brace Your Core Before Moving
- Step 5: Start With Bent Knees If Needed
- Step 6: Lift With Control, Not Momentum
- Step 7: Raise Your Legs to the Right Height
- Step 8: Pause Briefly at the Top
- Step 9: Lower Slowly
- Step 10: Control Your Breathing
- Step 11: Stop Before Your Form Breaks
- Step 12: Progress Gradually
- Common Hanging Leg Raise Mistakes
- Beginner-Friendly Variations
- Advanced Variations
- How Many Sets and Reps Should You Do?
- Sample Hanging Leg Raise Workout
- of Real-World Experience: What Hanging Leg Raises Actually Feel Like
- Final Thoughts
- Note
The hanging leg raise looks simple from far away: grab a bar, lift your legs, lower them down, and try not to make the same face you make when opening a math textbook. But once you actually hang from the bar, your grip starts negotiating with gravity, your abs begin filing a formal complaint, and your legs suddenly feel like they were made of wet cement.
Still, the hanging leg raise is one of the most effective bodyweight core exercises when it is done with control. It challenges your abs, hip flexors, grip, shoulders, and deep core muscles at the same time. Unlike basic floor crunches, this move asks your body to stabilize itself while suspended in the air, which makes every clean rep feel like a small personal victory.
This guide breaks down simple ways to do a hanging leg raise in 12 practical steps. You will learn how to set up safely, avoid swinging, use the right muscles, breathe properly, modify the movement, and build strength without turning your workout into a circus act. No ego lifting. No wild kicking. No pretending momentum is “advanced technique.”
What Is a Hanging Leg Raise?
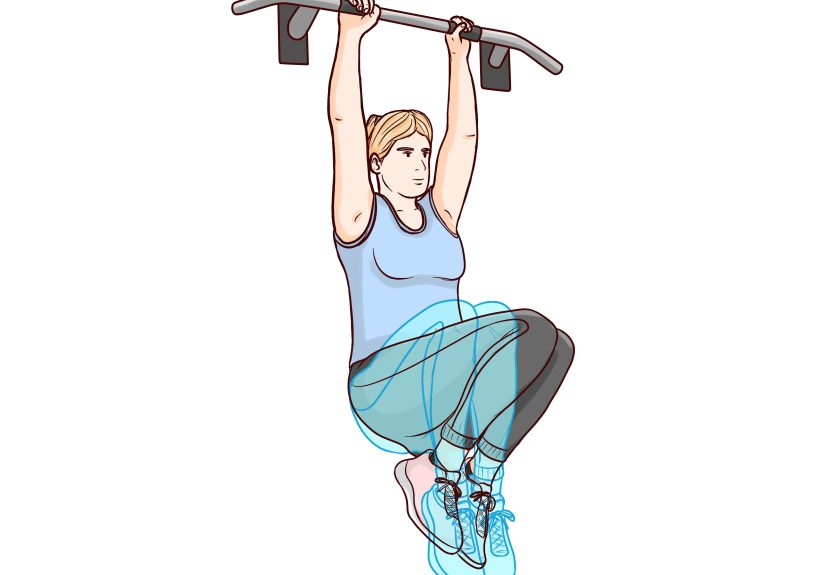
A hanging leg raise is a core exercise performed while hanging from a pull-up bar or using captain’s chair equipment. From a stable hanging position, you raise your legs in front of your body, usually toward hip height or higher, then lower them with control. The movement can be done with bent knees, straight legs, or advanced variations such as toes-to-bar.
The main muscles involved include the rectus abdominis, hip flexors, transverse abdominis, obliques, forearms, and stabilizing muscles around the shoulders. Although many people call it a “lower abs” exercise, your entire core works hard when you perform it properly. The real secret is not just lifting your legs; it is controlling your pelvis, ribs, spine, and breathing while gravity tries to humble you.
Benefits of Hanging Leg Raises
Hanging leg raises are popular because they deliver more than one benefit at once. First, they build core strength by forcing your midsection to resist swinging and control the lowering phase. Second, they train the hip flexors, which help lift your thighs toward your torso. Third, they improve grip endurance because you must hold your bodyweight while moving.
This exercise can also improve body control for calisthenics, pull-ups, climbing, gymnastics-style training, and many sports. If you lift weights, a stronger core may help you brace better during squats, deadlifts, rows, and overhead exercises. The hanging leg raise is not magic, of course. It will not replace good nutrition, full-body training, sleep, or consistency. But as a core-building tool, it is very hard to ignore.
Before You Start: Safety and Setup
Before doing hanging leg raises, make sure you can hang from a bar comfortably for at least 15 to 30 seconds. Your shoulders should feel stable, not pinched or painful. Your hands should be able to grip the bar securely. If hanging bothers your shoulders, wrists, elbows, or lower back, use an easier variation such as lying leg raises, reverse crunches, dead bugs, or captain’s chair knee raises.
Warm up first with five to ten minutes of light movement, then add shoulder circles, scapular hangs, hip flexor mobility, and a few easy core activation drills. Cold muscles are like cold pizza: technically usable, but not ideal for peak performance.
Simple Ways to Do a Hanging Leg Raise: 12 Steps
Step 1: Choose a Stable Bar
Start with a pull-up bar that is strong, secure, and high enough for your legs to hang without touching the floor. A gym pull-up station is ideal. A doorway bar can work only if it is properly installed and rated for your bodyweight. Do not use random playground bars, door frames, tree branches, or anything that looks like it was assembled during a power outage.
Stand under the bar and check your space. You need room to lift your legs forward without kicking a wall, mirror, machine, or innocent bystander. The goal is core training, not accidental martial arts.
Step 2: Grip the Bar Correctly
Grab the bar with an overhand grip, palms facing away from you. Place your hands slightly wider than shoulder-width apart. Wrap your thumbs around the bar if that feels secure. Your grip should feel firm but not frantic.
If your grip gives out before your abs do, consider using chalk if your gym allows it, practicing dead hangs, or starting with a captain’s chair version. Avoid relying on lifting straps too early because grip strength is one of the useful side benefits of this exercise.
Step 3: Create an Active Hang
Do not simply dangle like laundry on a windy day. Instead, create an active hang. Pull your shoulders slightly down away from your ears, lightly engage your upper back, and keep your chest controlled. Your elbows should stay mostly straight, but your shoulders should not be completely relaxed.
Think of making your body long, strong, and organized. This stable starting position helps reduce unnecessary swinging and gives your core a better platform to work from.
Step 4: Brace Your Core Before Moving
Before lifting your legs, brace your abs as if someone is about to gently poke your stomach. Do not hold your breath forever; just create tension around your midsection. Your ribs should stay down, and your lower back should not arch dramatically.
This matters because hanging leg raises can easily turn into hip-flexor-only leg flinging. Bracing helps shift more work into your abs and keeps the movement safer and cleaner.
Step 5: Start With Bent Knees If Needed
If you are new to the exercise, begin with hanging knee raises. Bend your knees to about 90 degrees and lift them toward your chest. This shortens the lever, making the move easier to control. It is not cheating; it is smart progression.
Many people rush into straight-leg raises before they can control knee raises. That usually leads to swinging, back arching, and reps that look like a fish trying to escape a boat. Master the bent-knee version first, then gradually straighten your legs over time.
Step 6: Lift With Control, Not Momentum
Begin the rep by tightening your abs and lifting your knees or legs forward. Move slowly enough that you can stop at any point. If your body swings backward before your legs rise, you are probably using momentum.
A good cue is: lift, do not kick. The hanging leg raise should feel like a controlled curl of the pelvis and legs, not a dramatic gymnasium launch sequence. Smooth reps beat sloppy high reps every time.
Step 7: Raise Your Legs to the Right Height
For a standard hanging leg raise, lift your legs until they are roughly parallel to the floor. If you are doing knee raises, bring your knees toward your chest. Advanced exercisers may raise their toes higher, but height should never come at the cost of control.
At the top, lightly tuck your pelvis upward. Imagine bringing your belt buckle toward your ribs. This small pelvic tilt helps your abs work harder instead of letting your hip flexors do all the heavy lifting.
Step 8: Pause Briefly at the Top
Hold the top position for a short moment. Even a half-second pause can make the exercise more effective because it removes bounce and forces you to own the movement. Your body should be steady, your shoulders active, and your abs tight.
If you cannot pause at the top, the variation may be too difficult right now. Switch to bent-knee raises, reduce the range of motion, or perform fewer reps with better form.
Step 9: Lower Slowly
The lowering phase is just as important as the lift. Slowly return your legs to the starting position without letting them drop. Keep tension in your core until your body is still again.
Many people work hard on the way up and then let gravity slam the door on the way down. Do not be that person. Lowering with control builds strength, improves stability, and helps prevent swinging.
Step 10: Control Your Breathing
Exhale as you lift your legs and brace your abs. Inhale carefully as you lower them. Avoid holding your breath for the entire set, especially if you are doing multiple reps. Good breathing keeps your movement smoother and helps you maintain tension without turning purple.
A simple rhythm works well: breathe out on effort, breathe in on the return. If you lose your breathing pattern, stop the set, reset your hang, and begin again.
Step 11: Stop Before Your Form Breaks
End the set when your reps start getting sloppy. Warning signs include swinging, shrugging your shoulders, arching your lower back, kicking your legs, or using a huge hip swing to start each rep.
Quality matters more than quantity. Five clean hanging leg raises are better than fifteen wild ones that look like you are trying to start an invisible motorcycle.
Step 12: Progress Gradually
Once you can perform controlled hanging knee raises, progress to one-leg extensions, bent-knee leg raises, straight-leg raises, and eventually toes-to-bar if appropriate. You can also increase difficulty by slowing the tempo, adding a top pause, or increasing total sets.
Do not add ankle weights or hold a dumbbell between your feet until you can perform strict bodyweight reps with excellent control. Advanced resistance can be useful, but only after your technique is solid.
Common Hanging Leg Raise Mistakes
Mistake 1: Swinging Too Much
Swinging is the most common problem. A little movement is normal, especially when learning, but large swings reduce core tension and make the exercise less effective. Reset between reps if needed. Start each repetition from a still position.
Mistake 2: Arching the Lower Back
If your lower back arches excessively, your abs may not be bracing well enough. Keep your ribs down and focus on a slight pelvic tuck at the top. If that is difficult, switch to hanging knee raises or floor-based core exercises until your control improves.
Mistake 3: Lifting Only With the Hip Flexors
The hip flexors are supposed to help, but they should not take over completely. To involve your abs more, think about curling your pelvis upward rather than simply raising your thighs. The difference is subtle but powerful.
Mistake 4: Going Too Fast
Fast reps often hide weak control. Slow down. A two-second lift and two-second lower is a good starting tempo. When your reps become cleaner, you can adjust the pace based on your training goal.
Beginner-Friendly Variations
If the full hanging leg raise is too challenging, use progressions. Start with lying leg raises on the floor. Then try reverse crunches, dead bugs, captain’s chair knee raises, and hanging knee raises. These movements build the same general pattern without demanding as much grip strength or shoulder endurance.
Another useful option is the supported hanging knee raise. Use a captain’s chair or vertical knee raise station, place your forearms on the pads, and keep your back against the support. This reduces grip demand while still challenging your core.
Advanced Variations
Once strict hanging leg raises feel manageable, try adding a pause at the top, slowing the lowering phase, raising your toes higher, or performing toes-to-bar. You can also try hanging windshield wipers, but only after you have excellent strength and control. That variation is demanding and should not be rushed.
Advanced does not mean chaotic. If the exercise becomes faster, swingier, and uglier, you did not progress; you just made gravity laugh.
How Many Sets and Reps Should You Do?
For beginners, start with 2 to 3 sets of 5 to 8 controlled reps. Intermediate exercisers can work toward 3 to 4 sets of 8 to 12 reps. Advanced athletes may use stricter tempo work, longer pauses, or harder variations instead of simply chasing more reps.
Train hanging leg raises two or three times per week, leaving recovery time between sessions. Your abs need recovery just like your legs, chest, back, and shoulders. If your grip, hip flexors, or lower back feel overworked, reduce volume or choose an easier variation.
Sample Hanging Leg Raise Workout
Here is a simple core finisher you can add after your main workout:
- Dead hang: 2 sets of 20 seconds
- Hanging knee raise: 3 sets of 8 reps
- Slow lowering leg raise: 2 sets of 5 reps
- Front plank: 2 sets of 30 seconds
- Side plank: 2 sets of 20 seconds per side
Keep the workout controlled and stop before your form falls apart. The goal is not to destroy your abs; it is to train them well enough that they come back stronger.
of Real-World Experience: What Hanging Leg Raises Actually Feel Like
The first time most people try a hanging leg raise, they learn two things immediately: gravity is rude, and grip strength is not just something rock climbers talk about to sound mysterious. You may step up to the bar feeling confident, hang for three seconds, lift your knees halfway, swing backward, and wonder why your body has suddenly become a pendulum with gym shoes.
That is completely normal. Hanging leg raises are not beginner-easy, even though they look simple in videos. The hardest part is often not the abs; it is staying still. When your legs move forward, your body naturally wants to swing in the opposite direction. If you rush the movement, each rep feeds the next swing until you are basically doing playground physics instead of core training.
A helpful experience-based tip is to treat every rep like a single rep, not part of a race. Hang still, brace, lift, pause, lower, and reset. At first, this may mean doing only three or four good reps. That can feel disappointing if you expected a heroic set of twenty, but clean reps build faster progress than messy ones. Your body learns the pattern. Your grip improves. Your shoulders feel more stable. Your abs begin to understand the assignment.
Another real-world lesson is that bent-knee raises are not “less serious.” They are often the smartest place to start. When you bend your knees, the movement becomes easier to control because your legs create less leverage. This lets you focus on the most important parts: keeping the ribs down, tucking the pelvis slightly, and lowering slowly. Once those habits are solid, straight-leg raises become much more realistic.
Many people also discover that their hip flexors fatigue before their abs. This does not mean the exercise is useless. It usually means the hip flexors are doing their share, but the abs need better positioning to contribute more. The fix is not to kick harder. Instead, slow down and think about curling the pelvis upward at the top. That little tuck changes the feel of the movement dramatically.
Grip can be another limiting factor. If your hands give out early, practice dead hangs separately. Start with short holds and build gradually. You can also alternate hanging leg raise days with floor core exercises so your hands and shoulders are not overloaded. There is no rule saying every ab workout must happen while dangling from a bar like a determined bat.
The best progress usually comes from consistency, not drama. Two or three focused sessions per week can produce noticeable improvement over time. You might begin with knee raises, then add a pause, then straighten one leg, then both legs. Each stage teaches control. Each stage counts.
In the end, the hanging leg raise rewards patience. It teaches you to move with intention, brace under tension, and respect the difference between strength and momentum. It is challenging, yes, but that is part of the appeal. Few core exercises make you feel as strong as a strict, smooth hanging leg raise. And when you finally perform one without swinging, it feels less like exercise and more like quietly winning an argument with gravity.
Final Thoughts
The hanging leg raise is a powerful core exercise, but it works best when you treat technique as the main event. Start with a secure bar, use an active hang, brace your abs, lift with control, pause at the top, and lower slowly. If the full version is too difficult, use bent-knee progressions. If you are advanced, increase difficulty carefully without sacrificing form.
Remember: the goal is not to throw your legs around until your abs send a resignation letter. The goal is controlled strength. Master that, and the hanging leg raise can become one of the most valuable moves in your core training routine.
Note
This article is for general fitness education. Stop the exercise if you feel sharp pain, dizziness, shoulder discomfort, or lower-back pain. If you are unsure whether hanging leg raises are appropriate for you, ask a qualified fitness professional, physical therapist, or healthcare provider.


