
Table of Contents >> Show >> Hide
- Why a Road Bike Gear Cable Needs Replacing
- What You’ll Need Before You Start
- Know Your Setup Before Pulling the Old Cable
- Step 1: Shift Into the Position With the Least Cable Tension
- Step 2: Disconnect the Old Cable at the Derailleur
- Step 3: Remove the Cable From the Shifter
- Step 4: Inspect the Housing Before Reusing It
- Step 5: Measure and Cut New Housing the Right Way
- Step 6: Route the New Gear Cable
- Step 7: Attach the Cable to the Derailleur
- Step 8: Fine-Tune the Cable Tension
- Step 9: Check Derailleur Adjustment if Shifting Still Feels Off
- Step 10: Trim and Cap the Cable
- Common Mistakes to Avoid
- When to Replace the Housing Too
- How Long Does a Road Bike Shift Cable Last?
- Final Thoughts
- Real-World Experience: What Replacing a Road Bike Gear Cable Actually Feels Like
If your road bike has started shifting like it’s negotiating a hostage situation, there’s a decent chance the gear cable is the culprit. A worn, frayed, rusty, or sticky shift cable can turn a smooth ride into a crunchy little drama, complete with missed gears, noisy shifts, and that classic “why are you doing this to me?” stare at the drivetrain.
The good news: replacing a road bike gear cable is not wizardry. You do not need a cathedral workshop, a beard full of chain lube, or a mechanical engineering degree from Planet Shimano. You just need the right parts, a bit of patience, and a willingness to admit that small metal wires are somehow capable of causing enormous emotional damage.
In this guide, you’ll learn the simple ways to replace a road bike gear cable, how to avoid the most common mistakes, and how to get your shifting crisp again without turning your bike into an expensive sculpture.
Why a Road Bike Gear Cable Needs Replacing
Before you start cutting anything, it helps to know why the cable is misbehaving. A gear cable usually needs replacement when shifting feels heavy, vague, delayed, or inconsistent. In many cases, the problem is not the derailleur itself. It’s the cable system, which includes both the inner cable and the housing.
Here are the usual suspects:
- Frayed inner cable near the shifter or derailleur clamp
- Rust or corrosion inside the housing
- Kinks, sharp bends, or crushed cable housing
- Contamination from water, grime, or old lubricant
- General wear from lots of miles and weather exposure
If your bike still has the original shift cables from a geological era ago, replacing them can make the drivetrain feel younger, happier, and less dramatic.
What You’ll Need Before You Start
Replacing a road bike shift cable goes much more smoothly when you gather your tools first. That way, you won’t be halfway through the job, holding a cable in one hand and your dignity in the other.
Basic tools and supplies
- New road bike shift cable
- New shift housing if the old housing is worn or contaminated
- Cable cutters made for bike cables and housing
- Allen keys or hex wrenches
- Small pick or awl to reopen the housing liner after cutting
- Ferrules and cable end caps
- Pliers
- Bike stand, if you have one
For many bikes, it makes sense to replace the housing at the same time as the inner cable. That is especially true if the shifting has felt gritty for a while. A fresh cable running through tired, dirty housing is like putting fancy dress shoes on a raccoon. Technically possible. Not truly helpful.
Know Your Setup Before Pulling the Old Cable
Road bikes are not all routed the same way. Some have external cable routing, which is simpler and easier to follow. Others use partial or full internal routing through the frame, which looks sleek but can test your patience and your vocabulary.
Take a minute to inspect:
- Whether the cable is for the front derailleur or rear derailleur
- Whether the housing runs externally, internally, or both
- How the cable exits the shifter
- Where the housing stops and ferrules sit
A quick phone photo before disassembly can save you from the classic repair-garage question: “Why do I have one extra piece and three wrong ideas?”
Step 1: Shift Into the Position With the Least Cable Tension
This is one of the simplest and smartest ways to replace a road bike gear cable: start with the cable as slack as possible.
For the rear derailleur, shift onto the smallest rear cog. For the front derailleur, shift onto the smallest chainring. This reduces cable tension and makes removal much easier. It also helps the derailleur settle into its relaxed position, which is exactly what you want when disconnecting the old cable.
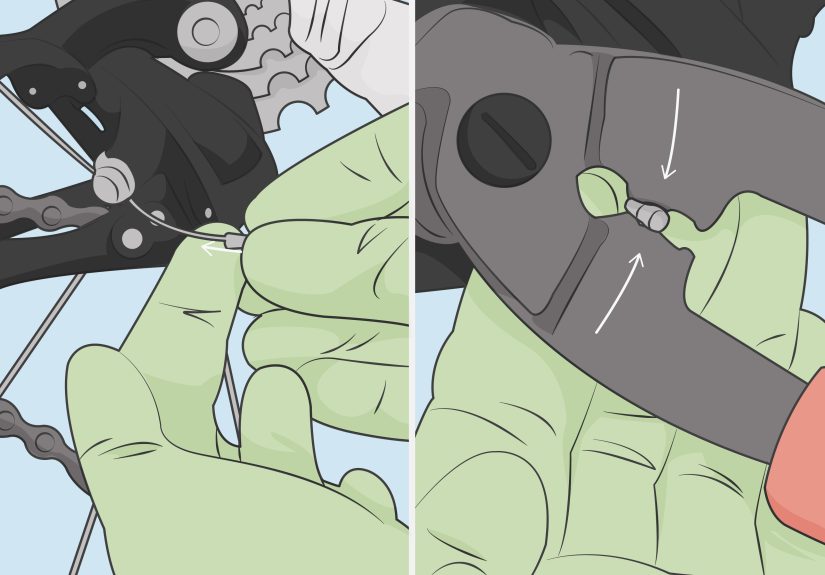
Step 2: Disconnect the Old Cable at the Derailleur
Locate the cable pinch bolt on the derailleur and loosen it. If there’s an end cap crimped on the cable tail, remove or snip it off first. Pull the cable free from the clamp.
If the cable is badly frayed, do not force it backward through the housing or shifter until you inspect the damage. A shredded cable end can snag inside the lever mechanism and turn a simple maintenance job into a full-on rescue mission.
Step 3: Remove the Cable From the Shifter
Now move to the shifter. On many road shifters, you’ll need to click through the lever until the cable head lines up with the exit port. Then you can push or pull the inner cable out.
This step varies by brand and model, but the idea is the same: expose the cable head, then guide it out without forcing it. If it resists, pause and check alignment. Brutal confidence is not a bike tool.
Step 4: Inspect the Housing Before Reusing It
You can sometimes replace only the inner cable, but it is wise to inspect every section of housing first. Run your fingers along it and look for cracks, rust stains, flattened spots, split ends, or ugly bends. If it has sharp curves or contamination inside, shifting will suffer even with a new cable.
Reusable housing should still have:
- Clean, square-cut ends
- An open liner with no crushed opening
- Smooth interior movement
- No corrosion or obvious wear
If the housing looks suspect, replace it. This is not the moment for optimism.
Step 5: Measure and Cut New Housing the Right Way
If you’re installing new housing, use the old housing as a length guide when possible. Cut each section one at a time. The goal is smooth curves, not giant loops and not razor-sharp bends. Housing that is too short can bind and pull during steering. Housing that is too long can look messy and feel sloppy.
Tips for cutting shift housing
- Use dedicated cable cutters, not generic pliers
- Make each cut as square and clean as possible
- Use a pick to reopen the liner if the cut compresses it
- File or tidy the end if needed
- Install the correct ferrule on each housing end
This is one of those tiny details that makes a huge difference. Bad housing cuts are the bicycle equivalent of trying to drink a milkshake through a folded garden hose.
Step 6: Route the New Gear Cable
Feed the new inner cable into the shifter exactly as the old one was routed. Make sure the cable head seats correctly in the lever. Then thread the cable through the housing sections toward the derailleur.
If your system uses internal cable routing, take your time. Sometimes the easiest method is to leave the old cable or liner in place as a guide before fully removing it. On fully internal frames, a routing magnet or internal-routing tool can save time and save your sanity.
If your cable kit includes specific liner or lubricant instructions, follow them. Some systems benefit from a light cable-specific grease, while some pre-lubricated housings are designed to be used as provided. When in doubt, follow the cable or drivetrain manufacturer’s guidance.
Step 7: Attach the Cable to the Derailleur
Once the cable reaches the derailleur, route it correctly through the anchor groove or clamp path. This matters more than many riders realize. A cable installed on the wrong side of a washer, guide, or groove can throw off tension and make indexing feel weird from the start.
Pull the cable snug by hand, but do not yank on it like you’re starting a lawn mower. Tighten the pinch bolt to the proper torque if you know it. Then leave a small tail of cable beyond the clamp so you have room for fine adjustment later.
Step 8: Fine-Tune the Cable Tension
Now comes the satisfying part. Shift through the gears while turning the pedals. If the chain hesitates going into larger cogs at the rear, you may need more cable tension. If it hesitates going back to smaller cogs, you may need less.
Use the barrel adjuster in small increments:
- Turn counterclockwise to add cable tension
- Turn clockwise to reduce cable tension
Make tiny changes, then test again. Good indexing is all about patience. One-quarter turn can be the difference between “silky smooth” and “angry squirrel in a blender.”
Step 9: Check Derailleur Adjustment if Shifting Still Feels Off
A new road bike gear cable fixes a lot, but not everything. If shifting still struggles after cable replacement, the issue may involve derailleur setup rather than the cable itself.
Check these basics:
- High and low limit screws
- B-tension on the rear derailleur
- Derailleur hanger alignment
- Worn cassette or chain
- Dirty drivetrain parts
If the cable is new but the derailleur is out of adjustment, the bike may still shift like it woke up on the wrong side of the garage.
Step 10: Trim and Cap the Cable
Once the shifting feels good, trim the excess inner cable, leaving a practical tail length. Crimp on a cable end cap to prevent fraying. This is a small finishing touch, but it keeps the cable neat and saves future-you from dealing with a wire that has turned into a tiny metal cactus.
Common Mistakes to Avoid
Even a simple cable replacement can go sideways if you rush. Here are the mistakes most likely to sabotage a good result:
- Using the wrong cable type
- Reusing damaged or contaminated housing
- Cutting housing with dull tools
- Routing the cable incorrectly at the derailleur clamp
- Forgetting ferrules or end caps
- Over-tightening or under-tightening the pinch bolt
- Trying to adjust indexing before the cable head is fully seated in the shifter
Bike mechanics love precision because bicycles punish “close enough” with weird noises.
When to Replace the Housing Too
If you’re wondering whether replacing just the cable is enough, here’s the honest answer: sometimes yes, often no. A new inner cable can restore shifting if the housing is still smooth and intact. But if the housing is old, corroded, or contaminated, you’re only solving half the problem.
Replace both cable and housing when:
- The shifting has felt rough for a long time
- The bike has been ridden in rain or stored in damp conditions
- The housing has visible damage
- You are already doing a full drivetrain refresh
How Long Does a Road Bike Shift Cable Last?
That depends on mileage, weather, storage, and how often you ride. Fair-weather bikes that live indoors can go quite a while. Commuter bikes, rainy-day bikes, and sweat-marinated indoor trainer bikes will wear cables faster. If shifting quality drops and adjustment no longer holds for long, fresh cables are often one of the best-value fixes you can make.
Final Thoughts
Replacing a road bike gear cable is one of those jobs that seems intimidating right up until you do it once. Then it starts to feel less like black magic and more like a neat little ritual involving wires, patience, and occasional muttering.
The simple ways to replace a road bike gear cable all come down to a few smart habits: reduce cable tension first, inspect the whole cable system, cut housing cleanly, route everything correctly, and fine-tune the derailleur with tiny adjustments. Do that, and you’ll usually get smoother, quieter, more reliable shifting without a trip to the bike shop.
And honestly, few things in cycling feel better than clicking into a gear and having the bike respond instantly. It’s like the drivetrain finally stopped ghosting you.
Real-World Experience: What Replacing a Road Bike Gear Cable Actually Feels Like
The first time many riders replace a road bike gear cable, they expect one of two outcomes: either a glorious home-mechanic victory montage or a complete garage-based emotional collapse. The truth is usually somewhere in the middle, with a strong possibility of getting chain grease on one knee and somehow losing a ferrule that was in your hand half a second earlier.
One common experience is realizing how gradually poor shifting sneaks up on you. When a cable wears out slowly, you adapt without noticing. You click twice instead of once. You pedal a little softer to help the chain climb. You accept mystery noises as part of the bike’s “personality.” Then you replace the gear cable and suddenly remember that the bike is not supposed to feel like it’s filing paperwork every time you change gears.
Another very normal experience is discovering that the housing matters more than expected. A lot of riders start with the idea that the inner cable is the whole story. Then they pull out an old cable, thread in a new one, and still get sticky shifting. That’s the moment the housing becomes the plot twist. Old housing can hide grime, corrosion, friction, and tiny deformations that sabotage the whole system. The lesson tends to stick: if the bike has been ridden hard, ridden wet, or ignored heroically, replacing cable and housing together is often the smarter move.
Riders with externally routed bikes usually come away from the job feeling pleasantly capable. The path is visible, the process makes sense, and the improvement is immediate. Riders with internal routing tend to come away with character development. Internal routing looks clean on the bike and chaotic in real life. The cable disappears into the frame like it has rent-free housing inside your patience. Still, once you manage it, there’s a weird sense of pride that makes you want to casually mention it to other cyclists, preferably near a coffee shop.
There’s also the experience of learning how tiny adjustments change everything. New mechanics often expect one dramatic fix. But cable replacement teaches a subtler lesson: quarter turns matter. A small tweak at the barrel adjuster can take shifting from hesitant to crisp. That moment is oddly satisfying because it feels like the bike is suddenly speaking your language. Not fluently, maybe, but at least with less sarcasm.
Many riders also notice that replacing a road bike shift cable makes them more attentive overall. Once you’ve handled the derailleur, checked the housing, and watched the cable move through the system, the whole drivetrain starts to make more sense. You begin noticing hanger alignment, chain wear, cassette condition, and cable routing quality. In other words, one little maintenance task often turns a rider into the kind of person who says things like, “Hmm, the indexing is slightly off,” which is both useful and mildly dangerous.
And perhaps the best experience of all is the first ride afterward. The lever clicks. The chain moves. The bike shifts cleanly under load. No grinding, no hesitation, no bargaining with the machine. It feels less like fixing a cable and more like restoring trust. For a modest repair, that’s a pretty great payoff.


