Table of Contents >> Show >> Hide
- What Is a Self-Closing Spring Hinge (and How Is It Different From a Door Closer)?
- Before You Touch Anything: Quick Safety + Sanity Checklist
- Tools You’ll Typically Need
- Step 1: Identify Which Type of Spring Hinge You Have
- Step 2: Diagnose the Problem (So You Adjust the Right Direction)
- How to Adjust an Allen-Key Self-Closing Spring Hinge
- How to Adjust a Pin-and-Hole (Tension Lug) Spring Hinge
- Adjusting Double-Acting Spring Hinges (Swinging Cafe Doors)
- Pro-Level Results: Fix the Underlying Issues That Mimic “Bad Spring Tension”
- Specific Example: Adjusting a Door That Slams Shut
- When You Should Replace the Spring Hinge Instead of Adjusting It
- Quick FAQ
- DIY “Experience” Notes: What Usually Happens in the Real World (and How to Handle It)
- Experience #1: “I adjusted it once… and now it’s worse.”
- Experience #2: “The top hinge feels different from the bottom hinge.”
- Experience #3: “It closes fine when I test it… but not when I’m carrying groceries.”
- Experience #4: “It won’t latch unless it slams.”
- Experience #5: “The door used to close fine until we added weatherstripping / a new rug.”
- Experience #6: “The pin is stuck and I’m about to lose my patience.”
- Conclusion
A self-closing spring hinge is basically a tiny, determined bouncer living inside your door hardware. Its whole job is to make sure the door shuts behind youno matter how distracted, rushed, or “I’ll come back for that” you feel.
The problem? Sometimes that bouncer gets a little too enthusiastic (door slams like it’s mad at you), or too relaxed (door drifts halfway closed and just… gives up). The good news: most adjustable spring hinges are designed for simple tension tweaks, and you can usually do it with basic tools and a little patience.
What Is a Self-Closing Spring Hinge (and How Is It Different From a Door Closer)?
A self-closing spring hinge has an internal spring that pulls the door shut. Many residential versions are adjustable using an Allen key (hex wrench) and a locking pin. Some commercial models use a tension rod and a removable pin in a series of holes.
A door closer (the box-and-arm device you see on many commercial doors) is different: it’s usually hydraulic and adjusts closing speed with valves and sometimes spring power with turns. Don’t mix up the adjustment methodsyour hinge doesn’t want valve adjustments, and your closer doesn’t want you yanking out hinge pins.
Before You Touch Anything: Quick Safety + Sanity Checklist
- Protect your eyes. Springs store energy. Wear safety glasses.
- Control the door. Keep it closed or firmly propped. A moving door while you adjust tension is chaos.
- Keep fingers clear. Don’t rest fingertips near the hinge barrel or pin holes while tension is changing.
- Check the basics first. If the door rubs the frame, sticks on carpet, or has a misaligned latch, tension alone won’t fix everything.
- Fire-rated doors: If this hinge is part of a fire door assembly, the door must reliably close and latch. If you’re unsure, involve a qualified pro and follow the door/hardware listing requirements.
Tools You’ll Typically Need
- Allen key / hex wrench (often supplied with the hinge)
- Small tension rod (some hinge styles use a metal “lever” tool)
- Locking pin(s) (the little pin that holds the tension setting)
- Flathead screwdriver or awl (sometimes helpful to guide pins)
- Pliers (for stubborn pinsuse gently)
- Door wedge or a helper (to steady the door)
- Optional: lubricant for squeaks (silicone spray or light oil)
Step 1: Identify Which Type of Spring Hinge You Have
A) Allen-Key Adjustable Spring Hinge (Common Residential)
These usually have a small hex adjustment socket at the top (or sometimes bottom) of the hinge barrel. There’s also a locking pin or cross pin that sits in a hole once tension is set.
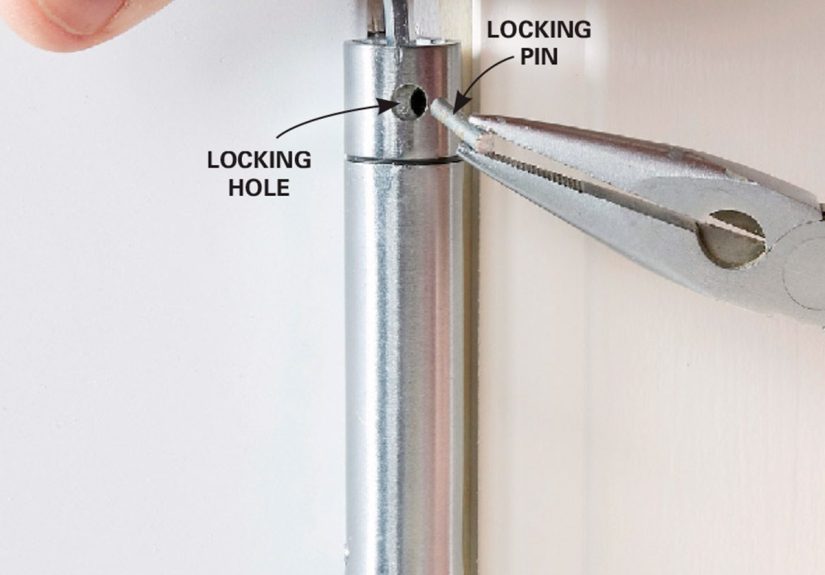
B) Pin-and-Hole “Tension Lug” Spring Hinge (Common Commercial)
These have a visible row of adjustment holes and a removable tension pin that locks into one of the holes. You insert a tension rod into a hole to rotate the mechanism, remove the pin, then re-pin at a new setting.
C) Double-Acting Spring Hinges (Cafe / Saloon / Swinging Doors)
Double-acting spring hinges let doors swing both ways. They often have tension pins and multiple adjustment holes, and the “best” tension can depend on whether the door is meant to return to center gently or snap shut for hands-free traffic control.
Step 2: Diagnose the Problem (So You Adjust the Right Direction)
- Door won’t close fully: Usually needs more tension (increase spring force).
- Door closes but won’t latch: Often needs a bit more tension, OR the latch strike plate needs alignment.
- Door slams: Usually needs less tension (decrease spring force).
- Door closes unevenly or twists: May need balanced tension across hinges, tightened screws, or hinge/door alignment fixes.
How to Adjust an Allen-Key Self-Closing Spring Hinge
1) Close and Stabilize the Door
Most manufacturers recommend adjusting with the door closed. Use a wedge to keep it from drifting, or have someone hold it steady.
2) Locate the Hex Adjustment Socket
Look at the top of the hinge barrel. You’ll usually see a small hex-shaped opening where the Allen key fits.
3) Insert the Allen Key Fully
Push the hex key in until it seats. If it’s only half in, you can strip the internal mechanisman expensive way to learn the value of “fully seated.”
4) Relieve Tension to Free the Locking Pin
Rotate the Allen key slightly in the direction needed to take pressure off the locking pin. On many designs, you’re rotating to the next “click” position. The goal is to make the pin removable without fighting the spring.
5) Remove and Reposition the Locking Pin
Once the pin is loose, pull it out (pliers can help if it’s snug). Then rotate the Allen key to increase or decrease tension by one increment and insert the pin into the next matching hole when it lines up.
6) Make Small Adjustments (One “Click” at a Time)
Spring hinges are not impressed by dramatic, multi-step cranks. Move one increment, re-pin, then test. Repeat until the door closes smoothly and latches reliably.
7) Test the Door Like You Actually Use It
Don’t just crack it open two inches and call it good. Open the door to a normal angle (for many doors, 45–90 degrees), then release and watch:
- Does it close without slamming?
- Does it latch?
- Does it bounce off the weatherstripping and pop back open?
How to Adjust a Pin-and-Hole (Tension Lug) Spring Hinge
1) Keep the Door Closed
Again: closed is calmer. If this is a high-traffic door, do this when you won’t be interrupted by someone who thinks “adjusting hardware” is a spectator sport.
2) Insert the Tension Rod Into an Adjustment Hole
Insert the rod into one of the holes on the tension lug. You’re creating leverage to rotate the mechanism slightly.
3) Rotate Just Enough to Remove the Tension Pin
Rotate the rod so the tension pin becomes loose. Pull the pin out carefully. You’ve now “unlocked” the hinge setting.
4) Increase or Decrease Tension, Then Re-Insert the Pin
Turn the tension lug to the next hole position and insert the pin into the desired hole. More tension generally means choosing a setting that increases spring preload; less tension means stepping it back.
5) Repeat for the Other Spring Hinges (If You Have More Than One)
Many doors use two spring hinges, or a combination of spring and bearing hinges depending on door size and weight. If you adjust one hinge aggressively and leave the other barely tensioned, you can get twisting, uneven closing, or premature wear. Aim for balanced behavior.
Adjusting Double-Acting Spring Hinges (Swinging Cafe Doors)
Double-acting hinges often use a similar tension rod + pin system. The key difference is the “goal”: you may want the door to return to center smoothly rather than latch like an exterior door.
- Too little tension: doors can sag, drift, or not return consistently.
- Too much tension: doors whip back with force (fun in movies, annoying in kitchens).
Adjust in small increments and test from both swing directions to make sure it behaves consistently.
Pro-Level Results: Fix the Underlying Issues That Mimic “Bad Spring Tension”
Door won’t latch even with more tension
- Strike plate alignment: The latch bolt may be hitting the strike plate instead of entering it.
- Weatherstripping resistance: New or thick weatherstripping can push the door back open.
- Door sag: Loose screws or worn hinge knuckles can drop the door slightly.
Door slams even on a lower setting
- Too much spring hinge for the door: The hinge may be rated for a heavier door.
- Drafts or pressure differences: HVAC pressure can “help” the door shut aggressively.
- Hinge binding: If the hinge is slightly misaligned, the spring can release abruptly once it clears friction.
Door squeaks while closing
A squeak doesn’t always mean something is broken. Often it’s dryness, dust, or metal-on-metal friction. A small amount of appropriate lubricant can quiet things down fast. Wipe excess so it doesn’t become a dust magnet.
Specific Example: Adjusting a Door That Slams Shut
Let’s say your garage entry door has two spring hinges and it closes like it’s trying to win an argument. You want it to shut firmly (security!) but not slam (sanity!).
- Start with the top spring hinge. Reduce tension by one increment.
- Test: open to about 60 degrees, release, and watch the speed and latch.
- If it still slams, reduce one more incrementbut stop as soon as it begins to close calmly.
- Now test the latch: if it doesn’t latch, add a tiny bit of tension back or check strike alignment.
- Repeat on the second spring hinge, aiming for balanced closing.
The “sweet spot” is where the door closes fully, latches reliably, and doesn’t try to audition for an action movie.
When You Should Replace the Spring Hinge Instead of Adjusting It
- Missing locking pins that won’t stay put
- Visible cracks, wobble, or metal deformation
- A spring mechanism that won’t hold a setting (keeps slipping)
- Door sag that persists even after tightening screws and alignment checks
- Severe rust/corrosion (especially on exterior doors)
Quick FAQ
How many spring hinges should a door have?
Many standard doors use one or two spring hinges depending on door weight, height, and door use. Some configurations place a spring hinge in the middle, while heavier or code-driven applications may require more than one.
Should I max out spring tension so it always closes?
Not usually. Over-tension can cause slamming, wear out hinges faster, loosen screws, and make the door unpleasant (or unsafe) to use. The goal is “reliably closes and latches,” not “punishes everyone in the house.”
Why does my door close fine in summer but not in winter?
Seasonal changes can affect weatherstripping compression, door swelling, and air pressure differences. In winter, thicker seals and stack-effect pressure can change how the door behavessometimes requiring a small tension tweak or strike plate adjustment.
DIY “Experience” Notes: What Usually Happens in the Real World (and How to Handle It)
Most spring hinge adjustments don’t fail because the steps are hardthey fail because real doors refuse to behave like perfect diagrams. Here are some common, very “human” experiences DIYers run into when adjusting a self-closing spring hinge, plus what typically works.
Experience #1: “I adjusted it once… and now it’s worse.”
This is unbelievably common. A door that slammed might now close gentlybut it doesn’t latch. Or a door that wouldn’t close now shuts, but it yanks itself closed from halfway like it’s late for a meeting. The fix is rarely dramatic: go back one increment. Spring hinges live in the land of small changes, and one “click” can be the difference between “smooth close” and “door rage.”
Experience #2: “The top hinge feels different from the bottom hinge.”
That’s because it is different in practice. Gravity, door weight, and slight frame variations can make one hinge carry more load or experience more friction. Many people get better results by adjusting incrementally and then balancing both spring hinges so the door closes straight rather than twisting. If one hinge is doing all the work, the door can close crooked and the latch may miss the strike.
Experience #3: “It closes fine when I test it… but not when I’m carrying groceries.”
A test close from 30 degrees is not the same as coming through the door with your arms full. In real use, you might let go sooner, open the door wider, or nudge it at an angle. That’s why the best “experience-based” testing is: open it the way you normally do, let it go like you normally do, and watch for the same annoying behavior you’re trying to eliminate.
Experience #4: “It won’t latch unless it slams.”
This one feels like the hinge is the villain, but the latch alignment is often the secret culprit. If the latch bolt is barely grazing the strike plate opening, the door may need a slam to force it in. Before you over-tighten spring tension, check the strike plate: is there fresh scrape marks? Does the latch line up with the hole? A tiny strike plate adjustment can turn a “slam-to-latch” situation into a calm, secure closurewithout turning your doorway into a percussion instrument.
Experience #5: “The door used to close fine until we added weatherstripping / a new rug.”
New seals and thick mats are notorious for changing door behavior. Weatherstripping pushes back against the door near the latch side, and rugs add drag near the bottom. DIYers often think the spring hinge “suddenly went bad,” when it’s really just facing new resistance. In those cases, a mild tension increase may helpbut if the door is rubbing or dragging, address that friction first. Otherwise you’re asking the spring hinge to fight a problem it didn’t create.
Experience #6: “The pin is stuck and I’m about to lose my patience.”
If a locking pin won’t budge, it’s usually because the spring tension is still pressing on it. The move here isn’t brute forceit’s relief. Rotate the Allen key or tension rod slightly to take pressure off the pin, then remove it. Pliers can help, but use them as a gentle assistant, not a demolition crew. Once the pin is out, the rest of the adjustment tends to feel surprisingly easy.
The overall “experience lesson” is simple: spring hinge adjustment is a blend of mechanics and patience. Make one small change, test like a real person (not a lab robot), and fix friction or alignment issues that pretend to be spring problems. When everything is dialed in, the door closes smoothly, latches reliably, and nobody jumps every time it shuts. That’s a win.
Conclusion
Adjusting a self-closing spring hinge is one of the most satisfying small home fixes: quick, practical, and instantly noticeable. Identify your hinge style, adjust in tiny increments, and test realistically. If the door still won’t behave, look beyond tensionalignment, friction, and latch hardware often decide whether “self-closing” actually means “self-closing.”