
Table of Contents >> Show >> Hide
- Can you install pebble tile over existing tile?
- What makes pebble tile different (and why it matters)
- Tools and materials checklist
- Step-by-step: How to install stone pebble tile over old tile
- Step 1: Inspect the existing tile like a picky detective
- Step 2: Clean the old tile until it stops being gross
- Step 3: Make the surface bondable (two common methods)
- Step 4: Flatten what needs flattening
- Step 5: Plan the height (doors, thresholds, and drains)
- Step 6: Dry-lay a few pebble sheets and “prettify” the seams
- Step 7: Choose the right mortar for pebble tile over tile
- Step 8: Set pebble sheets (and verify coverage like a pro)
- Step 9: Let it cure, then prep for grout (don’t rush this)
- Step 10: Grout the pebbles without losing your sense of humor
- Step 11: Seal (and seal the right way)
- Special section: Pebble tile in showers (where mistakes get loud)
- Common problems and how to avoid them
- Maintenance: keep it spa-like, not swamp-like
- When to call a pro
- Conclusion
- Real-world experiences and lessons learned (the part people wish they read first)
You’ve got old tile. It’s not leaking, it’s not loose… it’s just giving “1998 builder-grade beige” energy.
And now you’re eyeing those gorgeous stone pebble sheets like they’re the glow-up your bathroom (or entryway)
desperately deserves.
The good news: installing stone pebble tiles on top of old tiles can workwhen the existing tile is
solid, the prep is done right, and you don’t skip the unsexy steps (cleaning, bonding, leveling). The bad news:
tile-over-tile is not magic. If the bottom layer is failing, adding pebbles is basically putting fresh frosting on a collapsing cake.
Delicious for 12 minutes, tragic forever.
Can you install pebble tile over existing tile?
Yessometimes. Tile-over-tile is a real renovation method, but it has strict “no drama” rules:
the old tile must be well-bonded, stable, and free of moisture problems, and the new installation must bond properly to a non-porous surface.
If any of that sounds shaky, removal is often the better option.
Green lights: when tile-over-tile is usually reasonable
- The existing tile is firmly bonded (no loose corners, no hollow-sounding tiles, no movement).
- The surface is reasonably flat (minor grout grooves are okay; major lippage is not).
- No hidden moisture issue (especially important in showers and wet rooms).
- You have clearance for extra height at doors, drains, thresholds, baseboards, and appliances.
- You’re using the right bonding method for slick, glazed tile (abrasion and/or a bond-promoting primer + the correct mortar).
Red flags: when you should remove the old tile first
- Tiles that sound hollow in multiple spots, crack when stepped on, or flex.
- Cracked substrate or ongoing movement (the new layer will inherit the problem).
- Evidence of leaks, rot, mold, or recurring moisture behind the tile.
- Big height issues (doors won’t clear, trip hazards, toilet flange height problems).
- Shower floors with poor slope or drainage (pebbles will not “fix” puddling).
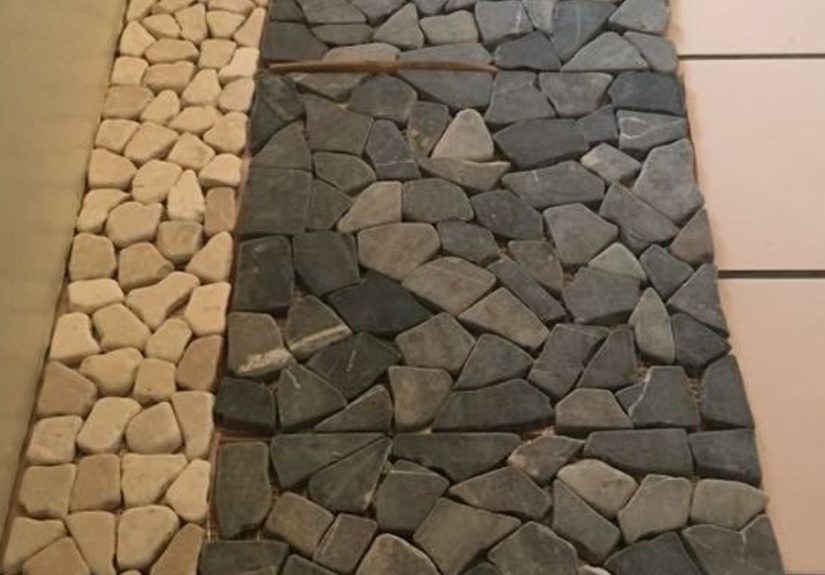
What makes pebble tile different (and why it matters)
Pebble mosaics are charming… and slightly chaotic. They’re thick, irregular, and mounted on mesh sheets.
That means:
- Coverage matters more. Every pebble needs solid support in mortarnot just “most of them.”
- Sheet seams can show. You’ll need to blend edges so it doesn’t look like a waffle grid.
- There’s more grout. More joints = more places for grime to move in and start paying rent.
- Cleaning and sealing are not optional. Natural stone is porous and can stain if left unprotected.
Tools and materials checklist
You don’t need a contractor’s warehouse, but you do need the right stuff so you’re not improvising with a butter knife at 11:47 p.m.
Tools
- Painter’s tape, pencil/marker, measuring tape
- Level (or straightedge) and a few spacers
- Oscillating tool or angle grinder (for surface abrasion if needed)
- Shop vac + dust mask/respirator (abrasion is dusty business)
- Notched trowel (often 1/4″ x 1/4″ works for pebble sheets, but follow your product guidance)
- Rubber grout float and a beating block or flat float (for pressing sheets evenly)
- Tile saw or wet saw (plus nippers for weird pebble edges)
- Mixing bucket and drill with paddle (or a strong arm and patience)
Materials
- Stone pebble mosaic sheets (buy 10% extra; your future self will thank you)
- Bond-promoting primer (optional but often very helpful on slick tile)
- High-quality polymer-modified thinset or LHT mortar suitable for tile-over-tile bonding
- Grout (consider high-performance options for wet areas)
- Grout release or pre-grout sealer (highly recommended for porous stone)
- Penetrating/impregnating sealer for stone and grout
- Patch/skim coat or leveling compound (if your existing tile is uneven)
Step-by-step: How to install stone pebble tile over old tile
Step 1: Inspect the existing tile like a picky detective
Don’t start by shopping for grout colors. Start by confirming your base won’t betray you.
Walk the floor slowly. Tap tiles with a wooden handle. Look for cracked grout, loose edges, and movement.
If you find a few loose tiles, fix them before you even think about pebbles.
- Hollow sound? That can indicate poor adhesion underneath. Investigate and repair.
- Cracks? Identify whether they’re surface-only or a sign of substrate movement.
- High corners (lippage)? Grind them down or plan a leveling step.
Step 2: Clean the old tile until it stops being gross
Thinset does not bond well to “soap scum + body lotion + mystery wax.” Clean like you’re prepping for surgery,
not like you’re wiping a kitchen counter.
- Remove everything: rugs, caulk drips, loose grout, adhesive residue.
- Scrub with a degreasing cleaner and rinse thoroughly.
- Let it dry completely. “Looks dry” is not the same as dry.
Step 3: Make the surface bondable (two common methods)
Existing glazed tile is basically a skating rink for mortar unless you create a better bonding surface.
You have two main approachessometimes people use both.
Option A: Mechanical abrasion (scuff/scarify)
Lightly abrading the glaze gives your mortar something to bite into. This can be done with a grinder and an appropriate wheel,
focusing on creating a consistent “dull” surface rather than polishing it smoother (yes, that can happen).
Control dust, ventilate, and wear proper protection.
Option B: Bond-promoting primer
Many modern primers are designed to improve bonding on smooth, low-absorption surfaces by leaving a slightly gritty “keying” surface.
Follow the manufacturer’s dry time and coverage guidance and don’t overthink itthis is one area where “winging it” is rarely rewarded.
Step 4: Flatten what needs flattening
Pebble tile hides some sins, but it does not forgive structural ones. If the existing tile has deep grout joints, uneven spots,
or lippage, fix it now.
- Fill missing grout valleys and low spots with a patch/skim product appropriate for tile prep.
- If the floor is seriously uneven, consider a leveling compound system (primer first, then leveler).
- Re-check flatness with a straightedge. Your feet will notice everything later.
Step 5: Plan the height (doors, thresholds, and drains)
Tile-over-tile adds height. Pebbles add even more height. Before you set a single stone:
- Open and close the door. If it already kisses the tile, it’s about to become a guillotine.
- Check transitions to adjacent flooring (you may need a reducer/threshold).
- In showers, confirm the drain height can be adjusted so the drain cover ends up flush.
Step 6: Dry-lay a few pebble sheets and “prettify” the seams
Pebble sheets love to show their edges. Dry-lay several sheets, then:
- Stagger sheet seams where possible (avoid long straight “grid lines”).
- Pluck a few stones off edges and swap them between sheets to blend seams.
- Check that pebble thickness is consistent enough for your space (especially near doorways).
Step 7: Choose the right mortar for pebble tile over tile
This step is where long-lasting installs are born (and where shortcut installs become future Reddit posts).
Because you’re bonding to a non-porous surface, you generally want a high-quality polymer-modified mortar
rated for the jobor a manufacturer-approved system using primer + mortar.
- Use a premium mortar. Tile-over-tile bonding demands better adhesion than basic installs.
- Consider LHT/medium-bed mortar if your pebble tile is thicker or varies in height.
- Use white mortar when recommended for natural stone, especially light-colored pebbles.
Step 8: Set pebble sheets (and verify coverage like a pro)
- Key in a thin layer of mortar with the flat side of your trowel to promote contact.
- Trowel mortar with your notched side. Work in small areas so it doesn’t skin over.
- Optional trick: Lightly flatten trowel ridges to reduce squeeze-through between pebbles.
- Place the sheet and press it in with a grout float or beating block to seat stones evenly.
- Lift and check one sheet early on. You want good coverage beneath stones, not spotty contact.
- Clean as you go. Mortar that hardens between pebbles is not “character,” it’s a future headache.
Step 9: Let it cure, then prep for grout (don’t rush this)
Follow mortar cure times. Then decide on a grout strategy. Pebble floors have lots of joints, so choose grout with maintenance in mind.
For wet areas, stain resistance and durability matter a lot.
Pre-grout sealer or grout release: your best friend
Many stone guides recommend sealing (or applying a grout-release product) before grouting to prevent grout haze and staining.
This is especially helpful with porous river rock or textured stones where grout loves to cling.
- Apply pre-grout sealer or grout release evenly.
- Allow proper dry time.
- Then grout according to grout manufacturer instructions.
Step 10: Grout the pebbles without losing your sense of humor
Grouting pebble tile is part flooring project, part endurance sport. Work in small sections.
Pack joints well, then clean carefully so you don’t wash grout out of the lower joints between stones.
- Use a grout float and push grout from multiple angles to fill deep joints.
- Wipe gently with a damp spongetoo much water can weaken grout and cause color issues.
- Buff haze with a microfiber cloth once the surface firms up.
Step 11: Seal (and seal the right way)
After grout cures, apply a penetrating/impregnating sealer suitable for natural stone and grout.
Avoid random “shiny coatings” unless a stone professional specifically recommends themtopical products can haze, peel, or get slippery.
- Apply sealer evenly, allow dwell time, and wipe off excess (don’t leave puddles).
- Plan on re-sealing periodically depending on usage and product instructions.
- Maintain with pH-neutral cleaners; avoid harsh acids on natural stone.
Special section: Pebble tile in showers (where mistakes get loud)
Shower floors are not forgiving. A pebble floor can feel spa-like, but only if water moves to the drain correctly
and the waterproofing is properly built. Tile and grout are not your waterproofing; they’re the finish.
Drainage and slope: the non-negotiable
A shower floor should slope to the drain so water doesn’t pond. The commonly cited best practice is about
1/4 inch per foot toward the drain for tiled shower receptors. If your existing shower already drains perfectly,
tiling over it can be possiblejust be sure the added thickness doesn’t reduce effective slope near the drain or create a “birdbath.”
Waterproofing reality check
- If you have any leak history, stop and investigate before covering anything.
- If the current assembly is questionable or you suspect improper waterproofing, a full rebuild is often safer than tile-over-tile.
- Follow a complete shower system method (membrane, drain integration, movement joints) rather than guessing.
Common problems and how to avoid them
“I can see the sheet grid!”
- Blend sheet edges by swapping pebbles between sheets before setting.
- Stagger seams and avoid long straight lines.
- Use consistent pressure when embedding sheets.
“Mortar is oozing up between stones.”
- Use the correct trowel size and avoid overly thick mortar beds in one pass.
- Flatten trowel ridges slightly before placing sheets.
- Clean squeeze-through while it’s still soft.
“My shower floor holds water in little puddles.”
- Verify slope before you tile. Pebbles won’t correct poor pitch.
- Use a straightedge in multiple directions around the drain.
- Adjust drain height correctly so the tile plane meets the drain cleanly.
“There’s a stubborn haze on the stones.”
- Use grout release or pre-seal before grouting to reduce haze risk.
- Follow proper cleanup timingtoo early smears grout, too late hardens haze.
- Use a stone-safe haze remover if needed (and test in a small area first).
Maintenance: keep it spa-like, not swamp-like
Pebble floors can stay beautiful for years if you treat them like stone (because they are stone).
A simple routine helps:
- Weekly: rinse and squeegee in showers, quick mop in dry areas.
- As needed: pH-neutral stone cleaner (skip harsh acids and abrasive powders).
- Periodically: re-seal based on product guidance and how fast water stops beading.
When to call a pro
DIY is greatuntil you’re rebuilding a shower because of a hidden leak. Consider professional help if:
- The existing tile is failing, cracked, or uneven and you’re not sure why.
- This is a shower pan or a wet area and waterproofing details are unclear.
- Drain height, transitions, or height constraints require plumbing or carpentry changes.
- You’re planning a curbless shower or anything where water containment is high-stakes.
Conclusion
Installing stone pebble tile over old tile can be a smart, satisfying upgradeespecially when you want a new look without full demolition.
The secret isn’t luck. It’s prep: verify the old tile is solid, clean it like it insulted your family, create a bondable surface,
choose the right mortar, embed pebbles fully, and protect everything with smart sealing.
If you do those things, your new pebble floor won’t just look greatit’ll hold up to real life: wet feet, muddy paws, and the occasional “how is there shampoo on the ceiling?” moment.
Real-world experiences and lessons learned (the part people wish they read first)
Homeowners who try pebble tile over old tile often say the same thing after day one: “Why are there so many rocks?”
Pebble mosaics look calm and natural, like a riverbed. In practice, they are hundreds of tiny stones that each want to be treated with respect.
The most common “experience-based” lesson is that prep is the project. Setting sheets is the victory lap.
One frequent surprise is how much your results depend on the old tile’s cleanliness. People will swear the floor is cleanuntil the degreaser turns the rinse water a suspicious shade of regret.
If this is a bathroom, you’re not just removing dirt. You’re removing years of soap film, body oils, hair-product overspray, and whatever that “mystery shine” was from the previous owner.
When installers talk about adhesion failures on tile-over-tile jobs, the story often starts with contamination, not the mortar brand.
The practical takeaway: clean, rinse, dry, then clean again. If your sponge squeaks on the tile, you’re getting close.
Another common moment: sheet seams. In the store, pebble sheets look seamless. On your floor, the edges can line up like a checkerboard if you just slap them down.
DIYers who get the best-looking installs usually spend time dry-laying and “stealing” a few pebbles from one sheet to disguise the next.
It feels fussy, but it’s worth it. This is also when people realize buying extra sheets isn’t wastefulit’s sanity insurance.
Nothing kills the vibe faster than running out of matching pebbles and trying to hide it behind the toilet like it’s a secret.
Grouting is the biggest emotional roller coaster. Pebble floors have a lot of grout lines and lots of texture.
Many first-timers expect grouting to be one tidy pass. Instead, it’s more like spreading frosting through a gravel driveway.
The experience-based tip that keeps showing up: work in smaller sections than you think you need to, and be gentle with cleanup.
Too much water too soon can pull grout out of deep joints, leaving low spots that become dirt collectors later.
People also learn quickly why pre-sealing or grout release is popular with stone mosaicsbecause scrubbing dried grout haze off 400 pebbles is not a personality trait.
In showers, the most talked-about lesson is drainage. Pebbles feel amazing underfoot, but they also make it easier to notice puddles.
Homeowners often realize that a “pretty good” slope that worked for flat tile isn’t always “pretty good” for thick, uneven pebbles.
If the floor is even slightly off, water will find the low spots and hang out.
The best real-world approach is to check slope before tiling and keep checking during the installespecially around the drain.
When people skip that, they tend to end up with a shower that looks like a spa but drains like a kiddie pool.
Finally, maintenance expectations matter. Pebble tile is not hard to maintain, but it is different.
People who love their pebble floors tend to adopt simple habits: quick rinse, occasional pH-neutral cleaning, and re-sealing when water stops beading.
People who hate their pebble floors often expected “set it and forget it” like vinyl plank.
Pebbles are natural stonebeautiful, durable, and happiest when protected.
If you go in knowing that, you’ll probably end up in the “I can’t believe we didn’t do this sooner” camp.


