Table of Contents >> Show >> Hide
- Why Stove-Top Short Ribs Work So Well
- Quick Guide to Buying Short Ribs
- Stove-Top Short Ribs Recipe
- Best Sides for Stove-Top Braised Short Ribs
- Flavor Variations (Because Short Ribs Love Attention)
- Common Problems (And How to Fix Them)
- Make-Ahead, Storage, and Reheating Tips
- of “Real-Kitchen” Experience With Stove-Top Short Ribs
- Conclusion
- SEO Tags
Short ribs are the dinner equivalent of a weighted blanket: cozy, comforting, and basically impossible to be mad at while eating.
And the best part? You don’t need an oven, a slow cooker, or a culinary degree from Hogwarts. You just need a heavy pot, a stovetop,
and the willingness to let time do the tenderizing.
This stove-top short ribs recipe is a classic braise: we sear beef short ribs for deep flavor, build a saucy base with
aromatics and a splash of something delicious, then simmer low and slow until the meat turns fork-tender and starts acting like it pays rent.
Why Stove-Top Short Ribs Work So Well
Beef short ribs come from a hardworking part of the cow, which means they’re packed with connective tissue (collagen). That’s not a problemit’s
an opportunity. With gentle, moist heat over time, collagen breaks down and turns the meat buttery and rich. A stove-top braise gives you the
same melt-in-your-mouth results as oven braising, with two bonuses: you can keep an eye on the simmer, and your kitchen smells like a fancy bistro
that definitely has cloth napkins.
Quick Guide to Buying Short Ribs
English-cut vs. flanken-cut
For braising, you want English-cut short ribs (thicker pieces, bone running along one side). Flanken-cut ribs are sliced across
the bones into thin stripsgreat for quick grilling, not ideal for long simmering.
Bone-in or boneless?
Bone-in ribs generally bring more flavor and structure during braising. Boneless works too, but the cooking time can be a little shorter and the
pieces may shred more easily (not a tragedy; just a different vibe).
Stove-Top Short Ribs Recipe
Serves: 4–6 | Time: about 3 hours total (mostly hands-off)
What you’ll need
- Large heavy pot or Dutch oven with a lid
- Tongs
- Wooden spoon
- Fine-mesh strainer (optional, for a smoother sauce)
Ingredients
- 4–5 lb bone-in beef short ribs (English-cut)
- Kosher salt and freshly ground black pepper
- 2–3 tbsp neutral oil (avocado, canola, grapeseed)
- 2 tbsp all-purpose flour (optional, for light thickening)
- 1 large onion, chopped
- 2 carrots, chopped
- 2 celery stalks, chopped
- 4–6 garlic cloves, smashed or minced
- 2 tbsp tomato paste
- 1 cup dry red wine (or extra broth if skipping alcohol)
- 2–3 cups low-sodium beef broth (enough to come halfway up the ribs)
- 2 tsp Worcestershire sauce (optional but highly encouraged)
- 2–3 sprigs fresh thyme
- 1–2 sprigs rosemary (or 1/2 tsp dried)
- 1 bay leaf
- 1 tbsp balsamic vinegar (optional, for balance)
Step-by-step instructions
-
Season and dry the ribs.
Pat the short ribs dry (this helps browning). Season generously with salt and pepper on all sides.
If you have time, salt them 30–60 minutes ahead for deeper seasoning. -
Optional: lightly flour for a silkier sauce.
Sprinkle the ribs with flour (or dredge lightly), then shake off excess. This is not mandatory, but it helps the sauce cling. -
Sear the ribs until deeply browned.
Heat oil in a Dutch oven over medium-high heat. Sear ribs in batchesdon’t crowd the potuntil browned on all sides.
Take your time here. Brown equals flavor. Transfer browned ribs to a plate. -
Sauté the aromatics.
Lower heat to medium. Add onion, carrots, and celery. Cook 6–8 minutes, scraping up browned bits as the vegetables release moisture.
Add garlic and cook 30 seconds (just until fragrant, not until it has regrets). -
Cook the tomato paste.
Stir in tomato paste and cook 2 minutes. This caramelizes it slightly and deepens the “wow” factor in the sauce. -
Deglaze with wine.
Pour in the red wine and scrape the bottom of the pot thoroughly to dissolve the browned fond.
Simmer 3–5 minutes to reduce slightly. -
Add broth, herbs, and ribs.
Add beef broth until the liquid comes about halfway up the ribs. Stir in Worcestershire, bay leaf, thyme, and rosemary.
Nestle the ribs back in (bone side down if possible). The liquid should gently surround, not drown, the meat. -
Bring to a low simmer, then cover and braise on the stove.
Increase heat to bring the liquid to a gentle simmer. Reduce heat to low.
Cover with a lid slightly ajar so steam can escape (this helps the sauce reduce without drying out).
Maintain a lazy simmera few bubbles, not a rolling boil. -
Simmer until fork-tender.
Cook 2 1/2 to 3 hours, turning the ribs once or twice.
They’re done when a fork slides in easily and the meat is tender enough to pull apart with minimal effort.
If the liquid drops too low, add a splash more broth. -
Skim fat and finish the sauce.
Transfer ribs to a platter and tent with foil.
Skim excess fat from the surface of the sauce. (For the easiest degreasing: chill the sauce and lift off the solid fat.)
If you want a thicker sauce, simmer uncovered 10–15 minutes. Taste and adjust with salt, pepper, and a small splash of balsamic vinegar if needed. -
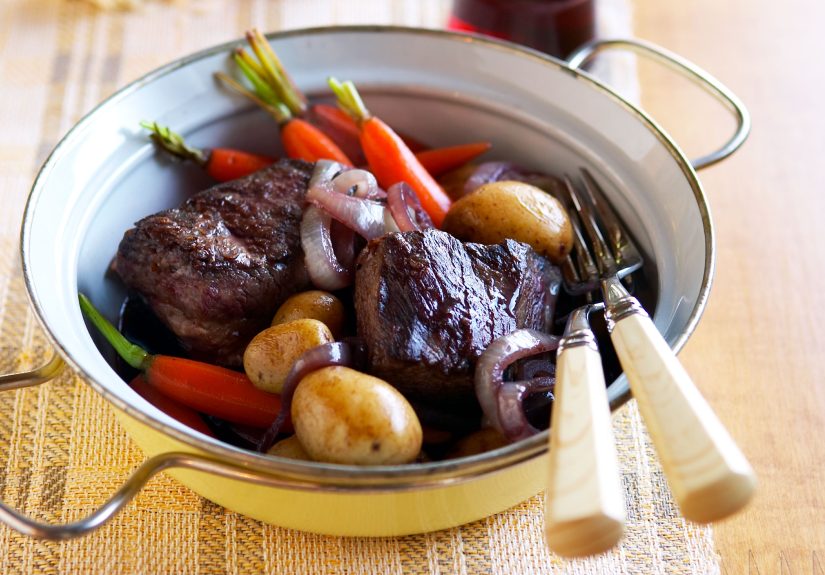
Serve like you mean it.
Spoon sauce over the ribs and serve hot.
This is not the moment for modestyladle generously.
Best Sides for Stove-Top Braised Short Ribs
Short ribs are rich, so the best sides either soak up sauce or provide contrast.
- Mashed potatoes (the classic sauce sponge)
- Creamy polenta (silky + luxurious)
- Egg noodles or pappardelle (turn leftovers into a ragu situation)
- Roasted carrots or Brussels sprouts (sweet + bitter balance)
- Simple green salad (crunch and acidity to cut the richness)
Flavor Variations (Because Short Ribs Love Attention)
Beer-braised short ribs
Swap the wine for a dark beer (stout or porter). The result is roasty, slightly bittersweet, and perfect for cold weather or dramatic monologues.
Cola-braised short ribs
Add a small amount of cola to the braising liquid for subtle sweetness and caramel notes. It sounds odd until you taste it and suddenly it makes
complete sense.
Coffee-and-bourbon style
Add a splash of bourbon and a tiny bit of espresso (or espresso powder). It won’t taste like coffeemore like “mysteriously deeper.”
Ginger-soy braise
Replace wine with broth, add soy sauce, ginger, scallions, and a bit of brown sugar. Serve with rice and something green.
Common Problems (And How to Fix Them)
“My short ribs are still tough.”
They’re not done yet. Tough short ribs usually mean they haven’t had enough time for collagen to break down. Keep simmering at low heat and check
again every 20–30 minutes.
“My sauce tastes flat.”
Add a small hit of acid (balsamic, red wine vinegar, or lemon), plus salt. Rich food needs contrast. Your tongue will thank you.
“My sauce is too thin.”
Simmer uncovered to reduce. If you need a faster fix, whisk 1 tsp cornstarch with 1 tbsp cold water and stir in, then simmer 2 minutes.
“My sauce is greasy.”
Skim the surface fat while warm, or chill and lift off the solid fat cap. (This is one of the reasons short ribs are even better the next day.)
Make-Ahead, Storage, and Reheating Tips
Short ribs are famously better after a rest. Make them a day ahead, chill overnight, remove the solid fat, then gently reheat on the stove.
Store leftovers in an airtight container in the fridge and reheat until steaming hot. Freeze portions for future-youwho will feel like a genius.
of “Real-Kitchen” Experience With Stove-Top Short Ribs
If you’ve never made short ribs on the stove, the first time can feel like a weird trust fall: you sear expensive meat, pour liquid around it,
put a lid on, and then… wait. The good news is that stove-top braising is one of those cooking methods where small mistakes rarely ruin dinner.
The even better news is that the “experience” of making short ribs is mostly learning how to read your pot like it’s trying to communicate with you.
The biggest lesson most home cooks learn quickly is that heat control matters more than fancy ingredients. A hard boil can make the
meat seize and the sauce reduce too fast, leaving you with dry-ish ribs and a scorched pot bottom. A gentle simmer, on the other hand, is like a spa
day for tough cuts: low stress, high reward. You’re looking for a few bubbles breaking the surface and a steady little puff of steam. If you hear
aggressive splashing, your pot is basically yelling at you.
Another “aha” moment: browning is not optional if you want restaurant-level flavor. It’s tempting to rush the sear, especially when
the kitchen gets smoky and you start questioning your life choices. But that deep brown crust is where the flavor lives. The trick is to pat the ribs
dry, work in batches, and don’t move them around like nervous furniture. Let the meat sit long enough to develop color. If the ribs stick at first,
that’s normalgive them a minute and they’ll release when they’re ready.
Then there’s the sauce. The sauce is where short ribs go from “nice” to “I could cry right now.” Many cooks discover that the sauce tastes better
after it reduces a bit and gets a final adjustment of salt and acid. A small splash of vinegar at the end can transform the whole pot, making the
flavors pop instead of feeling heavy. It’s not about making the dish sour; it’s about giving your taste buds a high-five.
And finally: short ribs are a patience dish, but not a stressful dish. While they simmer, you can do literally anything elsefold laundry,
watch a show, text a friend “I am braising,” and instantly become the most interesting person in the group chat. When you lift that lid near the end,
you’ll see the transformation: meat relaxed, sauce glossy, kitchen smelling like you have your life together. You don’t. The pot does. And tonight,
that’s good enough.
Conclusion
This stove-top short ribs recipe is the kind of meal that feels fancy but behaves like comfort food: sear, simmer, and let time do
the heavy lifting. Serve it with mashed potatoes, noodles, or polenta, and don’t forget the final sauce tweakbecause great short ribs aren’t just
cooked, they’re finished. Make it once and you’ll start looking at your Dutch oven like it’s a small, dependable miracle.