Table of Contents >> Show >> Hide
Bright, buttery, and just fancy enough to make your weeknight dinner feel like it owns a tiny vineyard.
Why This Recipe Works
“String beans with shallots” sounds simple because it isbut it’s also one of those sneaky side dishes that can
upstage a roast chicken, intimidate a casserole, and make a steak feel emotionally supported. The magic is in the
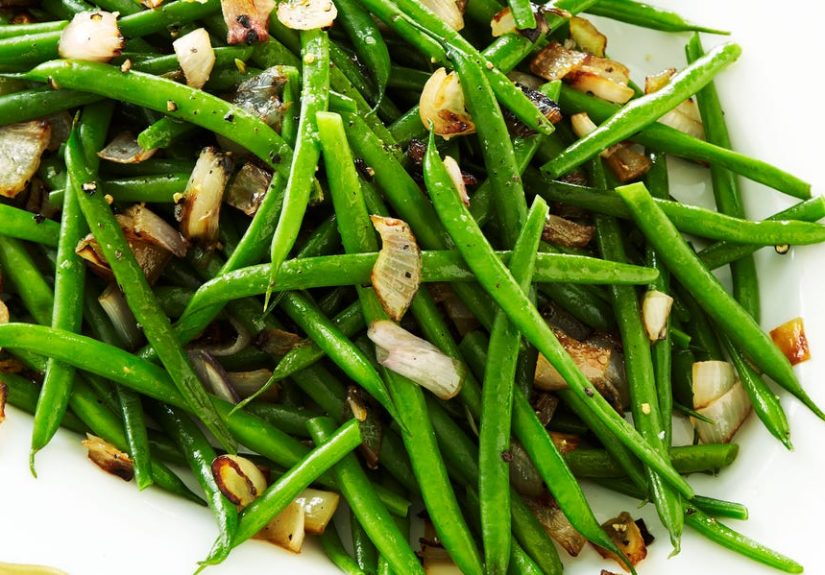
contrast: crisp-tender green beans (or haricots verts if you’re feeling French about it) paired with sweet,
mellowed shallots that taste like onions went to finishing school.
Most great U.S. test-kitchen versions land on the same idea: keep the beans green and snappy, and build flavor
with shallots cooked in butter and/or olive oil. Many recipes also lean on one key technique for texture and color:
a quick blanch followed by a rapid chill so the beans don’t drift into the sad, army-green zone.
After that, it’s all about a fast sauté to coat everything in shallot-y goodness.
Bonus: this string beans with shallots recipe scales beautifully. It can be a quick Tuesday side,
a holiday table staple, or the “I brought vegetables” dish that people actually eat at potlucks (a rare and noble role).
Ingredients
Main Ingredients
- 1 pound green beans (string beans) or haricots verts, trimmed
- 3 large shallots, thinly sliced (or 2 jumbo shallots)
- 2 tablespoons unsalted butter
- 1 tablespoon olive oil (helps keep butter from browning too fast)
- Kosher salt and freshly ground black pepper
Flavor Finish (Choose One “Vibe”)
- Lemon finish: 1 teaspoon lemon zest + 1–2 teaspoons lemon juice
- Vinegar finish: 1–2 teaspoons sherry vinegar or red wine vinegar
- Dijon finish: 1 teaspoon Dijon mustard whisked into 1 tablespoon olive oil (quick “warm vinaigrette”)
Optional Add-Ins (Because You’re the Boss Here)
- Garlic: 1–2 cloves, thinly sliced (add late so it doesn’t burn)
- Herbs: chopped parsley, thyme leaves, or tarragon
- Crunch: toasted hazelnuts, almonds, or buttery breadcrumbs
- Umami: a sprinkle of Parmesan, or a pinch of flaky salt at the end
- Holiday energy: crispy fried shallots on top
- Meaty option: pancetta or bacon bits (tiny salty confetti)
Main keyword note (naturally, not loudly):
This recipe is built around classic sautéed green beans with shallots flavor, with optional upgrades like
caramelized shallots or crispy shallot topping.
Shopping & Prep Tips
Choosing the Beans
Look for beans that are firm, bright green, and free of wrinkles. If you can bend one and it snaps rather than
droops, you’re in business. Haricots verts are thinner and cook a little faster; standard green beans are slightly
meatier and more forgiving.
Trimming Without Losing Your Weekend
Line up a handful of beans, trim the stem ends in one swoop, and call it a day. You can trim the pointy tail ends
too, but it’s mostly for aesthetics (and your beans won’t file a complaint if you skip it).
Shallot Slicing: Thin Is Your Friend
Thinly sliced shallots cook quickly and melt into the beans. For caramelized shallots, slightly thicker half-moons
work toojust expect a longer cook time. If your eyes water, congratulations: you are experiencing the shallot’s
emotional depth.
Step-by-Step Recipe: String Beans with Shallots
Serves: 4 (as a side) • Prep: 10 minutes • Cook: 10–15 minutes
Step 1: Blanch the Beans (Fast, Bright, and Worth It)
- Bring a large pot of water to a rolling boil and salt it generously. While it heats, set up a big bowl of ice water.
-
Add the trimmed beans and cook until crisp-tender:
- Haricots verts: about 2–3 minutes
- Standard green beans: about 3–5 minutes
-
Immediately transfer beans to the ice bath to stop the cooking. Once cool, drain well and pat dry.
Dry beans = better sauté. Wet beans steam, and steaming is how crispness goes to retire early.
Step 2: Cook the Shallots (The Flavor Engine)
- Heat butter and olive oil in a large skillet over medium heat.
-
Add sliced shallots with a pinch of salt. Cook, stirring often, until softened and turning golden at the edges,
about 6–10 minutes. -
Want deeper sweetness? Reduce heat to medium-low and cook 5 minutes longer to push toward
caramelized shallots (watch closely so they don’t burn).
Step 3: Toss, Season, Finish
- Add the dried beans to the skillet and toss until heated through, about 2–3 minutes.
- Season with pepper and a final pinch of salt if needed.
-
Add your finish:
- Lemon: stir in zest, then a squeeze of juice
- Vinegar: splash in 1–2 teaspoons and toss quickly
- Dijon: whisk Dijon with olive oil and toss into warm beans for a glossy “warm vinaigrette” feel
- Optional: top with herbs, nuts, breadcrumbs, Parmesan, or crispy fried shallots.
Chef-y Tip Without the Chef-y Attitude
If you’re serving this at a holiday meal, keep the beans slightly underdone during blanching (still snappy),
because they’ll soften a touch when reheated and tossed with the shallots.
Variations (Roasted, Crispy, Bacon-y)
1) Roasted Green Beans with Shallots
Prefer your beans blistered with toasty edges? Toss beans and shallots with olive oil, salt, and pepper. Roast on a
sheet pan at 425–450°F for 15–18 minutes, stirring once. Finish with lemon or vinegar.
Roasting makes the shallots jammy and the beans slightly smoky.
2) Crispy Fried Shallot Topper (Restaurant Crunch)
You can buy crispy fried shallots (many grocery stores and Asian markets have them), or make them yourself if you
enjoy delicious projects. Sprinkle on top right before serving so they stay crisp. This is the move when you want
the dish to say, “I came to win Best Side Dish,” without yelling it.
3) Green Beans with Shallots and Pancetta
Cook diced pancetta until crisp, remove to a paper towel, then cook shallots in the rendered fat (with a little
butter if needed). Toss in blanched beans, season, and add pancetta back in at the end. Salty + sweet + green
equals a very reliable crowd-pleaser.
4) Pickled Shallot Twist
If you love a tangy punch, quick-pickle sliced shallots in vinegar with a pinch of sugar and salt for 15 minutes.
Blister or sauté the beans, then toss with the pickled shallots and a drizzle of olive oil. It tastes bright, modern,
and slightly “I read menus for fun.”
5) Brown Butter Moment
Let the butter brown lightly before adding shallots (watch carefully). You’ll get a nutty, cozy flavor that makes
green beans feel like they’re wearing a soft sweater.
Make-Ahead, Storage, and Reheating
Make-Ahead Strategy (Best for Holidays)
Blanch and shock the beans up to 24 hours ahead. Dry thoroughly and refrigerate in an airtight container
(paper towel inside helps absorb moisture). Slice shallots ahead too. When it’s go-time, cook shallots and toss
beans in the skillet for a fast finish.
Storing Leftovers
Store in the fridge for up to 3–4 days. Reheat gently in a skillet with a tiny splash of water or a dab
of butter. Microwaving works, but the skillet keeps the texture nicer.
Freezing?
Blanched beans freeze well, but once dressed with butter and shallots, texture can soften more than you want.
If freezing matters, freeze the blanched beans plain, then cook shallots fresh later.
Serving Ideas
This green bean side dish with shallots is flexiblelike a good pair of jeans, but edible:
- Weeknight: serve with roast chicken, salmon, pork chops, or a cozy bowl of pasta
- Holiday: pairs perfectly with turkey, prime rib, ham, stuffing, and anything that needs a green break
- Potluck: choose the roasted version for easier transport and less last-minute skillet juggling
- Vegetarian plate: add toasted nuts + a mustardy vinaigrette finish for a more “main event” feel
If you’re building a menu, think in contrasts: rich main + bright beans. Your taste buds will thank you, and your
dinner guests will stop asking where you bought “those fancy green beans.” (You didn’t. You made them. Cue dramatic hair flip.)
FAQs & Troubleshooting
Why blanch at all? Can’t we just sauté?
You can sauté from raw, especially if you like blistered beans, but blanching gives you consistent crisp-tender
texture and keeps the color vibrant. It also makes the final skillet toss super fast, which is ideal when everything
else on the stove is fighting for attention.
My beans turned soft. What happened?
Overcooking is the usual culpriteither too long in boiling water, or reheated too aggressively. Pull them when
they’re still a touch firm, then finish in the skillet. Also: don’t skip the rapid chill.
My shallots burned. How do I avoid that?
Shallots go from “golden and sweet” to “bitter and tragic” quickly. Use medium heat, stir often, and if they start
browning too fast, lower the heat and add a teaspoon of water to cool things down.
How do I make this taste more “restaurant”?
Add a finishing pop: lemon zest, sherry vinegar, a tiny spoon of Dijon, or a sprinkle of flaky salt. Then add
texture: crispy fried shallots, toasted nuts, or breadcrumbs. That’s the secret handshake.
Can I use frozen green beans?
Fresh is best for snap, but frozen can work. Thaw and dry well, then sauté quickly with shallots. Frozen beans are
softer by nature, so aim for the roasted or skillet-toss version and don’t overcook.
Nutrition Notes
Green beans bring fiber and micronutrients, while shallots add flavor depth with minimal fuss. The butter and olive
oil make the dish satisfying and help carry flavorplus, they make vegetables feel like they belong at the party.
If you want it lighter, reduce butter to 1 tablespoon and lean on olive oil and lemon for brightness.
Kitchen Experiences & Real-Life Moments (Extra )
A funny thing happens with a string beans with shallots recipe: people who “don’t really do vegetables”
suddenly do vegetables. It’s not because green beans are secretly dessert (they’re not), but because shallots are
persuasive. In a lot of American home kitchens, this dish becomes the “gateway side” that quietly upgrades dinners
without asking anyone to learn a new personality.
One of the most common experiences is discovering how much timing matters. Many cooks have a green bean memory
not always a happy oneof beans that were cooked until they gave up all hope. This recipe flips that script. The
first time someone pulls beans at crisp-tender and shocks them cold, the reaction is usually the same: “Wait, so
that’s why restaurant beans are so green.” It’s a tiny technique that creates an outsized win, especially for people
who want reliable results without turning dinner into a science fair.
Shallots also tend to change minds. People often expect shallots to behave like onions, but they’re softer, sweeter,
and a little more elegantlike onions wearing a blazer. When shallots hit warm butter and olive oil, they turn glossy,
mellow, and almost jammy. The smell alone can pull someone into the kitchen with a casual “What are you making?”
(Translation: “I would like to taste that immediately.”)
There’s also a very real holiday experience tied to this dish. Green bean casserole gets most of the attention, but
simple green beans with shallots often win on the plate because they cut through the heavier stuff. At big gatherings,
guests frequently build bites that combine a slice of turkey, a little gravy, and a forkful of these beansbecause
the bright, buttery shallot flavor plays well with everything. It’s the side dish equivalent of being friends with
every group in school: athletes, theater kids, band kids, everyone.
On weeknights, the experience is different but equally useful. This recipe fits into the “I want something fresh,
but I also want dinner in under 30 minutes” reality. Many home cooks end up keeping shallots around specifically
for this purpose. Once you’ve made beans this way, you start noticing other opportunities: toss the same shallots
over roasted potatoes, stir them into rice, or use them to upgrade a simple omelet. It’s a small ingredient that
quietly improves the vibe of your whole fridge.
The most satisfying moment, though, might be the leftovers. Cold green beans aren’t everyone’s dream snack, but
beans tossed with shallots and a little vinegar or Dijon can turn into a surprisingly good “next-day salad” situation.
People often report grabbing a fork straight from the container, which is a strong endorsement in the language of
real life. If you add toasted nuts or crispy shallots at serving time, you get the even rarer experience: leftovers
that still feel special instead of sad.
Ultimately, the shared kitchen experience around this recipe is confidence. It’s an approachable technique that
teaches a couple of small skillsblanching, quick sautéing, finishing with acidthat translate to dozens of other
dishes. And if the goal is to serve vegetables that people actually want to eat, this one has an excellent track record.