Table of Contents >> Show >> Hide
- Why This Is the Quickest and Easiest Method
- What a Family Organization Center Should Actually Hold
- The Best Layout for Speed and Function
- Tools and Materials That Keep the Job Easy
- Step-by-Step: The Quickest Way to Install It
- When Drywall Anchors Make Sense
- When Adhesive Hooks Are Helpful
- Common Mistakes That Make the Project Slower
- Simple Design Ideas That Make It Look Better Fast
- Experiences and Practical Lessons From Real Family Setups
- Conclusion
If your kitchen counter looks like a mailroom, your entryway looks like a sneaker convention, and your kids keep asking where their backpacks are while standing directly next to their backpacks, it may be time for a family organization center. The good news: you do not need a full custom mudroom, a weekend-long renovation, or the patience of a saint. The quickest and easiest way to hang shelves and hooks for a family organization center is to keep the design simple, mount the main support into wall studs, and use one solid “base” system that makes the rest of the setup easy to adjust.
In plain English, the fastest no-drama method is this: install a level backer board or a sturdy wall-mounted rail across studs, then attach your shelf brackets and hooks to that support zone. It is quicker to line up, easier to keep level, more forgiving than installing every piece separately, and much more practical for a busy household that will absolutely change its mind about where keys, lunch boxes, jackets, and permission slips should live.
This approach works especially well for a family command center in an entryway, mudroom nook, kitchen wall, hallway, or near the garage door. It gives you a place for the everyday essentials without making your home feel like a hardware aisle exploded in the middle of dinner.
Why This Is the Quickest and Easiest Method
When people struggle with hanging shelves and hooks, the problem usually is not the shelf. It is the layout, the measuring, or the wall hardware. Hanging each hook and bracket individually means more measuring, more chances to miss a stud, more anchor choices, and more opportunities to say words that are not suitable for a family organization center.
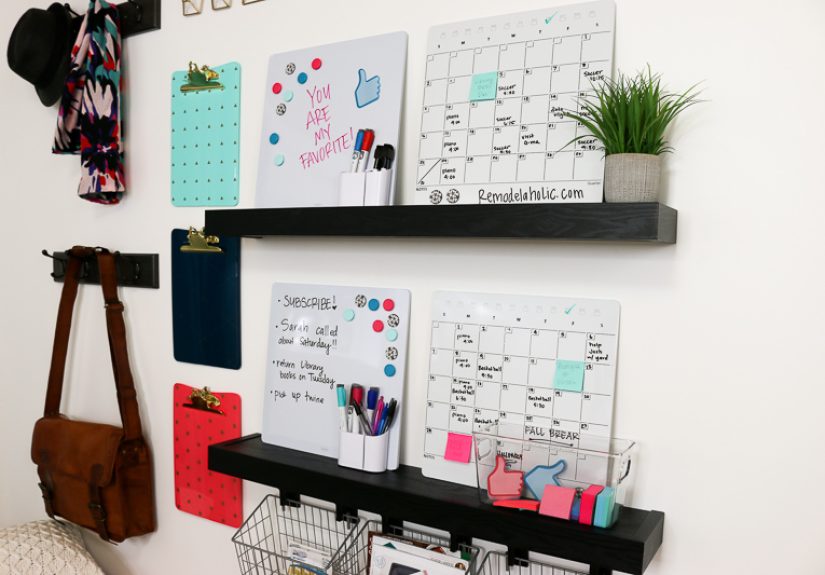
A backer board or rail-based setup simplifies the whole job. Once the support piece is level and securely fastened, everything else becomes easier. You can place a small shelf above for mail bins or baskets, add hooks below for bags and jackets, and leave room nearby for a calendar, corkboard, whiteboard, or charging station.
It also looks intentional. That matters. A family command center should feel helpful, not like a rescue mission for loose screws and random baskets.
The biggest advantages
- Fewer wall mistakes: You secure one main support correctly instead of fussing with every piece separately.
- Better strength: Stud-mounted support handles daily wear better than relying on multiple drywall anchors for heavier items.
- Easier upgrades: Need more hooks in six months? Add them to the support board instead of making new holes all over the wall.
- Cleaner look: A single organized zone looks more polished than scattered shelves and hooks.
What a Family Organization Center Should Actually Hold
Before you touch a drill, decide what this station needs to do. A family organization center is not just pretty wall decor with a clipboard. It should solve the daily traffic jam at your door or kitchen pass-through.
Most families need room for a mix of these items:
- Backpacks and tote bags
- Jackets or hoodies
- Keys and lanyards
- Mail and school papers
- Lunch boxes
- Sunglasses or hats
- Charging cords
- A weekly calendar or reminder board
The trick is to separate heavy everyday items from light occasional items. Backpacks full of books and sports gear are not “cute little hook” items. They need sturdy hardware and a secure mounting method. A small hook for keys or a lightweight note board is a different story.
The Best Layout for Speed and Function
If you want the fastest setup with the best payoff, use a simple three-zone design:
1. Top zone: shelf
Use one shelf for baskets, mail sorters, spare chargers, or items you want nearby but not dangling in plain sight. This keeps visual clutter under control and gives the wall a finished look.
2. Middle zone: information
This is where a small whiteboard, calendar, corkboard, or family checklist goes. If your household runs on sports practice, field trip reminders, and “Who is picking up whom?” energy, this zone earns its keep fast.
3. Bottom zone: hooks
Hooks should handle the grab-and-go stuff: bags, jackets, hats, or keys. Put the most frequently used hooks at adult shoulder height, and add lower hooks for kids if they are expected to use the system without climbing like raccoons.
Tools and Materials That Keep the Job Easy
You do not need an advanced workshop. A basic tool kit is enough:
- Stud finder
- Level
- Tape measure
- Pencil
- Painter’s tape
- Drill/driver
- Screws rated for your wall and hardware
- Wall anchors for lighter items if needed
- One wood backer board, wall rail, or shelf track component
- Shelf brackets and shelf board
- Hooks
If you want the fastest finish, buy pre-cut wood from a home center and have it cut to size in-store. A painted board in white, black, oak, or walnut-tone usually blends nicely with most modern homes. It looks custom without demanding custom-level effort.
Step-by-Step: The Quickest Way to Install It
Step 1: Pick the wall and keep the footprint compact
Choose a wall close to the main entry point your family actually uses. Not the theoretical front door that exists for holiday photos. The real one. The garage entry, mudroom pass-through, hallway corner, or kitchen wall near the door is often the most useful spot.
Keep the width manageable. A center that is about the width of two stud bays is often perfect for one shelf and several hooks without taking over the whole room.
Step 2: Find and mark the studs
Use a stud finder and mark the center of each stud with pencil or painter’s tape. This is the part that saves you from weak mounting and future regret. If your shelf or hook area will carry bags, heavy coats, or bins, studs matter more than aesthetics, and frankly, more than optimism.
Step 3: Mark a level line
Use painter’s tape or a pencil line to mark where the top of your backer board or rail will go. Check level twice. This sounds boring because it is boring, but it is also the difference between “professional-looking family command center” and “why does this shelf look seasick?”
Step 4: Mount the backer board or rail
Fasten the backer board or rail directly into the studs with appropriate screws. This is the heart of the whole system. Once it is secure, you have created a strong, stable mounting zone that can support shelves and hooks more confidently than a patchwork of random anchors.
If you are using a wood backer board, predrill the screw holes first for easier alignment. If you are using a manufactured rail or track system, follow the product spacing instructions carefully. Adjustable systems are especially handy if you want to change shelf height later without turning your wall into Swiss cheese.
Step 5: Add your shelf brackets
Attach the shelf brackets to the backer board or directly into the supported installation area. Make sure the brackets are level with one another before placing the shelf board on top. A single shelf is usually enough for a family organization center. This is not the moment to build a wall library unless your mail arrives in hardcover.
For families, shallow shelves often work better than deep ones. They hold the essentials without creating a tempting place to hide mystery papers, old coupons, and one lonely battery that belongs to nothing.
Step 6: Install hooks below the shelf
Hooks should go where arms naturally reach, not where they merely look symmetrical in a photo. Space them based on actual items. Backpack hooks need more room than key hooks. If several people will use the center every day, give each person a dedicated hook or pair of hooks. Households run on ownership. The phrase “That’s your hook” is surprisingly powerful.
If you want a mix of heavy-duty and light-duty storage, use screwed-in hooks for backpacks and jackets, and reserve adhesive hooks for lighter extras like lanyards, small notes, or charging cords.
Step 7: Add organization accessories last
Once the structural pieces are installed, finish the center with a whiteboard, basket labels, mail slots, or a corkboard. This final layer is what turns a shelf-and-hooks setup into a true family organization center.
When Drywall Anchors Make Sense
Drywall anchors are helpful, but they are not magic. They are a good option for lighter accessories or when you cannot land directly on a stud. They are not the smartest choice for the heaviest, most frequently yanked-on items in a family drop zone.
That is why the quickest and easiest plan is not “put anchors everywhere and hope.” It is “put the main load into studs, then use anchors only where they truly make sense.” That gives you a faster install, fewer failures, and a wall that does not look like it survived a very specific kind of woodpecker.
Also, do not overtighten anchors. More force does not automatically mean more strength. Sometimes it just means damaged drywall and a fresh reason to learn patching.
When Adhesive Hooks Are Helpful
Adhesive hooks can absolutely help inside a family organization center, especially for very light items or supporting extras on the side of cabinets, inside a pantry door, or near a charging station. They are great for temporary or flexible organization and can save time when you do not want more drill holes.
But use them wisely. They are better for cords, lightweight accessories, or reminder tools than for overloaded school bags. And if you use them, follow the surface prep and waiting instructions carefully. The fastest way to turn “easy” into “annoying” is to hang something too soon and watch it pop off the wall in front of your children, who will remember that forever.
Common Mistakes That Make the Project Slower
- Skipping the stud finder: This is how easy projects become repair projects.
- Making the shelf too deep: Deep shelves attract clutter like free pizza attracts teenagers.
- Using one type of hook for everything: Keys, jackets, and backpacks do not all need the same hardware.
- Installing it too high: If kids cannot reach their hook, they will invent a new storage system called “the floor.”
- Adding too many features: A simple center used daily beats an elaborate one ignored daily.
- Ignoring visual clutter: Baskets, labels, and consistent finishes keep the area calm and usable.
Simple Design Ideas That Make It Look Better Fast
You do not need a designer budget to make the center look polished. A few smart choices go a long way:
- Paint the backer board to match the trim or wall color for a built-in feel.
- Use matching black, brass, or brushed nickel hooks for a cleaner finish.
- Add labeled baskets on the top shelf for mail, chargers, and grab-and-go items.
- Choose one small whiteboard instead of multiple paper notes flapping around like surrender flags.
- Leave a little empty space. Organization looks better when it can breathe.
Experiences and Practical Lessons From Real Family Setups
One of the most useful lessons from real family organization projects is that the “perfect” center is rarely the one with the most accessories. It is the one that fits the family’s actual routine. In many homes, the most successful setup starts with a single sturdy shelf, a row of dependable hooks, and one place for incoming paper. That is it. Families often begin by imagining a full command station with labeled bins, multiple calendars, charging drawers, clipboards, and decorative signs announcing that life is beautiful. Then Tuesday happens. Someone drops a soccer bag, someone else throws mail on the counter, and the fancy system turns into wall art. The simpler setup usually wins because people use it without thinking.
Another common experience is that height matters more than style. Parents often install everything at adult height because it looks cleaner, then wonder why kids still drop coats on a chair two feet away. As soon as lower hooks are added, the whole system starts working better. Children do not suddenly become organized because a hook exists; they become more organized when the hook is easy to reach, clearly theirs, and located exactly where they stop walking. Tiny difference, huge improvement.
Many households also discover that the shelf should not be asked to do too much. A family center works best when the shelf holds contained items rather than loose piles. A couple of baskets, a mail sorter, or a tray for sunglasses is practical. A mountain of unsorted paper, five water bottles, and three unmatched gloves is not “storage.” It is a suspense thriller. Families who keep only high-value, daily-use items on the shelf usually stay happier with the system over time.
Hook spacing is another real-world lesson. On paper, evenly spaced hooks look beautiful. In practice, bags are bulky, puffy coats spread out, and one child will absolutely hang a backpack like it is trying to occupy multiple zip codes. Slightly wider spacing makes the center more usable. The wall may look a bit less formal, but daily function improves. And daily function is the whole point.
There is also a repeating pattern with drywall anchors: they are wonderful right up until someone treats a light-duty hook like a gym apparatus. Families tend to be rough on entryway storage because they are in a hurry. That is why the centers that last are the ones where the heavy-use parts are secured into studs or into a strong mounted support. The lighter accessories can be flexible. The main structure should not be.
Finally, the most successful family organization centers are adjusted after a week or two of real use. Maybe the keys need to move left. Maybe the lunch bags need a second hook. Maybe the paper tray belongs lower because everyone avoids the top shelf. That is normal. A good setup is not a museum exhibit. It is a living station that should get easier to use the longer your family lives with it. If the system helps mornings run smoother, keeps clutter off the counter, and prevents one daily “Where is my stuff?” meltdown, then congratulations: your shelves and hooks have become overachievers.
Conclusion
The quickest and easiest way to hang shelves and hooks for a family organization center is to start with strength, not guesswork. Mount one solid support zone into studs, keep the layout simple, add one useful shelf, and place hooks where your family naturally reaches for everyday items. That approach is faster to install, easier to keep level, and far more durable than trying to piece together a wall full of random hardware.
Most of all, remember that the best family organization center is not the fanciest one. It is the one that works on a rushed Monday morning, a rainy Thursday afternoon, and that weird Friday when everyone has three different bags for some reason. Build for real life, and your wall will finally start pulling its weight.