
Table of Contents >> Show >> Hide
- Why an Old Glass Table Top Makes a Great Mosaic Wall Light
- Before You Start: Safety Comes First
- Materials and Tools You Will Need
- Design Ideas for a Stained Glass Mosaic Wall Light
- Step-by-Step: How to Upcycle the Table Top
- Color Planning Tips for a Better Glow
- Common Mistakes to Avoid
- How to Style Your Mosaic Wall Light at Home
- Experience Notes: What This Project Teaches You
- Conclusion
An old glass table top has a special talent: it can sit in a garage for years while everyone politely pretends it is “still useful.” It is too nice to throw away, too awkward to store, and too mysterious to match with any furniture you currently own. But with a little creativity, that forgotten circle or rectangle of glass can become something far more dramatic than a coffee table ever dreamed of being: a stained glass mosaic wall light.
This project blends upcycling, mosaic art, and soft ambient lighting into one eye-catching home decor idea. Instead of sending a heavy glass table top to the landfill, you transform it into a glowing wall feature filled with color, texture, and handmade character. Think of it as a night-light that went to art school, learned sustainability, and came home with excellent taste.
In this guide, you will learn how to plan the design, choose safe materials, attach stained glass pieces, grout the mosaic, add a simple low-voltage LED backlight, and mount the finished piece as wall decor. The goal is not to create a perfect factory-made lamp. The goal is to make something beautiful, personal, and slightly magical from an object that nearly became clutter.
Why an Old Glass Table Top Makes a Great Mosaic Wall Light
A glass table top is already flat, sturdy, transparent, and often finished around the edges. That makes it a strong candidate for a glass-on-glass mosaic. When colored glass pieces are attached to the surface, light can pass through them, creating the jewel-like glow people love in stained glass windows.
Unlike traditional stained glass, which often uses copper foil, solder, or lead came, a mosaic wall light is more beginner-friendly. You are not building a window panel from separate pieces that must hold themselves together. Instead, the table top acts as the base. The colored glass pieces, also called tesserae, are glued to the surface, then grouted to define the pattern and create a finished look.
This makes the project ideal for DIY home decor lovers who enjoy craft projects but do not want to start with complicated soldering. It also gives you a lot of artistic freedom. Your design can be floral, geometric, coastal, abstract, celestial, or delightfully chaotic in a “my creativity had coffee” kind of way.
Before You Start: Safety Comes First
Working with glass is rewarding, but it deserves respect. Always wear safety glasses, cut-resistant gloves, closed-toe shoes, and a dust mask when handling glass fragments or grout powder. Work on a stable surface, keep pets and younger children away from the area, and clean up tiny shards carefully. A handheld vacuum used only for craft cleanup or a damp disposable towel can help catch the sneaky glitter-like bits that glass leaves behind.
One important warning: many glass table tops are tempered glass. Tempered glass is designed for strength and safety, but it should not be cut, drilled, or reshaped after tempering. For this project, use the old table top as the full base. Do not try to trim it. If you need holes, special edges, or a different size, ask a professional glass shop before beginning.
For the lighting, avoid homemade electrical experiments. Use a plug-in, low-voltage LED strip or LED puck lights from a reputable manufacturer. Choose lighting labeled for indoor use and follow the product instructions. If you want hardwired wall lighting, hire a licensed electrician. The finished piece should glow beautifully, not make your breaker box file a complaint.
Materials and Tools You Will Need
The exact supply list depends on your design, but most stained glass mosaic wall light projects use a similar set of materials. Start with the old glass table top, cleaned thoroughly and checked for cracks. You will also need stained glass scraps, glass mosaic tiles, or transparent glass pieces in your chosen color palette.
For adhesive, choose a clear-drying glue suitable for glass-on-glass mosaics. Many mosaic artists use clear-drying craft adhesives or silicone-based options, depending on the final location and desired transparency. Read the label carefully and confirm that the adhesive bonds to glass. Use it sparingly enough that it does not flood the gaps, but generously enough to hold each piece securely.
You will also need sanded or unsanded grout depending on the gap size between pieces. For narrow joints, unsanded grout is often easier to work into small spaces. For wider gaps, sanded grout may provide more body. A dark gray or charcoal grout creates bold stained-glass-style outlines, while white grout gives a lighter, airy look. Colored grout can also be used if you want the background lines to become part of the design.
Helpful Tools
Useful tools include a glass cutter, running pliers, glass nippers, a marker, paper template, painter’s tape, disposable gloves, mixing container, grout float or old plastic card, soft rags, sponge, and a small brush. If you are buying pre-cut glass mosaic tiles, you may not need cutting tools at all. That option is easier, safer, and still gives a gorgeous result.
Design Ideas for a Stained Glass Mosaic Wall Light
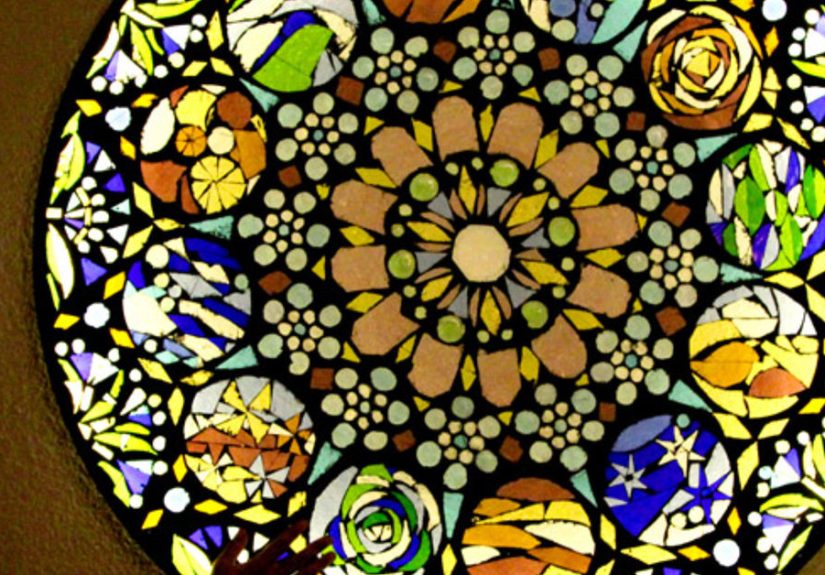
The best design for an upcycled glass table top depends on the table shape. A round table top naturally suits sunbursts, moons, mandalas, flowers, peacock feathers, ocean waves, or abstract rings. A rectangular table top works well for landscapes, city skylines, vertical botanical patterns, Art Deco lines, or modern geometric blocks.
For beginners, large shapes are easier than tiny details. A simple mountain scene with a sunset, a tree silhouette, or a flowing river can look stunning when backlit. If you want a more modern look, try color-blocked glass in blues, greens, amber, and clear pieces. The light will do half the work for you. That is the secret of stained glass: even simple shapes become dramatic when they glow.
Print or sketch your design at full size. Tape the pattern behind the glass table top so you can see the lines through the surface. This makes placement much easier. If your table top is tinted, smoked, or frosted, use a bold marker on the pattern so the lines remain visible.
Step-by-Step: How to Upcycle the Table Top
1. Clean and Inspect the Glass
Wash the glass table top with mild soap and water, then dry it completely. Remove grease, dust, old adhesive, and fingerprints. Any residue can weaken the bond between the base and the mosaic pieces. Inspect the table top for cracks, chips, or unstable edges. Small edge scuffs may be acceptable if they will be covered by a frame, but deep cracks are a sign to choose another base.
2. Create the Pattern
Decide whether the mosaic will be viewed mainly in daylight, at night, or both. For a wall light, contrast matters. Pale yellow glass may look soft and pretty in daylight, but with warm LEDs behind it, it can become very bright. Deep blue, ruby, green, amber, and violet glass often create rich glowing effects.
Place the full-size drawing under the table top and secure it with tape. If the table top has a metal rim, use it as a natural border. If it does not, plan to frame the finished piece with wood, metal, or a simple backing structure.
3. Cut or Arrange the Glass Pieces
If you are cutting stained glass, keep shapes simple. Straight lines and gentle curves are easier than sharp points or tiny curls. Score the glass once with steady pressure, then use pliers to break along the score. For a safer beginner version, use pre-cut mosaic glass tiles, glass gems, or stained glass scraps that already fit your design.
Lay the pieces onto the base before gluing. Leave consistent gaps for grout, usually around 1/8 inch, though handmade mosaics can vary slightly. Do not worry if the pattern is not mathematically perfect. Mosaic art thrives on small irregularities. That is not a mistake; that is charm wearing work boots.
4. Glue the Mosaic Pieces
Apply adhesive to one piece at a time and press it gently onto the table top. Avoid smearing glue into the grout gaps. Too much adhesive can dry cloudy or interfere with grout. Work from the center outward or from one major design section to another. This helps keep the pattern from drifting.
Let the adhesive cure fully according to the manufacturer’s instructions. Do not rush this stage. If the pieces move during grouting, you will say words that are not usually found in cheerful DIY blogs.
5. Grout the Mosaic
Mix grout in small batches until it reaches a peanut-butter-like consistency. Wear gloves and a dust mask when mixing. Spread grout over the surface with a float, plastic scraper, or gloved hand, pressing it firmly into the spaces between glass pieces.
After the grout begins to set, wipe away excess with a barely damp sponge or soft cloth. Do not over-wet the grout, especially on glass-on-glass work, because too much water can weaken the joints or wash grout out of the gaps. Once a haze forms on the glass, buff it gently with a dry cloth. Let the grout cure fully before handling the panel.
6. Add the Backlight
The easiest lighting method is to create a shallow backing frame behind the glass and attach a low-voltage LED strip around the inner edge. Warm white LEDs create a cozy golden glow, while cool white LEDs make blues and greens appear crisp. Some people prefer dimmable LEDs because stained glass can shift mood dramatically at different brightness levels.
Do not place LEDs directly against adhesive or grout if the product instructions warn against heat buildup. Leave a little air space behind the panel. Test the lighting before final mounting. This is the moment when your project goes from “interesting craft object” to “wait, did we just make boutique hotel decor?”
7. Frame and Mount the Wall Light
Because glass is heavy, mounting must be secure. A sturdy wooden frame, metal bracket, or French cleat system can help distribute the weight. The frame should support the glass safely without relying only on glue. If the table top is large, get help lifting and mounting it.
Choose a location near an outlet if using a plug-in LED system. Hide the cord with a cord cover, furniture placement, or a decorative channel. Keep the light away from moisture unless all components are specifically rated for damp areas. This project belongs in a living room, bedroom, hallway, reading nook, or covered indoor entrynot inside a shower or directly above a steamy bathtub.
Color Planning Tips for a Better Glow
Backlit mosaics behave differently from regular wall art. Opaque tiles may look beautiful on the table, but they will block light. Transparent and translucent glass pieces are best for glowing areas. Use opaque pieces only where you want shadow, contrast, or strong outlines.
Warm colors such as amber, orange, red, and gold feel cozy and energetic. Cool colors like blue, teal, and green feel calm and watery. Clear textured glass can add sparkle without overwhelming the design. Mirrored glass should be used carefully because it reflects light rather than letting it pass through.
If you are unsure, make a mini test. Place a few glass pieces over a flashlight or LED strip in a dark room. You will quickly see which colors sing and which ones mumble.
Common Mistakes to Avoid
The first mistake is choosing a design with too many tiny pieces. Detailed patterns look impressive online, but they can turn a weekend project into an archaeological expedition. Start with medium and large shapes, then add small accents only where they matter.
The second mistake is using too much glue. Thick blobs can dry unevenly, show through clear glass, or squeeze into grout lines. The third mistake is grouting before the adhesive has cured. Patience is not glamorous, but neither is reattaching fifty tiny pieces while covered in grout.
Another common issue is uneven lighting. If the LED strip sits only on one side, the mosaic may glow brightly near the edge and look dull in the center. A backing frame with LEDs around multiple sides usually creates a smoother effect. For very large pieces, you may need more than one light source.
How to Style Your Mosaic Wall Light at Home
A stained glass mosaic wall light can serve as a focal point above a console table, behind a sofa, beside a reading chair, or in a hallway that needs personality. Pair it with simple surrounding decor so the colors can stand out. If the mosaic is bold, keep nearby artwork minimal. If the design is soft and neutral, layer it with plants, books, ceramics, or natural wood for a cozy handmade look.
This type of upcycled wall light also works beautifully in eclectic, bohemian, cottage, coastal, and modern rustic interiors. In a minimalist room, it becomes the one dramatic feature that proves minimalism does not have to mean “afraid of color.”
Experience Notes: What This Project Teaches You
The biggest lesson from turning an old glass table top into a stained glass mosaic wall light is that upcycling is rarely just about saving money. It is about seeing potential before the object looks impressive. At the beginning, the table top may feel like a bulky leftover from furniture history. By the end, it becomes a glowing handmade piece with a story.
One experience many DIYers share is that the project takes longer than expected. Cleaning the glass is quick. Sketching the idea feels exciting. Buying supplies is dangerously fun, especially if you are the kind of person who believes “just one more shade of blue” is a reasonable design strategy. But placing the mosaic pieces takes time. You may spend an entire evening adjusting three sections of the pattern, only to realize the original version was better. This is normal. Mosaic art rewards patience.
Another practical experience is learning how much lighting changes the design. A piece that looks dark on the worktable may glow beautifully once LEDs shine through it. On the other hand, glass that looks bright in daylight may become too intense when backlit. That is why testing colors with a small light source is so valuable. It prevents surprises and helps you build a balanced design.
You also learn that imperfections are part of the beauty. A handmade mosaic does not need every gap to match. Slightly irregular pieces create movement and sparkle. When light passes through the glass, those tiny variations make the piece feel alive. A machine-made panel can look flawless, but a handmade wall light has personality. It has evidence of decisions, experiments, and maybe one or two moments when you questioned your life choices while holding a grout sponge.
The project also teaches respect for materials. Glass is beautiful, but it is sharp. Grout is simple, but it needs proper mixing and cleanup. LED lighting is easy when you use safe plug-in products, but it should not be improvised. The best DIY projects are creative and careful at the same time. Safety does not make the process less artistic; it makes the finished piece something you can actually enjoy without worrying.
Finally, this upcycled stained glass wall light creates emotional value. Anyone can buy a lamp. Not everyone can point to a glowing mosaic on the wall and say, “That used to be a table.” It becomes a conversation piece, a sustainability statement, and a reminder that old objects do not always need to disappear. Sometimes they just need a new job, better lighting, and a little creative encouragement.
Conclusion
Upcycling an old glass table top into a stained glass mosaic wall light is a creative way to combine sustainability, home decor, and hands-on artistry. With a clean glass base, carefully chosen colored glass, clear adhesive, grout, and safe low-voltage LED lighting, you can turn forgotten furniture into a glowing statement piece.
The process is approachable, but it rewards planning. Keep the design simple if you are a beginner, test your colors with light, use the right adhesive, let everything cure properly, and mount the finished piece securely. Most importantly, enjoy the transformation. A table top that once held coffee cups, magazines, and maybe one suspicious water ring can become a radiant wall light with color, texture, and personality.
In a world full of fast decor, this project offers something better: a handmade piece with history. It is practical, artistic, eco-friendly, and just dramatic enough to make your wall feel like it has been waiting for its spotlight.


