
Table of Contents >> Show >> Hide
- The Secret Sauce: Why Models Look “Naturally” Good on Camera
- The 20 Tips: What Models Have Been Doing (and Why It Works)
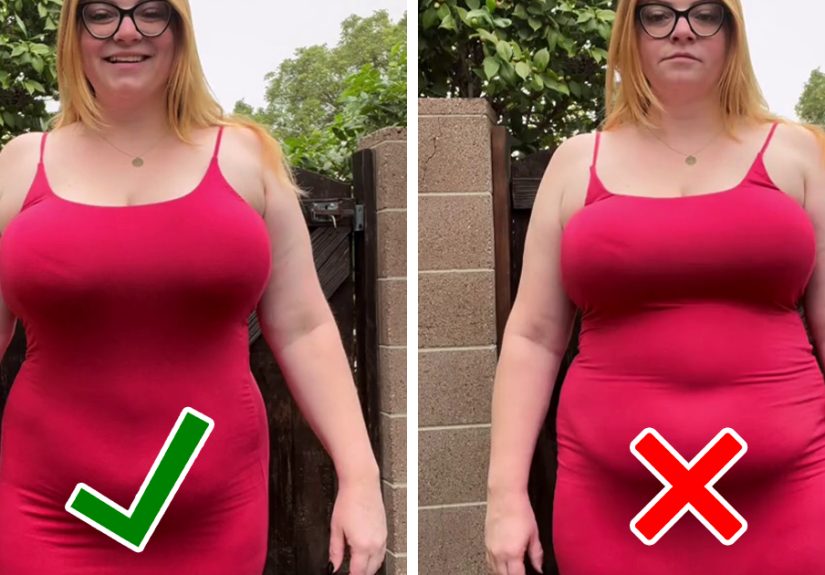
- Tip 1: Angle Your Body, Don’t Face the Camera Like a Billboard
- Tip 2: Push Your Forehead Slightly Forward (Yes, Like a Confident Turtle)
- Tip 3: Drop Your Chin a TouchThen Let Your Eyes Do the Work
- Tip 4: Find Your Light Before You Find Your Angle
- Tip 5: Turn Your Face Toward the LightNot the Chaos
- Tip 6: Relax Your Mouth (The “Soft Lips” Trick)
- Tip 7: Smile With Your Eyes, Not With Sheer Facial Force
- Tip 8: Create Space Between Your Arms and Torso
- Tip 9: Hands Need a Job (A Calm, Specific Job)
- Tip 10: Shift Your Weight to One Leg
- Tip 11: Pop the Hip (Subtle, Not Cartoon)
- Tip 12: Lengthen Your Neck Like You’re Wearing an Invisible Crown
- Tip 13: Shoulders Down, Back, and Uneven (Yes, Uneven)
- Tip 14: Tilt Your Head Slightly (But Don’t Overdo It)
- Tip 15: Watch the Camera HeightIt Changes Everything
- Tip 16: Step Back From the Phone (Wide-Angle Distortion Is Real)
- Tip 17: Clean Backgrounds Make You Look More Expensive (Free Luxury!)
- Tip 18: In Group Photos, Lead With Your FaceNot Your Shoulder
- Tip 19: Move Between Shots (Micro-Movement Creates “Candids”)
- Tip 20: Do a Quick “Face Reset” Before the Click
- The 10-Second Checklist (Use This When Someone Says “Say Cheese!”)
- Common Mistakes That Make Great People Look “Off” in Photos
- Real-Life Scenarios: of Photo Experiences (Where These Tips Actually Save the Day)
- Conclusion: You Don’t Need to Be “Photogenic”You Need a Plan
Cameras don’t “capture reality.” They capture angles, light, and timingthree things models have been quietly managing like
seasoned stage magicians for decades. And lately, a woman on the internet did everyone a favor by packaging that hard-won know-how into a
practical list of “do this, not that” moves you can actually remember when someone suddenly yells, “Group pic!”
Here’s the good news: looking photogenic isn’t a genetic lottery ticket. It’s mostly physics (hello, lens distortion), posture (goodbye, stiff shoulders),
and micro-expressions (your face does not need to panic just because it’s being perceived). Below are 20 photo posing tipsmodel-tested,
photographer-approvedwritten for real humans who sometimes forget what to do with their hands.
Whether you’re chasing a polished headshot, a cute couple photo, or a “casually effortless” selfie that absolutely required 17 attempts, this guide will help
you look better in pictures without looking like you’re trying too hard. (Trying a little is allowed. Trying is how we survive.)
The Secret Sauce: Why Models Look “Naturally” Good on Camera
Models aren’t “effortlessly perfect” in photosthey’re consistent. They know how cameras interpret faces and bodies: a lens can widen what’s closest,
overhead light can carve shadows under eyes, and stiff posture can make anyone look like they’re being photographed for a passport that ruined their life.
The goal isn’t to change how you look. It’s to make the camera see you the way people do in real lifeconfident, dimensional, and alive. That means
creating flattering lines (neck/jaw), shape (waist/hips), and intention (eyes/mouth), while keeping everything relaxed enough that you still look like you.
The 20 Tips: What Models Have Been Doing (and Why It Works)
Tip 1: Angle Your Body, Don’t Face the Camera Like a Billboard
A straight-on stance can flatten your shape and widen shoulders/hips. Turn your torso slightly (think 30–45 degrees), then rotate your face back toward the lens.
This creates dimension, slims visually, and instantly looks more “editorial” than “I was summoned.”
Tip 2: Push Your Forehead Slightly Forward (Yes, Like a Confident Turtle)
This tiny move sharpens the jawline and reduces the look of a double chineven on people who don’t have one until a camera appears. Keep it subtle:
forehead forward, chin slightly down. From the side it may feel silly; from the front it reads as sculpted.
Tip 3: Drop Your Chin a TouchThen Let Your Eyes Do the Work
Chin too high can look defiant (cool if that’s the brief) but often emphasizes nostrils and disconnects the eyes. Chin slightly down brings focus back to the eyes,
which is where most “photogenic” energy lives.
Tip 4: Find Your Light Before You Find Your Angle
Light is the real filter. Step toward soft, even lightlike shade near a bright open area, or window light indoors. Avoid harsh overhead lighting when possible
(it loves creating under-eye shadows like it’s getting paid per shadow).
Tip 5: Turn Your Face Toward the LightNot the Chaos
A simple rule: let the brighter side of your face face the light source. This opens the eyes, lifts cheekbones, and gives skin a smoother look. If one side is your “better side,”
let that side catch the light for extra advantage.
Tip 6: Relax Your Mouth (The “Soft Lips” Trick)
Pressed lips can look tense. Try a gentle, relaxed mouth: lips closed but not clamped, or slightly parted. It reads calm and confident, not “I’m smiling because HR told me to.”
Tip 7: Smile With Your Eyes, Not With Sheer Facial Force
A good photo smile is more about eyes than teeth. Think of something genuinely pleasant (a friend, a joke, the fact that you remembered deodorant),
and let that lift your eyes. If you go full grin without eye involvement, the camera can read it as performative.
Tip 8: Create Space Between Your Arms and Torso
If your arms are glued to your sides, they spread and look larger. Give your arms a little breathing roomhand on hip, elbow slightly away, or holding a jacket strap.
You’ll instantly look more defined and less “human rectangle.”
Tip 9: Hands Need a Job (A Calm, Specific Job)
Hands look awkward when they’re aimless. Give them purpose: lightly touch hair, hold a lapel, rest fingertips on the waist, hold a cup, adjust a sleeve.
Keep fingers relaxedno clenched claws unless you’re auditioning for a superhero movie.
Tip 10: Shift Your Weight to One Leg
Standing evenly can look stiff. Shift weight to the back leg, let the front leg soften (slight bend), and angle toes. This creates a natural S-curve,
adds energy, and helps you look taller.
Tip 11: Pop the Hip (Subtle, Not Cartoon)
A small hip shift creates shape and breaks symmetry. The keyword is “small.” The goal is elegance, not “I’m about to ask to speak to the manager.”
Tip 12: Lengthen Your Neck Like You’re Wearing an Invisible Crown
Think “up” through the spineshoulders down, neck long. This improves posture instantly and makes your face look more defined.
Bonus: it makes outfits hang better too.
Tip 13: Shoulders Down, Back, and Uneven (Yes, Uneven)
Lifted shoulders signal tension. Drop them, roll them back, and let one shoulder dip slightly forward for a relaxed, candid feel.
Perfect symmetry can read stiff; a little asymmetry reads natural.
Tip 14: Tilt Your Head Slightly (But Don’t Overdo It)
A small head tilt can look approachable and friendly. Too much tilt can look forced or overly coy. Think “curious,” not “yearbook pose from 2007.”
Tip 15: Watch the Camera HeightIt Changes Everything
Camera angle matters. Slightly above eye level can be flattering for many faces (especially for selfies). Lower angles can add drama and elongate the body,
but they can also exaggerate what’s closest to the lens. Choose based on the vibe: approachable vs. powerful.
Tip 16: Step Back From the Phone (Wide-Angle Distortion Is Real)
Phone camerasespecially ultra-widecan stretch features when you’re too close. If you can, step back and zoom a little (even modest zoom),
or have someone else take the shot from a bit farther away. Your face will look more like your face.
Tip 17: Clean Backgrounds Make You Look More Expensive (Free Luxury!)
A messy background steals attention and creates “why is there a broom coming out of your head?” problems. Shift a step left/right,
simplify what’s behind you, and keep the horizon from cutting through your skull. Easy win.
Tip 18: In Group Photos, Lead With Your FaceNot Your Shoulder
If you’re angled awkwardly, you can look wider or hidden. Slightly angle your body, bring your face toward the camera, and keep your chin from tucking.
Also: stand close. Gaps in group photos look like emotional distance, even if you love everyone there.
Tip 19: Move Between Shots (Micro-Movement Creates “Candids”)
The best photos often happen between poses. Shift weight, change your gaze, soften your smile, adjust your hands. Small movements keep you from looking frozen
and give the camera multiple “moments” to capture.
Tip 20: Do a Quick “Face Reset” Before the Click
If you feel tense: inhale, exhale, drop shoulders, loosen jaw, relax forehead, soften eyes. It takes two seconds and prevents the most common photo problem:
looking like you’re bracing for impact.
The 10-Second Checklist (Use This When Someone Says “Say Cheese!”)
- Light: turn toward it (soft light is your friend).
- Angle: body slightly turned, face back to camera.
- Posture: tall spine, shoulders down.
- Jawline: forehead slightly forward, chin gently down.
- Hands: give them a calm job.
- Expression: eyes engaged, mouth relaxed.
Common Mistakes That Make Great People Look “Off” in Photos
Most “bad photos” aren’t about your facethey’re about timing and tension. Here are the usual culprits:
- Overhead lighting: creates under-eye shadows and shiny hotspots.
- Standing square: flattens the body and can look stiff.
- Tucking the chin: shortens the neck and softens the jawline.
- Clenched hands: tension travelsfingers tell on you.
- Ultra-wide selfie distance: distortion makes features look different than real life.
Fixing just one of these can upgrade a photo immediately. Fixing three makes people ask, “Waitwho took that?!”
Real-Life Scenarios: of Photo Experiences (Where These Tips Actually Save the Day)
Scenario 1: The Wedding Group Photo Marathon. You’re three hours into a wedding, your feet hurt, and someone’s uncle has appointed himself
the official “everyone get in!” coordinator. This is where the 10-second checklist is basically a superpower. Step into open shade (or at least face the light),
angle your body slightly, and bring your forehead a touch forward. In group photos, people tend to tuck their chinsespecially when they’re trying to “fit in.”
That’s when necks disappear and everyone wonders why they look tired. A quick face reset (exhale, shoulders down, jaw relaxed) fixes the “bracing” look.
Then give your hands a job: hold a clutch low, wrap an arm lightly around someone’s back, or rest fingertips at your waist. You’ll look present instead of posed,
which is the whole point of wedding photos anyway.
Scenario 2: The Office Headshot (a.k.a. “LinkedIn Court”). Headshots punish tiny mistakes: camera too low, chin tucked, eyes not engaged.
If you’ve ever looked at a headshot and thought, “Why do I look like I’m negotiating with the camera?” it’s usually posture and angle. Sit tall, lean slightly
toward the lens (not back), and push your forehead subtly forward. Turn your shoulders a bitnobody needs a mugshot vibe. Keep your mouth relaxed and let your
eyes carry the expression. If you’re wearing dark clothing, make sure the lighting shows texture, not a “black hole” sweater situation. The result is a headshot
that reads confident, not cautious.
Scenario 3: The Mirror Selfie That’s “Not a Big Deal” (But Totally Is). Mirror selfies are mostly about background and pose simplicity.
Clean the scene (or at least hide the laundry mountain), angle your body, and keep the phone from covering your whole outfit. Use soft lightbathroom overheads
are famously unkind. If your phone has an ultra-wide setting, resist the temptation to stand too close unless you want your hand to look like it’s auditioning
for a giant role in a fantasy film. A tiny head tilt and a relaxed mouth make the selfie feel effortless. Also: hands. If one hand holds the phone, the other can
rest at the waist, adjust hair, or lightly hold a pocket edge. Your free hand should look like it belongs to you.
Scenario 4: The “Candid” Dinner Photo Someone Took Without Warning. Surprise photos are where micro-movement matters. If you notice the camera,
don’t freeze. Turn slightly toward the light, lift your posture, and do a quick face reset. The difference between “caught in the wild” and “wow, that’s a great shot”
is often one second of relaxing your jaw and engaging your eyes. If you’re mid-laugh, let it happenauthentic expression beats perfect posing. The only thing to avoid
is the panic face people make when they get self-conscious. (You know the one. It’s like your smile is trying to leave the building.)
Scenario 5: Couple Photos That Don’t Look Like a Hostage Situation. Stand closer than you think. Angle bodies slightly toward each other, keep shoulders relaxed,
and let hands do something naturalarm around waist, hand on chest, fingers lightly interlaced. If you’re both facing the camera straight-on, it can look stiff.
A small turn plus a shared moment (a glance, a laugh, a whispered comment) gives the photo warmth. And yes, turning toward soft light is still the cheat code.
Across all these situations, the pattern is the same: light first, angle second, relaxation always. Models didn’t become photogenic by accident. They became consistent.
You can toowithout losing the part where you look like a real person living a real life.


