
Table of Contents >> Show >> Hide
- Why Updating Cabinets Instead of Replacing Them Makes Sense
- 26 DIY Kitchen Cabinet Updates That Actually Make a Difference
- 1. Start with a serious deep clean
- 2. Tighten hinges and realign crooked doors
- 3. Swap outdated knobs and pulls
- 4. Upgrade the hinges too
- 5. Fill old hardware holes and redrill for a better layout
- 6. Paint the cabinets a fresh color
- 7. Try a two-tone cabinet scheme
- 8. Restain or tone wood cabinets instead of painting them
- 9. Add crown molding to upper cabinets
- 10. Add light rail, toe-kick trim, or small furniture-style feet
- 11. Turn flat doors into DIY Shaker-style fronts
- 12. Add beadboard, fluting, or reeded detail
- 13. Replace center panels with glass inserts
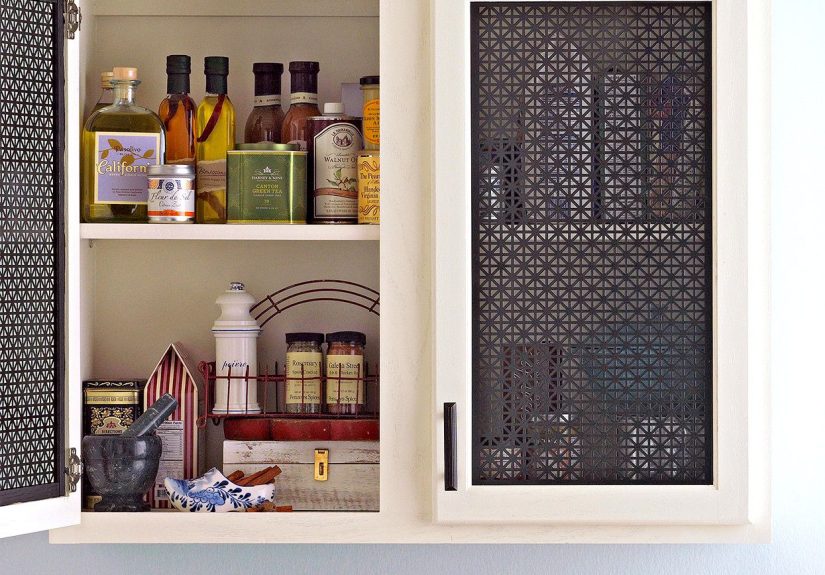
- 14. Try metal mesh, cane, or other decorative inserts
- 15. Remove select upper doors for open shelving
- 16. Paint the inside of the cabinets
- 17. Line the backs or shelves with wallpaper or contact paper
- 18. Add faux panels to exposed cabinet sides
- 19. Install under-cabinet lighting
- 20. Add slide-out shelves inside lower cabinets
- 21. Install drawer dividers and organizers
- 22. Create vertical storage for trays, cutting boards, and bakeware
- 23. Add a pull-out trash and recycling setup
- 24. Use cabinet doors for extra storage
- 25. Turn one cabinet zone into a specialty station
- 26. Reface doors and drawer fronts while keeping the cabinet boxes
- How to Choose the Right Cabinet Updates for Your Kitchen
- Experience-Based Lessons From Real DIY Cabinet Makeovers
- Final Thoughts
If your kitchen cabinets are making your whole room look tired, dramatic, and slightly offended by modern life, take a breath before pricing a full replacement. In many kitchens, the cabinet boxes are still perfectly solid. What looks outdated is usually the finish, the hardware, the trim, the lighting, or the storage setup. That is very good news for your budget.
A smart DIY kitchen cabinet makeover can change the entire personality of your space without the cost, mess, and commitment of ripping everything out. You can brighten dark wood, make plain builder-grade cabinets look custom, add storage that finally makes sense, and give your kitchen a cleaner, more intentional style. In other words, you can get “wow, did you remodel?” results without actually living through a full remodel.
Below are 26 DIY kitchen cabinet updates so you don’t have to replace them. Some are one-afternoon projects. Some are weekend-level commitments. All of them can help update kitchen cabinets without replacing them, which is exactly the kind of sentence your wallet likes to hear.
Why Updating Cabinets Instead of Replacing Them Makes Sense
Cabinet replacement is expensive because you are paying for more than doors and drawers. You are paying for demolition, disposal, installation, possible countertop disturbance, wall repair, and sometimes plumbing or electrical adjustments. A DIY kitchen cabinet update keeps the layout you already know works while improving the way the space looks and functions.
The best candidates for a kitchen cabinet makeover are cabinets with sturdy boxes, decent shelf structure, and doors that still open and close properly, even if they are ugly enough to have their own origin story. If the cabinets are warped, water-damaged, falling apart, or badly laid out, replacement may be worth considering. But if the bones are good, updating old kitchen cabinets can be one of the highest-impact projects in the room.
26 DIY Kitchen Cabinet Updates That Actually Make a Difference
-
1. Start with a serious deep clean
Before you decide your cabinets are doomed, scrub them like you mean it. Years of cooking grease, dust, and handprints can make a finish look much older than it really is. A thorough degreasing often reveals that the cabinets are not hopeless, just grimy. This is the least glamorous cabinet update on the list, but it is the one that helps every other project stick, cure, and look better.
-
2. Tighten hinges and realign crooked doors
One sagging door can make an entire kitchen look cheap. Tighten loose screws, adjust hinge placement, and get consistent gaps between doors and drawer fronts. This small fix creates a cleaner, more custom look right away. It is like straightening a picture frame, except the picture frame holds your cereal.
-
3. Swap outdated knobs and pulls
New cabinet hardware is one of the fastest ways to modernize kitchen cabinets. Matte black feels clean and current, aged brass adds warmth, polished nickel stays timeless, and simple bar pulls can make basic cabinet doors look sharper. When choosing new hardware, think about the overall mood of the kitchen, not just what is trendy this minute.
-
4. Upgrade the hinges too
Hardware should not stop at the pull handles. New concealed hinges or soft-close hinges can improve both appearance and function. If your cabinet doors slam like they are trying to settle an argument, soft-close hardware is a quality-of-life improvement you will appreciate every single day.
-
5. Fill old hardware holes and redrill for a better layout
Sometimes the problem is not the hardware itself but the awkward placement. Filling existing holes, sanding smooth, and using a drilling template or jig for new ones lets you completely change the look of the door and drawer fronts. It is a practical way to make cabinets feel more intentional and less builder-basic.
-
6. Paint the cabinets a fresh color
Painting kitchen cabinets remains the biggest visual transformation for the money. White, warm greige, soft green, navy, charcoal, and muted blue continue to work because they play nicely with many counters, backsplashes, and floors. The key is prep: remove doors, label everything, clean thoroughly, sand lightly, prime properly, and let each coat cure. The glamorous reveal is earned by the unglamorous prep.
-
7. Try a two-tone cabinet scheme
Two-tone cabinets are a smart move if you want contrast without overwhelming the room. A lighter upper cabinet color paired with darker lowers can make a kitchen feel more open while still adding depth. It is especially effective in small kitchens, where all-dark cabinetry can feel heavy and all-white cabinetry can feel a bit too “dentist’s waiting room.”
-
8. Restain or tone wood cabinets instead of painting them
If you have real wood cabinets with attractive grain, paint is not your only option. A new stain, a toned finish, or even a clear protective topcoat can refresh wood while preserving character. This approach works well when the cabinet style is fine but the orange, red, or overly dark tone feels dated.
-
9. Add crown molding to upper cabinets
Crown molding can make stock cabinets look taller and more expensive. It visually connects the cabinets to the ceiling and gives the room a finished, built-in appearance. If there is a soffit above your cabinets, painting the molding and surrounding area the same color can create an especially polished result.
-
10. Add light rail, toe-kick trim, or small furniture-style feet
Decorative trim at the bottom or underside of cabinets adds detail that builder-grade kitchens often lack. Light rail molding hides under-cabinet fixtures more neatly. Toe-kick trim can sharpen the base line. In some kitchens, decorative feet on an island or peninsula create a furniture-style look that feels custom without requiring a full rebuild.
-
11. Turn flat doors into DIY Shaker-style fronts
If your doors are plain slab fronts, adding thin trim to create a Shaker profile can dramatically improve their appearance. This works best when measurements are precise and the trim is installed symmetrically. After paint, the result can look surprisingly high-end for a relatively modest investment.
-
12. Add beadboard, fluting, or reeded detail
Texture is what takes cabinets from basic to memorable. Beadboard gives a cottage or farmhouse vibe, while fluted or reeded details lean more tailored and modern. You do not need to turn every cabinet door into a design experiment, either. A few accent panels can be enough.
-
13. Replace center panels with glass inserts
Glass-front cabinet doors visually lighten a wall of cabinetry and give you a place to display everyday dishes, glassware, or a few pretty pieces. Frosted glass is great if you like the lightness but not the pressure of styling shelves like a magazine spread every week.
-
14. Try metal mesh, cane, or other decorative inserts
If plain glass feels too expected, decorative inserts can add character. Metal mesh adds vintage charm, while cane can warm up a kitchen with natural texture. These options are especially effective on one or two feature doors, such as an upper cabinet near a breakfast nook or coffee station.
-
15. Remove select upper doors for open shelving
You do not have to commit to fully open shelving to get the look. Removing just a couple of upper cabinet doors can make the kitchen feel lighter and more relaxed. Paint the interior, style it with neatly stacked dishes, and keep the rest of the cabinets closed for the less photogenic parts of real life.
-
16. Paint the inside of the cabinets
Cabinet interiors are often ignored, which is exactly why painting them can feel so special. A crisp white inside brightens storage. A contrasting interior color adds a designer touch. This is a great move if you have glass-front doors or open cabinets because the inside becomes part of the visual story.
-
17. Line the backs or shelves with wallpaper or contact paper
Wallpaper inside a cabinet or on the back panel of a glass-front door adds color, pattern, and personality without taking over the room. It is one of the easiest ways to make cabinets feel customized. Choose something that complements your backsplash or wall paint so the look feels intentional instead of random.
-
18. Add faux panels to exposed cabinet sides
Exposed end panels are often dead giveaways that a kitchen was built for speed, not beauty. Adding a faux panel, frame trim, or matching finish to the cabinet sides makes the entire run look more finished. It is a subtle fix, but it helps cabinets feel like furniture instead of boxes lined up against a wall.
-
19. Install under-cabinet lighting
Under-cabinet lighting is one of those upgrades that improves both form and function. It brightens work surfaces, adds atmosphere at night, and makes a kitchen feel more thoughtfully designed. Warm LED strip lights or puck lights can usually be installed without major drama, which is always welcome in a DIY project.
-
20. Add slide-out shelves inside lower cabinets
Lower cabinets are where good intentions go to disappear behind stockpots and mystery lids. Slide-out shelves make storage more accessible and far less frustrating. This kind of cabinet upgrade does not change the exterior much, but it changes daily life in a very real way.
-
21. Install drawer dividers and organizers
Updating kitchen cabinets is not only about appearance. Smart organization makes the kitchen feel newer because it works better. Drawer dividers for utensils, spices, wraps, or junk-drawer chaos can make the entire space feel more efficient and less like a treasure hunt gone wrong.
-
22. Create vertical storage for trays, cutting boards, and bakeware
Vertical dividers inside a cabinet turn awkward piles into organized storage. This is especially useful near the oven or prep zone. It is one of the simplest cabinet storage upgrades, but it instantly makes the kitchen feel better planned.
-
23. Add a pull-out trash and recycling setup
A hidden pull-out trash cabinet makes a kitchen look cleaner and function more smoothly. It also frees up floor space and removes visual clutter. This is the kind of cabinet update that guests may not notice immediately, but you definitely will.
-
24. Use cabinet doors for extra storage
The inside of a cabinet door can hold a lot more than people realize. Add slim racks for wraps, lids, cleaning supplies, or spices where it makes sense. Door-mounted storage works best when it is light and carefully placed so shelves still close properly.
-
25. Turn one cabinet zone into a specialty station
Instead of treating every cabinet the same, dedicate one to a coffee station, baking center, lunch-packing area, or small appliance garage. This kind of targeted update makes the kitchen feel custom to the way you actually live. It is also a great way to justify finally giving the blender a home that is not “wherever it fits.”
-
26. Reface doors and drawer fronts while keeping the cabinet boxes
If the boxes are solid but the doors are beyond saving, cabinet refacing can be the middle ground between cosmetic updates and full replacement. New doors, drawer fronts, veneer, and hardware can make the kitchen look dramatically different while preserving the original layout. It costs more than paint but much less than full replacement in many cases.
How to Choose the Right Cabinet Updates for Your Kitchen
The smartest DIY kitchen cabinet update is the one that solves your biggest problem first. If the kitchen looks dark, paint and lighting will have the most impact. If it looks dated, new hardware and trim may be enough. If it feels chaotic, focus on pull-outs, dividers, and specialty storage. If your cabinet doors are the main offender, consider refacing or adding glass, trim, or fresh panels.
It also helps to combine one visual upgrade with one functional upgrade. For example, paint the cabinets and add under-cabinet lighting. Swap hardware and install pull-out shelves. Add glass-front doors and paint the interiors. These combinations create results that feel more complete and thoughtful.
Experience-Based Lessons From Real DIY Cabinet Makeovers
One of the most common experiences people have with DIY kitchen cabinet updates is realizing the project is more emotional than expected. On day one, the kitchen usually looks worse, not better. Doors are off. Screws are in labeled bags. There is sanding dust in the air. Half the family is asking where the coffee mugs went. This is normal. The middle of a cabinet makeover is the awkward teenager stage of home improvement.
Another real-world lesson is that prep work decides the final result. People often start out excited about color, hardware, and styling, then discover the real heroes are degreaser, painter’s tape, filler, a good sanding sponge, and patience. The cabinets that look smooth and durable months later are usually the ones that were cleaned properly, lightly sanded, primed where needed, and allowed to cure before being put back into heavy use.
There is also a huge difference between a cabinet update that photographs well and one that lives well. Open shelving, for example, looks airy and beautiful, but it works best for households that are comfortable keeping dishes neat and dusting occasionally. Glass-front doors can feel elegant, but they also reveal whether your idea of organization is “stacked neatly” or “stuffed strategically.” Many homeowners find that a mix of closed storage and a few display moments is the sweet spot.
Hardware is another area where experience changes your thinking. At first, it can seem like a minor accessory. Then you install the wrong size pull on a wide drawer and suddenly the whole cabinet face looks off-balance. Or you choose a gorgeous finish that fights with the faucet. Or you realize that the sleek little knob you loved online is annoying to grab when your hands are wet. Good cabinet hardware should look right, feel comfortable, and make sense with the kitchen’s overall finish story.
Lighting also surprises people. Many DIYers start a cabinet project expecting paint to be the star, then install warm under-cabinet lighting and realize that was the move that made the whole kitchen feel expensive. Light changes how color reads, how the backsplash looks, and how inviting the room feels at night. It is one of those updates that seems small until you live with it for a week and never want to go back.
Perhaps the biggest experience-based takeaway is that you do not need to do everything at once. Some of the best cabinet makeovers happen in layers. First, clean and paint. A month later, change the hardware. Then add lighting. Then build pull-outs in the lower cabinets. This phased approach spreads out the budget, reduces decision fatigue, and lets you adjust the plan as the kitchen evolves. In real homes, that often works better than trying to finish twenty-six ideas in one caffeine-fueled weekend with unrealistic optimism and one missing screwdriver bit.
Final Thoughts
You do not need brand-new cabinets to make your kitchen feel brand-new. A thoughtful kitchen cabinet makeover can refresh the style, improve the storage, and make the room work harder for everyday life. Whether you choose a full cabinet paint job, a simple hardware swap, decorative trim, glass inserts, or a smarter organization setup, the goal is the same: keep the good bones, fix what is dated, and make the kitchen feel more like you.
That is the real magic of DIY kitchen cabinet updates. They prove that smart changes beat expensive changes more often than people think.


