Table of Contents >> Show >> Hide
- Why the Side Bun Works So Well
- Before You Start: Tools and Prep
- 1. The Classic Low Side Bun
- 2. The Messy Side Bun
- 3. The Braided Side Bun
- 4. The Twisted Side Chignon
- Common Side Bun Problems and Easy Fixes
- How to Choose the Right Side Bun for Your Occasion
- Extra Styling Tips for a Long-Lasting Side Bun
- Personal Experience: What Actually Happens When You Try a Side Bun
- Conclusion
A side bun is the hairstyle equivalent of a good pair of black jeans: it works for almost everything, it flatters nearly everyone, and it can look polished or perfectly undone depending on your mood. Whether you are heading to work, a wedding, brunch, a date, or the grocery store where you accidentally see everyone you have ever met, learning a few ways to do your hair in a side bun gives you an instant beauty backup plan.
The best part? A side bun does not demand professional-level styling skills. You do not need a salon chair, three mirrors, and a dramatic soundtrack. You need a brush, a few elastics, bobby pins, maybe some texture spray or hairspray, and a willingness to accept that one loose face-framing piece is “romantic,” not “I lost a fight with my pillow.”
In this guide, you will learn four beautiful side bun hairstyles: the classic low side bun, the messy side bun, the braided side bun, and the twisted side chignon. Each method includes clear steps, styling tips, product suggestions, and small fixes for common problems like slippery hair, short layers, frizz, and buns that slowly migrate south during the day.
Why the Side Bun Works So Well
The side bun is popular because it balances structure with softness. Unlike a high bun, which can feel sporty or severe, a side bun sits lower and slightly off-center, creating a more relaxed, face-framing shape. It also photographs beautifully because the bun is visible from the front and side, making it a favorite for weddings, formal events, proms, holiday parties, and everyday polished hairstyles.
A side bun can be sleek and elegant with gel and shine spray, or soft and casual with texture spray and loose strands. It works on straight, wavy, curly, thick, fine, medium-length, and long hair. Even shoulder-length hair can join the party with enough pins and a little strategic teasing. Shorter layers may pop out, but that is not failure; that is texture doing jazz hands.
Before You Start: Tools and Prep
Good prep makes the difference between a side bun that lasts all day and one that collapses before lunch. Start with dry hair unless you are intentionally creating a slick wet-look bun. Freshly washed hair can be too slippery, so second-day hair often holds better. If your hair is clean and silky, add dry shampoo or texturizing spray to give it grip.
Helpful tools
- Brush or wide-tooth comb
- Fine-tooth comb for parting and smoothing
- Small clear elastics or hair ties
- Bobby pins and U-shaped hair pins
- Texturizing spray, dry shampoo, mousse, or light styling cream
- Flexible-hold hairspray
- Optional: curling iron, shine spray, decorative pins, ribbon, pearl clips, or a small hair donut
Quick prep by hair type
Fine hair: Add dry shampoo at the roots and lightly tease the ponytail before wrapping it into a bun. This creates fullness without needing a donut.
Thick hair: Use a strong elastic and larger U-pins. Divide the ponytail into sections before wrapping so the bun does not feel like a small household appliance attached to your head.
Curly or coily hair: Smooth the crown with styling cream or gel if you want a polished finish, but do not erase your texture. A curly side bun looks beautiful with defined tendrils around the face.
Layered hair: Use texture spray and pin shorter pieces as you go. Loose layers can make the style look soft and intentional.
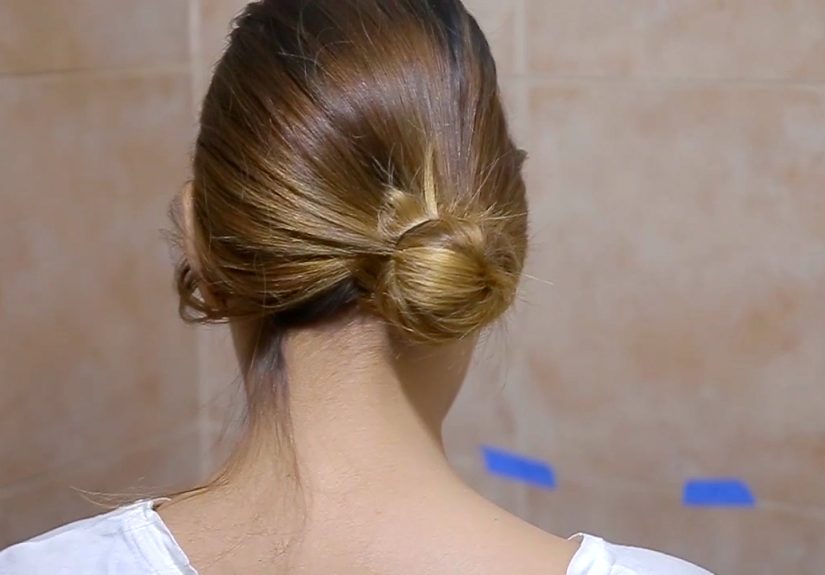
1. The Classic Low Side Bun
The classic low side bun is elegant, simple, and reliable. This is the style to choose when you want something neat but not stiff. It pairs well with a blazer, a cocktail dress, a wedding guest outfit, or that one blouse you bought because it made you feel like you had your life together.
Step-by-step instructions
- Create your part. Make a side part or middle part, depending on what flatters your face. A deep side part gives the bun a more glamorous look.
- Brush hair to one side. Gather your hair low behind one ear. Keep the placement at the nape of your neck, slightly to the left or right.
- Secure a low side ponytail. Use a hair tie that matches your hair color or a clear elastic for a cleaner finish.
- Twist the ponytail. Twist the length of the ponytail loosely from base to ends. Do not twist too tightly unless you want a very compact bun.
- Wrap into a bun. Coil the twisted ponytail around the base of the elastic.
- Pin securely. Insert bobby pins around the bun, pushing them toward the base so they anchor into the ponytail.
- Finish the shape. Smooth flyaways with a little hairspray or styling cream. Pull out one or two small face-framing pieces if you want softness.
Pro styling tips
For a sleek classic side bun, apply a small amount of gel or smoothing cream before brushing the hair into the ponytail. For a softer version, gently tug at the crown after pinning the bun to create lift. If your bun looks too small, loosen the coil with your fingers and pin the widened shape in place.
This style is especially good for medium to long hair. If your hair is shorter, make the ponytail slightly higher and use more pins underneath the bun to catch loose ends.
2. The Messy Side Bun
The messy side bun is the laid-back cousin of the classic bun. It says, “I woke up effortless,” even if you actually spent seven minutes negotiating with your bobby pins. This style is ideal for casual days, beachy outfits, summer weddings, date nights, and any moment when polished perfection feels a little too serious.
Step-by-step instructions
- Add texture. Mist your hair with texturizing spray or dry shampoo. Scrunch with your hands to create body.
- Make a loose side part. Use your fingers instead of a comb for a softer, less perfect part.
- Gather hair loosely to one side. Place it behind one ear or slightly lower at the nape.
- Create a loose ponytail. Secure it with an elastic, but do not pull the hair too tight against your scalp.
- Form the bun. Wrap the ponytail around the base casually. Let some ends peek out for movement.
- Pin in sections. Pin the bun at the top, bottom, and sides. Use extra pins where the bun feels loose.
- Loosen strategically. Pull small pieces from the crown, around the temples, and near the bun. Stop before “effortless” becomes “wind tunnel.”
How to make it look stylish, not sloppy
The secret to a good messy side bun is controlled imperfection. Keep the front intentional and the bun relaxed. If every strand is loose, the style may look unfinished. If the crown is smooth and the bun is softly tousled, it looks chic.
Use a curling iron on a few face-framing pieces if you want a romantic finish. For fine hair, tease the ponytail lightly before wrapping. For thick hair, split the ponytail into two sections, twist each section loosely, and pin them around the base one at a time. This keeps the bun from becoming too bulky on one side.
3. The Braided Side Bun
The braided side bun is perfect when you want your hairstyle to look more detailed without actually being complicated. Braids add texture, structure, and visual interest, which is why this version is popular for weddings, dances, outdoor events, and photo-heavy occasions. Translation: it looks like you tried, but not in a “please admire my suffering” way.
Option A: Simple braided ponytail bun
- Brush your hair and gather it into a low side ponytail.
- Secure the ponytail with an elastic.
- Braid the ponytail all the way down and tie the end with a small elastic.
- Gently pancake the braid by pulling the edges outward to make it look fuller.
- Wrap the braid around the base of the ponytail.
- Pin the braided bun in place, tucking the end underneath.
- Finish with hairspray and decorative pins if desired.
Option B: Side braid into bun
- Create a deep side part.
- On the heavier side, take a front section and make a loose three-strand braid or French braid.
- Guide the braid toward the side where you want the bun to sit.
- Gather the braid and remaining hair into a low side ponytail.
- Twist or braid the ponytail, wrap it into a bun, and pin securely.
- Loosen the braid slightly for volume and softness.
Best occasions for a braided side bun
A braided side bun works beautifully for formal and semi-formal events because it has built-in decoration. You can dress it up with pearl pins, small flowers, a velvet bow, or a delicate barrette. For casual wear, keep the braid loose and the bun slightly undone.
If your hair is layered, braid only the front section and leave the bun more textured. If your hair is very long, a braided ponytail bun can become large and dramatic, which is excellent if your goal is “fairy-tale side bun with main-character energy.”
4. The Twisted Side Chignon
The twisted side chignon is the most refined of the four side bun hairstyles. A chignon is traditionally a low bun worn near the nape of the neck, and shifting it slightly to one side gives it a graceful, modern shape. This is the style for job interviews, formal dinners, bridesmaids, holiday parties, and days when you want your hair to look expensive even if your coffee order was the day’s major investment.
Step-by-step instructions
- Prep for smoothness. Brush out tangles and apply a small amount of smoothing cream to the crown and mid-lengths.
- Create a clean part. A side part makes this style especially flattering, but a center part also works for a classic look.
- Gather hair low and to one side. Secure it into a ponytail at the nape, just behind one ear.
- Split the ponytail into two sections. Twist each section in the same direction.
- Wrap the sections together. Coil them around each other to create a rope-like twist.
- Shape the chignon. Fold or wrap the twisted rope into a low bun shape.
- Pin deeply. Use U-pins for the outer shape and bobby pins for tighter areas near the elastic.
- Polish the finish. Smooth the crown, tuck the ends, and mist with flexible-hold hairspray.
How to customize it
For a romantic chignon, leave the twist loose and let a few tendrils fall around the face. For a sleeker office-ready style, use a fine-tooth comb and a small amount of gel at the hairline. For extra volume, tease the ponytail before twisting it. For a vintage-inspired finish, create a soft wave in the front section before pinning the bun.
This method is also helpful for thick hair because twisting the ponytail before pinning gives the bun more control. Instead of fighting the volume, you organize it. Your hair gets a job description, and suddenly everyone behaves.
Common Side Bun Problems and Easy Fixes
The bun keeps falling out
Use more texture before styling. Clean, slippery hair needs dry shampoo, mousse, or texturizing spray. Also, make sure your pins are crossing into the base of the ponytail, not just sitting on the surface of the bun.
The bun looks too tiny
Tease the ponytail, pancake a braid, or pull the wrapped bun outward before pinning. You can also use a small hair donut, but place it low and slightly to one side so the shape still looks natural.
Short layers keep sticking out
Spray the layers lightly, twist them into the bun, and pin them individually. Another trick is to curl the loose pieces so they look intentional instead of rebellious.
The front looks too flat
After securing the bun, gently tug the hair at the crown with your fingertips. Lift small sections instead of pulling one big chunk. This creates volume without ruining the shape.
The style feels too formal
Loosen the bun, pull out soft pieces around the face, and use texture spray instead of shine spray. A side bun can be elegant, but it does not have to look like it is attending a royal committee meeting.
How to Choose the Right Side Bun for Your Occasion
Choose the classic low side bun when you want a clean, timeless style. It is excellent for work, dinners, and simple formal events. Choose the messy side bun when you want casual beauty with movement. It pairs well with sundresses, sweaters, linen outfits, and relaxed weekend looks.
Choose the braided side bun for weddings, parties, and events where you want extra detail. It is also a great choice if your hair has highlights or balayage because the braid shows off dimension. Choose the twisted side chignon when you want the most polished result. It looks elegant with earrings, off-the-shoulder tops, high necklines, and formal dresses.
Extra Styling Tips for a Long-Lasting Side Bun
Use pins with the wavy side facing down for better grip. Insert each pin into the bun, catch a little hair from the scalp, then push the pin back into the bun. This locks the style more securely than simply sliding pins straight in.
Do not overload your hair with heavy product. Too much cream or oil can make the bun slip. Use lightweight products first, then add hairspray after the bun is pinned. For humid days, choose anti-frizz cream at the crown and flexible-hold hairspray all over.
For a softer look, curl your hair before making the bun. Loose waves add texture and make the final shape more romantic. For a sleek look, straighten or smooth the hair first and use a brush to guide it into place.
Personal Experience: What Actually Happens When You Try a Side Bun
Here is the honest truth about doing your hair in a side bun: the first attempt may not look like a red-carpet updo. It may look like your hair took a scenic detour and got confused. That is normal. Side buns are simple, but they rely on balance, and balance takes a few tries. The bun has to sit low enough to look elegant, but not so low that it rests on your shoulder like a decorative croissant. It has to be loose enough to look soft, but not so loose that it begins a slow escape during dinner.
One of the best lessons from real-life styling is that texture solves many problems. When hair is freshly washed, it often slips out of the elastic and refuses to hold pins. Adding dry shampoo or texture spray can completely change the result. Suddenly, the bun has grip. The pins stay put. The shorter layers stop acting like they have separate weekend plans. If you have ever wondered why your hair behaves better the day after washing, this is why.
Another experience-based tip is to style the side bun according to your mirror angle. Many people make the bun too far back because they only check the front view. After pinning, turn your head slightly and look from the side. The bun should be visible enough to frame your jawline and neck. If it disappears behind your head, move it closer behind the ear. If it sits directly under the ear, shift it back a little so it does not compete with earrings or feel uncomfortable.
For busy mornings, the messy side bun is usually the most forgiving. It lets you work with your natural texture, and it does not punish you for a few loose pieces. For important events, the twisted side chignon is more dependable because the twist gives the hair structure before you pin it. For photos, the braided side bun often wins because the braid catches light and makes the hairstyle look more detailed from every angle.
The biggest practical lesson is this: do not wait until the big event to test the hairstyle. Try your preferred side bun on an ordinary evening while wearing a T-shirt and standing in your bathroom. Time yourself. See how many pins you actually need. Notice which side of your head looks better. Most people have a “good bun side,” just like they have a preferred selfie side, and discovering it before a wedding or party is a gift to your future self.
Finally, remember that side buns are not supposed to be identical on everyone. Fine hair creates soft, delicate buns. Thick hair creates fuller, dramatic buns. Curly hair creates beautiful texture and volume. Layered hair creates movement. Instead of forcing your hair into someone else’s version, use these four methods as flexible recipes. Adjust the part, height, tightness, accessories, and finish until the style feels like you. That is when a side bun stops being just an updo and becomes one of those dependable beauty tricks you can pull out whenever your hair needs to look charming in a hurry.
Conclusion
Learning how to do your hair in a side bun gives you four reliable styling options for almost any occasion. The classic low side bun is polished and timeless. The messy side bun is relaxed and romantic. The braided side bun adds texture and detail. The twisted side chignon brings elegance without needing a professional stylist. With the right prep, enough pins, and a little patience, you can turn medium or long hair into a flattering updo that looks intentional, stylish, and surprisingly easy.
Note: This original article is written in standard American English for web publication and avoids unnecessary source-link clutter in the body content.