Table of Contents >> Show >> Hide
- What Is a Cheese Zombie, Exactly?
- Why This Cheese Zombie Sandwich Recipe Works
- Ingredients
- How to Make Cheese Zombie Sandwiches
- Tips for the Best Cheese Zombie Sandwich Recipe
- Easy Variations
- What to Serve with Cheese Zombies
- How to Store and Reheat Them
- Conclusion
- The Experience of Making and Eating Cheese Zombies at Home
If you grew up with school cafeteria food, you probably remember one of two things: a questionable rectangle of pizza or a mysteriously glorious blob of bread and cheese that somehow tasted better than it had any right to. That second wonder, dear reader, is the Cheese Zombie. Despite a name that sounds like it crawled out of a low-budget horror movie, this beloved school-lunch classic is really a soft, buttery baked cheese sandwich with serious comfort-food credentials.
A true Cheese Zombie sits somewhere between a stuffed roll, a baked grilled cheese, and a cafeteria legend. In some regions, it was made in giant sheet pans and cut into squares. In others, it was shaped into round, crimped buns with molten American cheese trapped inside like a delicious secret. Either way, the appeal was the same: tender bread, gooey cheese, buttery tops, and the kind of nostalgia that makes adults say, “I haven’t thought about those in 20 years,” right before inhaling three of them.
This Cheese Zombie sandwich recipe takes the best parts of the old-school versions and adapts them for a modern home kitchen. It gives you a soft, enriched dough, a classic melty cheese center, clear step-by-step instructions, and enough tips to keep your cheese from making a dramatic prison break onto the baking sheet. It is simple enough for a weekend baking project, comforting enough for cold-weather lunches, and fun enough to make you feel like your kitchen just became the coolest cafeteria in America.
What Is a Cheese Zombie, Exactly?
A Cheese Zombie is a baked cheese-filled bread creation that became famous in school cafeterias, especially in parts of California and Washington. Think of it as a baked cheese sandwich made with bread dough instead of sliced sandwich bread. The original versions were practical, filling, inexpensive, and wildly popular with students, which is basically the holy trinity of school lunch success.
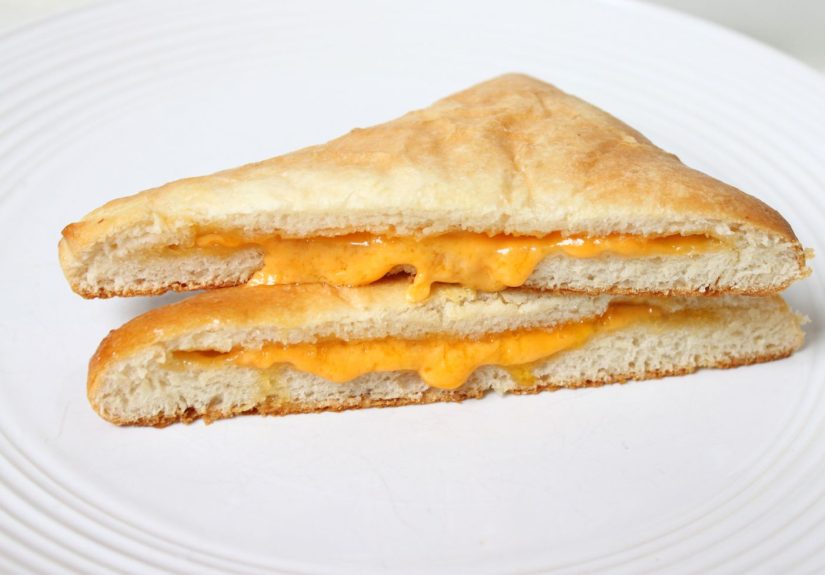
What makes a Cheese Zombie special is not fancy cheese or artisan fermentation or any other phrase that makes a sandwich sound like it needs a publicist. It is the texture contrast. The outside is lightly golden and buttery. The inside is soft and fluffy. The cheese melts into that stretchy, creamy zone that makes you pull one apart and immediately regret not making a double batch.
For a truly classic flavor, American cheese or Velveeta-style processed cheese works best. I know, I know. Food snobs may clutch their pearls. But this is one of those moments where “fancy” is not the point. The point is that processed cheese melts smoothly, stays creamy, and gives you the nostalgic school-lunch taste that made Cheese Zombies famous in the first place.
Why This Cheese Zombie Sandwich Recipe Works
1. The dough is soft, rich, and forgiving
This recipe uses milk, butter, a little sugar, and an egg to create a tender, slightly enriched dough. That gives the finished sandwich its plush texture instead of a tough, dry crust. In other words, we are chasing “cafeteria comfort,” not “European bread exam.”
2. The filling melts instead of separating
American cheese is ideal because it melts evenly and stays silky. You can blend in a little mild cheddar for more flavor, but keeping some American cheese in the mix helps prevent greasy breakage and gives you that iconic gooey center.
3. The shape is easy for home cooks
Traditional large sheet-pan Cheese Zombies are wonderful, but individually shaped buns are easier to portion, easier to seal, and less likely to turn into a lava leak situation. You get the same flavor, just with less kitchen drama.
Ingredients
For the dough
- 1 cup whole milk, warmed
- 1/2 cup warm water
- 2 1/4 teaspoons active dry yeast (1 packet)
- 2 tablespoons granulated sugar
- 3 tablespoons unsalted butter, melted
- 1 large egg
- 1 1/2 teaspoons kosher salt
- 4 to 4 1/2 cups all-purpose flour
For the filling
- 12 slices American cheese
- 1 cup shredded mild cheddar (optional, for extra flavor)
For finishing
- 2 tablespoons unsalted butter, melted
- Optional pinch of flaky salt
How to Make Cheese Zombie Sandwiches
Step 1: Wake up the yeast
In a large mixing bowl, combine the warm water, warm milk, yeast, and sugar. Let the mixture sit for about 5 to 10 minutes until it looks foamy on top. If nothing happens, your yeast may be expired or your liquid may have been too hot. Congratulations, you have met the one undead thing in this recipe that is actually unhelpful.
Step 2: Make the dough
Add the melted butter, egg, and salt to the yeast mixture. Stir in 4 cups of flour, mixing until a shaggy dough forms. Knead for 6 to 8 minutes by hand or with a stand mixer until the dough becomes soft, smooth, and slightly elastic. If it feels very sticky, add the remaining flour a little at a time. You want soft, not soupy.
Step 3: Let it rise
Transfer the dough to a lightly greased bowl, cover it, and let it rise in a warm place for about 1 hour, or until puffy and roughly doubled. If your kitchen is cold, put the bowl in the oven with just the light on. Do not turn the oven on unless you are trying to invent a tragic bread pudding.
Step 4: Divide and fill
Line a baking sheet with parchment paper. Punch down the dough and divide it into 12 equal pieces. Flatten each piece into a round about 4 inches wide. Place one slice of American cheese in the center of each round. For a cheesier, slightly sharper bite, add a small spoonful of shredded cheddar on top.
Pull the edges of the dough up and over the cheese, pinching tightly to seal. Place each bun seam-side down on the baking sheet. Leave space between them because they will puff up again and become close friends.
Step 5: Second rise
Cover the buns loosely and let them rise for 25 to 30 minutes. Meanwhile, preheat the oven to 375 degrees Fahrenheit.
Step 6: Bake until golden
Brush the tops with melted butter. Bake for 18 to 22 minutes, or until lightly golden brown. Brush again with a little more butter as soon as they come out of the oven. That glossy, buttery finish is not optional if you are chasing authentic cafeteria energy.
Step 7: Cool slightly and serve
Let the Cheese Zombies cool for 5 to 10 minutes before serving. The cheese inside will be lava-hot at first, and while that may sound exciting, roof-of-mouth injuries are a rude way to begin lunch.
Tips for the Best Cheese Zombie Sandwich Recipe
Use the right cheese
If you want the classic school lunch texture, use American cheese. Period. Cheddar alone can get oily or firm as it cools. A mix of American and cheddar gives you the best of both worlds: nostalgia plus flavor.
Seal the dough like you mean it
The number-one reason Cheese Zombies fail is escaping cheese. Pinch the seams tightly, then place the buns seam-side down. If one leaks a little anyway, call it rustic and move on with dignity.
Do not overbake
Too much time in the oven makes the bread dry and the cheese less dreamy. Pull them once they are golden and still soft. Cheese Zombies should feel plush, not like a football helmet.
Butter is your friend
A generous brush of melted butter after baking helps recreate that glossy cafeteria finish. It also makes them taste outrageously good with tomato soup.
Easy Variations
Sheet-pan Cheese Zombies
Want the old cafeteria square? Divide the dough in half. Press one half into a buttered 9×13-inch pan, layer on the cheese, top with the second half of dough, seal the edges, let it rise, then bake and cut into squares. It is less tidy, more nostalgic, and ideal for feeding a crowd.
Cheddar-American blend
Use one slice of American cheese plus a tablespoon of shredded cheddar in each bun. This keeps the filling smooth while giving it a more “grown-up” flavor. Grown-up is in quotation marks because you are still making cafeteria cheese bread on purpose.
Ham and cheese zombie
Add a small folded piece of deli ham with the cheese. This version feels like a mash-up of a hot pocket, a baked sandwich, and every school lunch fantasy from 1997.
Jalapeño version
Add a few pickled jalapeño slices for a little heat. This is not traditional, but it is delicious and makes the sandwich taste like it got a promotion.
What to Serve with Cheese Zombies
The most classic pairing is tomato soup. It is cozy, nostalgic, and practical. Dunking a hot Cheese Zombie into tomato soup feels like the food equivalent of wearing a blanket. You can also serve these with a simple green salad, roasted tomato soup, kettle chips, or raw veggies if you want to pretend balance was part of the original cafeteria plan.
They also work surprisingly well for game-day snacks, after-school bites, casual lunches, and lazy dinners. Because at the end of the day, a Cheese Zombie is just a very efficient delivery system for bread, butter, and melted cheese. Humanity has built entire empires on worse ideas.
How to Store and Reheat Them
Let the sandwiches cool completely before storing. Refrigerate leftovers in an airtight container. They are best within 3 to 4 days. Reheat in a 325-degree Fahrenheit oven until warmed through, or use an air fryer for a crispier exterior. If you use a microwave, the bread will soften, but the cheese will still melt nicely.
For food safety, do not leave them sitting out for hours like they are decorative centerpieces. Once reheating leftovers, make sure they are hot all the way through before serving.
Conclusion
The best Cheese Zombie sandwich recipe is not trying to be trendy. It is trying to be comforting, nostalgic, and unapologetically cheesy. That is exactly why it works. This is a recipe built on simple ingredients and strong emotional support from melted cheese. It does not need fancy sourdough scoring, twelve imported cheeses, or a dramatic backstory involving a tiny village in the mountains. It just needs soft dough, good sealing, and the confidence to be a little ridiculous.
Whether you remember Cheese Zombies from a school lunch tray or are discovering them for the first time, this version delivers everything people love about the classic: fluffy bread, buttery tops, and that gooey middle that makes one sandwich disappear suspiciously fast. Serve them with tomato soup, make a double batch, and do not be shocked when the adults at the table get more excited than the kids.
The Experience of Making and Eating Cheese Zombies at Home
There is something hilariously wholesome about making Cheese Zombies at home. The name suggests chaos. The actual experience is comfort on a baking sheet. You start by blooming yeast and suddenly your kitchen smells like a real bakery instead of a place where someone occasionally panic-makes scrambled eggs. Then the dough comes together, soft and warm under your hands, and for a few minutes you feel like one of those people who always has fresh bread and emotional stability. Even if neither is usually true, the dough is very convincing.
Then comes the filling stage, which is where Cheese Zombies become weirdly fun. Flattening little rounds of dough, dropping cheese in the center, and pinching them shut feels part baking project, part edible arts and crafts. This is also the moment where optimism peaks. Every bun looks perfect. Every seam looks sealed. Every future bite seems destined to be beautifully molten. You place them on the tray with the confidence of a cafeteria legend, brush them with butter, and slide them into the oven as if you have personally improved lunch for the entire household.
The best part is the smell. About halfway through baking, the kitchen starts giving off that rich, buttery, yeasty aroma that makes people wander in and ask what’s cooking, even if they were not remotely hungry five minutes earlier. It smells like warm bread, melted cheese, and childhood in the broadest possible sense. Not everybody grew up with Cheese Zombies, but almost everybody understands the emotional pull of hot bread and cheese. It is one of the few food experiences that can silence a room without being fancy.
When they come out of the oven, glossy from melted butter and lightly golden on top, they look far more charming than the name “Cheese Zombie” has any business suggesting. The first one is always too hot, and someone always tears it open too soon. Then comes the dramatic cheese stretch, followed by a quick juggling act because molten filling waits for no one. You blow on it, take a bite, and immediately understand why these things survived in memory long after people forgot most cafeteria meals. The bread is pillowy, the cheese is soft and salty, and the whole thing tastes like comfort wearing sneakers.
What makes the experience even better is how flexible it is. Serve them with tomato soup and suddenly dinner feels cozy and nostalgic. Put them out on a platter for a casual party and people who have never heard of Cheese Zombies will still hover nearby, pretending they are “just trying one.” Pack leftovers for lunch, reheat them the next day, and they still carry that same friendly, familiar appeal. They are not elegant, but that is part of their charm. A Cheese Zombie does not want to impress your food critic friend. It wants to disappear quickly and make people ask for another batch.
And maybe that is the real magic of this recipe. It creates the kind of food experience that feels cheerful, a little goofy, and deeply satisfying. In a world of overcomplicated cooking trends and sandwiches that need five sauces and a branding consultant, the Cheese Zombie remains wonderfully humble. It is bread. It is cheese. It is butter. It is joy with a slightly alarming name. Honestly, that may be the American dream.