
Table of Contents >> Show >> Hide
- Why These Bars Work (And Why They’re Easier Than You Think)
- Ingredients
- Equipment Checklist
- Step-by-Step Recipe
- How to Brûlée the Tops (Torch Method and Broiler Backup)
- Flavor Variations That Still Feel Like Crème Brûlée
- Troubleshooting (Because Ovens Have Opinions)
- Storage and Make-Ahead Plan
- Conclusion & Real-Life Notes (Bonus 500+ Words of Experience)
If cheesecake bars are the reliable friend who always shows up on time, crème brûlée is the glamorous cousin who arrives fashionably late wearing a sugar-glass tiara.
Put them together and you get the dessert equivalent of a mic drop: creamy, tangy cheesecake in neat little squares… topped with a shatteringly crisp caramelized sugar crust that crackles like thin ice.
This guide gives you a bakery-style, cut-clean cheesecake bar with a legit brûlée finishno ramekins, no fussy custard stirring, and no stress-eating sugar while “testing” your torch.
We’ll also talk technique (why low heat matters, how to avoid grainy batter, how to keep the sugar crunchy), because the only surprise you want is how fast the pan disappears.
Why These Bars Work (And Why They’re Easier Than You Think)
1) Bars bake more evenly than a tall cheesecake
Because the filling is shallower, you’re less likely to end up with an overcooked edge and a wobbly center. That means fewer cracks and a silkier biteespecially if you avoid overmixing and bake gently.
2) The brûlée topping is a “last-minute” flex
The caramelized sugar layer is best made right before serving. Sugar attracts moisture, and cheesecake is basically a humidity generator. Torch it too early and your crunchy top can soften into a sticky syrup situation.
3) You get the best textures in one bite
The goal: buttery crust + creamy cheesecake + crackly caramel lid. Each layer has its own job, and none of them is optional (yes, even the pinch of salt).
Ingredients
For the graham cracker crust
- 2 1/4 cups graham cracker crumbs (about 300g; roughly 18–20 full sheets, depending on brand)
- 1/3 cup granulated sugar
- 10 tablespoons unsalted butter, melted
- Pinch of salt (optional, but a very good idea)
For the vanilla cheesecake filling
- 32 ounces full-fat cream cheese, softened (4 blocks)
- 1 cup granulated sugar
- 1 cup sour cream (full-fat)
- 4 large eggs, room temperature
- 1 tablespoon vanilla bean paste (or 2 teaspoons pure vanilla extract)
- 2 teaspoons cornstarch (helps slice cleanly; optional but recommended)
- 1/4 teaspoon fine salt
- Optional: 1 teaspoon lemon zest (for brightness without screaming “lemon dessert”)
For the brûlée topping
- 1/2 to 3/4 cup granulated sugar (you won’t necessarily use it all; thin layer is the secret)
Equipment Checklist
- 9×13-inch metal baking pan (metal helps with even baking and clean edges)
- Parchment paper (for a slingyour future self will thank you)
- Stand mixer or hand mixer
- Rubber spatula (scraping matters more than you think)
- Kitchen torch (ideal) or an oven broiler (backup plan)
- Instant-read thermometer (optional, but it turns “I guess?” into “I know.”)
Step-by-Step Recipe
Step 1: Prep the pan
Preheat your oven to 350°F. Line a 9×13-inch pan with parchment paper, leaving overhang on the long sides to create a sling.
Lightly grease the parchment (especially corners) so the bars release cleanly.
Step 2: Make and pre-bake the crust
- In a bowl, mix graham crumbs, sugar, and a pinch of salt.
- Stir in melted butter until the texture resembles damp sand and holds together when pressed.
- Press firmly into the bottom of the pan in an even layer. Use a flat-bottomed measuring cup to smooth it out (firm, not crushed-into-concrete firm).
- Bake for 10 minutes, then cool while you make the filling.
Step 3: Mix the filling (smooth, not foamy)
Lower oven temperature to 325°F. In a large bowl, beat the softened cream cheese on low until smooth.
Add sugar and mix just until combined. Scrape the bowl.
Mix in sour cream, vanilla, cornstarch (if using), salt, and lemon zest (if using).
Add eggs one at a time, mixing on low only until each disappears. Scrape again.
The goal is a glossy batter with minimal airair bubbles can puff, sink, and leave cracks or a spongy texture.
Step 4: Bake gently
- Pour batter over the warm (or cooled) crust and smooth the top.
- Bake at 325°F for 35–45 minutes, until the edges are set and the center still has a slight jiggle.
- Optional “gentle heat” hack: place a pan of hot water on the lower rack to add moisture and soften the oven’s heat (helpful if your oven runs hot).
-
Doneness check (optional but excellent): an instant-read thermometer inserted about 1 inch from the edge should read around
175–180°F. The middle will look softer than you think it shouldtrust the chill time.
Step 5: Cool slowly, then chill like you mean it
Turn off the oven, crack the door, and let the pan sit for 15–20 minutes.
This gradual cool-down helps prevent dramatic temperature shocks (a common crack-maker).
Then cool at room temperature for another 30–60 minutes.
Refrigerate uncovered until fully cold, then cover and chill at least 6 hours (overnight is best for the cleanest slices).
Step 6: Slice like a pro
Lift the slab out using the parchment sling. Use a long knife dipped in hot water and wiped dry between cuts.
For neat bars, cut into 12–24 pieces depending on how generous you’re feeling.
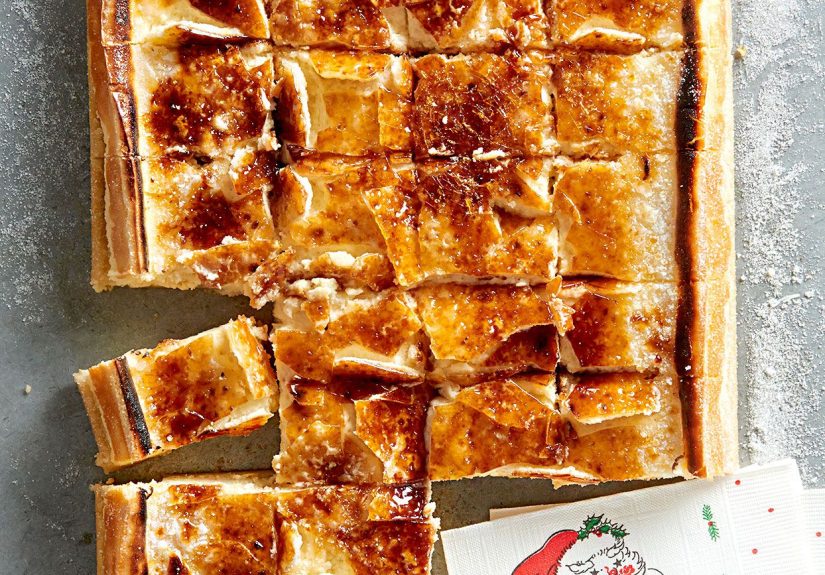
How to Brûlée the Tops (Torch Method and Broiler Backup)
Best method: kitchen torch
- Pat the tops lightly with a paper towel if you see condensation.
- Sprinkle a thin, even layer of granulated sugar over each bar (too thick = burnt outside, raw inside).
-
Torch in smooth, steady passes until the sugar melts, bubbles, and turns deep golden amber.
Let it sit for 1–2 minutes to harden into that satisfying glassy shell.
Torch tip: keep the flame moving and don’t hover in one spot unless you enjoy the scent of “campfire cheesecake.”
Backup method: oven broiler
If you don’t have a torch, you can still get a brûlée-style topjust know the broiler is less precise and can warm the cheesecake more.
- Place sliced bars on a chilled metal baking sheet. Freeze for 10 minutes (this helps them stay firm).
- Sprinkle sugar thinly over the tops.
- Broil on high, very close to the heat, for 30–90 seconds. Watch nonstop. This goes from “golden” to “smoke alarm concert” fast.
- Cool 1–2 minutes until the sugar hardens.
Flavor Variations That Still Feel Like Crème Brûlée
- Cookie swap crust: vanilla wafers, Biscoff, or gingersnaps for a spiced edge.
- Espresso whisper: dissolve 1–2 teaspoons instant espresso in the vanilla before mixing in.
- Brown butter crust: brown the butter, cool 5 minutes, then mix into crumbs for a nutty depth.
- Berry serving move: serve with raspberries on the side (not under the sugarmoisture is the enemy of crunch).
Troubleshooting (Because Ovens Have Opinions)
My cheesecake looks cracked
Most cracks come from overbaking or cooling too quickly. Next time, stop when the center still jiggles slightly and cool gradually.
For this batch, don’t panicthe brûlée topping is basically a delicious disguise with benefits.
My filling tastes grainy
Usually: cream cheese wasn’t fully softened, or sugar didn’t dissolve because the batter stayed cold. Soften your dairy, mix on low,
and scrape the bowl like you’re trying to find hidden treasure.
My crust is soggy
Make sure you pre-bake it and press it evenly. Also, store bars chilled and covered once fully cold (steam trapped while warm can soften crust).
My brûlée topping melted into syrup
It sat too long or encountered moisture. Brûlée just before serving, keep the sugar layer thin, and avoid topping warm bars.
If you need to travel with them, bring sugar and torch on-site (yes, you will look like a dessert magicianembrace it).
Storage and Make-Ahead Plan
- Fridge: store bars (without brûlée topping) in an airtight container for up to 3 days.
- Freezer: freeze un-topped bars, wrapped well, for up to 1 month. Thaw overnight in the fridge.
- When to brûlée: as close to serving time as possible for the crispest crack.
Conclusion & Real-Life Notes (Bonus 500+ Words of Experience)
These crème brûlée cheesecake bars are the kind of dessert that makes people stop mid-conversation because their brain is busy processing
“wait… did that just crack?” between bites. If you take only three lessons from this recipe, make them these:
bake gently, chill thoroughly, and brûlée right before serving. Those three choices do about 80% of the heavy lifting.
Now for the real-life partthe stuff that doesn’t always fit neatly into recipe cards. The first time I made a brûléed dessert for a group,
I treated the torch like a toy (because it kind of is) and got a little too excited. The sugar went from pale gold to “marshmallow left in a campfire”
in a blink. The good news: you can scrape off burnt sugar, re-sprinkle, and torch again. The better news: you learn quickly that the torch
isn’t about aggression; it’s about patience and motion. Think “slow painting,” not “dragon attack.”
Another surprise: the sugar layer changes how your bars behave. Without the brûlée top, cheesecake bars are forgivingslice, plate, chill, repeat.
Once you add caramelized sugar, timing becomes everything. Leave them in the fridge too long after torching and the top can soften because sugar is hygroscopic
(it loves pulling moisture from the air and from anything creamy nearby). That’s why torching per bar can be the smartest move for parties:
keep the tray cold, and brûlée in small batches. Everyone gets that fresh “glass crack,” and you don’t have to mourn a tray of formerly-crisp tops.
I’ve also learned that these bars are a social dessert. The torching moment becomes a tiny eventpeople drift into the kitchen like it’s a live show.
Someone will ask if it’s safe (it is, if you keep the flame moving and your paper towel roll far away). Someone will say they’ve “always wanted to try one of those.”
Someone else will volunteer to torch and immediately become overconfident. If you want to prevent chaos, pre-slice the bars, lay them on a metal tray,
and hand the torch operator one job: “Melt, bubble, amber. Then stop.” You can even do a practice torch on a spoonful of sugar on a platecheap rehearsal, big payoff.
My favorite practical trick: use the thinnest sugar layer that still covers the surface. Thick sugar feels like you’re guaranteeing crunch,
but it actually makes it harder to caramelize evenly. Thin sugar melts quickly into a uniform sheet, cools into a cleaner crack, and doesn’t burn as easily.
And if you’re worried about the cheesecake warming during torching, keep the bars cold and torch in quick passes. The sugar caramelizes faster than the cheesecake can heat upespecially if your flame is focused and you don’t linger.
Finally, if you ever bring these to a gathering, accept this truth now: someone will request them again. That’s not pressurethat’s job security.
Save yourself future effort by making a note of what worked in your kitchen: exact bake time, whether your oven runs hot, and how long it took your sugar to hit the perfect amber.
Recipes are maps. Your oven is the weather. Adjust accordingly.


