Table of Contents >> Show >> Hide
- What Makes These Bars “Crème Brûlée” (and Not Just Cheesecake With Attitude)
- Recipe Snapshot
- Ingredients
- Equipment You’ll Be Happy You Have
- Step-by-Step: Creme Brulee Cheesecake Bars
- Pro Tips for a Silky Filling and a Non-Soggy Crust
- How to Get That Crackly Brûlée Top Every Time
- Flavor Variations (Because Vanilla Likes Company)
- Make-Ahead, Storage, and Freezing
- Troubleshooting: Quick Fixes for Common Drama
- FAQs
- Kitchen Notes & Real-Life Experience (The Part Where This Dessert Gets Personal)
- Conclusion
If crème brûlée and cheesecake ever eloped, these bars would be the wedding photos: creamy, classy, and slightly
dramatic (in the best way). You get a buttery cookie-style crust, a thick vanilla-forward cheesecake layer, and
a crackly caramelized sugar top that shatters like edible stained glass. It’s the kind of dessert that makes
people say, “Wait… you made this?” while quietly calculating whether they can take two pieces without
looking suspicious.
This Creme Brulee Cheesecake Bars Recipe is written for real life: a standard square pan, clear
timing, and practical tricks for smooth filling, clean slices, and a brûléed top that snaps instead of melting
into sadness. You’ll also get broiler instructions if you don’t have a torchbecause gatekeeping crunchy sugar
would be rude.
What Makes These Bars “Crème Brûlée” (and Not Just Cheesecake With Attitude)
Classic crème brûlée is a baked custard topped with sugar that’s caramelized right before serving. Cheesecake is
basically custard’s richer cousin (thank you, cream cheese). To bridge the two, we lean hard into
vanilla, use a gentle bake for a silky texture, and finish with a thin, evenly melted sugar cap.
The goal is a filling that’s creamy and set, not airy, puffy, or cakeyand a topping that’s crisp enough to
“tap-tap” before it cracks.
Recipe Snapshot
- Pan: 8×8-inch metal baking pan (9×9 works; bars will be a bit thinner)
- Prep time: ~25 minutes
- Bake time: 35–45 minutes
- Chill time: 6 hours minimum (overnight is best)
- Makes: 12–16 bars (depending on how generous you’re feeling)
Ingredients
For the Graham Cracker Crust
- 1 1/2 cups graham cracker crumbs (about 10–12 full sheets, crushed)
- 3 tablespoons granulated sugar
- 1/4 teaspoon fine salt
- 6 tablespoons unsalted butter, melted
- Optional: 1/4 teaspoon cinnamon (quietly cozy)
For the Cheesecake Filling
- 24 ounces cream cheese, softened to room temperature
- 3/4 cup granulated sugar
- 2 tablespoons cornstarch (helps set cleanly for bars)
- 1/2 teaspoon fine salt
- 2 teaspoons vanilla extract (or 1 1/2 teaspoons vanilla bean paste for extra “crème brûlée energy”)
- 1/2 cup sour cream, room temperature
- 1/4 cup heavy cream, room temperature
- 3 large eggs, room temperature
- 2 large egg yolks, room temperature
For the Brûlée Topping
- 1/3 to 1/2 cup granulated sugar (or superfine sugar for ultra-even melting)
- Optional: a pinch of flaky salt for a sweet-salty “chef’s kiss” finish
Equipment You’ll Be Happy You Have
- 8×8-inch metal baking pan (metal browns crust more reliably than glass)
- Parchment paper (with overhang for lifting)
- Hand mixer or stand mixer
- Fine-mesh sieve (nice for preventing tiny lumps)
- Kitchen torch or oven broiler (torch is easier; broiler works with vigilance)
- Rimmed baking sheet (for torching or broiling the sugar topping)
Step-by-Step: Creme Brulee Cheesecake Bars
1) Prep the Pan
Heat oven to 350°F. Line an 8×8-inch metal pan with parchment, leaving a generous overhang on
two sides so you can lift the bars out later. Lightly grease the parchment where it meets the pan corners (the
“sticky zones”).
2) Make and Bake the Crust
- Mix graham crumbs, sugar, salt (and cinnamon if using).
- Stir in melted butter until the mixture looks like damp sand and holds together when squeezed.
- Press firmly into the pan using the bottom of a measuring cup (this is the difference between “crust” and “crumbly regret”).
- Bake for 8–10 minutes, until lightly golden and fragrant.
Reduce oven temperature to 300°F and let the crust cool while you make the filling. Lower heat
helps cheesecake set gently and stay creamy.
3) Mix the Filling (Smooth, Not Puffy)
- Beat cream cheese on medium-low until smooth, about 1–2 minutes. Stop and scrape the bowl.
- Add sugar, cornstarch, and salt. Beat just until combined and silky. Scrape again.
- Mix in vanilla, sour cream, and heavy cream on low until smooth.
- Add eggs one at a time on low, mixing only until the yellow disappears.
- Add yolks and mix briefly. If you see bubbles, you mixed too enthusiasticallylet the batter sit 5 minutes.
Pro move: If you want an extra-smooth top, pour the batter through a fine-mesh sieve directly onto the crust.
(This is optional, but it’s basically a cheat code for velvety texture.)
4) Bake (Gentle Heat = Silky Bars)
Pour filling over the crust and smooth the top. Bake at 300°F for 35–45 minutes,
until the edges look set and the center has a slight wobblethink “Jell-O jiggle,” not “ocean wave.”
Optional water-bath method: For the most even bake, place your pan inside a larger roasting pan
and pour very hot water into the roasting pan until it reaches about halfway up the sides of the 8×8 pan. This
buffers heat and helps prevent drying and cracking. (If that sounds like a lot, you can skip itbars are more
forgiving than tall cheesecakes.)
5) Cool Slowly, Then Chill Thoroughly
- Turn off the oven, crack the door, and let the pan sit inside for 20 minutes.
- Remove and cool at room temp for 60–90 minutes.
- Refrigerate at least 6 hours, ideally overnight.
Cheesecake hates sudden temperature changes. Slow cooling keeps the texture dreamy and the top smoother.
6) Lift, Slice, and Get Ready to Brûlée
Use the parchment overhang to lift the chilled cheesecake slab onto a cutting board. For clean slices, run a
large knife under hot water, wipe dry, then slice. Repeat the warm-and-wipe routine between cuts like you’re
a dessert barber with standards.
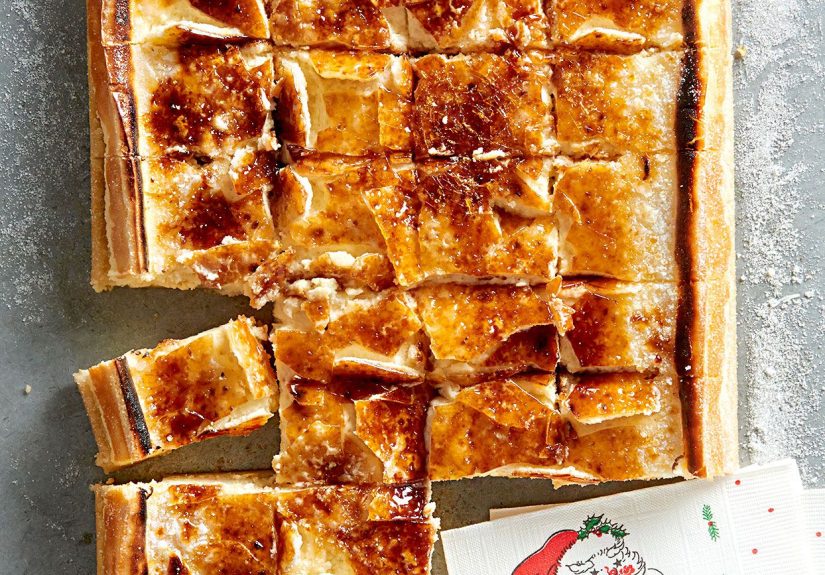
7) Brûlée the Top (Torch or Broiler)
Torch Method (Recommended)
- Place sliced bars on a cold rimmed baking sheet (metal is your friend here).
- Blot the tops gently with a paper towel if there’s any moisture or condensation.
- Sprinkle a thin, even layer of sugar over each bar. Too thick = burnt top and unmelted crystals underneath.
- Hold the torch a few inches above the sugar and move constantly in small circles until the sugar melts and turns amber.
- Let sit 2–5 minutes to harden into a crisp shell.
Broiler Method (No Torch, Still Fabulous)
- Place bars on a baking sheet and chill them again for 10 minutes (cold bars tolerate broiler heat better).
- Sprinkle sugar thinly and evenly.
- Broil very close to the heat for 30–120 seconds, watching nonstop.
- Remove as soon as the sugar turns amber. Let it harden for a few minutes before serving.
Pro Tips for a Silky Filling and a Non-Soggy Crust
Use Room-Temperature Ingredients
Cold cream cheese makes lumps that no amount of mixing can fully bully into submission. Room-temp dairy and eggs
blend smoothly with less mixing, which means fewer air bubbles and a creamier finish.
Don’t Overmix
Overmixing whips in air. Air expands in the oven, then collapses as it coolshello cracks, goodbye smooth top.
Mix on low once eggs go in. You’re making custard, not auditioning for a fitness video.
Know When It’s Done
Cheesecake bars should be set at the edges and slightly wobbly in the center. If the whole pan looks firm and
“solid,” it’s likely overbaked and may turn dry once chilled. When in doubt, err on the side of a gentle wobble.
Cool in Stages
A gradual cool-down helps prevent sudden contraction and cracking. Think of it as letting the cheesecake
“exhale” instead of slamming it into cold air.
How to Get That Crackly Brûlée Top Every Time
Choose Your Sugar Like a Dessert Strategist
- Granulated sugar: Classic, melts evenly, easy to find.
- Superfine sugar: Melts even faster and smoother (great if your torch is intense).
- Turbinado/raw sugar: Crunchier, thicker shellbut harder to melt evenly without scorching.
Keep the Sugar Layer Thin
For bars, thin is the win. A heavy pile of sugar needs more heat, and more heat can warm the cheesecake underneath.
If you want a thicker crack, brûlée in two thin rounds: torch the first layer, let it harden, then add a
second whisper-thin layer and torch again.
Practice (Yes, Really)
If you’re new to torching, practice caramelizing sugar on an empty metal tray first. You’ll learn how quickly
your torch runs hot and how fast amber turns into “oops.”
Flavor Variations (Because Vanilla Likes Company)
- Citrus-bright: Add 1 tablespoon lemon zest to the batter.
- Espresso moment: Dissolve 1–2 teaspoons instant espresso powder into the heavy cream before mixing in.
- Salted caramel vibe: Add a pinch of flaky salt after torching, or drizzle caramel just before serving (not before brûléeing).
- Berry swirl: Dollop thick berry jam on top before baking and swirl gently with a knife (don’t overdo it or the bars can bake unevenly).
Make-Ahead, Storage, and Freezing
These bars are a make-ahead dream. Bake and chill the day before serving, then brûlée right before you bring them
out so the top stays crisp.
- Refrigerate: Store covered in the fridge. For best quality, enjoy within several days.
- Freeze (best method): Freeze un-brûléed bars in a single layer, then wrap well. Thaw overnight in the fridge and brûlée just before serving.
- Transport tip: Bring the chilled bars and torch at the destination if you can. If not, brûlée as close to serving time as possible.
Troubleshooting: Quick Fixes for Common Drama
My filling is lumpy
Usually: cream cheese wasn’t soft enough. Next time, let it sit at room temp longer. For now, press the batter
through a sieve before baking (it helps more than you’d think).
My bars cracked
Often: overbaked or cooled too quickly. Cracks don’t ruin flavortop with brûlée sugar and call it “rustic.”
(People pay extra for rustic.)
My crust is soggy
Usually: not baked long enough or not pressed firmly. Bake the crust until lightly golden and press it like you
mean it. If using a water bath, keep water below the pan rim and avoid splashing.
The brûlée top melted into the cheesecake
The bars were too warm or the sugar layer was too thick. Chill bars well, blot condensation, and torch in quick
passes. Let the sugar do the meltingnot the cheesecake.
FAQs
Do I really need a kitchen torch?
It’s the easiest way to control caramelization. But the broiler worksjust watch constantly and keep the bars
cold so the cheesecake doesn’t warm up too much.
Is a water bath required?
Not required for bars, but it’s helpful if you want the most even, gentle bake. Low oven temperature and
careful cooling get you most of the way there.
Why add cornstarch?
It supports a clean slice and a slightly more stable setideal for bars. It also helps avoid a filling that’s
too soft once cut.
Can I use vanilla extract instead of vanilla bean paste?
Absolutely. Vanilla bean paste boosts the “classic crème brûlée” aroma and gives pretty specks, but extract still
tastes fantastic.
Kitchen Notes & Real-Life Experience (The Part Where This Dessert Gets Personal)
People tend to underestimate two things about crème brûlée cheesecake bars: how much the chill matters,
and how fast sugar can go from “golden and gorgeous” to “campfire souvenir.” In practice, most home bakers find
the bake is the easy partit’s the patience (and the torch confidence) that separates a good batch from a
show-off batch.
The first “aha” moment usually happens at slicing. If you cut too soon, the knife drags and the bars look like
they lost a tiny argument. Once fully chilled, though, the filling becomes plush and sliceable, and you can get
those bakery-style edges with the hot-knife trick. Many bakers also discover that an 8×8 pan is the sweet spot:
thick enough to feel indulgent, but not so tall that you’re basically serving cheesecake skyscrapers.
Torching is where the stories come from. The most common beginner move is holding the flame still, like the sugar
needs a heartfelt pep talk. It doesn’t. Sugar wants quick, moving heat. The pros (or anyone who’s torched sugar
more than twice) treat it like painting: steady hand, constant motion, small circles. Another shared discovery:
thin sugar layers are braver. A thick layer seems like it would make a better crack, but it
actually forces you to apply more heat, which can soften the cheesecake underneath. That’s why the two-layer
method is such a crowd-pleaserthin torch, harden, thin torch againbig crunch, less risk.
Serving these at a gathering creates a predictable social pattern. Someone hears “crème brûlée” and expects a
ramekin. Then you bring out bars with a glassy top, and suddenly you’re the person who “makes fancy desserts.”
(Enjoy your new identity.) If you want peak drama, brûlée in front of guests. The sugar goes glossy, then amber,
then crackly in minutes. It’s basically a tiny science fair, but delicious.
Another real-life lesson: humidity and condensation are sneaky. Cheesecake straight from the fridge can collect
moisture on top, and moisture is the enemy of crisp brûlée. A quick blot makes a surprising difference, and so
does choosing the right sugar for your environment. Superfine sugar melts quickly (great if you want a smooth
shell with minimal heat), while raw sugar gives an extra-crunchy cap but may need more torch time. If you’re
transporting bars, many bakers learn to keep the brûlée step until the endbecause a crisp top can soften if it
sits under a lid for hours, especially in warm weather.
Finally, there’s the confidence curve. The first batch feels like following instructions. The second batch feels
like owning the technique. By the third batch, people start customizing: a hint of espresso, a whisper of citrus
zest, a pinch of flaky salt. And that’s when this Creme Brulee Cheesecake Bars Recipe becomes a
personal signaturepart comfort dessert, part “look what I can do,” and fully worth the dish you’ll have to wash.
Conclusion
Crème brûlée cheesecake bars are the rare dessert that delivers both comfort and spectacle: creamy vanilla
cheesecake, buttery crust, and a caramelized sugar top that cracks like a tiny dessert drumroll. Bake gently,
chill thoroughly, brûlée right before serving, and you’ll have bars that look bakery-level without requiring
bakery-level stress. Now go forth and make sugar crack.