
Table of Contents >> Show >> Hide
- A Clever Lamp Hack That Still Has Main Character Energy
- What Is the DIY Accordion Lamp by Manhattan Nest?
- Why an Accordion Wall Lamp Works So Well
- Materials You May Need
- Step-by-Step: How to Make a DIY Accordion Lamp
- Design Ideas for a Better-Looking Accordion Lamp
- Where to Use a DIY Accordion Lamp
- Safety Notes You Should Not Skip
- Common Mistakes to Avoid
- DIY Experience: What This Project Teaches You
- Conclusion: A Small Lamp With Big DIY Confidence
Note: This article is written as original web content inspired by the well-known Manhattan Nest FRÄCK lamp hack and broader DIY lighting safety/design guidance.
A Clever Lamp Hack That Still Has Main Character Energy
Some DIY projects arrive with a shopping list longer than a tax form and a tool requirement that makes your garage look underqualified. Then there is the Manhattan Nest accordion lamp idea: simple, smart, inexpensive, and suspiciously stylish for something that begins with a wall-mounted IKEA mirror arm.
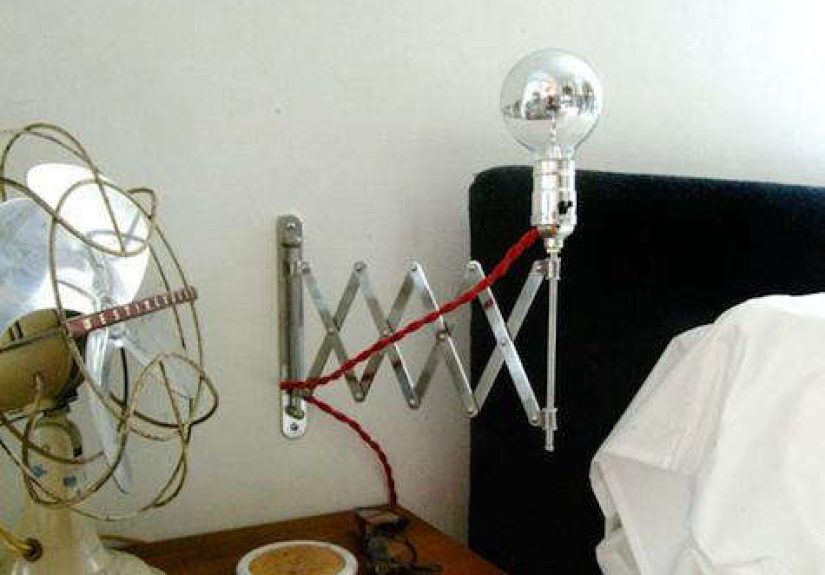
The basic concept is beautifully odd in the best possible way. Take an accordion-style wall mirror arm, remove the mirror, add a lamp socket and bulb, mount it near a bed or reading nook, and suddenly you have a swing-arm wall lamp that looks like it belongs in a small boutique hotel where the pillows are too expensive to understand. The original Manhattan Nest version became popular because it turned an everyday object into a functional light fixture with personality, flexibility, and a budget-friendly wink.
Before we go further, let’s address the elephant wearing safety goggles: the word is usually spelled “accordion,” although the title “Accordian Lamp” has floated around online for years. We’ll keep the title as requested, but yes, your spell-checker is not having a dramatic episode.
This guide explores what makes the DIY accordion lamp so appealing, how the design works, what materials make sense, where to use it, how to keep it safe, and how to give it a polished finish. Think of it as part tutorial, part design analysis, and part friendly warning not to let your enthusiasm outrun your electrical common sense.
What Is the DIY Accordion Lamp by Manhattan Nest?
The DIY accordion lamp is a wall-mounted swing-arm lamp inspired by Manhattan Nest’s clever conversion of an IKEA FRÄCK-style bathroom mirror arm into a bedside light. The appeal is immediate: the arm already extends, folds, and mounts to a wall. In other words, half the engineering is already done for you, which is the DIY equivalent of finding money in last winter’s coat.
Instead of using the arm to hold a mirror, the project adapts it to hold a light socket and bulb. The result is a compact adjustable lamp that can be pulled closer for reading or pushed back toward the wall when not in use. It works especially well in bedrooms, small apartments, studio spaces, dorm-style rooms, and anywhere a traditional table lamp would steal precious surface space.
Why This Hack Became So Popular
The project checks nearly every box that makes a DIY idea go viral among design lovers. It is affordable, visually satisfying, practical, and customizable. It also carries that magical “Wait, that used to be what?” quality that makes guests lean closer and suddenly respect your hardware-store instincts.
At its core, the project uses three powerful design principles:
- Repurposing: A mirror arm becomes a lamp arm.
- Function-first design: The adjustable arm solves a real lighting problem.
- Minimal footprint: Wall mounting frees up nightstands, desks, and shelves.
That combination is why the Manhattan Nest accordion lamp still feels relevant. It is not just cute. It is useful cute, which is the strongest form of cute.
Why an Accordion Wall Lamp Works So Well
A good wall lamp does more than glow politely in the corner. It improves how a room functions. The accordion lamp shines because it offers adjustable task lighting without the visual heaviness of a floor lamp or the clutter of a table lamp.
It Saves Space
If your nightstand is already holding a book, phone, water glass, lip balm, mystery receipt, and three emotionally important objects, adding a lamp can make it look like a tiny garage sale. A wall-mounted accordion lamp solves that by moving the light source up and off the furniture.
It Adds Industrial Charm
The exposed metal arm gives the lamp a slightly industrial, workshop-inspired look. Depending on the finish, it can lean vintage, modern, minimalist, farmhouse, or even playful. Black feels graphic and modern. Brass looks warm and classic. White blends into the wall. A bold color says, “Yes, I own spray paint and confidence.”
It Gives Flexible Light
The adjustable arm lets you aim light where you need it. Pull it out for reading, angle it toward a desk, or tuck it away when you are done. This is especially helpful in small rooms where every item has to do at least two jobs, preferably without complaining.
Materials You May Need
The exact materials depend on how closely you follow the original Manhattan Nest approach or whether you create a safer modern variation using a ready-made plug-in lamp kit. For most DIYers, the best route is to use certified lighting parts and avoid improvising with questionable wiring.
Basic Supplies
- An accordion-style wall mirror arm or similar adjustable wall arm
- A lamp socket or plug-in lamp kit rated for the bulb you plan to use
- An appropriate adapter nut or threaded connector
- Mounting screws and wall anchors suited to your wall type
- A low-heat LED bulb
- Optional lampshade, reflector, or decorative bulb
- Optional spray paint or metal finish
- Screwdriver, pliers, measuring tape, pencil, and level
The small connector between the mirror arm and lamp socket is often the trickiest part. Bring the arm or measurements to a lighting supply store or hardware store if you need help finding a compatible adapter. This is not the moment to say, “Eh, close enough,” because close enough is how lamps become modern art in the least useful way.
Step-by-Step: How to Make a DIY Accordion Lamp
This overview focuses on design and assembly logic. If you are not comfortable with electrical work, use a prewired lamp kit or ask a qualified electrician. A beautiful lamp is not worth turning your wall into a cautionary tale.
Step 1: Remove the Mirror
Start by separating the mirror from the accordion arm. Most wall-mounted makeup mirrors have a joint where the mirror head connects to the arm. Keep the hardware organized in a small bowl or container. Loose screws have a known talent for teleportation.
Step 2: Test the Arm Movement
Extend and collapse the arm several times. Check whether it moves smoothly, holds position, and feels sturdy. If the arm is flimsy, squeaky, or already tired from its former life as a mirror, do not force it into lamp duty. A lamp arm needs to support weight safely.
Step 3: Plan the Socket Connection
The goal is to attach a lamp socket securely to the end of the accordion arm. This usually requires a compatible threaded adapter or nut. The socket should sit straight, tighten firmly, and allow the cord to exit safely without pinching or rubbing against sharp metal edges.
Step 4: Choose a Bulb
For this project, an LED bulb is the smart choice. LEDs use less energy and produce less waste heat than old-fashioned incandescent bulbs. Choose a bulb that fits the socket rating and gives the mood you want. A warm white bulb around 2700K is cozy for bedside lighting, while 3000K can feel a little cleaner for reading or desk use.
Step 5: Decide on a Shade or Bare Bulb Look
A chrome-tipped bulb, small globe bulb, or decorative LED can look great if the bulb is visible. If you prefer softer light, add a small shade or reflector. Make sure any shade has enough clearance around the bulb and is appropriate for the fixture. The goal is ambiance, not a tiny sun trapped in a metal hat.
Step 6: Mount the Arm Securely
Mark the wall position with a pencil and level. Mount the wall plate into a stud if possible. If not, use anchors rated for the fixture’s weight and movement. Remember, this lamp will be pulled and pushed, so the mount must handle more than just gravity. A weak wall anchor will eventually file a formal resignation.
Step 7: Route the Cord Cleanly
For plug-in versions, route the cord neatly down the wall. Cord covers can make the setup look intentional instead of “temporary since 2019.” Avoid running cords under rugs, behind sharp edges, or anywhere they can be pinched by the moving arm.
Step 8: Test Before Daily Use
Turn the lamp on and let it run while you remain nearby. Check whether the socket, shade, arm, or cord becomes unusually warm. Move the arm gently to confirm nothing pulls, twists, or scrapes. If anything feels wrong, unplug it and fix the issue before using it again.
Design Ideas for a Better-Looking Accordion Lamp
The original charm of this project is its simplicity, but a few design decisions can make it look more custom and less like it escaped from a bathroom aisle.
Paint the Arm
Spray paint can completely change the personality of the lamp. Matte black gives a modern industrial look. Satin brass adds warmth. Cream or white keeps things soft and subtle. For kids’ rooms or creative studios, a bright color can turn the lamp into a cheerful accent.
Use light coats and allow proper drying time. If the arm will move often, be aware that paint may wear at the joints. That distressed look can be charming, but only if you pretend it was intentional.
Upgrade the Cord
A cloth-covered cord can make a DIY lamp look much more finished. Black, white, linen, or twisted fabric cords add texture and polish. Just make sure the cord is part of a safe, properly rated lamp kit.
Use Matching Pairs
Two accordion lamps mounted on either side of a bed create symmetry and make the whole room feel designed. Even if the rest of the bedroom includes laundry on a chair, matching lamps whisper, “I have a plan.”
Add a Dimmer
A compatible plug-in dimmer can make the lamp more versatile. Use a dimmable LED bulb and a dimmer rated for LED lighting. This turns the lamp from task lighting into mood lighting, which is useful when you want the room to say “cozy evening” instead of “interrogation scene.”
Where to Use a DIY Accordion Lamp
The accordion lamp works in more places than just beside a bed. Its adjustable shape makes it useful in any small or task-focused zone.
Bedroom Reading Light
This is the classic use. Mount the lamp slightly above shoulder height when sitting in bed. Aim it so the light falls onto your book or tablet without shining directly into your eyes.
Desk or Homework Area
A wall-mounted lamp can free up desk space and provide focused light. This is especially helpful for compact desks, craft tables, or shared work areas.
Kitchen Nook
Mount one above a small breakfast table or coffee station for a café-inspired detail. Just keep it away from steam, splashes, and cooking heat.
Workshop or Craft Corner
The adjustable arm is perfect for hobbies that need focused light, such as sketching, model making, sewing, or repairing small objects. It gives your workspace that “serious maker” energy without requiring a dramatic tool wall.
Safety Notes You Should Not Skip
DIY lighting is fun, but lamps involve electricity, heat, movement, and wall mounting. That means safety should be part of the design from the beginning, not a guilty thought you have after plugging it in.
Use Certified Parts
Choose lamp sockets, cords, plugs, and kits from reputable manufacturers. Look for parts that are rated for household lighting. Avoid mystery components with no markings, no instructions, and the general aura of “found in a bin.”
Do Not Exceed Wattage Ratings
Every socket and shade has limits. Stay within the rated wattage and use LED bulbs whenever possible. A low-watt LED can provide plenty of light while reducing heat concerns.
Protect the Cord
The cord should never be pinched by the accordion mechanism. Move the arm through its full range and watch the cord carefully. If it stretches, rubs, or twists, adjust the routing.
Mount It Strongly
Because the arm moves, the wall mount experiences repeated pressure. Use proper anchors or mount into a stud. If the lamp wobbles, fix it immediately.
Call an Electrician When Needed
If you want a hardwired version connected directly to household wiring, hire a qualified electrician. Plug-in lamps are much friendlier for renters and beginners.
Common Mistakes to Avoid
Even a simple DIY accordion lamp can go sideways if you rush. Here are the most common errors and how to dodge them gracefully.
Using a Bulb That Gets Too Hot
Vintage-style incandescent bulbs look beautiful, but they can produce a lot of heat. LED versions are usually the better choice for a small wall lamp.
Ignoring Scale
A tiny bulb on a large arm can look awkward. A huge shade on a small arm can look like the lamp skipped leg day. Test proportions before final assembly.
Mounting Too Low
If the lamp is mounted too low beside a bed, it may bump pillows, shoulders, or your forehead during sleepy midnight negotiations. Measure from your actual sitting position before drilling.
Forgetting the Cord Path
A visible cord is not automatically ugly, but a messy cord can ruin the look. Plan the path before mounting the lamp. Cord covers, clips, and thoughtful placement make a big difference.
DIY Experience: What This Project Teaches You
The best thing about a DIY accordion lamp is that it teaches design problem-solving without requiring advanced carpentry or a dramatic renovation budget. You begin with a simple question: what else could this object become? That question is the heartbeat of good DIY.
In many homes, lighting is treated as an afterthought. People decorate walls, choose bedding, argue with rugs, and then toss a random lamp into the corner like lighting is a substitute teacher. But a project like the Manhattan Nest accordion lamp reminds you that lighting can shape the whole feeling of a room. A small adjustable lamp can make a bedroom feel calmer, a desk feel more intentional, and a reading corner feel like it finally got promoted.
One of the most satisfying parts of this project is the transformation. A wall mirror arm is not glamorous by itself. It is practical, maybe a little awkward, and usually trapped in bathroom duty. But once you remove the mirror and add a thoughtful light source, the same object becomes sculptural. That is the fun of repurposing: you get to see potential where other people see clearance-bin confusion.
The project also teaches patience with small hardware. The adapter nut or connector can be the tiniest villain in the story. Everything else may seem obvious, but that one small part determines whether the socket attaches securely. This is where many DIYers learn an important lesson: bring parts with you to the hardware store, ask questions, and do not be embarrassed. Hardware stores are basically libraries where the books are made of metal and nobody agrees on the naming system.
Another real-world lesson is that finish matters. A raw DIY lamp can look charming, but a painted arm, clean cord route, and well-chosen bulb can make the project feel designer-level. Small visual decisions add up. Matching the lamp color to other metal finishes in the room can make it feel intentional. Choosing a warm LED bulb can make the light flattering rather than harsh. Adding a cord cover can move the whole project from “I made this yesterday” to “Yes, it has always belonged here.”
This DIY also encourages honest self-assessment. If you are comfortable assembling parts but not wiring a socket, use a prewired kit. If you are not confident mounting into drywall, get the right anchors or ask for help. DIY does not mean doing every single thing alone while pretending YouTube made you immortal. The smartest projects are the ones that balance creativity with caution.
There is also a renter-friendly lesson here. Many renters assume stylish lighting is off-limits because they cannot hardwire sconces or renovate walls. A plug-in accordion lamp offers a flexible alternative. Yes, you may need to patch small holes later, but compared with rewiring a room, that is a tiny commitment. It gives renters a way to enjoy custom-looking lighting without begging a landlord for permission to become an electrician.
Finally, the DIY accordion lamp proves that good design does not always require expensive materials. Sometimes it requires noticing movement, shape, and function in an object that already exists. The Manhattan Nest idea works because it respects the original mechanics of the mirror arm while giving it a new purpose. That is the sweet spot of DIY: not forcing an object to become something impossible, but nudging it toward a better destiny.
Conclusion: A Small Lamp With Big DIY Confidence
The DIY Accordian Lamp by Manhattan Nest remains a standout project because it is affordable, clever, useful, and full of personality. It turns a simple accordion mirror arm into a practical wall-mounted light that works beautifully in bedrooms, offices, reading corners, and small apartments. With the right parts, a safe bulb choice, secure mounting, and a little design polish, this project can look far more expensive than it is.
More importantly, it captures the spirit of great DIY: look twice, think creatively, and make something ordinary work harder. Just remember to respect the electrical side of the project, choose safe components, and let the finished lamp glow with confidencenot questionable wiring.


