
Table of Contents >> Show >> Hide
- What Is a Farmhouse Wood Window Valance?
- Why Add a DIY Wood Window Valance?
- Choose the Right Style Before You Cut Wood
- Materials and Tools for a DIY Farmhouse Wood Window Valance
- How to Measure for a Farmhouse Wood Window Valance
- DIY Farmhouse Wood Window Valance: Step-by-Step Instructions
- Step 1: Plan the Cut List
- Step 2: Cut the Wood Carefully
- Step 3: Assemble the Wood Cornice Box
- Step 4: Add Trim or Decorative Details
- Step 5: Fill, Sand, and Prepare the Surface
- Step 6: Paint or Stain the Valance
- Step 7: Locate Wall Studs and Mark the Mounting Height
- Step 8: Install the Window Valance Securely
- Farmhouse Wood Valance Styling Ideas
- Common DIY Window Valance Mistakes to Avoid
- Where a DIY Farmhouse Wood Window Valance Works Best
- DIY Farmhouse Wood Window Valance Experience: Lessons From Real-World Builds
- Final Thoughts
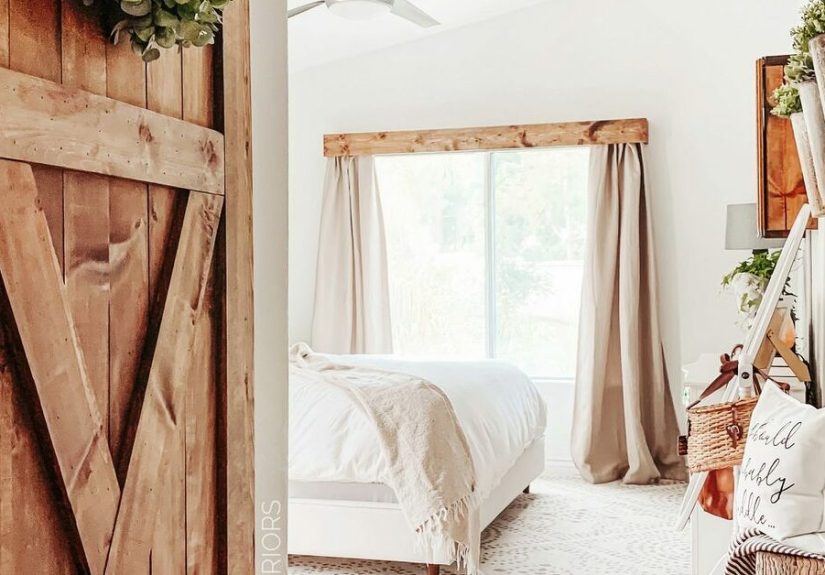
Some windows are perfectly fine. They let in sunlight, offer a view of the neighbor’s suspiciously enthusiastic lawn mower collection, and generally do their job. But “fine” is not the same as charming. A DIY farmhouse wood window valance can turn a plain window into a cozy focal point, hide curtain rods or blind hardware, and add the kind of warm, handmade character that makes a room feel less builder-basic and more “I definitely planned this look.”
The good news: you do not need a barn, a tractor, or a chicken named Mabel to pull off farmhouse style. With a few boards, basic tools, careful measuring, and a finish that fits your room, you can create a custom wood cornice that looks far more expensive than its material list suggests.
This guide walks through how to plan, build, finish, and install a farmhouse wood window valance. It also covers the common mistakes that can turn a simple project into an accidental modern-art sculpture hanging above your curtains.
What Is a Farmhouse Wood Window Valance?
A wood window valance is a decorative topper mounted above a window. Unlike a soft fabric valance, a farmhouse wood valance is usually a rigid three-sided box made from lumber or plywood. It can hide curtain rods, blind headrails, roller shades, mounting brackets, and the small visual chaos that tends to collect at the top of a window.
You may also hear it called a wood cornice board, window cornice, wooden pelmet, or curtain box. The names vary, but the mission stays the same: create a clean, finished frame above the window while adding personality.
For farmhouse interiors, the best designs are usually simple. Think straight lines, natural wood grain, white paint, matte black hardware, subtle distressing, or a small trim detail. The goal is rustic warmth, not “this window has been recruited into a Victorian parade float.”
Why Add a DIY Wood Window Valance?
A farmhouse window valance does more than sit there looking cute. It can solve several decorating problems at once.
- It hides curtain rods, blinds, shades, and mounting hardware.
- It adds visual height when mounted above the window trim.
- It makes inexpensive curtains or blinds look more customized.
- It brings warmth to rooms with lots of white, gray, or neutral finishes.
- It can tie together wood accents such as shelves, beams, tables, or floating mantels.
- It creates a polished farmhouse look without replacing the entire window treatment.
It is especially useful in kitchens, bathrooms, laundry rooms, bedrooms, dining rooms, and living rooms where you want the softness of curtains but would rather not stare at metal brackets every morning before coffee.
Choose the Right Style Before You Cut Wood
The easiest DIY farmhouse wood window valance is a clean three-sided box: one front board and two short return boards that extend back toward the wall. That shape creates depth, hides hardware, and gives the project a finished appearance from the side.
Simple Flat-Front Valance
This version uses one wide front board with side returns. It works beautifully in modern farmhouse, Scandinavian farmhouse, cottage, and rustic interiors. Use a clear matte finish for a natural look, or paint it warm white for a soft and bright result.
Shiplap-Style Window Valance
A shiplap-inspired valance uses narrow boards across the front, often with tiny gaps between them. It adds texture without becoming overly fussy. This style works well above kitchen sinks, in laundry rooms, or anywhere you already have shiplap, board-and-batten, or beadboard.
Trimmed Farmhouse Cornice
Add a small piece of lattice, cove molding, or thin decorative trim along the bottom edge to make the valance feel more finished. Keep it restrained. One trim detail looks intentional; seven trim details can make the window look like it is preparing for prom.
Reclaimed-Wood Look
You can use reclaimed lumber, but clean new boards often provide a safer and easier option. To create a reclaimed look, lightly distress the surface, apply a weathered stain, or layer a dark base stain under dry-brushed paint. The key is subtle variation, not making it look like the board survived three shipwrecks and a tornado.
Materials and Tools for a DIY Farmhouse Wood Window Valance
Your exact supply list depends on the design, but most basic farmhouse wood valances use the same core materials.
Materials
- 1×6, 1×8, or 1×10 pine, poplar, select board, or plywood for the front panel
- Matching boards for the side returns
- Wood screws or finish nails
- Wood glue
- Wood filler
- Sandpaper in medium and fine grits
- Paint, stain, wax, or clear protective finish
- Wall-mounting screws
- Heavy-duty L-brackets, French cleat hardware, or wood mounting blocks
- Optional decorative trim, corbels, hooks, or faux iron brackets
Tools
- Measuring tape
- Level
- Pencil
- Stud finder
- Drill and drill bits
- Miter saw, circular saw, or handsaw
- Brad nailer or hammer
- Clamps
- Safety glasses and hearing protection
Pine is affordable and easy to find, though it can absorb stain unevenly. Poplar is a great choice for painted projects because it sands smoothly and takes paint well. Plywood is practical for wide valances because it stays stable and can be trimmed for a more polished edge.
How to Measure for a Farmhouse Wood Window Valance
Measuring is the part where the project either becomes satisfying or begins its journey toward becoming “firewood with a backstory.” Take your time here.
Measure the Width
Start by measuring the full width of the window trim, not just the glass. For a valance that lightly frames the window, add 2 to 4 inches beyond the trim on each side. For curtains that need room to stack open, extend the valance farther so the curtain panels can sit outside the window opening.
Example: If your outside trim measurement is 36 inches wide, a simple valance could be 40 to 44 inches wide. If you have wide curtain panels that stack on each side, you may want a width closer to 48 or 52 inches.
Measure the Depth
The depth must clear the furthest point of your curtain rod, blind headrail, or shade hardware. Measure from the wall to the front edge of that hardware, then add at least 1 inch of breathing room. A common finished depth is 5 to 8 inches.
If the valance is too shallow, it will not hide anything. If it is too deep, it may make a small room feel heavy. You want “custom built-in,” not “tiny roof over the window.”
Choose the Height
Most wood window valances are 6 to 12 inches tall. A shorter valance works well in low-ceiling rooms or above kitchen windows. A taller one makes more sense in rooms with high ceilings, large windows, or dramatic curtains.
Before cutting, tape a piece of cardboard above the window at your intended size. Step back across the room and look at it from several angles. Cardboard mockups may not be glamorous, but neither is recutting lumber after you discover your valance resembles a medieval drawbridge.
DIY Farmhouse Wood Window Valance: Step-by-Step Instructions
Step 1: Plan the Cut List
For a basic three-sided cornice, you need:
- One front board cut to the full finished width
- Two side return boards cut to the finished depth
- Optional top board if you want a fully enclosed box or shelf-like look
For example, a valance that is 48 inches wide, 8 inches tall, and 6 inches deep would need one 48-inch front board and two 6-inch side returns. If you add a top board, it should fit between or over the side pieces depending on your preferred joinery style.
Step 2: Cut the Wood Carefully
Cut the front board and return pieces according to your measurements. Straight square cuts are perfectly fine for a farmhouse valance, especially if you plan to paint it. If you want a more furniture-like finish, you can use mitered corners, but simple butt joints are easier and still look great once filled, sanded, and painted.
Always test-fit the pieces on a flat surface before fastening them together. Walls and windows are rarely perfectly square, because apparently houses enjoy keeping secrets.
Step 3: Assemble the Wood Cornice Box
Apply a thin bead of wood glue where each return meets the front board. Hold the pieces in place with clamps, then reinforce the joints with brad nails or screws driven from the inside where possible.
For a cleaner finish, predrill screw holes to reduce the chance of splitting the wood. If you use finish nails, place them carefully and fill the holes later with paintable or stainable wood filler.
Let the glue cure according to the product instructions before moving the box around. Freshly glued wood joints have the emotional stability of a stack of pancakes on a paper plate.
Step 4: Add Trim or Decorative Details
This is optional, but it can make a plain board look intentional and custom. Consider one of these ideas:
- A narrow strip of cove molding along the bottom edge
- A thin lattice strip around the front perimeter
- Small corbels under each outer corner
- A simple painted stripe or stenciled farmhouse pattern
- A row of tiny black hooks for seasonal greenery or lightweight decor
Keep practical use in mind. Avoid bulky decorations that interfere with curtains, blind cords, or window operation.
Step 5: Fill, Sand, and Prepare the Surface
Fill nail holes, gaps, and rough seams with wood filler. Once dry, sand the entire valance. Start with medium-grit sandpaper to smooth joints and rough edges, then move to fine grit for a finished surface.
Pay special attention to the front edge and bottom edge because these are the areas people will notice first. A few minutes of sanding can make a budget project look far more professional.
Step 6: Paint or Stain the Valance
For a classic farmhouse finish, choose one of these approaches:
- Natural wood: Use a light or medium stain, then protect it with a matte clear topcoat.
- White painted wood: Prime first, then use warm white, cream, or soft greige paint.
- Weathered gray: Use a gray-brown stain or a thin wash of gray paint over natural wood.
- Black accent valance: Use matte black paint for a modern farmhouse contrast above white curtains.
- Two-tone finish: Paint the box white and leave a small trim piece natural wood.
If you stain pine, test your finish on a scrap piece first. Pine can absorb stain unevenly, so a wood conditioner or gel stain can help create a more even result. When using paint, primer and a light sanding between coats can make the surface smoother and more durable.
Finish products can release fumes, so work in a well-ventilated area, follow label instructions, and allow the valance to dry fully before bringing it indoors.
Step 7: Locate Wall Studs and Mark the Mounting Height
Use a stud finder to locate studs above the window. Mark them lightly with pencil. Whenever possible, secure your farmhouse wood valance into studs because a solid wood box can become surprisingly heavy once you add trim, paint, and the confidence of someone who says, “It’s probably fine.”
Hold the valance in place with a helper and check it with a level. Mark the desired mounting height. Make sure it covers the curtain rod or blind headrail while still leaving enough clearance for curtains to slide and blinds to operate.
Step 8: Install the Window Valance Securely
There are several ways to mount a wood cornice board:
- L-brackets: Secure brackets to wall studs, then attach the valance from inside the box.
- Wood cleats: Attach a horizontal wood cleat to studs, then screw the valance into the cleat from the top or inside.
- French cleat: Great for a removable, sturdy installation, especially for larger valances.
- Direct mounting: Screw through the inside back area of the valance into wall studs when the design allows.
Use wall anchors only when a stud is unavailable and choose anchors rated for the actual weight of the finished piece. Never assume a small decorative valance is too light to matter. Gravity is patient, confident, and undefeated.
Farmhouse Wood Valance Styling Ideas
Pair It With White Linen Curtains
A natural wood valance looks beautiful above relaxed white linen or cotton curtain panels. This combination creates warmth without blocking too much natural light.
Use Black Curtain Rods for Contrast
Matte black curtain rods and rings work especially well with a white-painted valance, warm wood tones, or a modern farmhouse palette. The contrast gives the window definition without overpowering the room.
Match Existing Wood Accents
Try to repeat the same wood tone somewhere else in the room: a floating shelf, dining table, picture frame, bench, mirror, or mantel. Exact matching is not required, but the undertones should feel compatible.
Add Soft Texture Below the Valance
Layer a wood cornice with woven shades, bamboo blinds, café curtains, or light-filtering panels. The mix of hard wood and soft fabric is what makes farmhouse style feel comfortable instead of overly staged.
Common DIY Window Valance Mistakes to Avoid
Making It Too Narrow
A valance that stops exactly at the window trim can look cramped, especially when curtains are involved. Give the design enough width to frame the window and cover the hardware comfortably.
Ignoring Curtain Clearance
Before installing, pull your curtains open and closed. Check blinds, shades, and window locks too. The valance should hide hardware, not trap it in a wooden prison.
Mounting It Too Low
A low-mounted valance can make windows appear shorter and ceilings feel lower. Mount it higher when possible to create the illusion of more height.
Skipping the Level
Your eyes will notice a crooked valance every single day, especially after you proudly announce that you installed it yourself. Use a level before drilling, then use it again because walls have a way of humbling people.
Overdoing the Distressing
Farmhouse style is warm, relaxed, and lived-in. It does not require every board to look as though it spent a decade underwater. A little sanding on edges or a dry-brushed paint finish is usually enough.
Where a DIY Farmhouse Wood Window Valance Works Best
A wood cornice can work in nearly any room, but certain spaces benefit the most:
- Kitchen: Hide roller shades or blinds over a sink window.
- Laundry room: Add charm above a small utility-room window.
- Bathroom: Pair with moisture-friendly paint and simple café curtains.
- Bedroom: Create a cozy focal point above blackout curtains or woven shades.
- Living room: Make inexpensive curtain hardware look more custom.
- Dining room: Use a stained or painted valance to connect the window to furniture finishes.
For bathrooms, kitchens, and other humid areas, use a durable paint or protective clear coat and avoid untreated raw wood that may absorb moisture over time.
DIY Farmhouse Wood Window Valance Experience: Lessons From Real-World Builds
The first thing most people learn when building a DIY farmhouse wood window valance is that the project looks incredibly simple right up until they start measuring. A wood cornice is basically a box, which sounds harmless enough. Then you discover that your window trim is not square, the wall bows slightly, the curtain rod sticks out farther than expected, and your “quick weekend project” has developed a personality.
The most successful builds usually begin with a cardboard mockup. It may feel silly to stand in your living room holding a large rectangle of cardboard above a window, but that five-minute test can save an hour of recutting wood. A mockup helps you see whether the valance is too tall, too shallow, too wide, or mounted too low. It also helps you notice whether the side returns will collide with curtain rings, blinds, or a window sash that opens inward.
Another common lesson is that simple designs nearly always look better. A straight front board with modest side returns can feel custom, clean, and farmhouse-friendly. Beginners often worry that it needs more trim, more brackets, more distressing, more stencil work, and perhaps a tiny wooden sign that says “Bless This Window.” Usually, it does not. Let the wood, finish, and proportions do the work.
Finishing is where the project can either become charming or frustrating. Pine is budget-friendly, but it may stain unevenly. Testing stain on a scrap piece makes a huge difference. A light conditioner, gel stain, or paint wash can produce a more controlled finish than applying dark stain directly to unfinished pine and hoping for the best. Painted valances are often more forgiving, especially when the wood has knots, grain variation, or filled nail holes.
Mounting is another area where experience matters. It is tempting to use a couple of small anchors, hang the valance, step back, and declare victory. But a solid wood cornice deserves proper support. Finding studs, using sturdy brackets, and checking level twice can prevent headaches later. A slightly uneven valance is noticeable. A valance that comes loose above a curtain rod is memorable for all the wrong reasons.
Finally, do not rush the styling. Once the valance is installed, live with it for a day before adding extra decor. You may find that the wood grain, curtain panels, and natural light already provide enough character. Farmhouse design is at its best when it feels collected rather than crowded. A DIY wood window valance should make the room feel warmer and more finished, not like the window is wearing a decorative helmet.
Final Thoughts
A DIY farmhouse wood window valance is one of those projects that delivers a big visual payoff without requiring an entire room makeover. It adds warmth, hides hardware, gives windows a custom look, and creates a natural bridge between curtains, blinds, trim, and furniture.
The secret is not complicated joinery or expensive lumber. It is thoughtful measuring, clean assembly, a finish that fits the room, and secure installation. Build it simple, mount it level, and let the wood do what wood does best: make a space feel a little more inviting.
Note: Before drilling, confirm the location of wall studs, electrical wiring, plumbing, and curtain or blind hardware. Follow all manufacturer instructions for tools, fasteners, paints, stains, and mounting hardware.





 Close
Close