Table of Contents >> Show >> Hide
- Why Paint a Corkboard?
- Pick Your Corkboard Base
- Supplies Checklist
- Prep Work: The Step Everyone Wants to Skip (Don’t)
- Method 1: Paint the Frame and Border (Fast, Clean, Pin-Friendly)
- Method 2: Paint the Cork Surface (Patterns, Stencils, and “Wow” Factor)
- Three Design Projects You Can Copy Today
- Should You Seal a Painted Corkboard?
- Mounting and Hanging Without Regret
- Turn It Into a Command Center (Not Just a “Pin Stuff Here” Zone)
- Troubleshooting: Fix the Common Problems
- Care and Refresh Tips
- FAQ
- Conclusion
- Experience Notes: What Usually Happens When You Make One (So You Can Skip the Stress)
If your corkboard currently screams “middle school hallway” (no offense to hallways doing their best), a little paint can turn it into a legit decor pieceone that still holds your to-do lists, invitations, and the one coupon you swear you’ll use before it expires.
This guide walks you through two reliable approaches: painting just the frame/border for a fast glow-up, or painting the cork surface for patterns, color-blocking, and stenciled designs. You’ll get practical tips to keep the board pin-friendly, plus design ideas and common “oops” fixesbecause DIY without a tiny learning curve is basically just shopping.
Why Paint a Corkboard?
Painted corkboards do three things at once: they organize your life, upgrade your wall, and quietly judge you when you haven’t moved the same sticky note for three months. More seriously, paint can help a corkboard blend with your room palette, create a dedicated “command center,” or make a mood board feel intentional instead of accidental.
Pick Your Corkboard Base
Before you pick paint colors, decide what you’re painting. The “base” affects durability, how much paint you’ll need, and whether pins still glide in nicely.
Option A: A Ready-Made Framed Corkboard
This is the easiest path: a basic corkboard (often cork laminated over fiberboard) with a wood or MDF frame. Painting the frame is quick, and the cork surface can stay natural if you want maximum pin performance.
Option B: Cork Sheets or Cork Tiles
Great for large installations or custom sizes. Cork tiles can become a grid wall of mini boards, while sheets can be cut to fit inside a thrifted picture frame. If you’re building from scratch, add a firm backing (thin plywood, hardboard, or foam board) so it doesn’t warp or sag.
Option C: Upcycled Picture Frame + Cork (Custom Look)
If you love the “high-end memo board” look, an old frame plus cork sheets is your best friend. Bonus: you can paint and distress the frame, then keep the cork mostly bareor go bold and paint the cork pattern, too.
Supplies Checklist
You don’t need every item below, but you do need a plan. Choose based on which painting method you’re using.
Core Supplies
- Corkboard (framed board, cork sheet/tile setup, or framed DIY build)
- Drop cloth or old sheet + painter’s tape
- Lint-free cloth (or microfiber towel)
- Fine-grit sandpaper (optional but helpful)
- Paintbrushes (angled brush for corners) and/or a small foam roller
- Acrylic craft paint or interior latex paint (water-based is easiest)
- Disposable gloves (optional) and a dust mask if sanding
For Crisp Designs
- Painter’s tape or washi tape (washi for gentle removal, painter’s tape for sharper lines)
- Stencils (optional), stencil brush or sponge
- Pencil + ruler for layout
For Extra Durability
- Primer (water-based; optional but useful for heavy color changes)
- Clear sealer (light clear acrylic spray or a thin water-based topcoat)
Safety note: If you use spray products (primer or sealer), work outside or in a well-ventilated area and protect surrounding surfaces. Let everything cure fully before hanging indoors.
Prep Work: The Step Everyone Wants to Skip (Don’t)
Cork is porous, textured, and full of tiny valleys that love to collect dust. Prep is what prevents blotchy paint and peeling edges.
- Remove hardware and extras: Take off hanging hardware if it’s in the way. Remove pushpins, clips, and old tape residue.
- Clean the surface: Wipe the cork and frame with a dry microfiber cloth. If the frame is grimy, use a barely damp cloth and let it dry completely.
- Lightly sand the frame (if painting it): A quick scuff-sand helps paint grip, especially on glossy frames. Wipe away dust.
- Mask what you’re not painting: Tape off the cork if painting only the frame, or tape off the frame if painting the cork surface. Press edges down firmly.
Method 1: Paint the Frame and Border (Fast, Clean, Pin-Friendly)
If you want maximum function with minimum drama, paint the frame (and optionally a thin “border” on the cork) and call it a day. This method looks polished and keeps the cork surface mostly open for pins.
Step-by-Step
- Tape the cork: Run painter’s tape along the inner edge of the frame so the cork stays clean. Burnish the tape edge with a credit card for a crisp line.
- Prime if needed: If the frame is dark, glossy, or stained, a thin primer coat helps. Let it dry fully.
- Paint in thin coats: Use an angled brush for corners and a small foam roller for flat sections. Thin coats look smoother and dry faster.
- Let it dry, then repeat: Two coats usually beat one thick coatless dripping, better finish.
- Peel tape at the right time: Remove tape when paint is dry to the touch but not rock-hard. Pull tape back on itself at a 45-degree angle.
Style Ideas for Frame-Only Paint
- Modern monochrome: Black or white frame with natural cork.
- Color-pop frame: Bright frame in a neutral room to make the board feel like art.
- Soft matte neutrals: Warm white, greige, or sage for a calm home office vibe.
- Two-tone frame: Paint the outer edge one color and the inner lip another for subtle depth.
Method 2: Paint the Cork Surface (Patterns, Stencils, and “Wow” Factor)
Yes, you can paint cork. The trick is to keep paint layers thin so the cork doesn’t get “clogged” and stubborn about accepting pins. This method works best for decorative boards, inspiration boards, and command centers where you’ll pin papernot bricks.
Best Paint Types for Cork
- Acrylic craft paint: Great control, tons of colors, dries quickly.
- Water-based latex wall paint: Good coverage for larger boards, especially with a foam roller.
- Chalk-style paint: Matte look, often covers well, can be sealed lightly if needed.
Tip: Avoid heavy, gloopy coats. Thick paint can fill the cork texture and make pinning harder.
Step-by-Step: Painting the Cork Surface
- Decide how much cork you’re painting: Full coverage looks bold, but partial patterns preserve pin performance.
- Consider a light primer (optional): If you’re going from dark cork to a pale color, a thin primer coat can help reduce paint absorption. Keep it light.
- Use a foam roller for big areas: Roll gently to avoid forcing paint deep into the cork. For edges and small shapes, use a brush.
- Apply multiple thin coats: Let each coat dry fully. Cork will look blotchy mid-processdon’t panic; it evens out.
- Let it cure before heavy use: “Dry” and “fully cured” aren’t the same thing. If you start pinning too soon, paper may stick or paint may dent.
Three Design Projects You Can Copy Today
1) Geometric Tape Pattern (Beginner-Friendly, Very Satisfying)
This is the easiest way to get crisp shapes without freehand artistry. Painter’s tape creates the design; paint fills the spaces.
- Lay out triangles or angled blocks with painter’s tape. Press the tape edges down firmly.
- Paint over exposed cork areas using a foam roller or brush (thin coats).
- Let paint become dry to the touch, then carefully peel tape back.
- Optional: add a second color after the first is fully dry, re-taping as needed.
Example palette: navy + warm white + muted terracotta for a modern “designer” look.
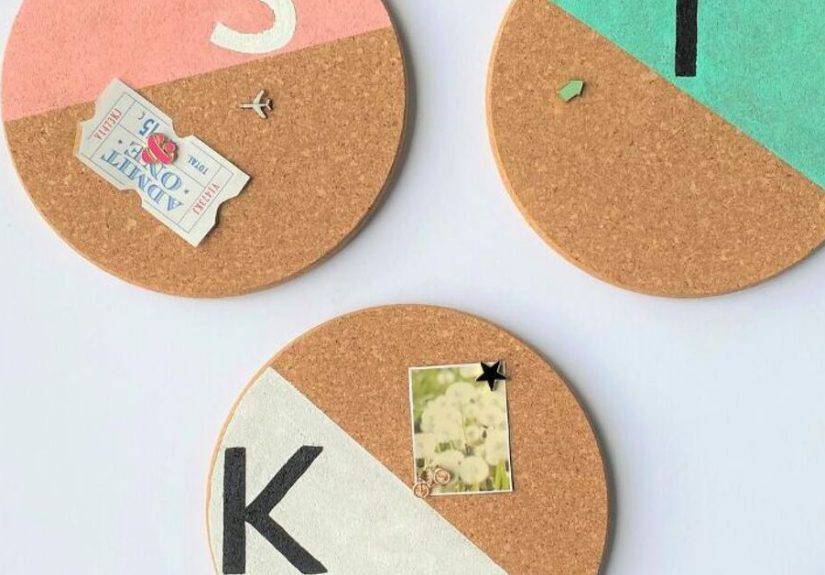
2) Stenciled Motif (Maps, Florals, or a Big Monogram)
Stencils are perfect when you want something that looks printed. A stencil brush or sponge gives better control than a standard paintbrush.
- Position stencil and secure it with painter’s tape.
- Use minimal paint on the brush/sponge (dab off excess first).
- Dab vertically instead of swiping to reduce bleed.
- Lift stencil carefully and let it dry before repositioning.
Pro tip: Cork texture means you should use less paint than you think. Most stencil “bleeding” is just too much paint.
3) Color-Blocked “Functional Zones” (Pretty and Actually Useful)
Instead of painting random shapes, paint areas that match how you use the board.
- Top band: “This Week” items
- Left column: reminders/appointments
- Right column: inspiration (quotes, photos, swatches)
- Bottom strip: receipts, tickets, coupons
Use thin tape lines between zones for a clean graphic layout.
Should You Seal a Painted Corkboard?
Sealing is optional. If your corkboard is mostly decorative (or you’ll touch it often), a light sealer helps protect the finish. If you want maximum “easy pinning,” you may skip sealeror seal only the painted sections.
Good Sealing Rules
- Go light: One or two very light coats beat a thick glossy layer.
- Choose a flexible finish: A clear acrylic spray is often easier than brushing a thick topcoat into cork texture.
- Let it cure: If it still smells strongly like paint or spray product, it probably isn’t fully cured yet.
Mounting and Hanging Without Regret
A corkboard becomes a lever the moment you start pinning things to it. Translation: it needs secure mounting, especially for larger boards.
- Use anchors for drywall: If you can’t hit studs, wall anchors help prevent sagging or ripping.
- Level it: A crooked corkboard will haunt you quietly every time you walk by.
- For tile setups: Follow the adhesive instructions carefully and press firmly. Consider a backing board for a more permanent install.
Turn It Into a Command Center (Not Just a “Pin Stuff Here” Zone)
A painted corkboard shines when it has a job. Here are a few practical setups that look intentional:
- Family hub: sections for each person + color-coded pins or clips
- Home office: goals, deadlines, meeting notes, and a small inspiration corner
- Kitchen board: grocery list + takeout menus + weekly meal plan card
- Craft room: swatches, pattern pieces, and project checklists
Small upgrade: Use binder clips pinned to the board to hold thicker stacks of paper so your cork doesn’t look like it’s growing a paper beard.
Troubleshooting: Fix the Common Problems
Problem: Paint Looks Blotchy
Why it happens: Cork absorbs unevenly. Fix: Apply another thin coat after full drying. Consider a light primer next time if going very light over dark cork.
Problem: Tape Lines Bled Under the Edge
Why it happens: Tape edge wasn’t fully pressed down, or too much paint was used. Fix: Touch up with a small brush, or lightly sand the bleed and repaint the edge.
Problem: Pins Are Hard to Push In
Why it happens: Paint layers were too thick, or a heavy topcoat filled the cork texture. Fix: Use sharper pushpins, avoid sealing next time, and keep paint coats thin. For future projects, paint only patterns or borders instead of full coverage.
Problem: The Board Warped
Why it happens: Moisture from paint or uneven coverage affected the backing. Fix: Paint both “sides” if possible (or at least seal the back), and use sturdier backing materials for DIY builds.
Care and Refresh Tips
- Dust it occasionally: Cork holds dust like it’s collecting it for a hobby.
- Rotate pin holes: Don’t pin in the same exact spots forever if you want it to look fresh.
- Refresh seasonally: Swap out pinned items and change the “featured” area so the board stays useful (and not just wall clutter).
FAQ
Will painting ruin my corkboard?
Not if you use thin coats. If you paint the entire cork surface with thick layers, it may become harder to pin into. Painting the frame or creating patterns preserves function best.
Can I use spray paint?
You can, but cork absorbs a lot. If you spray, use very light coats and expect to need more than you would on wood. Many DIYers prefer brush-on acrylic or latex paint for control.
Do I need primer?
Primer helps most when you’re covering dark cork with pale paint or when the frame is glossy. For small patterns or medium/dark colors, you can often skip it.
What’s the easiest “fancy” upgrade?
Paint the frame a modern matte color, add a slim painted border on the cork, and use matching pins or clips. It’s a five-star look with a two-star effort rating.
Conclusion
DIY painted corkboards are the rare craft that’s both pretty and genuinely useful. Whether you keep it simple with a painted frame or go bold with geometric patterns and stencils, the secret is thin coats, good tape lines, and a clear plan for how you’ll use the board once it’s on the wall.
Pick a style that fits your space, keep the paint light so pins still cooperate, and don’t be afraid to treat your corkboard like decornot just a dumping ground for paper. Your future self (the one who can actually find the appointment card) will thank you.
Experience Notes: What Usually Happens When You Make One (So You Can Skip the Stress)
Here’s a very common first-time experience: someone starts with a plain corkboard and thinks, “I’ll just paint it real quick.” Then they discover cork is basically a tiny sponge disguised as office supplies. The first coat looks uneven, and for a brief moment, it feels like the project is failing. It’s not. Cork often looks patchy mid-process because it absorbs paint differently across the surface. The best move is to step away, let it dry fully, and come back with a second thin coat. Impatience is the enemy hereimpatience and that one corner of painter’s tape that wasn’t pressed down.
Another classic moment: the tape reveal. Done right, it’s the satisfying part where you peel tape and suddenly your board looks like a boutique stationery shop display. Done wrong, it’s when you realize paint bled under the edge and your “clean lines” look like they got the flu. The good news is that most tape-bleed fixes are simple: a small touch-up brush, a steady hand, and the willingness to pretend it was “handcrafted character” all along. (It’s okay. That’s what DIY is. It’s vibes plus problem-solving.)
Many people also learnsometimes the hard waythat thick paint turns a corkboard into a “cork suggestion.” If your goal is to pin papers daily, full-coverage paint should be thin and intentional. A lot of DIYers end up preferring partial designs: color-blocked corners, stenciled centers, or a bold top band for weekly priorities. These layouts look designed, but they keep plenty of raw cork available for effortless pinning. It’s a functional win and a design win, which is basically the DIY jackpot.
There’s also a real “aha” moment when the board gets assigned a job. A painted corkboard that’s just “for stuff” becomes visual noise fast. But when it’s a command centerdeadlines on one side, reminders on another, inspiration in the middleit starts pulling its weight. People often report that once the board looks good, they’re more likely to keep it tidy. That sounds silly until you remember humans will absolutely clean a kitchen more often if the countertop is cute.
Finally, the most underrated experience: the accessories. Matching pins, binder clips, tiny labels, and a clean border can make the whole setup feel finished. And because the board is now “decor,” it gets treated betterpapers get swapped out, old notes get tossed, and the board stays useful instead of becoming a permanent museum exhibit of outdated to-dos. If you want your DIY painted corkboard to stay a success, make the system easy: simple zones, easy-to-move pins, and a quick weekly refresh. That’s the difference between “I made a cool thing” and “I made a cool thing that actually helps my life.”