
Table of Contents >> Show >> Hide
- What Focus Stacking Is (and Why “Just Shoot f/22” Isn’t a Personality)
- Why a CNC Machine Makes Focus Stacking Stupidly Easy
- Safety First: Your Camera Is Not a Cutting Tool
- Gear You Actually Need (and What’s Nice to Have)
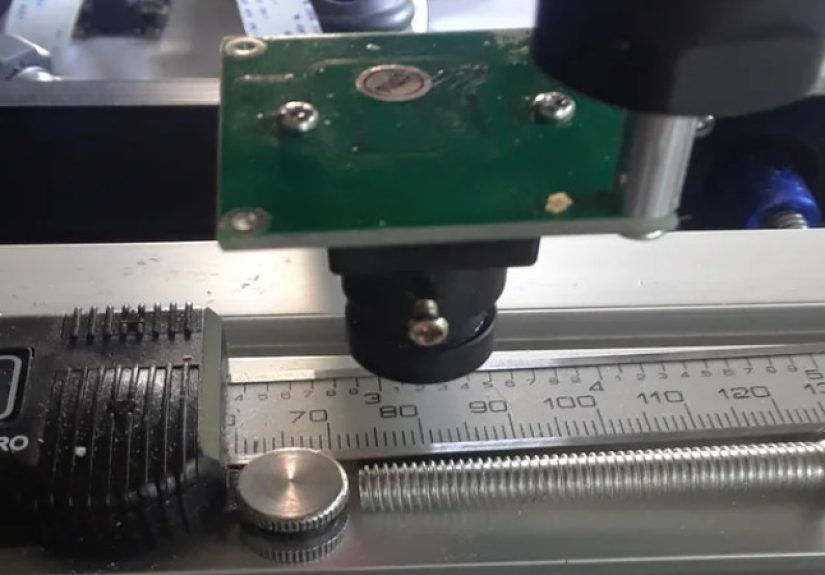
- Mounting the Camera: “Secure” Beats “Creative”
- The Capture Workflow (The Part That Makes or Breaks the Stack)
- 1) Lock your exposure and color
- 2) Choose a sharp aperture (not the smallest number on the dial)
- 3) Decide what moves: focus ring or CNC axis
- 4) Pick a step size that overlaps (the “70% rule” that saves your sanity)
- 5) Generate simple G-code to step and pause
- 6) Run a short test stack before committing
- Lighting for CNC Stacks: The Secret Sauce (That’s Also Just “Boring Consistency”)
- Blending the Stack: Photoshop and Beyond
- A Specific Example: Photographing a Milled Aluminum Badge
- Troubleshooting: The Five Problems You’ll Meet First
- Advanced Tricks for CNC-Assisted Stacking
- From the Shop Floor: Practical Experiences and Lessons Learned
- Conclusion
You know that moment when you machine a gorgeous partcrisp chamfers, clean toolpaths, the whole “I totally meant to do that” vibe
and then your camera takes a photo that looks like it was shot through a foggy aquarium? Welcome to macro depth of field:
one millimeter is sharp, the other 49 millimeters are a blur museum.
Focus stacking fixes that by combining multiple photoseach focused at a slightly different distanceinto one image that’s sharp
from front edge to back edge. And here’s the fun twist: your CNC machine is basically a precision motion stage that’s already
spectacular at moving in tiny, repeatable increments. In other words, your mill/router can moonlight as a fancy macro rail
without asking for a raise.
What Focus Stacking Is (and Why “Just Shoot f/22” Isn’t a Personality)
Focus stacking is the process of taking a series of images where the in-focus “slice” moves through the subject, then blending those
slices into one composite with extended depth of field. The key is that each frame overlaps the nextlike shingles on a roof, but for sharpness.
Sure, stopping down your lens (higher f-number) increases depth of field. But past a point, diffraction softens detail,
and macro subjects still laugh at your “f/22 should be enough” optimism. Stacking keeps the detail crisp by letting you use an aperture
that’s sharp for your lens while still getting front-to-back focus.
Why a CNC Machine Makes Focus Stacking Stupidly Easy
The hardest part of focus stacking isn’t the software. It’s getting a clean, consistent stack:
same framing, stable lighting, and tiny, repeatable focus changes. A CNC shines here because it can move a mounted camera (or the subject)
in sub-millimeter steps with excellent repeatabilityexactly what stacking likes.
CNC vs. “Turning the Focus Ring Like a Gremlin”
You can focus stack by manually turning the focus ring between shots. But at macro magnifications, focusing often changes magnification
(“focus breathing”) and slightly shifts framing. Moving the camera or subject along the optical axis keeps magnification and perspective steadier,
which makes blending cleaner and reduces alignment artifacts.
Two Practical Approaches
- Move the camera on the CNC: Treat the spindle/Z axis like a vertical macro rail. Great for small objects and high magnification.
- Move the subject on the bed: Secure the part and step the bed/Z (depending on your machine). Helpful when camera mounting is awkward.
Safety First: Your Camera Is Not a Cutting Tool
Before you strap a camera anywhere near a CNC: disable the spindle/router. Unplug it if you can. Remove tooling. Set conservative acceleration.
Your goal is smooth, gentle motionno rapid moves that could turn a lens into modern art.
- Spindle OFF / router unplugged. No exceptions.
- Soft limits ON. Keep motion predictable.
- Slow feeds, low accel. Vibration ruins stacks.
- Secure cabling. A dangling tether cable is a chaos rope.
Gear You Actually Need (and What’s Nice to Have)
Minimum viable setup
- Camera with manual controls (mirrorless or DSLR).
- Macro lens (or close-up setup) and a way to lock focus.
- Stable lighting (continuous lights or flash).
- Remote trigger / intervalometer or tethered shooting.
- A way to mount the camera securely to the CNC (more on that in a second).
Nice-to-have upgrades
- Ring light or diffused panel for even illumination.
- Polarizers (especially for shiny metal parts).
- Focus stacking software beyond Photoshop (especially for extreme macro).
- Vibration damping (foam pads under the machine or a heavy base).
Mounting the Camera: “Secure” Beats “Creative”
You need a rigid mount that won’t sag, rotate, or slowly droop like a tired houseplant. The CNC doesn’t care about your composition,
but gravity sure does.
Common mounting strategies
- Spindle clamp adapter: A bracket that fits where the router/spindle would go, holding a quick-release plate.
- Z-axis plate mount: Bolt an L-bracket to the moving plate and attach a ball head (lock it down tight).
- Bed-mounted camera, move the subject: If your camera is happier on a tripod, keep it there and move the part instead.
Whichever you choose: test for flex by gently tapping the mount and watching the live view. If the frame wobbles, your stack will wobble too.
The Capture Workflow (The Part That Makes or Breaks the Stack)
1) Lock your exposure and color
Use manual exposure, manual white balance, and consistent lighting. Auto settings may drift from frame to frame, creating brightness
banding in the final composite. For shiny parts, consider a slightly underexposed baseline to preserve highlights.
2) Choose a sharp aperture (not the smallest number on the dial)
Many macro setups are sharp around f/5.6–f/11 (varies by lens and sensor). Smaller apertures increase depth of field but can soften detail due to diffraction.
Stacking lets you stay in the “sweet spot” and still get deep focus.
3) Decide what moves: focus ring or CNC axis
For CNC-assisted stacking, the usual recommendation is: keep the lens focus fixed and step the camera or subject forward/backward.
This reduces magnification shifts and keeps the stack easier to blend.
4) Pick a step size that overlaps (the “70% rule” that saves your sanity)
Your step size should be smaller than your effective depth of field at the chosen magnification and aperture. A practical rule is to use a step size
around 70% of the maximum to ensure overlap. If you step too far, you’ll get “focus gaps” where nothing is sharp, and software can’t invent detail.
If you step too small, you’ll take a million frames and grow a beard waiting for the render.
Real-world numbers vary wildly, but here are ballpark starting points for CNC-friendly stacking:
- Close-up / product scale: 0.25–1.0 mm steps (depends on distance and aperture).
- True macro (around 1:1): 0.05–0.20 mm steps.
- Extreme macro: 0.005–0.05 mm steps (yes, micronswelcome to the tiny drama club).
5) Generate simple G-code to step and pause
You don’t need a complicated program. You need repeatable moves and a pause long enough for vibration to settle and the camera to fire.
Most people handle shutter timing with an intervalometer or tethered capture, while the CNC provides the precise stepping.
Tip: instead of fighting to electronically trigger the camera from the CNC controller, let the camera shoot at fixed intervals
while the CNC performs “move + dwell” cycles. It’s simple, reliable, and doesn’t require you to become a firmware archaeologist.
6) Run a short test stack before committing
Do a 10–15 frame mini-stack, blend it, and inspect at 100%. You’re looking for:
sharp coverage across the whole subject, minimal halos, and consistent exposure. Adjust step size, lighting angle, and dwell time based on the result.
Lighting for CNC Stacks: The Secret Sauce (That’s Also Just “Boring Consistency”)
Stacking loves consistency. Your lighting should not flicker, shift color, or wander as the camera moves. Continuous LED panels work well;
diffused light is usually kinder to machined surfaces. If you use flash, keep it fully manual so output stays constant.
Shiny metal? Control reflections
- Diffuse aggressively: a softbox, diffusion fabric, or even a white plastic storage bin as a “light tent.”
- Cross-polarize: polarizer on the lens + polarized light source (advanced but powerful).
- Angle the part: tiny changes in tilt can swap harsh hotspots for clean gradients.
Blending the Stack: Photoshop and Beyond
Option A: Photoshop (fast, accessible, great for many stacks)
- Import frames, then load them as layers in one document.
- Select all layers → Auto-Align Layers (helps correct tiny shifts).
- Select all layers → Auto-Blend Layers → choose “Stack Images.”
- Flatten, retouch dust/halos, and export.
Photoshop is a solid choice for product-scale stacks and moderate macro. If you’re doing extreme macro (lots of frames, very shallow slices),
specialized stacking software can offer cleaner detail and better retouch controls.
Option B: Dedicated stacking software (stronger for extreme macro)
Tools like Zerene Stacker are popular for high-magnification work because they provide blending methods optimized for micro-detail and
include practical retouching workflows. If you’re stacking tiny endmill flutes or PCB solder joints at high magnification, this category is worth a look.
A Specific Example: Photographing a Milled Aluminum Badge
Let’s say you machined a 40 mm aluminum badge with engraved text and a beveled edge. You want everything sharp: the near bevel, the engraving,
and the far edgewithout stopping down until the details turn to oatmeal.
Setup
- Lens: 100mm macro
- Aperture: f/8 (sharp, manageable depth of field)
- Lighting: diffused LED panel from above + reflector card
- Motion: move camera down the Z axis in 0.10 mm steps
- Frames: ~60 shots to cover the full height profile
- Timing: 0.7 sec dwell per step, camera on interval shooting
Why it works
The step size is small enough that each frame overlaps the next in focus, and moving the camera keeps the perspective stable.
The blend produces a final image where the engraving is crisp, the bevel reads sharply, and the surface texture looks intentionalnot accidental.
Troubleshooting: The Five Problems You’ll Meet First
1) Halos or weird edges
Usually caused by insufficient overlap, high-contrast transitions, or reflections changing across frames. Reduce step size, diffuse lighting more,
and retouch problem areas (masking is your friend).
2) “Soft everywhere” final image
Check vibration (lower accel, longer dwell), check diffraction (don’t stop down too far), and confirm you’re actually capturing sharp slices
(use manual focus and live-view magnification).
3) Exposure drift across the stack
Lock exposure. Turn off auto ISO. Keep lights constant. If your LED panel is PWM-dimmed and flickers, raise brightness and add diffusion instead
of dimming it.
4) The stack won’t align cleanly
This can happen when you focus by turning the ring (magnification shifts) or when the mount flexes. Move the camera/subject instead,
and stiffen your mount.
5) You took 400 frames and now regret everything
Congratulations, you’ve discovered “overkill.” Increase step size slightly, limit the stack range to only what matters,
and remember: not every background needs to be razor sharpsometimes blur is a design choice, not a failure.
Advanced Tricks for CNC-Assisted Stacking
Use the CNC’s repeatability to build a consistent photo style
Once you find a lighting setup and step size that works for your common parts, save it as a repeatable “photo recipe.”
That consistency is gold for product listings, portfolios, and documentation.
Stack for inspection, not just beauty
Focus stacking isn’t only aestheticit can reveal burrs, tool marks, surface defects, and edge conditions that hide in shallow depth-of-field shots.
If you document prototypes, a stacked image can be a surprisingly effective QA companion.
Go wider, not smaller, when you can
If you can step back and use a slightly longer focal length (or a less extreme magnification), you’ll gain depth of field and reduce the number of frames.
Sometimes the best optimization is: “stop trying to photograph the entire part from two inches away.”
From the Shop Floor: Practical Experiences and Lessons Learned
Makers who try CNC-assisted focus stacking often report the same first surprise: the CNC motion is the easy part, and the “photo stuff” is where the real
learning curve lives. The earliest stacks tend to fail for boring reasonslighting shifts, tiny vibrations, or step sizes that leave microscopic focus gaps.
The good news is that each failure is usually fixable with one simple adjustment, and you can iterate fast because your motion system is already precise.
One common experience is realizing how much machine acceleration affects image quality. A CNC that’s perfectly happy ripping through plywood
can still shake a camera enough to blur a macro frame. People often get better results by lowering acceleration and adding a longer dwell than they think
they need. The “feel” is different from machining: you’re not optimizing cycle time; you’re optimizing stillness. Many end up creating a separate
“photo” machine profileslow moves, gentle ramps, and consistent pausesso they can switch modes without re-tuning everything.
Another frequent lesson is that shiny surfaces behave like tiny mirrors with moods. When the camera moves even a fraction of a millimeter, reflections can
slide across the part, and stacking software may interpret that change as detail rather than glare. The practical fix most people land on is more diffusion
than they initially want to use. A simple light tentsometimes literally a translucent storage bin with a hole for the lenscan turn harsh hotspots into
smooth gradients. Add a white card “bounce” on the opposite side and suddenly the metal looks premium instead of “angry flashlight.”
A third recurring experience: once the stack works, it becomes addictive. People start stacking everythingendmills, knurling, 3D prints, even coffee beans
(no judgment). The trick is learning when stacking is worth it. For documentation photos, a short stack of 10–20 frames can be enough to make labels,
engraving, and edges readable. For glamour shots, longer stacks pay off. For quick progress updates, a single well-lit frame often wins because it’s
immediate. The experienced approach is situational: stack when you need detail, don’t stack when you need speed.
Finally, many find that CNC stacking improves their machining habits. When you routinely view your parts in ruthless, front-to-back sharpness,
small tool marks and edge artifacts become obvious. That feedback loop can push better finishing: a lighter chamfer pass, a cleanup contour,
a deburr step that actually removes burrs instead of relocating them. In a funny way, the camera becomes a quality coachone that never lies,
never gets tired, and never says, “Looks fine to me,” just to be polite.
Conclusion
Easy focus stacking with your CNC machine is really three simple ideas working together: lock down your exposure, move in small repeatable steps,
and blend with software that knows how to keep the sharp bits and ditch the blur. The CNC gives you precision motion that most photographers pay extra for,
and once you dial in your step size and lighting, you can produce consistently sharp images of your workwhether you’re selling parts, documenting builds,
or just flexing on the internet in the most wholesome way possible.
Start small, test a short stack, adjust one variable at a time, and let your CNC do what it does best: repeatable accuracy. This time, it’s just cutting
through depth of field instead of aluminum.


