Table of Contents >> Show >> Hide
- What Is a Fabric Covered Antler Mount?
- Before You Start: Ethical Sourcing and Basic Prep
- Materials and Tools
- Step-by-Step: How to Make a Fabric Covered Antler Mount
- Step 1: Decide your mount style (plaque mount vs. upholstered cap)
- Step 2: Mount the antlers securely
- Step 3: Create a fabric pattern (don’t freestyle this part)
- Step 4: Prep the fabric (reduce fraying and bulk)
- Step 5: Add optional padding for an upholstered finish
- Step 6: Cut fabric openings for the antlers
- Step 7: Wrap and secure the fabric
- Step 8: Make the antler base look intentional
- Step 9: Finish the back and add hanging hardware
- Choosing the Right Fabric: Style and Practicality
- Design Ideas: Make It Look Like It Belongs There
- Troubleshooting: Common Problems and Fixes
- Care and Maintenance
- of Real-World Experience (What People Commonly Run Into)
- Conclusion
Deer antlers have a certain vibe: rugged, outdoorsy, “I definitely own at least one flannel.” But not everyone wants
a traditional trophy look on their wall. Enter the fabric covered antler mounta smarter, softer,
more design-forward way to display antlers while keeping the hunting memory (or shed-hunting treasure) without turning
your living room into a lodge-themed time capsule.
Think of it like giving your antlers a wardrobe upgrade. With the right fabricplaid, linen, velvet, grain sack stripes,
even a vintage feed-sack printyou can make antlers blend with farmhouse décor, modern rustic spaces, cabins, nurseries,
or that one hallway where nothing looks right (until now).
What Is a Fabric Covered Antler Mount?
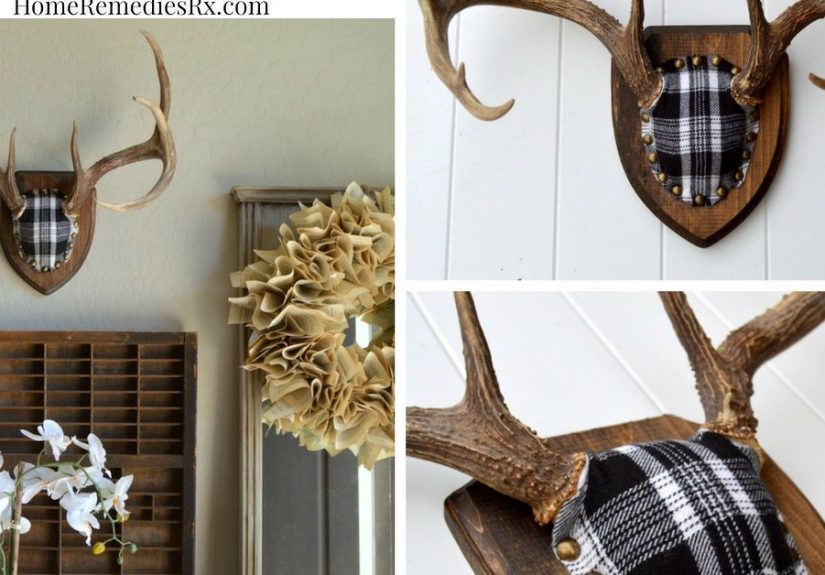
A fabric covered antler mount is a wall-mounted antler display where the skull plate area (and sometimes the plaque or
“cap” form around the antlers) is wrapped in fabric. The antlers remain visible, but the mount’s base becomes a clean,
tailored shapelike upholstery for your trophy.
This style is popular because it:
- Softens the look of a traditional mount (less “hunting cabin,” more “curated home”).
- Customizes the piece to match your color palette and room style.
- Upcycles leftoversfabric scraps, old shirts, or thrifted textiles can become the star.
- Makes the mount look finished even if you used a budget DIY plaque.
Before You Start: Ethical Sourcing and Basic Prep
Ethical sourcing matters (and rules vary)
If your antlers are naturally shed, awesomeshed hunting can be a fun outdoor hobby. But regulations can vary by state,
season, and land type (public land vs. private land). Some places restrict collection during winter and early spring to
reduce stress on wildlife, and some require permits or certificates during certain dates. In other words: don’t let your
craft project accidentally turn into a “surprise conversation with a game warden.”
Quick cleaning (keep it simple)
Most DIYers don’t need heavy-duty taxidermy prep for a fabric mount. A basic approach is usually enough:
- Brush off dirt and debris with a dry brush or cloth.
- Wipe gently with a slightly damp cloth and mild soap if needed (don’t soak).
- Let antlers dry completely before wrapping fabric or applying adhesive.
If you plan to sand or cut anything (many people don’t for this project), wear a proper mask/respirator and work in a
ventilated area to avoid inhaling fine dust. Safety firstyour lungs deserve better than “rustic aesthetic particles.”
Materials and Tools
You can tailor this project to your style and budget, but here’s a solid, reliable supply list used in many DIY antler
mount builds:
Core materials
- Antlers (shed or legally obtained) with a skull plate or mounting base
- Plaque (wood plaque, MDF, or a pre-cut decorative mount board)
- Fabric (woven cotton, canvas, upholstery fabric, flannel, linensomething that won’t stretch weirdly)
- Batting or thin foam (optional, for a smoother upholstered look)
Fasteners and adhesive
- Staple gun with staples (often the easiest for a crisp wrap)
- Upholstery tacks (optional, decorative and forgiving)
- Hot glue (helpful for corners and tight spots; not always the main anchor)
- Fabric decoupage medium (optional, if you prefer a “fabric-as-paper” decoupage approach)
Tools
- Scissors (fabric scissors if you want clean edges)
- Craft knife (optional)
- Drill + screws/bolts for mounting antlers to plaque
- Screwdriver
- Pencil + paper for patterning
- Iron (optional, but it helps fabric behave like an adult)
- Hanging hardware rated for the weight
Step-by-Step: How to Make a Fabric Covered Antler Mount
Step 1: Decide your mount style (plaque mount vs. upholstered cap)
There are two popular looks:
-
Plaque mount: Antlers are attached to a wood plaque; fabric covers the plaque area around the skull plate.
Clean, classic, and easy. -
Upholstered “cap” mount: A shaped form (wood base + padding) is covered in fabric, creating a smooth, raised
silhouette around the antlers. More “designer décor.”
Step 2: Mount the antlers securely
If your antlers already have a skull plate, you’ll typically attach that plate to a backing board or mount form, then secure
the assembly to the plaque. Many DIYers use screws through predrilled holes in a wood block or plate system. The goal is a
stable, level mount that won’t wiggle every time a door closes.
Tip: Before tightening everything down, step back and check symmetry. Tiny angle changes look huge once it’s on a wall.
Step 3: Create a fabric pattern (don’t freestyle this part)
Patterning is the difference between “tailored upholstery” and “fabric burrito with antlers.” Here’s an approach that works:
- Lay paper over the plaque area and gently trace the shape you want covered.
- Mark where antlers emerge and where the skull plate sits.
- Add seam allowance (usually 1/2 inch to 1 inch) so you have enough fabric to wrap and staple to the back.
- Cut the paper pattern and test fit it around the antlers before cutting your fabric.
Step 4: Prep the fabric (reduce fraying and bulk)
A few small moves make the finished piece look dramatically better:
- Iron the fabric so it lays flat.
-
If the fabric frays easily, consider applying a fabric stiffener/decoupage medium to the back of the fabric first,
then let it dry before cutting. This helps it cut cleaner. - For thick fabric, trim seam allowance strategically so corners don’t get bulky.
Step 5: Add optional padding for an upholstered finish
If you want the mount to look plush and smooth, wrap a thin layer of batting or foam over the base area first. Secure it
on the back with staples. This step hides unevenness in the skull plate area and makes the fabric look more “professional.”
Step 6: Cut fabric openings for the antlers
This is the “measure twice, cut once” moment. Start small:
- Cut a small slit where each antler base will pass through.
- Test fit. Widen gradually if needed.
-
Keep cuts neat; you can hide minor imperfections with careful folding, hot glue, or a decorative trim linebut it’s easier
if you don’t create a fabric crater.
Step 7: Wrap and secure the fabric
Place the fabric over the mount area. Smooth it from the front like you’re wrapping a fancy gift for someone you actually
like. Pull it taut (not stretched to distortion), then staple or tack it to the back of the plaque in this order:
- Anchor one point at the bottom center (single staple/tack).
- Anchor the top center.
- Anchor left and right sides.
- Work outward, alternating sides to keep tension even.
For curved shapes, make small relief cuts in the seam allowance (not into the visible area) so the fabric can turn smoothly.
Step 8: Make the antler base look intentional
Where the fabric meets the antlers, you want it snug and clean. Options:
- Fold-and-staple method: Fold fabric edges under and staple from behind for a tailored look.
- Hot glue assist: Use sparingly to tack down tiny folds near the antler bases.
-
Trim or rope detail: Add a thin trim line around the fabric edge for a “finished” frame.
(This can hide minor wobbles. It’s basically concealer for crafts.)
Step 9: Finish the back and add hanging hardware
Cover the back with felt or kraft paper if you want a clean professional finish. Then attach heavy-duty hanging hardware
rated for the weight of your antlers and plaque. If you’re unsure, go stronger than you think you needgravity is undefeated.
Choosing the Right Fabric: Style and Practicality
Best fabric picks
- Flannel plaid: Cozy cabin, farmhouse, and vintage vibes.
- Linen or canvas: Minimalist rustic; looks clean and modern.
- Upholstery fabric: Durable, structured, great for crisp edges.
- Velvet: Dramatic and surprisingly classy if your room can handle it.
- Vintage textiles: Grain sacks, feed sacks, and thrift finds add character and story.
Fabric patterns that work with antlers (not against them)
Antlers already bring visual “movement,” so your fabric can either complement or compete. If antlers are large and branching,
small patterns can get busy. If antlers are modest, bold patterns can add punch. A safe strategy: pick one statement element
either the antlers or the fabricthen let the other one be the supporting actor.
Design Ideas: Make It Look Like It Belongs There
Farmhouse and cottage
- Neutral linen + dark stained plaque
- Ticking stripe fabric + antique brass tacks
- Soft plaid flannel + weathered wood
Modern rustic
- Solid black fabric + light oak plaque
- Charcoal canvas + clean geometric plaque shape
- Leather-look fabric + minimal hardware
Playful “faux taxidermy” vibe
If you’re going more whimsical, you can pair real antlers with unexpected fabricflorals, bright stripes, even a
patterned scarf. The contrast is the point. Just promise you’ll stop short of covering them in neon leopard print
unless your décor is already committed to that life choice.
Troubleshooting: Common Problems and Fixes
Problem: Wrinkles on the front
Fix: Pull the fabric taut and re-staple, working from the center outward. Ironing beforehand helps more than people admit.
Problem: Fraying edges
Fix: Use a fabric stiffener/decoupage medium before cutting, or fold edges under and secure. Avoid loose weaves that unravel
if you look at them too hard.
Problem: Fabric “bunching” near antler bases
Fix: Make smaller, cleaner relief cuts in the seam allowance and fold in layers. If needed, hide the transition with trim.
Problem: The mount tilts on the wall
Fix: Use sturdier hanging hardware and ensure the weight is centered. Consider a French cleat for heavier mounts.
Care and Maintenance
Keep your fabric covered antler mount looking sharp by dusting occasionally and avoiding high humidity areas. If the fabric
is light-colored, consider a fabric protector spray (test first). And if you live with pets who believe “wall décor” is
a personal challenge, hang it high enough to avoid surprise redesigns.
of Real-World Experience (What People Commonly Run Into)
If you ask ten DIYers how their first fabric covered antler mount went, you’ll usually hear the same three storiesjust with
different levels of laughter (and different numbers of staples on the floor afterward). The first surprise is how much the
antlers “decide” the final design. On paper, your mount shape seems obvious. In real life, antlers can be asymmetric, the
bases aren’t always the same height, and the angle that looked perfect on the workbench can look slightly cockeyed on the wall.
A lot of people end up loosening screws once or twice just to rotate the antlers a few degrees so the whole thing feels balanced.
It’s normaland it’s worth itbecause tiny adjustments read as “intentional” from across the room.
The second common moment is the fabric choice reality check. A print that looks adorable as a fat quarter can look chaotic when
stretched across a mount. Plaids are famous for this: if the lines aren’t straight, the human eye screams, “Something is off!”
Many crafters learn to align a major stripe or plaid line with the center of the mount before stapling anything down. That one
trick makes the finished piece look dramatically more polished. On the flip side, textured solidslinen, canvas, even a soft
upholstery weavetend to be forgiving and upscale, especially if you’re trying to match modern farmhouse décor without
overcommitting to “theme.”
Then there’s the “antler base zone,” where fabric meets bone. This is where most beginners slow down, because it’s hard to get
a clean look without bunching. People often start with cuts that are too big, then spend the rest of the project trying to hide
extra space with glue. The better experience (and the one folks wish they’d done first) is cutting tiny slits, test-fitting,
and widening only as needed. Even if you’re not a perfectionist, you’ll feel the difference when the fabric hugs the antlers
neatly and the whole mount looks like it came from a boutique shop instead of a panicked late-night crafting session.
Another real-world detail: staple guns are both hero and villain. They make upholstery-style wrapping fast, but they also have
a talent for misfiring at the exact moment you’ve got the fabric perfectly smooth. Many DIYers keep needle-nose pliers nearby to
pull out bad staples, and they work in a slow, even rhythmcenter, opposite side, center, opposite sideso the tension stays
consistent. It’s also common to add a final “cover-up” step on the back: a piece of felt or paper to hide the raw edges and make
the mount feel finished when you pick it up.
Finally, almost everyone who loves the result says the same thing: once you do one fabric covered antler mount, you start seeing
opportunities everywhere. A second set of antlers becomes a hallway piece. A smaller set becomes a gallery wall accent. Someone
even starts planning seasonal fabric swaps like it’s a throw pillow. The project hits that sweet spot: it’s meaningful, it’s
stylish, and it turns a traditional display into something that actually feels like your home.
Conclusion
A fabric covered antler mount is the best of both worlds: the story and character of antlers, plus the softness and customization
of textile design. Whether you want a cozy plaid cabin look, a clean modern rustic vibe, or a playful piece that feels more
“faux taxidermy chic” than “sportsman’s den,” this DIY can meet you there. Take your time with patterning, keep your fabric neat,
mount securely, and you’ll end up with wall décor that looks intentionallike it belongs in your space, not just on a shelf in
the garage.