Table of Contents >> Show >> Hide
- Why Fresh Plum Pie Deserves a Spot in Your Dessert Rotation
- Key Ingredients for the Best Fresh Plum Pie
- Recommended Tools and Equipment
- Step-by-Step Fresh Plum Pie Instructions
- Pro Tips: Keep Plum Pie Juicy, Not Soupy
- Flavor Variations and Creative Twists
- Serving and Storage Suggestions
- Fresh Plum Pie Experiences: What Real-World Baking Teaches You
There are two kinds of people in this world: the ones who walk past a pile of glossy summer plums,
and the ones who see those plums and immediately think, “This needs to become pie.” If you’re in
the second group, welcome home. A fresh plum pie is everything you want in a fruit dessert:
jammy, juicy, just tart enough to keep things interesting, and wrapped in a crisp, buttery crust
that makes you feel like a baking legend.
Plum pie doesn’t get as much attention as apple or peach, but many experienced bakers swear it’s
one of the best “bridge” desserts from late summer into fall. Italian (prune) plums and purple
plums hold their shape beautifully and concentrate into a deep, wine-colored filling when baked,
especially when paired with warm spices and a touch of citrus.
This guide walks you through a fresh plum pie recipe that combines the best ideas from
well-tested American baking sources: double-crust pies, crumb-topped variations, and
professional tips to keep that bottom crust from going soggy.
You’ll get a detailed recipe, smart no-soggy-bottom tricks, plus real-world “lessons learned”
from home-baker experience so you’re confident from the first slice.
Why Fresh Plum Pie Deserves a Spot in Your Dessert Rotation
Plums bring a flavor profile you don’t always get from other fruit pies. They start sweet and
floral, then lean into a pleasant tartness that keeps the filling from tasting flat. The skins
contribute gorgeous color, and the natural pectin in plums helps the filling set up nicely when
balanced with the right thickener.
Italian prune plums and purple plums are especially popular for baking because they’re less watery
than some other varieties and hold their shape, rather than dissolving into mush.
That means you get defined slices of fruit in every wedge instead of a purple soup underneath your
crust.
On top of flavor, plum pie is surprisingly flexible:
- It can be fully double-crusted, lattice-topped, or finished with a buttery crumb topping.
- It plays well with almond extract, vanilla, lemon zest, orange zest, and warm spices.
- It’s a natural make-ahead dessert, since it slices best once fully cooled.
Key Ingredients for the Best Fresh Plum Pie
This recipe makes one 9-inch pie (about 8 servings).
For the crust
- 2 disks of pie dough (for a double crust) – homemade or high-quality store-bought.
- 1 large egg + 1 tablespoon milk or cream (for egg wash).
- Optional: 2–3 tablespoons crushed graham crackers or “crust dust” (1:1 flour and sugar)
for the bottom of the crust to help prevent sogginess.
For the plum filling
- 6–7 cups fresh plums (about 2 to 2 ½ pounds), pitted and sliced into wedges.
- ¾ to 1 cup granulated sugar, depending on how tart your plums are.
- ¼ cup cornstarch or ⅓ cup all-purpose flour (thickener).
- 1 tablespoon fresh lemon juice.
- 1 teaspoon lemon zest (optional but highly recommended).
- ½ teaspoon ground cinnamon.
- ¼ teaspoon ground nutmeg (optional).
- ½ teaspoon vanilla extract.
- ¼ teaspoon almond extract (a classic pairing with plums).
- 2 tablespoons unsalted butter, cut into small pieces (to dot over the filling).
- Pinch of salt.
Optional crumb topping (if not using a full top crust)
If you want a crumb-topped plum pie instead of a double crust, use:
- ¾ cup all-purpose flour
- ½ cup granulated sugar
- ¼ cup light brown sugar
- ¼ teaspoon ground cinnamon
- 4 tablespoons very cold unsalted butter, cubed
Cut the butter into the dry ingredients until you get coarse crumbs, as many U.S. crumb-topped
plum pie recipes recommend.
Recommended Tools and Equipment
- 9-inch pie plate (metal or glass).
- Large mixing bowl for the filling.
- Rolling pin and lightly floured surface.
- Sharp knife for slicing plums.
- Pastry brush for the egg wash.
- Baking sheet lined with foil or parchment (to catch drips and help crisp the bottom crust).
Step-by-Step Fresh Plum Pie Instructions
1. Prep the crust
-
If using homemade dough, make it at least a couple of hours in advance so it has time to chill.
Cold dough equals flaky layers. -
On a lightly floured surface, roll one disk of dough into a circle about 12 inches in diameter.
Fit it into your 9-inch pie plate, letting the extra dough hang over the edges. -
Sprinkle a thin, even layer of either crust dust (equal parts flour and sugar) or finely crushed
graham cracker crumbs over the bottom. This forms a barrier that helps absorb extra plum juices
as the pie bakes. - Place the crust-lined pie plate in the fridge while you prepare the filling and top crust.
2. Make the plum filling
-
In a large bowl, combine sliced plums, sugar, cornstarch or flour, lemon juice, lemon zest,
cinnamon, nutmeg (if using), vanilla, almond extract, and a pinch of salt. -
Toss gently until the plums are evenly coated. Let the mixture stand for 10–15 minutes so the
plums begin to release some juices. Many fruit-pie guides recommend this brief maceration step
to help control excess moisture. -
If an unusually large amount of liquid pools at the bottom after resting, you can spoon a bit
off (or reserve it to drizzle over ice cream later).
3. Assemble the pie
-
Preheat your oven to 425°F (220°C). Place a foil-lined baking sheet on the middle rack to heat
up; this helps crisp the bottom crust. -
Remove the crust-lined pie plate from the fridge. Spoon the plum filling into the crust,
spreading evenly. Dot the top with the small pieces of butter. -
For a double crust: Roll out the second disk of dough to another 12-inch circle. Place it over
the filling, trim excess, then fold and crimp the edges to seal. Cut several vents in the top
crust to let steam escape. -
For a lattice crust: Cut the top dough into strips and weave over the filling in a lattice
pattern, then trim and crimp the edges. Lattice tops are popular in many plum pie recipes
because they let steam escape and help moisture evaporate. -
For a crumb topping: Skip the top crust, pour the filling into the bottom crust, then sprinkle
the crumb mixture evenly over the plums. -
Whisk egg and milk together, then lightly brush the exposed dough with egg wash. Sprinkle with
a little sugar for extra shine and crunch.
4. Bake the pie
-
Place the pie on the preheated baking sheet. Bake at 425°F for 15 minutes. This high initial
heat jump-starts the crust and helps it set before the plums flood it with juice. -
Reduce the oven temperature to 375°F (190°C) and continue baking for 35–45 minutes, or until:
- the crust is deep golden brown, and
- the filling is bubbling vigorously through the vents or lattice for at least 5–10 minutes.
Most tested plum pie recipes fall in the 50–60 minute total range.
-
If the edges brown too quickly, loosely cover them with foil or a pie shield during the last
15–20 minutes of baking.
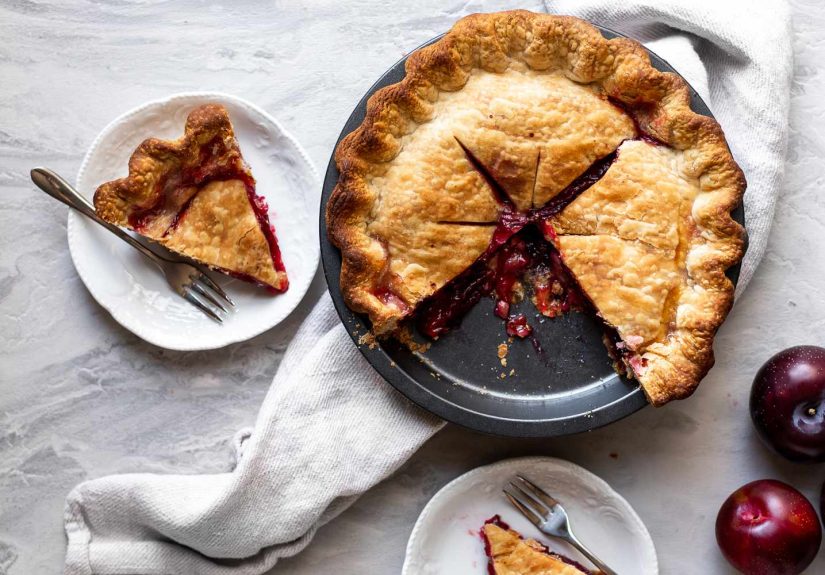
5. Cool and slice
This is the hardest step: let the pie cool completely on a wire rack, at least
3–4 hours. As many experienced bakers will tell you, cutting fruit pies too soon leads to a runny,
soupy fillingeven if you did everything else right.
Once cooled, slice and serve at room temperature or slightly warmed, with a scoop of vanilla ice
cream or lightly sweetened whipped cream.
Pro Tips: Keep Plum Pie Juicy, Not Soupy
1. Choose the right thickener and amount
For very juicy plums, cornstarch tends to give a cleaner, clearer set than flour. Flour gives a
slightly more opaque, rustic texture. If your plums are extremely ripe and juicy, lean toward the
higher end of the cornstarch range (¼ cup) or even add an extra tablespoon.
2. Protect the bottom crust
-
Sprinkle “crust dust” (equal parts flour and sugar) on the base of the crust to absorb liquid
as it bakes. -
Or add a very thin layer of crushed graham cracker crumbs. This trick, recently highlighted by
baking writers in the U.S., helps thicken the juices and adds a subtle toasty flavor. - Bake the pie on a preheated metal baking sheet so the bottom crust gets an extra heat boost.
3. Don’t rush the cool-down
It’s tempting to dive in when you see that bubbling, jewel-toned filling, but the starches need
time to set as the pie cools. Many bakers wait until the pie is just slightly warm or fully at
room temperature to slice, especially for photo-worthy wedges.
4. Consider a crumb or lattice top
Crumb toppings and lattice crusts give steam more escape routes, which helps cook off excess
moisture. That’s one reason so many modern plum pie recipes lean heavily on these stylesthey’re
both forgiving and visually impressive.
Flavor Variations and Creative Twists
Warm spice twist
Add a pinch of cardamom or ground cloves to the filling for a deeper, autumnal note. Go easy
plums are delicate, and you want the fruit flavor to stay in charge.
Almond bakery vibes
Increase the almond extract slightly (up to ½ teaspoon) and sprinkle slivered almonds on top of a
crumb-topped pie during the last 10 minutes of baking. This echoes classic European plum desserts
that pair stone fruits with almonds.
Citrus-bright plum pie
Substitute orange zest for the lemon zest, or use a mix of both. The aromatic oils in the zest
wake up the flavor of cooked plums and keep the filling from tasting too heavy.
“Almost jammy” roasted plums
For an extra-concentrated flavor, you can briefly roast the plums on a sheet pan with a bit of
sugar before using them in the pie. This drives off moisture and intensifies the flavor, similar
to pre-cooking fruit for other pies.
Serving and Storage Suggestions
Store leftover plum pie loosely covered at cool room temperature for up to 1 day, then in the
refrigerator for another 2–3 days. If you prefer warm slices, reheat briefly in a 300°F (150°C)
oven for 10–15 minutes so the crust re-crisps, rather than in the microwave, which can make the
crust rubbery.
Plum pie also freezes surprisingly well. Once completely cooled, wrap individual slices tightly
in plastic and then foil, or freeze the whole pie well-wrapped. To serve, thaw overnight in the
fridge and warm gently in the oven.
Fresh Plum Pie Experiences: What Real-World Baking Teaches You
Recipes are great, but real pie confidence comes from small, repeated experimentsespecially with
a fruit as moody as plums. Home bakers often discover that no two batches of plums behave exactly
the same in the oven. One week, your plum pie slices stand tall and regal; the next, they’re
leaning a little to one side like they had a long night out.
The first big “aha” moment many people have with plum pie is about sweetness. Fresh plums can
vary from sour to candy-sweet, even within the same bag. Smart bakers taste a wedge of plum
before mixing the filling. If it makes your face pucker, you’ll want the higher end of the sugar
range and maybe a little extra lemon zest to balance flavor instead of piling on more sugar.
When plums are already very sweet, ¾ cup sugar is usually plenty for a full pie, especially if
you’re planning to serve it with ice cream.
The second lesson is all about texture. People who’ve baked a lot of berry or peach pies often
assume plums will behave the same way, but plum skins play a big role. They soften and help
create that gorgeous deep color, yet they also contribute structure. When bakers mistakenly cut
plums into very tiny pieces, the filling can lean more toward sauce than slices. Keeping the
wedges on the chunkier sidethink quarters or sixthsgives you a more satisfying bite and
beautiful cross-section.
Another common experience: the crust vs. juiciness battle. Almost every fruit-pie baker has a
story about their “delicious but slightly swampy” pie. That’s usually the bake where you learn
the power of preheating the baking sheet, using a barrier layer, or even lightly par-baking the
crust for 10 minutes before adding the filling. Once you’ve had a plum pie with a truly crisp,
deeply browned bottom crust, it’s hard to go back to anything less. It tastes bakery-level, even
if you’re still wearing pajama pants while you slice it.
Many bakers also experiment with top styles over time. At first, a solid double crust feels
easieryou just roll, cover, and crimp. But as your confidence builds, a lattice top becomes
surprisingly approachable. You realize the strips don’t have to be perfect; even a slightly wonky
lattice bakes up charming and rustic. And because plums release so much steam and juice, that
extra ventilation often gives you a better set and more concentrated flavor. Eventually, some
bakers land on a crumb topping because it’s fast, forgiving, and ideal on busy days when nobody
has the energy to weave pastry strips.
There’s also the “holiday effect.” A lot of people first bake plum pie as a sidekick to something
more traditionalsay, pumpkin at Thanksgiving or apple for a family gathering. What tends to
happen, though, is that the plum pie quietly steals the spotlight. Guests start asking, “Who made
this one?” and suddenly your ‘experimental’ dessert becomes a yearly request. Over time,
you might tweak the recipe based on family feedback: a little more cinnamon here, a bit more
almond extract there, or a thinner lattice so more of that glossy filling shows.
Finally, fresh plum pie teaches patience. The first time you watch a bubbling pie cool on the
counter for hours, your brain insists it must be ready now. But each time you fight that urge,
you get rewarded with cleaner slices and a filling that holds together instead of spilling across
the plate. After a few bakes, waiting becomes part of the ritual: mix, roll, assemble, bake,
breathe in that unbelievable aroma, and then let time work its quiet magic. By the time you
finally cut into it, you’re not just eating dessertyou’re eating the results of every little
lesson you picked up along the way.