Table of Contents >> Show >> Hide
- Why This DIY Boob Light Makeover Works So Well
- Before You Start: Safety First (Because Cute Lighting Should Not Be a Fire Hazard)
- What I Used for My Beaded Chandelier Light Makeover
- Step-by-Step: How I Turned a Boring Flush Mount into a Beaded Chandelier
- Step 1: I Removed the Old Glass Dome
- Step 2: I Measured Everything (Then Measured Again Because Ceiling Work Is Humbling)
- Step 3: I Built the Beaded Strands
- Step 4: I Created the Shade Frame
- Step 5: I Refreshed the Visible Fixture Base
- Step 6: I Attached the Beaded Frame to the Existing Light Base
- Step 7: I Installed the Right Bulb and Tested the Look
- Design Tips That Make a DIY Beaded Chandelier Look Expensive
- Common Mistakes to Avoid in a Boob Light Makeover
- Budget and Time: What This DIY Ceiling Light Upgrade Cost Me
- Maintenance: How I Keep My Beaded Chandelier Looking Good
- My Experience: What It Was Really Like Transforming a Boring Boob Light into a Beaded Chandelier (Extended Notes)
- Final Thoughts
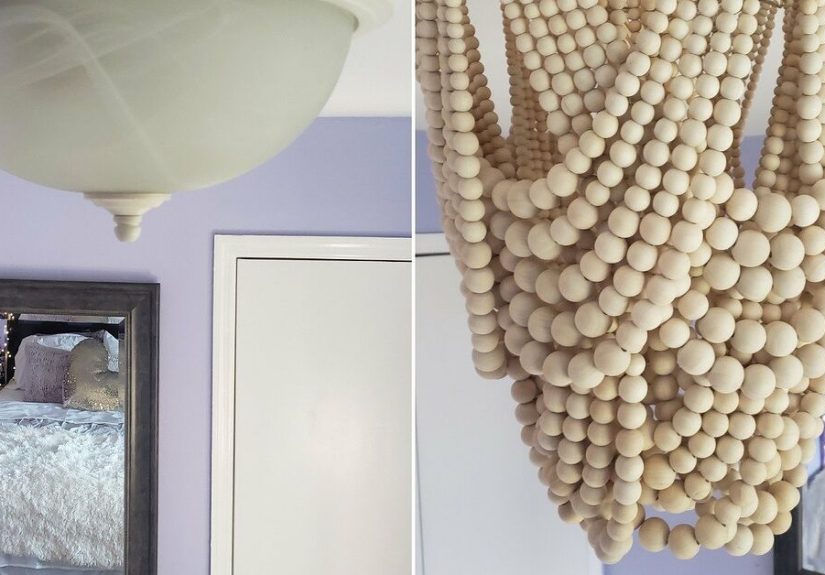
If you’ve ever looked up at a builder-grade flush-mount ceiling light and thought, “Ah yes, the decorative upside-down cereal bowl of sadness,” welcome. You are among friends.
For years, my hallway had that light: the classic frosted dome with a tiny finial in the middlethe fixture many homeowners lovingly (and a little immaturely) call the “boob light.” It worked. It was functional. It also had all the personality of plain oatmeal.
So instead of replacing the entire fixture (and spending a chunk of money), I decided to give it a glow-up. The goal: keep the base, upgrade the look, and create a beaded chandelier effect that felt custom, cozy, and expensive-looking without actually being expensive. And yes, it worked so well that I now look up at my ceiling like I’m admiring a crown jewel.
In this guide, I’ll walk you through exactly how I transformed a boring flush mount into a beaded chandelier-style light, what I learned, what I would do differently next time, and how to avoid the common mistakes that can make a DIY light makeover look… crafty in the wrong way.
Why This DIY Boob Light Makeover Works So Well
A beaded chandelier makeover is one of the smartest DIY lighting upgrades because it gives you maximum visual impact with minimal electrical drama. In many cases, you can leave the original light base in place and simply replace or disguise the glass dome with a decorative shade structure.
That means you get the charm of a wood bead chandelier, farmhouse chandelier, or boho ceiling light without having to fully rewire the fixture. It’s a huge win for budget-conscious homeowners, first-time DIYers, and anyone who wants a custom ceiling light without paying designer fixture prices.
It also solves a very specific problem: builder-grade flush mounts tend to flatten a room visually. A beaded chandelier adds texture, shape, and movement, which helps draw the eye up and makes the room feel more intentional.
Before You Start: Safety First (Because Cute Lighting Should Not Be a Fire Hazard)
Before we get to the fun part (beads, stain colors, and dramatic before-and-after moments), let’s talk safety. Even if you’re only modifying the outer look of a flush mount ceiling light, you’re still working around an electrical fixture.
My non-negotiable prep steps
- Turn off power at the breaker, not just the wall switch.
- Let the bulb cool completely before touching anything.
- Use a sturdy ladder and keep both hands free when removing the glass shade.
- Take a photo of the existing setup before disassembly.
- Use the correct bulb type and wattage for the fixture (I strongly prefer LED for lower heat).
- If the fixture is loose, the box is questionable, or your home wiring is older and unfamiliar, call a licensed electrician.
Important: this project is a decorative makeover, not a hack that should overload or hang weight from wires. Any decorative frame or shade needs to be secured to the fixture/base hardware appropriatelynot supported by the electrical wires.
What I Used for My Beaded Chandelier Light Makeover
You can customize this depending on your style (farmhouse, coastal, boho, modern organic), but here’s the basic setup I used for a DIY beaded chandelier effect:
Materials
- Wood beads (mixed sizes for a more organic look)
- Two metal or wood rings (one top ring, one bottom ring)
- Strong twine, jute, fishing line, or thin craft wire
- Flush mount light base (existing fixture, kept in place)
- Small screws + washers (depending on your attachment method)
- Primer/paint or Rub ’n Buff-style finish for the visible base (optional)
- Wood stain or paint for beads (optional)
- LED bulb (correct size and fixture rating)
Tools
- Screwdriver
- Drill (only if your frame needs pilot holes)
- Measuring tape
- Scissors or wire cutters
- Needle (if threading twine through small bead holes)
- Hot glue gun (optional for stabilizing knots, not for structural support)
Pro tip: If you want your DIY chandelier to look high-end, mix bead sizes instead of using all one size. That little change adds texture and makes the fixture feel more “boutique decor store” and less “summer camp craft table.”
Step-by-Step: How I Turned a Boring Flush Mount into a Beaded Chandelier
Step 1: I Removed the Old Glass Dome
This part is usually easy but awkward. I stood on a ladder, held the glass shade with one hand, and loosened the finial with the other. If your light has screws or clips instead of a center finial, go slowly and keep the shade supported the whole time.
Once the dome came off, I cleaned the base and took a hard look at what would remain visible after the makeover. In my case, the metal base ring was still visible from some angles, so I decided to paint it to blend with my beaded chandelier style.
Step 2: I Measured Everything (Then Measured Again Because Ceiling Work Is Humbling)
I measured:
- The diameter of the existing flush mount base
- The maximum drop I could add without the fixture feeling too low
- The width I wanted for the beaded shade
- Bulb clearance so the beads wouldn’t sit too close to heat
This is where many DIY ceiling light upgrades go wrong. If the beaded frame is too small, it looks like a weird collar. Too large, and it can feel out of scale for the room. I aimed for a shape that flared slightly wider than the original dome for that chandelier silhouette.
Step 3: I Built the Beaded Strands
This was the longest partand weirdly the most relaxing. I cut multiple lengths of twine and threaded wood beads in a repeating pattern. Some strands were uniform; others alternated bead sizes for more movement.
I tied knots at both ends and used a tiny dab of hot glue on the knot to prevent slippage. (Again, the glue was just insurance for the knot, not structural support.)
If you’re making a full beaded shade, consistency matters. I laid out the strands in batches so the lengths matched. Nothing ruins a chandelier vibe faster than one rogue strand hanging like it gave up halfway through.
Step 4: I Created the Shade Frame
I used a top ring and a bottom ring to form a drum/tapered shape. Then I attached each beaded strand between the rings, spacing them evenly. You can create:
- A drum shape (clean and modern)
- A tapered chandelier shape (more traditional/farmhouse)
- A looser swag effect (boho and casual)
I chose a soft taper because it looked the most “chandelier” while still working with a flush mount base.
Step 5: I Refreshed the Visible Fixture Base
Before installing the beaded shade, I painted the visible metal parts of the old flush mount. This was one of the biggest visual upgrades for the least effort. I used a warm neutral finish that blended with the wood beads and the room’s hardware.
This step makes a huge difference. If you leave a scratched, outdated brass or random white base peeking through a pretty beaded shade, your eye will go straight to the mismatch.
Step 6: I Attached the Beaded Frame to the Existing Light Base
This part depends on your fixture design. I used an attachment method that secured the decorative frame to the existing metal housing pointsnot the wiring. Some people use small screws and washers through pre-drilled holes in the decorative frame; others adapt the original shade hardware.
The key is stability. I gently tug-tested the frame after installation to make sure it was secure and centered.
Step 7: I Installed the Right Bulb and Tested the Look
I switched to a warm LED bulb for a softer glow and lower heat output. Then I restored power and stood back for the reveal.
Honestly? I laughed. Not because it looked badbut because it looked so much better than I expected. The beads diffused the light, added texture, and turned that boring ceiling fixture into something that looked custom and expensive.
Design Tips That Make a DIY Beaded Chandelier Look Expensive
1) Choose the right bead finish for your room
Natural wood beads feel warm and organic. Whitewashed beads lean coastal. Black beads look dramatic and modern. If your room already has wood furniture, match the undertone (warm, cool, or neutral) instead of guessing.
2) Pay attention to scale
A tiny beaded shade on a large ceiling can disappear visually. If the room is larger, go a little bigger with diameter or add more strand density so the fixture reads as a focal point.
3) Hide the “builder-grade” clues
Paint the visible base, use matching hardware, and keep the center bulb from showing too harshly. These little details are what separate a polished DIY light fixture from a “Pinterest-in-progress” situation.
4) Use warm lighting
If your goal is cozy, inviting, and stylish, a warm LED bulb usually looks better than a cool blue-white bulb. The beads catch and soften warm light beautifully.
Common Mistakes to Avoid in a Boob Light Makeover
- Ignoring bulb heat and fixture ratings: Decorative materials need clearance and the correct bulb type.
- Hanging weight from wires: Never do this. Decorative parts must be mechanically supported.
- Skipping measurements: Ceiling projects magnify asymmetry.
- Using flimsy string: Beads are heavier than they look when multiplied by 40+ strands.
- Forgetting maintenance: Beads collect dust, so design something you can actually clean.
- Overdecorating the fixture: A beaded chandelier already has texture; you usually don’t need tassels, crystals, feathers, and a fake bird’s nest all at once.
Budget and Time: What This DIY Ceiling Light Upgrade Cost Me
My final cost was far less than buying a new chandelier-style flush mount, especially one with the same handcrafted look.
Approximate budget breakdown
- Wood beads: moderate cost (depends on size and quantity)
- Rings/frame supplies: low to moderate
- Paint/finish: low (especially if you already own some)
- Hardware (screws/washers): low
- LED bulb: low
Time spent: One afternoon for planning and prep, one evening of bead-stringing while watching a show, and a final install session the next day. In other words: very doable, even if your schedule is less “DIY influencer” and more “I have exactly 47 minutes of peace after dinner.”
Maintenance: How I Keep My Beaded Chandelier Looking Good
Once a month (or whenever I notice dust doing what dust does), I lightly dust the beads with a microfiber cloth or a soft brush attachment on a vacuum. I also do a quick check to make sure all strands are secure and the fixture is still centered.
If you live in a humid climate, sealed or painted beads may hold up better than raw wood in bathrooms or laundry rooms. For hallways and bedrooms, natural unfinished wood beads usually age beautifully.
My Experience: What It Was Really Like Transforming a Boring Boob Light into a Beaded Chandelier (Extended Notes)
The funniest part of this project is that I put it off for months because I assumed it would be either too technical or too “crafty” to look good. I had this mental image of spending a weekend threading hundreds of beads only to end up with a ceiling fixture that looked like a costume necklace exploded. Happy to report: that did not happen.
What actually happened was a surprisingly satisfying, low-stress DIY project that made the entire room feel more finished. The light was in a spot I passed every day, but I had stopped seeing it. Once I changed it, I realized how much that one builder-grade fixture was dragging down the space.
I also learned that lighting upgrades are a little like haircuts: you can change one thing and suddenly everything else looks better. The wall color looked warmer. The runner rug looked more intentional. Even the art on the wall seemed less random. Was that the chandelier? Was it my imagination? I don’t know, but I’m choosing to give the chandelier full credit.
There were a few real-life hiccups. First, I underestimated how many beads I needed. I bought what I thought was “definitely enough,” which is the DIY equivalent of saying “I’ll just wing it.” I ran short and had to pause the project. If I could save you one extra trip to the store, it would be this: buy more beads than you think you need.
Second, I tested one strand spacing pattern that looked great on the table and weird on the ceiling. The fix was simpleI added more strands so the frame looked fullerbut it reminded me that ceiling fixtures are viewed from below, not straight-on. Perspective changes everything.
The biggest win, though, was realizing I didn’t need a full electrical replacement to get a dramatic result. Keeping the original flush mount base made the project feel much more approachable. I still followed safety steps carefully, but I wasn’t trying to become an electrician overnight. I was upgrading a ceiling light aesthetically, and that felt like the sweet spot between practical and creative.
If you’re on the fence about doing your own boob light makeover, here’s my honest take: start with one fixture in a lower-stakes room like a hallway, laundry room, guest room, or small bedroom. Once you see how much charm a beaded chandelier adds, you’ll start looking around your house thinking, “What else can I make less boring?” That is how DIY projects multiply. One minute you’re fixing a light, the next minute you’re online comparing paint finishes at 11:30 p.m.
Would I do it again? Absolutely. In fact, next time I’d experiment with a darker bead stain or a two-tone bead pattern for more contrast. I might also try a drum-style version in a bedroom for a softer, more tailored look. But even this first version taught me something useful: good design doesn’t always require a full renovation. Sometimes it just needs a screwdriver, a handful of beads, and the willingness to improve the thing you’ve been pretending not to notice.
Final Thoughts
Transforming a boring boob light into a beaded chandelier was one of those rare DIY projects that checked every box: affordable, high-impact, customizable, and genuinely fun. It upgraded the room, made the ceiling more interesting, and gave me that deeply satisfying “I made that” feeling every time I flip the switch.
If you want a ceiling light upgrade without replacing your entire fixture, this DIY beaded chandelier makeover is a fantastic place to start. Just measure carefully, prioritize safety, use the right bulb, and don’t rush the bead layout. Your ceiling will thank youand your old builder-grade flush mount may finally stop looking like a rental afterthought.