
Table of Contents >> Show >> Hide
- What You’re Building (And Why It Works)
- Planning: Measure First, Regret Less
- Tools & Materials Checklist
- Step-by-Step: Built-In Shelves Beside a Washer & Dryer
- 1) Choose shelf depth that won’t fight your appliances
- 2) Mark shelf heights like you’re designing a tiny store display
- 3) Find studs and draw level lines
- 4) Install cleats (the hidden heroes)
- 5) Cut and test-fit the shelf tops
- 6) Add a front edge to prevent sag and add thickness
- 7) Create the “built-in” look with side panels (optional but gorgeous)
- 8) Prime, paint, and caulk for a seamless finish
- 9) Organize like a calm person (even if you aren’t one)
- Safety & Common Sense (The Unsexy Section That Matters)
- Troubleshooting: When Laundry Rooms Fight Back
- A Specific Example Layout (So You Can Picture It)
- Budget & Timeline Reality Check
- Conclusion: Small Build, Big Payoff
- Real-World Experiences & Lessons DIYers Keep Repeating (The Extra )
Laundry rooms are tiny, loud, and weirdly judgmental. You walk in with a single sock and suddenly you’re confronting
your entire life: detergent towers, mystery lint, and a pile of “clean-ish” towels that have been rewashed so many
times they’re basically getting a graduate degree.
The good news: you don’t need a bigger laundry room to make it feel 10x more functional. You need vertical
storage. Specifically, that awkward sliver of space next to (or between) your washer and dryer that currently does
nothing except collect dust and steal dryer sheets like a gremlin.
This guide walks you through adding sturdy, built-in-style shelves next to a washer and dryeran approach popularized
by classic DIY blogs (including Young House Love) because it’s practical, budget-friendly, and looks custom when you
finish it with trim and paint.
What You’re Building (And Why It Works)
The most dependable “built-in shelf” recipe is simple:
wood cleats screwed into studs + a shelf top (plywood or MDF) + trim
for a clean, furniture-like edge. It’s the same logic behind strong closet shelves and pantry shelving: the wall does
the heavy lifting, and the shelf becomes a stable platform instead of a wobbly bracket experiment.
You can keep it open (great for baskets and frequently used items) or add side panels and a face frame for a more
built-in cabinet look. Either way, the goal is the same: create storage that’s easy to reach, easy to clean, and not
balanced on top of a vibrating appliance like a detergent Jenga tower.
Planning: Measure First, Regret Less
Before you buy anything, take 10 minutes to measure like you mean it. Laundry spaces are full of surprises:
baseboards, water hookups, outlet covers, dryer vents, and sometimes a random pipe that appears to exist purely to
ruin your day.
Key measurements to capture
- Width of the gap beside the appliances (at the floor and at the wallolder walls can bow).
- Depth you can safely use without blocking doors, knobs, or detergent drawers.
- Height range for shelves so you can reach them and still remove the machines later if needed.
- Obstacles: hoses, shutoff valves, vent ducts, electrical panels, or trim that sticks out.
Practical rule: shelves should never prevent you from sliding appliances out for service. Leave a little “escape
plan” space so future-you doesn’t have to uninstall carpentry just to replace a washer.
Tools & Materials Checklist
You can do this with basic DIY gear. If you can measure, level, and resist the urge to “eyeball it,” you’re in good
shape.
Materials
- Cleats: 1×2 or 1×3 boards (straight onesdon’t adopt the bowed ones out of pity).
- Shelf tops: 3/4-inch plywood (strong) or MDF (smooth, paint-friendly, heavier).
- Trim: 1×2 face trim or lattice/edge trim (for a thicker, built-in look).
- Screws: wood screws long enough to bite into studs (often 2.5–3 inches for cleats).
- Finish: primer + paint (semi-gloss or satin is easier to wipe clean).
- Caulk + wood filler for seams and nail holes.
Tools
- Stud finder
- Level (a longer level helps you avoid “sad shelf slope”)
- Drill/driver + bits
- Measuring tape + pencil
- Saw (circular saw, miter saw, or a store cut service if you plan well)
- Sandpaper or sanding sponge
- Optional but nice: brad nailer (or finish nails + a nail set)
Step-by-Step: Built-In Shelves Beside a Washer & Dryer
1) Choose shelf depth that won’t fight your appliances
If you have front-loaders, remember the doors swing out. If you have top-loaders,
remember the lids swing up. And if you have a dryer, remember it needs ventilation and clearance.
For many laundry setups, shelves around 10–14 inches deep are a sweet spot: deep enough for baskets,
shallow enough to avoid smashing into everything when you turn around holding a hamper like a defensive shield.
2) Mark shelf heights like you’re designing a tiny store display
Think about what will live on each shelf. A shelf that holds tall detergent bottles needs different spacing than a
shelf meant for folded rags or small bins.
- Bottom shelf: often best for heavy items (bulk detergent, baskets, pet supplies).
- Middle shelves: everyday items you grab constantly (stain remover, dryer balls, lint roller).
- Top shelf: backup stock or less-used items.
Use painter’s tape on the wall to “preview” shelf lines. It’s easier to move tape than to move a shelf after it’s
installed… ask literally anyone who has ever said, “It’s fine, we’ll get used to it.”
3) Find studs and draw level lines
Use a stud finder to mark stud locations. Then use a level to draw a straight line where each cleat will sit. This
step is the difference between “custom built-in” and “nautical theme,” because nothing says “sea voyage” like shelves
that slope toward the horizon.
4) Install cleats (the hidden heroes)
For a shelf that spans between walls (or between a wall and a side panel), the classic approach is three supports:
one cleat on each side wall and one on the back wall. If you only have one side wall (like shelves next to machines),
you can still create a sturdy build by anchoring cleats into studs and adding a vertical side panel on the open end.
- Pre-drill cleats to avoid splitting.
- Hold each cleat on your level line.
- Screw cleats into studs (not just drywall).
If studs are poorly placed, you can add heavy-duty anchors for light loads, but for laundry shelves holding
real weight (detergent is basically liquid dumbbells), hitting studs is the best plan.
5) Cut and test-fit the shelf tops
Cut shelf tops to size. If your walls aren’t perfectly square (they rarely are), test-fit and scribe the shelf edge
if needed. A tiny gap can be caulked, but a shelf that doesn’t fit because the room is secretly trapezoid-shaped will
force you into “creative persuasion” with a sander.
Once the shelf top fits, set it on the cleats. If you want extra security, drive a couple of screws down through the
shelf into the cleats (pre-drill so you don’t mushroom the wood).
6) Add a front edge to prevent sag and add thickness
This is where shelves start looking built-in. Attach a 1×2 (or similar) to the front edge of the shelf. It does two
things:
- Stiffens the shelf so it resists sagging over time.
- Makes the shelf look thicker (more “custom millwork,” less “board on wall”).
Use wood glue + brad nails (or finish nails) and fill holes later. If you’re painting, perfection is optional because
wood filler is basically magic putty for adults.
7) Create the “built-in” look with side panels (optional but gorgeous)
If your shelves sit next to appliances with an open side exposed, consider adding a vertical panel (plywood or MDF)
on the open end. This hides the cleats and gives the shelves a built-in “bookcase” vibe.
You can also add a simple face frame (trim around the front edges) to make everything look intentionallike it came
with the house instead of arriving in a cloud of sawdust and second-guessing.
8) Prime, paint, and caulk for a seamless finish
If you’re using MDF, priming is non-negotiable, especially on cut edges. Then paint with a durable finish (satin or
semi-gloss is common in utility spaces because it wipes clean). Caulk seams where wood meets wall for that “built-in”
effect.
Pro move: paint shelves before final install if you can. It’s easier to get coverage on a flat surface than while
hugging a washing machine.
9) Organize like a calm person (even if you aren’t one)
The shelves are only half the win. The other half is containment. Baskets, bins, and labeled jars turn a shelf from
“stuff happens here” into a system.
- One bin for stain treatments
- One bin for backup supplies
- A small tray for daily-use items (so they don’t migrate)
- A lidded container for pods (if kids/pets are in the house)
Safety & Common Sense (The Unsexy Section That Matters)
Laundry rooms combine heat, electricity, moisture, and chemicalsfour things that shouldn’t be left unsupervised
together like toddlers with markers.
- Don’t block dryer ventilation. Keep ducts clear and avoid sealing vents behind permanent panels.
- Avoid storing flammables near heat. Keep aerosols, extra solvents, and anything questionable away from the dryer.
- Don’t treat the top of the dryer as a shelf. Build real shelves so items aren’t sitting on a vibrating, warm surface.
- Keep access to shutoff valves and panels. If something leaks, you’ll want speednot a screwdriver.
Troubleshooting: When Laundry Rooms Fight Back
Problem: The shelves sag or feel bouncy
Solutions: use thicker shelf material (3/4-inch plywood), add a sturdier front rail, reduce shelf span, or add a
vertical divider/support panel on the open side.
Problem: Studs aren’t where you need them
Solutions: adjust shelf placement slightly, use a wider cleat to catch more studs, or add a vertical panel that can
carry the open end of the shelves. For heavy loads, prioritize stud attachment over “perfect” spacing.
Problem: The wall isn’t straight
Welcome to houses. Scribe the shelf to the wall, or plan a small caulkable gap. A tiny shadow line is better than a
shelf that won’t sit flat.
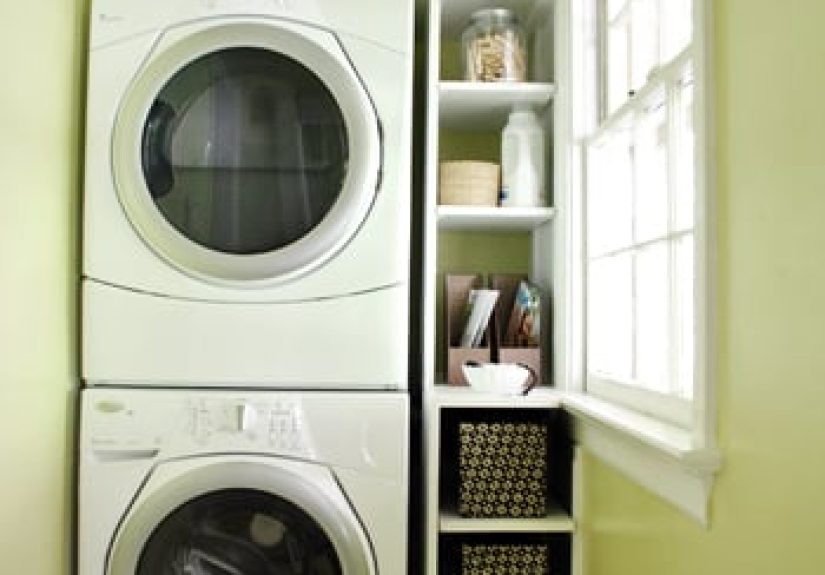
A Specific Example Layout (So You Can Picture It)
Imagine a narrow laundry room where the washer and dryer sit side-by-side, and you’ve got a slim gap on one side.
A smart plan is to run shelves up that vertical strip, keeping them shallow enough to avoid appliance door conflicts.
- Shelf depth: about the depth of a medium basket (often 10–14 inches)
- Bottom shelf height: high enough to clear baseboards and allow easy vacuuming
- Middle shelves: spaced for detergents and sprays
- Top shelf: for overflow supplies or linens
If you want a more “built-in cabinet” look, add an end panel facing the room, then paint everything the same color as
the walls or trim. That simple trick makes the shelves look like they were always part of the architecture.
Budget & Timeline Reality Check
Most DIY shelf builds like this can be done in a weekend:
- Day 1: measure, cut, install cleats, test-fit shelves
- Day 2: trim, fill, sand, prime/paint, caulk, then organize
Cost depends on material choices. Paint-grade plywood/MDF and basic trim can keep it affordable, while cabinet-grade
plywood and stained finishes push it higher. Either way, the return is big: the room feels larger because the floor
is clearer and the chaos is contained.
Conclusion: Small Build, Big Payoff
Built-in shelves beside a washer and dryer are one of those upgrades that feel almost unfair: a modest DIY project
that dramatically changes how the room works. You’re not adding square footageyou’re adding sanity.
Measure carefully, hit studs, keep shelves shallow enough to coexist peacefully with appliance doors, and finish with
trim and paint so it looks intentional. Then load it up with baskets and bins and enjoy the rare luxury of finding a
dryer sheet without opening four random drawers like you’re on a scavenger hunt.
Real-World Experiences & Lessons DIYers Keep Repeating (The Extra )
When people build laundry-room shelves, the steps are usually straightforward. The “experience” partthe stuff you
only learn mid-projecttends to repeat across almost every DIY story. Here are the most common lessons that come up,
especially when you’re building shelves right next to appliances that vibrate, vent hot air, and occasionally decide
to leak at 9:47 p.m. on a Sunday.
Lesson #1: The wall is rarely as straight as you think. Many DIYers assume they can cut shelves to a
perfect rectangle and slide them into place. Then the shelf hits a subtle bow in the drywall, a baseboard flare, or
a corner that’s 89 degrees instead of 90. The fix is simplescribe, sand, test-fit againbut it can add time. A good
trick is cutting shelves slightly oversized and trimming down in tiny increments until the fit feels “custom.”
Lesson #2: Stud finding becomes a personality test. In some houses, studs are predictable and your
stud finder behaves. In others, you’ll find a stud… and then find it again two inches over… and then your stud finder
will claim the entire wall is a stud, including your own hand. DIYers often end up verifying stud locations the old
fashioned way: measuring from a corner, looking for nail pops, or using a small finish nail in an inconspicuous spot
to confirm solid wood behind the drywall.
Lesson #3: Appliance clearance matters more than shelf perfection. A shelf that looks gorgeous but
prevents you from sliding out the washer for repair is the DIY equivalent of buying shoes you can’t walk in. People
who’ve done this project often recommend leaving a bit of breathing room and planning for the day you replace your
machines. Even if your current washer fits perfectly, the next model might be deeper, taller, or have a different
door swing. Designing shelves that don’t “trap” the appliances is a long-term win.
Lesson #4: Vibration is real, so build like it’s a tiny earthquake zone. Laundry machines shake. If
shelves are flimsy, you’ll hear it. That’s why cleats screwed into studs and a solid front edge/face trim are so
popular: they reduce bounce, prevent sag, and keep baskets from rattling like a percussion section. DIYers also learn
to avoid resting shelf supports on the machines themselvesyour shelves should be independent so the appliances can
do their spin-cycle interpretive dance without rearranging your storage.
Lesson #5: Finishing takes longer than building. Cutting wood and screwing cleats into studs can feel
fast. The “built-in” look comes from filling nail holes, sanding edges, caulking seams, priming, and paintingsteps
that are easy to rush and then regret. DIYers who love their final result usually say the same thing: take your time
on the finish work. Caulk and paint are the secret handshake of “this looks professional.”
Lesson #6: Organization is a system, not a pile. After shelves go up, many people experience a brief
magical moment where everything looks clean because the shelves are empty. Then the supplies move back in, and chaos
tries to return like a sequel nobody asked for. The fix is giving categories a home: one basket for stain removal,
one bin for backups, a tray for daily items, and labels if multiple people use the room. The shelves create the
spacecontainers create the calm.
The best “experience-based” takeaway is simple: plan for reality. Real walls aren’t perfect, real machines need
clearance, and real life creates laundry clutter daily. Build sturdy shelves, finish them neatly, and organize with
containers that make it easy to keep the system going. That’s how a small DIY upgrade becomes one of those
everyday-life improvements you appreciate every single week.


