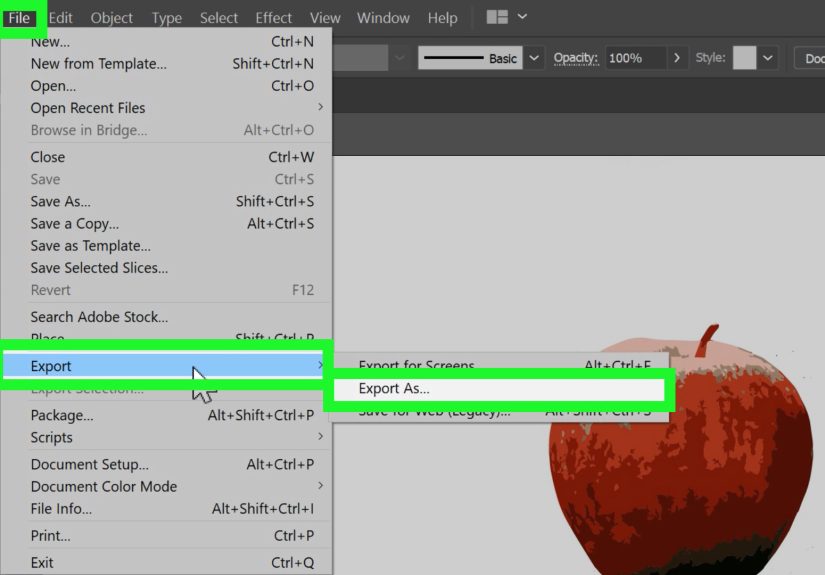
Table of Contents >> Show >> Hide
- Why Updating Cabinet Doors Is the Budget-Friendly Move
- Best Budget DIY Ways to Update Old Cabinet Doors
- Before You Start: A Realistic DIY Check
- Step-by-Step: How To Update Old Cabinet Doors on a Budget DIY
- Step 1: Label Everything Before Removing Doors
- Step 2: Clean Off Grease and Grime
- Step 3: Repair Dings, Old Hardware Holes, and Surface Flaws
- Step 4: Scuff Sand (or Degloss, If Appropriate)
- Step 5: Prime for Adhesion and Durability
- Step 6: Paint in Thin, Patient Coats
- Step 7: Add a Budget Style Upgrade (Optional but Powerful)
- Step 8: Reinstall Carefully (After Enough Dry Time)
- Budget Breakdown Examples
- Common DIY Mistakes to Avoid
- How to Make Cheap Updates Look Expensive
- Final Thoughts
- Extra: of Real-World DIY Experience and Lessons Learned
- SEO Tags
If your cabinet doors are giving “tired 2007 rental kitchen” energy, don’t panicand definitely don’t assume you need a full remodel. In many cases, the cabinet boxes are still structurally fine, and the doors just need a budget-friendly glow-up. That’s excellent news for your wallet.
A smart DIY cabinet-door update can completely change the look of a kitchen, laundry room, bathroom, or mudroom without the cost of tearing everything out. The trick is knowing where to spend money (good prep materials, decent paint, better hardware) and where to save it (reusing doors, refreshing existing hinges, choosing simple upgrades that look custom).
In this guide, you’ll learn how to update old cabinet doors on a budget using practical, real-world DIY methods: painting, adding trim, swapping hardware, patching holes, and making older doors look intentionally stylish instead of “we’re trying our best.” We’ll also cover prep, common mistakes, and a few budget plans so you can pick the version that fits your time, tools, and patience level.
Why Updating Cabinet Doors Is the Budget-Friendly Move
Cabinet replacement is expensive because you’re paying for new boxes, doors, installation, and often a domino effect (countertops, flooring touch-ups, plumbing disconnects, and more). If your cabinet boxes are solid, updating only the doorsor refinishing the doors and frontscan deliver a dramatic visual upgrade for much less money.
Budget DIY updates also let you control the scope. You can:
- Refresh just the doors and drawer fronts first
- Keep your existing layout (no plumbing or electrical headaches)
- Reuse hardware if needed or replace it later
- Upgrade in phases instead of doing one expensive project
Translation: your kitchen can look new-ish while your bank account remains emotionally stable.
Best Budget DIY Ways to Update Old Cabinet Doors
1) Paint the Existing Cabinet Doors
This is the most popular budget option for a reason. A well-prepped paint job can make dated oak, maple, or builder-grade doors look clean, modern, and intentional. Paint works especially well when the door shape is still fine but the finish is worn, yellowed, or just not your taste.
Best for: solid wood, MDF, and many previously painted doors (and some laminate doors with the right bonding primer).
2) Add Trim to Create a Faux Shaker Look
If your cabinet doors are flat or too plain, adding thin trim pieces can create a Shaker-style frame. This is a classic budget hack because it looks custom but uses inexpensive materials. After trim is attached, you caulk the seams, prime, and paint.
Best for: flat-front doors in decent condition.
3) Replace or Refinish Hardware
New knobs and pulls are the “lipstick and earrings” of cabinet makeovers. They’re fast, relatively cheap, and can completely shift the stylefrom farmhouse to modern, traditional to minimalist. If new hardware isn’t in the budget, you can clean and spray-paint the old hardware for a fresh look.
Best for: every cabinet project, even super-low-budget ones.
4) Fill Old Holes and Move Hardware Placement
Sometimes the cabinet doors are okay, but the hardware placement makes them look dated. You can fill old holes, sand smooth, repaint, and install longer pulls or modern knobs in a cleaner location. This is especially effective on older doors with tiny knobs placed awkwardly near the center.
5) Add Glass, Wire Mesh, or Decorative Panels to Select Doors
You do not need to do this on every door. Updating just 2–4 upper cabinet doors with glass inserts, cane webbing, or decorative metal mesh can make the entire kitchen feel more custom. It works best as an accent, not a full-room commitment.
Budget tip: upgrade only one section (like cabinets near a sink or coffee station) and keep the rest painted.
6) Use Peel-and-Stick or Decorative Interior Panels for a Style Boost
If you want a visual change without replacing doors, decorative films or peel-and-stick materials can be used inside glass-panel doors or on selected flat surfaces. This can add texture or pattern while keeping the project inexpensive.
Before You Start: A Realistic DIY Check
Make Sure the Doors Are Worth Saving
DIY updates are worth it when the doors are structurally sound. If they’re badly warped, water-damaged, cracked at hinge points, or constantly misaligned, replacement doors may be the smarter move.
Ask yourself:
- Do the doors open and close properly?
- Are hinges secure and screws holding?
- Is the damage cosmetic (great) or structural (less great)?
- Do I like the door shape enough to invest time in it?
Lead Paint Safety for Older Homes
If your home was built before 1978 and the cabinets have old paint layers, treat sanding and scraping carefully. Test for lead or follow lead-safe practices before creating dust. This is not the part of the project to “just wing it.”
Choose the Right Paint and Finish
Cabinet doors get touched constantly, so use durable paint designed for trim/cabinet use or a high-quality enamel-style product. For sheen, satin and semi-gloss are both popular because they clean more easily than flat paint. Matte can look beautiful, but it usually takes more effort to keep clean in busy kitchens.
Budget-First Tool & Material Checklist
- Screwdriver or drill
- Painter’s tape and marker for labeling
- Degreaser (or appropriate cabinet cleaner)
- TSP/TSP substitute or another grease-cutting cleaner (if needed)
- Wood filler
- Sandpaper (medium + fine grit) or sanding sponge
- Tack cloth / shop vacuum
- Bonding or stain-blocking primer (as needed)
- Cabinet paint / trim enamel
- Brush + mini roller (foam or microfiber, depending on finish preference)
- Drop cloths and good ventilation setup
- Optional: hardware jig/template, new knobs/pulls, trim molding, caulk
Step-by-Step: How To Update Old Cabinet Doors on a Budget DIY
Step 1: Label Everything Before Removing Doors
Take a photo of your cabinets first. Then remove one door at a time and label it clearly (for example: “U3” for upper cabinet #3). Label the matching cabinet frame too. Put screws and hinges in small bags or cups with matching labels.
This sounds overly organized until you’re holding six nearly identical doors and saying, “Hmm… this one feels like it came from somewhere important.” Labeling saves hours.
Step 2: Clean Off Grease and Grime
Paint sticks to clean surfacesnot to invisible kitchen grease. Even “clean-looking” doors often have oil buildup around handles and edges. Wash thoroughly with a degreaser or grease-cutting cleaner. If the grime is serious, use a stronger cleaner that is safe for your cabinet material.
Rinse off residue and let everything dry fully before sanding. Skipping this step is one of the top reasons DIY cabinet paint jobs peel early.
Step 3: Repair Dings, Old Hardware Holes, and Surface Flaws
Use wood filler for dents, scratches, and unused hardware holes. If you’re switching to a new pull size, patch the old holes now. Let filler dry completely, then sand smooth.
Budget pro tip: If you’re changing hardware placement, measure and test on one door first before drilling all of them. One “oops” hole is a learning moment. Twelve “oops” holes is a decorative problem.
Step 4: Scuff Sand (or Degloss, If Appropriate)
You usually don’t need to sand to bare wood. The goal is to scuff the finish so primer can grip. Use medium-grit sandpaper for the first pass, and pay extra attention to glossy spots and around handles.
After sanding, vacuum dust from corners and grooves, then wipe with a tack cloth. Dust left behind will show up in your paint finish like tiny crunchy confetti.
Step 5: Prime for Adhesion and Durability
Primer is the secret sauce of cabinet updates. It helps paint stick, blocks stains, and gives a more even finish. Use:
- Bonding primer for tricky surfaces (like laminate or very slick finishes)
- Stain-blocking primer for knotty wood, dark stains, or old discoloration
- High-quality all-purpose primer for many standard cabinet projects
Prime the edges and detailed areas with a brush, then roll the flat sections. Let it dry fully. Lightly sand the primed surface with fine grit, then wipe clean before paint.
Step 6: Paint in Thin, Patient Coats
Cabinet doors look best when paint is applied in light, even coats. Thick coats may feel faster but often create drips, pooled corners, and a gummy finish.
General order for doors:
- Paint the back side first
- Let it dry
- Flip and paint the front
- Repeat for a second coat after proper dry time
For paneled doors, use a brush on grooves and profiles first, then roll flat panels and rails/stiles. Smooth out overlaps while the paint is still wet.
Important: Dry time and cure time are not the same thing. “Dry to touch” can happen in hours, but full hardness takes longer. Be gentle with doors for several days (sometimes longer, depending on the paint).
Step 7: Add a Budget Style Upgrade (Optional but Powerful)
A) Faux Shaker Trim Upgrade
Cut thin trim pieces to create a frame on flat doors. Glue and clamp (or pin-nail), then fill gaps and seams with paintable caulk. Once dry, sand lightly, prime, and paint as usual.
B) Hardware Refresh
If you’re keeping old hardware, clean it well and spray it with light coats of primer and paint. If installing new hardware, use a jig/template so everything lines up consistently.
C) Accent Doors With Glass or Mesh
Choose one cabinet zone and upgrade just those doors. This creates a “designer” focal point without a full custom-cabinet budget.
Step 8: Reinstall Carefully (After Enough Dry Time)
Reattach hinges, hang doors using your labels, and check alignment. Tighten or adjust hinges so gaps are even. Install knobs/pulls last.
If your paint still feels soft, wait a bit longer before aggressive use. Cabinet doors love patience. Rushing reassembly is how fingerprints become permanent design features.
Budget Breakdown Examples
Actual cost depends on cabinet size, door count, and whether you already own tools, but here’s a practical DIY budget range for updating old cabinet doors:
| DIY Update Level | What’s Included | Estimated Budget |
|---|---|---|
| Ultra Budget Refresh | Clean, sand, prime, paint existing doors; reuse hardware | $120–$300 |
| Budget + Hardware Upgrade | Paint + new knobs/pulls + hole patching | $180–$450 |
| Faux Shaker Makeover | Paint + trim overlay + caulk + new hardware | $250–$700 |
| Feature-Door Upgrade | Paint + hardware + 2–4 glass/mesh accent doors | $300–$900 |
That range is still far below most full cabinet replacement projects, and often below pro refacing costs too.
Common DIY Mistakes to Avoid
1) Skipping Degreasing
Kitchen grease is sneaky. If you paint over it, adhesion suffers. Clean first, always.
2) Using Wall Paint Instead of Cabinet/Trim Paint
Wall paint usually won’t hold up well to constant touching and cleaning. Cabinet doors need a harder, more durable finish.
3) Rushing Dry Time
If the can says wait, wait. Putting doors back too early can cause sticking, smudging, and chipped edges.
4) Forgetting to Label Doors
You think you’ll remember. You won’t. Label everything.
5) Installing Hardware Without a Template
Eyeballing hardware placement is a bold choice. Use a jig or template unless asymmetry is your design theme.
6) Trying to “Save” Badly Damaged Doors
Budget DIY is smart. Spending 10 hours repairing doors that are falling apart is not. Replace only the damaged doors if necessary and refinish the rest to match.
How to Make Cheap Updates Look Expensive
- Use one color consistently: A unified cabinet color makes even mixed old/new pieces look intentional.
- Upgrade hardware style: Sleek pulls or classic knobs can instantly modernize doors.
- Keep spacing consistent: Even hardware placement makes a huge visual difference.
- Caulk trim seams: This is what makes faux-Shaker doors look custom instead of craft-project.
- Choose satin or soft semi-gloss: Durable and wipeable without looking overly shiny (unless you love gloss).
- Add one accent feature: A few glass-panel doors or under-cabinet lighting can make the whole refresh look more custom.
Final Thoughts
Updating old cabinet doors on a budget DIY style is one of the best “big visual impact, manageable cost” projects you can do at home. The key is prep, patience, and smart upgradesnot fancy tools or a giant budget.
If you clean thoroughly, prime properly, paint in thin coats, and finish with hardware that matches your style, old cabinet doors can look surprisingly polished. And if you add trim or a couple of accent doors? You may end up with a kitchen that looks custom enough to make people ask, “Wait… did you replace everything?”
You can smile and say, “Nope. I just outsmarted my cabinets.”
Extra: of Real-World DIY Experience and Lessons Learned
One of the biggest lessons people learn when updating old cabinet doors on a budget is that the prep phase feels slow, but it is absolutely where the “expensive-looking” result is built. In real DIY projects, the difference between a makeover that lasts and one that chips in six months usually comes down to cleaning, sanding, and primernot the final paint color. A lot of homeowners start excited about color swatches, then realize the true hero of the project is the degreaser and tack cloth. It’s not glamorous, but it works.
Another common experience: people underestimate how much cabinet doors vary from one another. Even in the same kitchen, some doors are more worn, some have more grease buildup, and some have tiny dents around the hardware. That’s why doing one “test door” first is so helpful. A test door helps you confirm your cleaning process, your primer adhesion, and your paint finish before you commit to the whole set. It also helps you estimate real project time, which is usually longer than expectedespecially if you’re working evenings or weekends.
Hardware changes also create a surprisingly dramatic transformation. Many budget DIYers expect paint to be the main event, but once they install updated pulls or knobs, the cabinets suddenly look intentional and modern. Even simple black pulls, brushed nickel handles, or warm brass knobs can make an older door style feel fresh. A consistent hardware layout matters a lot too. In real projects, using a jig/template prevents the “one handle is slightly higher and now I can’t unsee it” problem.
Faux Shaker upgrades are another favorite experience-based win. DIYers often report that flat cabinet doors looked too plain after painting, but adding trim changed the whole project. The trick is precise measuring and taking time to fill and caulk seams so the trim looks built-in. If the seams are left rough, the doors can look homemade in the wrong way. If they’re caulked and sanded smooth, they look much more custom. This is one of those upgrades where detail work matters more than expensive materials.
Many people also learn the hard way that dry time is not the same as cure time. Doors may feel dry within a day, but they can still be soft enough to scratch around handles or stick when closed. A better experience usually comes from spacing out the project: paint, let the doors sit longer than you think, then reinstall gently. Some DIYers even wait several days before putting frequently used items back in the kitchen so they aren’t slamming doors while the finish is still hardening.
Finally, the best budget cabinet-door projects usually happen in phases. Instead of trying to do every upgrade at once, homeowners paint first, then add hardware, then maybe add accent doors or under-cabinet lighting later. This keeps the project affordable, manageable, and less stressful. It also gives you a chance to live with the update and decide what’s really worth doing next. In real life, that phased approach is often what makes a DIY refresh feel successful instead of overwhelming.