Table of Contents >> Show >> Hide
- What Exactly Is Gold Leaf?
- Essential Supplies for Gold Leaf Projects
- Step-by-Step: How to Apply Gold Leaf Like a Pro
- Where Can You Use Gold Leaf at Home?
- Common Gold Leaf Mistakes (and How to Avoid Them)
- Care and Maintenance for Gold Leaf Surfaces
- Real-Life Experiences: What I Learned from Gold Leafing “Everything”
If you’ve ever looked at a plain vase, a scuffed dresser, or a very boring light switch cover and thought, “You, my friend, deserve to be shiny,” then welcome to the world of gold leaf. Applying gold leaf is one of those DIY tricks that looks intimidating but is actually totally doable at home with a bit of patience, the right glue, and a soft brush you do not steal from your makeup bag (ask me how I know).
In this guide, we’ll walk through how to apply gold leaf to just about anything: furniture, picture frames, planters, walls, and small decor. We’ll talk about choosing real vs. imitation gold leaf, the right adhesive (called “size”), how long to wait before applying, how to seal your work so it doesn’t tarnish, and common mistakes to avoid. By the end, you’ll be ready to give your home that glam, Hometalk-style makeoverwithout hiring a professional gilder.
What Exactly Is Gold Leaf?
Gold leaf is ultra-thin metal that’s been hammered or rolled into delicate sheets. Real gold leaf is made from genuine gold, usually 22–24 karats, and it doesn’t tarnish. Imitation gold leaf (often made from brass alloys like copper and zinc) looks similar at first but can dull or turn slightly greenish over time if it’s not sealed properly.
Here’s the quick breakdown of your options:
- Real gold leaf (22–24K): Brilliant color, won’t tarnish, great for heirloom pieces and high-end projects. It’s pricier, so most people reserve it for special accents or indoor decorative work.
- Imitation gold leaf: Affordable and perfect for large surfaces, beginner projects, and experiments. However, it must be sealed to protect it from oxidation and tarnishing over time.
- Other metal leaf: You’ll also find silver, copper, variegated, and colored leaf. The application process is basically the same, so once you learn gold, you can do them all.
For most “gold leaf everything” projectsthink frames, vases, decor, accent furnitureimitation gold leaf is a budget-friendly way to get the look, especially when you’re just starting out.
Essential Supplies for Gold Leaf Projects
Before you start coating every surface in your house, gather the right tools. Having the proper supplies makes a huge difference in how easy the process feels and how professional your results look.
Basic Gold Leaf Kit
- Gold leaf sheets or flakes: Choose loose or transfer sheets depending on your project. Transfer sheets are easier for flat surfaces like furniture and walls; loose leaf is great for irregular shapes.
- Adhesive size: This is the special glue used for gilding. You’ll typically see water-based size for DIY projectsit’s easy to use, low-odor, and works on most indoor surfaces.
- Soft brushes: You’ll need one brush to apply the adhesive and a very soft brush (often called a gilder’s mop or a soft synthetic brush) to smooth and burnish the gold leaf.
- Sealer or topcoat: Especially crucial for imitation gold leaf. Look for a sealant specifically labeled for use with metal leaf to avoid dulling or discoloration.
- Fine sandpaper or sanding sponge: For smoothing furniture or walls before you start.
- Tack cloth or lint-free cloth: To remove dust from your surface.
- Optional: Painter’s tape, cotton gloves (to avoid fingerprints on the leaf), and a drop cloth to catch stray flakes.
Once you own a small gold leaf kit, you’ll be dangerously tempted to cover everything from thrift-store candlesticks to your light switch plates. Consider yourself warned.
Step-by-Step: How to Apply Gold Leaf Like a Pro
Whether you’re gilding a small picture frame or the top of a side table, the process is basically the same. The magic is in the surface prep, the patience with the adhesive, and the gentle handling of the leaf.
Step 1: Prep Your Surface
Gold leaf shows everything, including bumps, dents, and dust. A smooth surface gives you a much more polished finish, especially on furniture and walls.
- Sand glossy or rough surfaces lightly to remove shine and imperfections.
- Wipe away sanding dust with a tack cloth or lint-free cloth.
- If needed, apply a base coat of paint or primer. Warm tones like yellow, tan, or red under the leaf can make the gold look richer; white will make any gaps more obvious.
On small decor items (like ceramic vases or glass bottles), a quick cleaning with soapy water and a bit of rubbing alcohol to remove oils is usually enough.
Step 2: Tape Off and Plan Your Design
If you only want gold leaf on certain areaslike the edges of a frame, the legs of a chair, or a geometric pattern on a walluse painter’s tape to mark off clean lines. This helps you get that “designer” look instead of “I accidentally spilled a jar of glitter.”
Step 3: Apply the Adhesive Size
Use a soft brush to apply a thin, even coat of adhesive where you want the gold. Less is more here: thick adhesive can stay wet too long, slide around, and give you messy edges.
- Brush in smooth strokes and avoid drips or puddles.
- Only coat the area you can cover in one session; size stays tacky for a while but not forever.
Now the hard part for impatient DIYers: you must wait for the size to become tacky. For most water-based adhesives, that sweet spot is around 15–30 minutes. It should feel sticky like the back of a Post-it note, not wet and juicy.
Step 4: Wait for the Perfect Tack
This step is where a lot of beginners mess up. If you apply gold leaf too early, it slides and wrinkles excessively. If you wait too long and the adhesive loses tack, the leaf won’t stick.
Test the tack by lightly touching an inconspicuous area with a clean finger or knuckleit should feel sticky but not stringy or wet. If your finger comes away with glue, wait longer. If it feels dry and not sticky, you may have waited too long and need a fresh coat.
Step 5: Lay Down the Gold Leaf
Now for the fun part. Carefully place the gold leaf sheets over the tacky area:
- For transfer sheets, place the sheet gold-side down and gently rub the backing paper so the leaf adheres.
- For loose leaf, use the backing paper or a soft brush to pick up the sheet and float it onto the surface.
Overlap sheets slightly to avoid gaps. Don’t worry about wrinkles or torn areas just yetgold leaf is forgiving, and you’ll fill in the gaps in the next step.
Step 6: Smooth, Burnish, and Clean Up
Once your sheets are in place, use a soft, dry brush to gently smooth the surface:
- Use light, sweeping motions to press the leaf into the adhesive.
- Brush away loose flakes; they’ll turn into “gold dust” you can save for small touch-ups.
- For a brighter shine, burnish gently with a soft cloth or gilder’s mop once the size has fully dried (usually after a few hours).
If your design has taped edges, wait until the adhesive has set a bit, then carefully peel off the painter’s tape to reveal crisp gilded lines.
Step 7: Fill Gaps and Layer for Depth
See tiny bare spots? That’s normal. Simply dab a little more adhesive into those areas, wait for tack, and press in leftover flakes or small pieces of leaf. Multiple layers of gold leaf can actually create a richer, more dimensional look, especially on furniture or frames.
Step 8: Seal Your Gold Leaf
Sealing is crucial for imitation gold leaf and for any surfaces that will be handled often, like tabletops or cabinet doors.
- Use a sealant made specifically for gold or metal leaf to avoid cloudiness or tarnish.
- Apply thin, even coats with a soft brush.
- On high-use surfaces, two or three light coats are better than one thick coat.
Real gold leaf in a low-traffic indoor area sometimes doesn’t need sealing, but most DIYers still add a light protective layer for peace of mind.
Where Can You Use Gold Leaf at Home?
Once you master the basics, you’ll start seeing potential gold leaf projects everywhere. Here are some “Hometalk-style” ideas to get your creativity going:
1. Gold Leaf Picture Frames
This is a classic beginner project. Take a thrifted wooden frame, sand lightly, apply size, and cover the front or just the inner edge with gold leaf. Seal it, then pop in your favorite art or family photo. Instant upgrade.
2. Furniture Accents
Instead of gilding an entire dresser (unless you’re ready for full drama), try:
- Gold leafing just the drawer fronts.
- Adding gold to table legs or the apron of a console.
- Creating a subtle border along the edges of cabinet doors.
This technique works beautifully on painted furniture, especially deep blues, greens, and charcoal grays that make the gold pop.
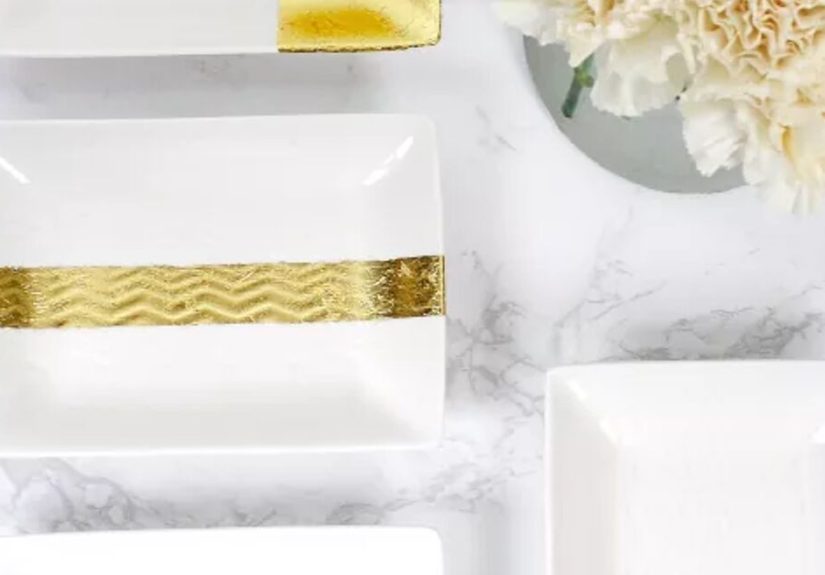
3. Vases, Planters, and Candleholders
Glass and ceramic pieces are perfect for experimental gold leaf:
- Apply gold leaf in organic patches at the bottom of a vase for a “dipped in gold” effect.
- Create a geometric band around the middle of a planter.
- Add tiny gold details to candleholders for a luxe tablescape.
Just be sure to keep gold leaf away from areas that come into direct contact with open flame or food unless products are labeled food-safe.
4. Gold Leaf on Walls and Ceilings
Ready for a statement? You can apply gold leaf to accent walls, ceiling medallions, or even small stenciled motifs.
- Use a laser level and painter’s tape to mark out stripes or geometric designs.
- Apply adhesive only in the design area, then lay down leaf and burnish once dry.
- Seal for durability, especially in high-humidity rooms.
Even a small gilded detaillike a thin gold stripe around a room or a halo of gold around a light fixturecan make the whole space feel custom and polished.
Common Gold Leaf Mistakes (and How to Avoid Them)
Gold leaf is forgiving, but a few classic mistakes show up over and over. Here’s how to dodge them:
1. Applying Leaf Too Soon
If the adhesive is still wet, the leaf can slither around and clump. Always wait for that “tacky but not wet” stage. When in doubt, give it a few more minutes and re-test.
2. Touching Leaf with Your Fingers
Gold leaf is so thin that body oils and pressure from your fingers can tear or wrinkle it. Use the backing paper, tissue, or a soft brush instead. If you must handle it directly, cotton gloves are your friend.
3. Skipping the Sealant on Imitation Gold Leaf
This is the big one. Imitation gold leaf will tarnish over time if you don’t seal it, especially in humid areas or near kitchens and bathrooms. A proper metal leaf varnish helps preserve the color and shine.
4. Rough or Dusty Surfaces
Dust, crumbs, and lint are the mortal enemies of smooth gold leaf. Take the extra couple of minutes to sand, wipe, and dry your surface before applying adhesive.
5. Using Random Glue Instead of Gilding Size
Regular craft glue often dries too fast, too rubbery, or not tacky enough for delicate leaf. Gilding size is formulated specifically to stay tacky long enough and bond well with metal leafuse the right product and your life gets a lot easier.
Care and Maintenance for Gold Leaf Surfaces
After all that effort, you’ll want your newly gilded treasures to stay gorgeous.
- Dust gently: Use a soft, dry cloth or feather duster. Avoid harsh scrubbing.
- Avoid harsh cleaners: No ammonia, bleach, or abrasive powders. A damp cloth is usually enough for sealed surfaces.
- Protect tabletops: Use coasters and placemats on gold-leafed surfaces so you’re not constantly battling scratches and water rings.
- Touch up as needed: If you notice tiny chips over time, a bit of adhesive and leftover gold leaf flakes can easily refresh the finish.
With basic care, your gold leaf decor will keep its sparkle for yearsand yes, you’ll absolutely end up bragging to guests that you did it yourself.
Real-Life Experiences: What I Learned from Gold Leafing “Everything”
Once you start playing with gold leaf, it’s a slippery slope. Many DIYers (myself included in spirit) go from “Let me just try this on one frame” to “Do you think the cat would hold still long enough to get a gilded collar?” Here are some hard-earned lessons and stories from the gold-leaf trenches to help you learn faster and laugh more.
Project 1: The Gold Leaf Picture Frame Glow-Up
The classic starter project is a beat-up frame from a thrift store. The first time you gold leaf a frame, you’ll probably have a mini panic moment during the “ugly middle”when the leaf is half-on, half-off, and there are bare spots everywhere. That’s normal. Once you go back in with a second round of adhesive and leftover flakes, suddenly the gaps disappear and the frame looks like something you’d see in a boutique shop.
The big aha moment on frames is realizing you don’t need perfection. Tiny imperfections actually make it look more like genuine, hand-applied gilding instead of mass-produced foil. If the corners aren’t 100% smooth, call it “vintage character” and move on.
Project 2: Gilded Furniture Edges (a Game-Changer)
Gold leafing the edges of furniture is a high-impact, low-effort trick. On a painted dresser, you can tape off just the front edges of the drawers and top, then gild those lines. The result? The piece suddenly looks custom and expensive.
Along the way, you learn a few things:
- Drawers that stick will scrape your new gold finish if you don’t sand and adjust them first.
- Sealing is non-negotiable on high-touch areas like drawer fronts and tabletops.
- Deep, moody paint colors (navy, black, emerald) plus gold leaf is a match made in design heaven.
If you’ve ever painted furniture and thought, “It still needs something,” gold leaf on the edges or hardware is often the missing piece.
Project 3: Gold Leaf Planters and Vases
Small decor pieces are where you can really play. For example, a plain white ceramic planter can go from “generic” to “Pinterest-worthy” with a band of gold leaf around the rim or a dip-dyed gold effect at the bottom.
Here’s what experience teaches you on these projects:
- Curved surfaces are trickier. Smaller pieces of leaf are easier to manage than trying to wrap a full sheet around a curve.
- Organic, imperfect edges look intentional. Don’t stress about perfectly straight lines on rounded vases.
- Gold leaf and natural textures (terracotta, stone, matte ceramics) are a beautiful contrastseal well, especially if the planter will be near water.
These “accessory” projects are also an excellent way to use leftover leaf and flakes from bigger projects. Keep a small jar of scraps and you’ll always have a quick detail ready to go.
Project 4: The Ambitious Gold Leaf Wall
At some point, you’ll be tempted by the idea of a statement gold accent wall or a stenciled pattern. This is where planning and patience really pay off.
DIYers who’ve done full or partial gold leaf walls usually share the same tips:
- Break the wall into manageable sections. Apply adhesive and leaf one area at a time so the size doesn’t dry out on you.
- Use a grid or lightly drawn pencil lines to keep your sheets straight and overlapping consistently.
- Expect more mess. Gold flakes will fall everywhere, so cover floors, vents, and nearby furniture.
The payoff is huge, though. Even a small gilded sectionlike the space behind a bar cart, around a fireplace, or on the ceiling inside a tray ceilingcan make the room feel like it belongs in a design magazine.
Common “Oh No” Moments (and Why They’re Not the End)
Every gold leaf enthusiast has a few disaster stories that turn into happy accidents:
- Wrinkled leaf: Sometimes it actually looks great, especially on vintage-style frames or decorative trims. Call it “antique texture.”
- Tiny bald spots: Fixable with a little extra adhesive and scrap flakes. No one will know once it’s sealed.
- A weird color shift: This usually pops up when the wrong sealer is used on imitation gold. It may darken or turn slightly orange. The lesson: test your sealer on a small sample before committing to a large, visible area.
Gold leaf is a skill that gets easier and more intuitive the more you do it. Your first project might feel fiddly, but by the third or fourth, you’ll know exactly how long your adhesive takes to get tacky, how gently to brush, and how much overlap you like for your style.
Why Gold Leaf Becomes Addicting
There’s something incredibly satisfying about transforming inexpensive, forgettable items into decor that looks custom and high-end. A plain wooden box turns into a jewelry box worthy of display. A $5 thrift-store mirror suddenly looks like an antique find. A basic planter now looks like it came from a fancy boutique.
Once you see how far a single booklet of gold leaf can stretchand how quickly a project goes from “meh” to “wow”you’ll understand why people joke about wanting to gold leaf everything in sight. And honestly? With the right prep, patience, and sealing, you pretty much can.
So grab your adhesive, pick a practice project, and start small. By the time you’re done, you’ll have the confidence (and the shiny proof) that yes, you can absolutely apply gold leaf to almost anything in your homeand make it look intentionally glamorous, not like a craft experiment gone rogue.