
Table of Contents >> Show >> Hide
- What a Shower Pan Actually Does (And Why Tile Doesn’t Count as Waterproofing)
- Pick Your Shower Pan System (Because “A Shower Pan” Isn’t One Thing)
- The Non-Negotiables: Five Rules That Prevent 90% of Shower Pan Failures
- Rule #1: Everything slopes to the drainconsistently
- Rule #2: The waterproof layer must be continuous (no “almost sealed” areas)
- Rule #3: The drain must match the system
- Rule #4: Curbs and walls must be protectedwithout puncturing critical zones
- Rule #5: Flood testing isn’t optional if you care about your ceiling
- Materials and Components (What You’ll Actually Be Dealing With)
- Build Overview: Traditional Liner + Mortar Bed (What Must Happen, In Order)
- Build Overview: Bonded Surface Waterproofing (Sheet or Liquid)
- Common Shower Pan Mistakes (And How to Spot Them Before They Wreck Anything)
- Practical Examples That Make the Math Less Annoying
- FAQ: Quick Answers to the Questions People Ask Mid-Remodel
- Real-World Experiences (The “What People Wish They Knew” Section) 500+ Words
- Conclusion
- SEO Tags
A shower pan is one of those home-improvement things that looks simpleuntil you realize it has exactly one job:
never leak. Not “mostly never.” Not “only when nobody’s using it.” Never. Because when a shower pan fails,
it doesn’t just ruin your Saturday. It can quietly marinate your framing, subfloor, and patience for months before
anyone notices. Fun!
This guide explains how shower pans are built, the major systems used in the U.S., and the quality checks that matter
most (slope, waterproof continuity, drain compatibility, and flood testing). If you’re newer to construction or
you’re under 18, treat this as a “how it works + what to verify” roadmap and bring in a qualified adult or a licensed
tile/plumbing pro for the hands-on parts. Shower pans are not a great place to learn by “creative guessing.”
What a Shower Pan Actually Does (And Why Tile Doesn’t Count as Waterproofing)
A shower pan is the waterproof “bowl” under your shower floor that funnels water into the drain and keeps moisture
from reaching the structure. Tile and grout are the pretty surface, but water can move through grout lines and
into the layers below. A correctly built pan assumes water will get past the tile and still manages it safely by
directing it to the drain.
Depending on the system, that water either:
- Travels through the mortar bed to weep holes at a clamping drain (traditional liner method), or
- Stops at a surface waterproofing layer (bonded sheet/liquid membrane method), then heads straight to the drain.
Either way, the pan works only if it has consistent slope, intact waterproofing, and the correct drain assembly for
the method you choose.
Pick Your Shower Pan System (Because “A Shower Pan” Isn’t One Thing)
In the U.S., shower pans generally fall into four categories. The “best” one is the one that matches your drain,
your shower footprint, your skill level, and your appetite for precise work.
1) Traditional liner + mortar bed (the classic “two-stage drain” setup)
This method uses a PVC/CPE liner clamped into a three-piece (clamping ring) drain. It typically includes:
- A pre-slope under the liner (so water on the liner moves to the drain)
- The liner folded up the walls and over the curb (without punctures in the wrong places)
- A top mortar bed above the liner (the tile-setting surface)
- Weep-hole protection so the drain’s tiny escape routes don’t clog
Pros love it because it’s time-tested. The downside: there are multiple layers and multiple ways to mess it up
(especially skipping the pre-slope or blocking the weep holes).
2) Surface waterproofing membrane (bonded sheet or liquid)
Instead of putting waterproofing under the mortar, this approach puts waterproofing on top of the sloped base.
Water hits the membrane and goes directly to the drainso the mortar bed doesn’t stay damp like it can in traditional
builds.
This can be done with:
- Sheet membranes (common in “system” kits), or
- Liquid-applied membranes (rolled/painted on in specified coats and thickness).
The catch: you must use the correct drain connection method (often a bonding-flange drain or a manufacturer-approved
adapter approach). Compatibility matters here more than optimism.
3) Prefabricated foam shower trays (still tiled, just less mud)
Foam trays are pre-sloped and fast. They can be great for standard sizes where the subfloor is flat, stiff, and true.
If your floor is uneven, the tray may telegraph that problembecause foam does not magically ignore physics.
4) One-piece acrylic/fiberglass shower bases (not a tiled pan)
If you want the simplest “pan” with the fewest waterproofing variables, a factory-made base is hard to beat.
It’s not the look everyone wants, but it’s a real-world optionespecially in rentals or fast remodels.
The Non-Negotiables: Five Rules That Prevent 90% of Shower Pan Failures
Rule #1: Everything slopes to the drainconsistently
The widely recognized minimum is 1/4 inch per foot of run. Translation: if the farthest wall is 3 feet from
the drain, you need about 3/4 inch of drop from perimeter to drain. This slope applies to the tiled surface,
and in traditional liner pans it also applies to the layer beneath the liner (the pre-slope).
Rule #2: The waterproof layer must be continuous (no “almost sealed” areas)
Liners and membranes fail most often at transitions: corners, curbs, benches, niches, and the drain connection.
The waterproofing layer must remain unbroken and properly connected at seams, corners, and penetrations.
Rule #3: The drain must match the system
A traditional liner pan expects a clamping ring drain with weep holes. Many bonded membrane systems expect a
bonding-flange drain (or a manufacturer-approved method that creates an equivalent bonded connection).
Mismatching drains is like putting bicycle tires on a boat: impressive creativity, poor flotation.
Rule #4: Curbs and walls must be protectedwithout puncturing critical zones
For liner systems, fasteners should not go through the liner at low points where water collects. Corners must be
folded correctly, and outside curb corners typically need pre-formed “dam corners” to stay watertight.
Rule #5: Flood testing isn’t optional if you care about your ceiling
A flood test verifies the pan holds water before tile hides everything. Many pros and manufacturers call for a longer
test window (often around a day), while some codes specify shorter minimums. Either way, testing before tile is how you
avoid learning about leaks via stains.
Materials and Components (What You’ll Actually Be Dealing With)
The exact list depends on your system, but most shower pans involve variations of:
- Subfloor preparation: plywood or slab readiness, blocking/support at walls and curb
- Drain assembly: clamping ring or bonding flange style
- Slope-forming base: mortar bed or prefabricated tray
- Waterproofing: PVC/CPE liner, sheet membrane, and/or liquid membrane
- Reinforcement & accessories: corner pieces, seam tape/band, weep protection
- Tile-setting layer: thin-set mortar compatible with your membrane and tile
The most important “material” is actually system instructions: each manufacturer specifies compatible mortars,
overlaps, cure times, and testing requirements. Mixing brands can work, but only if the components are explicitly
compatible and installed to standards.
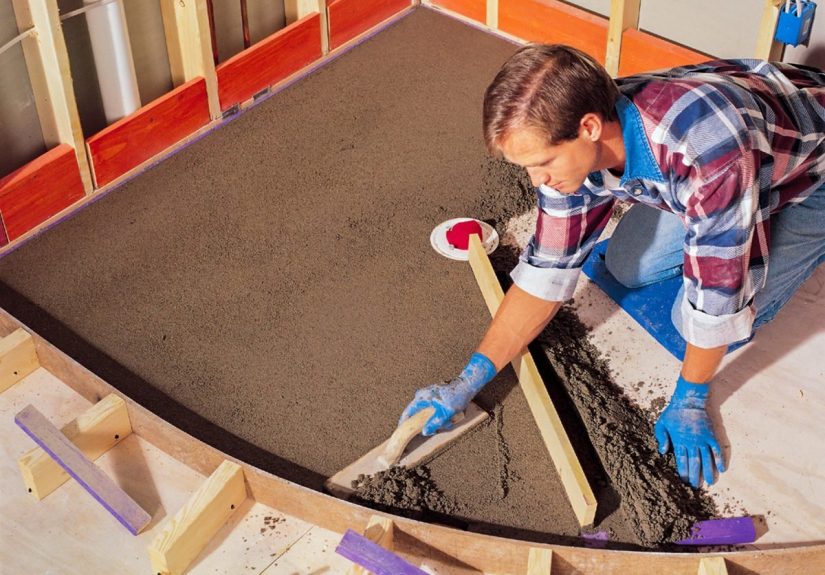
Build Overview: Traditional Liner + Mortar Bed (What Must Happen, In Order)
This is the classic method many tile setters still use. Here’s the build logicfocus on the “why” behind each layer.
1) Prepare the framing and subfloor
-
Ensure the floor structure is stiff enough for tile and the subfloor is sound. A bouncy floor can crack tile/grout
and stress waterproofing transitions. - Add solid backing (“blocking”) between studs around the perimeter so the liner has continuous support up the walls.
- Plan the curb and confirm the drain location and height are feasible for the slope you need.
2) Form the pre-slope (under the liner)
The pre-slope is the “invisible hero” that keeps water from stagnating on top of the liner. Without it, water that
migrates through the mortar bed can sit on a flat linerleading to odors, discoloration, and slow dryingchus the Mold
That Would Not Leave.
Quality check: the pre-slope should pitch evenly to the drain at roughly 1/4 inch per foot, with no birdbaths
(low pockets).
3) Install the liner and connect it to the clamping drain
-
The liner must be laid over the pre-slope and clamped properly at the drain so water on the liner can reach the
weep holes. -
At corners, the liner is foldednot cutwhere possible. Outside corners at the curb typically require pre-formed
dam corners. - The liner runs up the walls and over the curb to a code- and best-practice-compliant height (and must stay intact).
4) Protect the weep holes
Those tiny weep channels are your “escape hatch” for moisture. If they get blocked by mortar, sealant, or debris,
water can become trapped in the base. Many installers use a weep protector or a small ring of clean aggregate around
the drain area so mortar can’t smother the weep paths.
5) Install the top mortar bed (the tile-setting surface)
The top mortar bed recreates the slope on the finished surface and provides a stable setting plane for tile.
Quality checks here matter: consistent pitch, solid perimeter height, and a drain height that works with your chosen
tile thickness.
6) Flood test before tile
Plug the drain appropriately and verify the pan holds water with no drop in level and no leakage signs below.
If a problem appears now, you fix it nowbefore tile turns your shower into a beautifully decorated mystery.
Build Overview: Bonded Surface Waterproofing (Sheet or Liquid)
Surface waterproofing systems aim to keep the setting bed drier by putting waterproofing directly beneath the tile.
The workflow differs by manufacturer, but the principles are consistent.
1) Create a sloped base (mortar bed or tray)
You still need slope. Whether you form it with mortar or use a prefabricated tray, the surface needs a true, even
plane to the drain.
2) Waterproof the surface and transitions
- Sheet membrane: seams and corners are overlapped or banded per system requirements.
- Liquid membrane: applied in required coats and thickness, with full cure before testing (per product data).
- Critical areas: drain flange connection, corners, curb, wall-to-floor junctions, penetrations.
3) Confirm drain compatibility
Many surface systems are designed around a specific drain style that allows a bonded waterproof connection. Don’t
improvise this part. If the drain connection is wrong, the fanciest membrane in the world becomes a very expensive
suggestion.
4) Flood test per system and local requirements
Different membranes have different cure windows before testing. Follow the product data sheet and local inspection
rules. The goal is the same: prove watertightness before tile.
Common Shower Pan Mistakes (And How to Spot Them Before They Wreck Anything)
Mistake: Skipping the pre-slope in a liner pan
Symptom: musty smell, persistent dark grout, or water that seems to “never fully dry” even with ventilation.
Prevention: ensure the liner sits on a sloped basenot flat subfloor.
Mistake: Blocking weep holes
Symptom: slow drain behavior despite a clear pipe, or dampness that lingers around the drain area.
Prevention: use weep protection and avoid clogging the weep paths.
Mistake: Puncturing waterproofing in the wrong places
Symptom: leaks that show up at curb ends, wall bases, or corners.
Prevention: keep fasteners out of critical wet zones and use proper corner treatment pieces.
Mistake: Inconsistent slope (aka “puddle art”)
Symptom: standing water, slippery biofilm zones, or mineral rings that form in low spots.
Prevention: verify slope with a straightedge/level during shapingbefore tile locks it in.
Mistake: Mixing systems without a compatibility plan
Symptom: bond failures, seam issues, or warranty voids.
Prevention: follow a single manufacturer “system” when possible, or confirm each component is approved to work
together.
Practical Examples That Make the Math Less Annoying
Example 1: Checking required slope
If the farthest point from the drain is 4 feet away, a minimum slope of 1/4 inch per foot means:
4 × 1/4 inch = 1 inch of height difference from perimeter to drain. That’s the drop you need to plan for in
drain height and perimeter screed height.
Example 2: Why curb pitch matters
A curb that’s perfectly level (or pitched outward) can let water linger or escape the shower area. A slight inward
pitch sends water back where it belongs: toward the drain, not your bathroom floor.
FAQ: Quick Answers to the Questions People Ask Mid-Remodel
Do I need a shower pan liner if I’m using a surface membrane?
Usually, nosurface membrane systems are designed as the waterproof layer. But you must build the pan exactly as the
system specifies (including drain connection and seam treatment). Doubling up layers without a plan can create trapped
moisture or compatibility issues.
Can I just “paint on waterproofing” and call it a day?
Liquid waterproofing can work when it’s applied to the specified thickness, in the specified coats, over the right
substrate, and allowed to cure before testing. The failure mode is almost always “too thin” or “not cured,” not
“the product is cursed.”
What’s the single best way to avoid a leak?
Pick one complete system, follow the instructions, and flood test before tile. Most shower pan disasters are not
caused by complicated physicsthey’re caused by skipping steps because “it’ll probably be fine.”
Real-World Experiences (The “What People Wish They Knew” Section) 500+ Words
In real remodels, the shower pan rarely fails in a dramatic, movie-worthy way. It fails like a slow rumor: quietly,
persistently, and just out of sight. Homeowners often describe the early signs as “a little smell,” “a grout line that
never looks clean,” or “a tile that always feels damp.” By the time it graduates to “my baseboard is swelling,” the pan
has usually been filing complaints for a while.
One common experience people report is the shock of learning that tile and grout aren’t waterproof. They assumed
the glossy tile surface was the barrier. Then they watch an experienced installer talk about weep holes, liners,
and flood testsand suddenly the shower feels less like a spa feature and more like a miniature roof that you stand on.
(Which, honestly, is a good way to think about it: a shower pan is roofing, but indoors, and with far less forgiveness.)
Another recurring story: someone tears out an old shower and finds a flat liner sitting directly on plywoodno pre-slope.
The tile looked “fine” from above, but the mortar bed underneath stayed wet, and the smell was the giveaway. When people
rebuild, they’re often amazed how much better the shower feels when the pan is properly sloped and drainedless lingering
dampness, fewer mildew flare-ups, and a base that dries out the way it’s supposed to. It’s not magic; it’s just water
being allowed to leave instead of renting a studio apartment under your tile.
Flood testing is another “experience gap” moment. People who skip it often do so for the most human reason imaginable:
they’re excited to tile. The shower is finally taking shape, and waiting feels like punishment. But homeowners who have
lived through a leak will tell you the opposite: the flood test is the best 24-ish hours you can spend, because it buys
peace of mind that lasts for years. And if it fails, it fails at the only acceptable timebefore tile makes repairs
expensive and emotionally personal.
People also learn (sometimes the hard way) that shower pans are not “mix-and-match friendly.” A membrane from one brand,
a drain from another, a random adhesive someone swore by on a forum… it can work, but only when the pieces are designed
to cooperate. Many homeowners who switched to a single, integrated system describe the experience as less stressful:
fewer unknowns, clearer instructions, and fewer “Wait, does this bond to that?” moments at 10 p.m. The goal in a shower
is boring reliability. If you want to be creative, paint the vanity. Let the pan be the most predictable thing in your
house.
Finally, there’s the “small details matter” lessoncurb pitch, corner treatment, weep protection, and careful handling of
penetrations. People who have watched a shower get rebuilt often say the pros look almost annoyingly fussy: measuring,
checking, smoothing, re-checking. Then they realize why. Water is patient. It doesn’t need a big openingjust a pathway.
Building a shower pan is essentially designing a world where water has only one legal move: toward the drain.
When that happens, the shower stays clean, dry, and drama-free… which is exactly the kind of boring you want from
plumbing.
Conclusion
Building a shower pan is less about brute force and more about disciplined details: consistent slope, continuous
waterproofing, the right drain for the method, protected transitions, and a real flood test before tile.
Pick a system that matches your shower design and stick to it like your future self’s sanity depends on itbecause it
does. Do it right once, and your shower will quietly work for years (which is the highest compliment plumbing can
receive).


