
Table of Contents >> Show >> Hide
- Why Raised Garden Beds Are Worth the Effort
- Step 1: Plan Your Raised Garden Beds
- Step 2: Choose Materials for Your Raised Beds
- Step 3: Gather Tools and Materials
- Step 4: Build the Raised Garden Bed Frame
- Step 5: Protect the Base and Fill the Bed
- Step 6: Plant, Mulch, and Maintain
- Common Mistakes to Avoid with DIY Raised Beds
- Real-Life Lessons from Building DIY Raised Garden Beds
- Wrapping It Up
If you’ve ever dreamed of harvesting tomatoes without also harvesting a sore back and a wheelbarrow full of weeds, raised garden beds are your new best friend. A well-built raised bed gives you better soil, better drainage, fewer weeds, and a garden that looks like you actually know what you’re doingeven if this is your first time holding a drill.
This guide walks you through planning, building, and filling DIY raised garden beds step by step, with tips inspired by pro builders, home improvement stores, and university extension services across the U.S.
Why Raised Garden Beds Are Worth the Effort
Better Soil, Better Harvests
In traditional in-ground gardens, you’re stuck with whatever soil your yard came with: clay bricks, beach sand, or something suspiciously gravel-like. A raised garden bed lets you bring in a customized mix of topsoil and compost so plants get exactly what they need. Many U.S. extension services suggest a blend of about half to two-thirds topsoil and one-third to half compost for a rich, well-drained growing medium.
Improved Drainage and Fewer Mud Puddles
Because the soil sits above ground level, excess water drains away instead of turning your garden into a swamp. That’s especially helpful in areas with heavy clay or poor drainage, and it helps prevent root rot and other water-related plant problems.
Less Bending, Easier Access
Raise the soil and you raise your comfort level. Beds that are 10–24 inches high make it easier to reach the plants, and taller beds (up to 24–36 inches) are helpful for gardeners with mobility issues or those who just don’t enjoy gardening as an extreme sport.
Weed and Pest Control
A raised bed creates a clear boundary between “garden” and “lawn.” Line the bottom with cardboard or newspaper to smother existing grass, and you’ll greatly reduce the number of weeds that sneak into your new garden. Hardware cloth at the base can also keep out tunneling pests like gophers and voles.
Step 1: Plan Your Raised Garden Beds
Pick the Perfect Spot
Most vegetables and herbs love full sunaim for at least 6–8 hours of direct light per day. Choose a relatively level area or be prepared to do some digging and leveling. Avoid spots that stay soggy after rain or sit under shallow-rooted trees that will compete with your plants.
Choose the Right Size
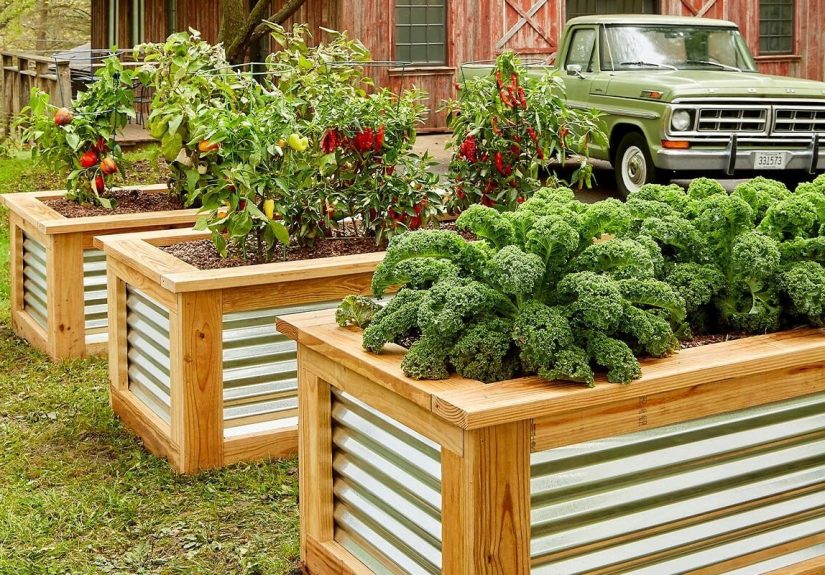
A classic raised bed size is 4 feet wide by 8 feet long. The magic here is the width: at 3–4 feet wide, you can reach the center from either side without stepping into the bed and compacting the soil. Longer beds are fine, but smaller multiple beds are usually easier to manage and access than one giant box.
Decide on the Depth
Soil depth is all about root space:
- 6–8 inches: OK for shallow-rooted crops (lettuce, radishes, spinach) if underlying soil is decent.
- 10–12 inches: Good general depth for most vegetables.
- 18–24 inches: Ideal for root crops (carrots, potatoes) and for comfortable, bend-free gardening.
If your bed is on top of concrete or rock, err on the deeper side so plant roots have room to stretch.
Step 2: Choose Materials for Your Raised Beds
Best Woods for Raised Beds
For classic wooden beds, look for rot-resistant lumber. Popular options include:
- Cedar: Naturally rot-resistant and widely recommended for raised beds. It weathers beautifully and can last many years.
- Redwood: Also rot-resistant and durable, though often more expensive and not available everywhere.
- Pressure-treated lumber: Modern pressure-treated wood in the U.S. no longer uses arsenic-based preservatives and is generally considered safe for raised beds when used correctly, especially with a barrier between soil and boards if you’re cautious.
Avoid old railroad ties or any wood treated with creosote or unknown chemicalsthose can leach into the soil over time.
Alternative Materials
If wood isn’t your thing, you can also build raised beds from stone, concrete blocks, or metal stock tanks. Stone beds blend into the landscape and last nearly forever, while galvanized metal beds are quick to install and great for deep-root crops once you add drainage holes.
Step 3: Gather Tools and Materials
For a simple 4×8-foot wooden raised bed about 11–12 inches tall, you’ll typically need:
- Four 2×6 or 2×8 boards (two cut to 8 feet, two to 4 feet)
- Four 2×4 or 4×4 corner posts cut to bed height
- Exterior-grade deck screws (2½–3 inches)
- Drill/driver and bits
- Measuring tape and pencil
- Circular or miter saw
- Level and shovel
- Cardboard or newspaper for weed suppression
- Hardware cloth if you have burrowing pests
The same basic tool set appears again and again in DIY raised bed tutorials from home centers, gardeners, and DIY bloggersit’s truly a beginner-friendly project.
Step 4: Build the Raised Garden Bed Frame
1. Prepare and Mark the Site
- Set your boards on the ground where you want the bed to visualize the footprint.
- Use a shovel or spade to strip away thick turf, or simply mow grass very low.
- Lay overlapping cardboard or several layers of newspaper across the entire base to block weeds.
2. Cut and Pre-Drill the Boards
Cut your lumber to length. For a standard 4×8 bed, cut two 8-foot boards and two 4-foot boards. Pre-drill screw holes near the ends to prevent splitting, especially in cedar and other softwoods.
3. Attach the Corner Posts
Clamp or hold each corner post flush with the inside of a long board. Drive screws through the board into the post. Repeat on the other end, then attach the short side boards to form a rectangle. Corner posts help keep the bed square, sturdy, and less likely to bow out when filled with soil.
4. Square and Level the Frame
Set the assembled frame in place on top of the cardboard. Use a level across the top edges and adjust by shaving off high spots or adding soil under low spots. A mostly level bed ensures even watering and better-looking plants.
5. Anchor the Bed (Especially on Slopes)
If your yard slopes, you may need longer corner posts set into shallow holes to hold the frame in place and keep it from creeping downhill over time. Some builders add extra stakes along long sides for extra strength.
Step 5: Protect the Base and Fill the Bed
Add Pest Protection (Optional but Smart)
If gophers, moles, or voles are a problem in your area, staple hardware cloth tightly across the bottom of the frame before filling. Overlap seams and bend the edges up the inside of the frame by a few inches to prevent gaps where critters can sneak in.
Create a Budget-Friendly Filler Layer
Filling a deep bed entirely with high-quality soil can get pricey. To reduce costs without sacrificing plant health, you can layer organic materials at the bottom:
- Logs and branches (from non-toxic trees)
- Sticks and coarse wood chips
- Straw or dry leaves
- Partially decomposed compost
These materials slowly break down, improving soil structure and feeding soil life over timea technique similar to hugelkultur.
Top It Off with Quality Soil Mix
On top of the filler layer, add your main soil blend. A commonly recommended mix uses about 50–70% topsoil and 30–50% compost. If your topsoil is heavy clay, incorporate some sand or lighter material for better drainage and texture.
Fill the bed until the soil is 1–2 inches below the top edge. As it settles over time, you can top up with additional compost each season.
Step 6: Plant, Mulch, and Maintain
Plant with Tighter Spacing
Because raised beds have rich soil and good drainage, you can usually plant a little more densely than in traditional rows. Just don’t overdo itplants still need airflow and room to grow. Plant in blocks or staggered patterns rather than single long rows to maximize space.
Mulch to Save Time and Water
Add a 1–2 inch layer of mulch (straw, shredded leaves, or fine bark) on top of the soil after planting. Mulch helps conserve moisture, reduce weeds, and keep soil temperatures more stable.
Water Smart
Raised beds drain faster than in-ground beds, so consistent watering is key. Many gardeners use drip irrigation or soaker hoses to deliver water directly to plant roots while keeping foliage dry. This lowers disease risk and saves water in the long run.
Feed the Soil, Not Just the Plants
Each year, top-dress your raised bed with an inch or two of compost. Over time, this maintains fertility and structure, so your bed stays productive instead of slowly “wearing out.”
Common Mistakes to Avoid with DIY Raised Beds
Making the Beds Too Wide
It’s tempting to go big, but a 6-foot-wide bed quickly becomes a “why did I do this” bed. If you can’t reach the center without stepping inside, the soil will get compacted and harder to work. Stick to 3–4 feet wide for beds accessible from both sides.
Skimping on Soil Quality
Soil is where the magic happens. Filling a beautiful cedar bed with cheap, low-quality fill dirt is like buying a sports car and putting lawnmower gas in it. Invest in good topsoil and compostyour plants will show you the difference in growth and yield.
Forgetting About Drainage
Raised beds almost always drain better than native soil, but if you build on top of compacted clay or a hard surface and then line the bottom with plastic, water may have nowhere to go. Use breathable materials like cardboard, avoid solid plastic liners, and make sure excess water can escape.
Ignoring Long-Term Durability
If you live in a wet climate or plan to keep your beds for many years, choose durable materials and construction methods. Rot-resistant wood, exterior screws, and sturdy corner posts will keep the bed from bowing out or collapsing once it’s full of heavy, wet soil.
Real-Life Lessons from Building DIY Raised Garden Beds
Reading instructions is great. Learning from people’s mistakes is even better. Here are some real-world experiences and takeaways you can borrow before you pick up your first board.
Lesson 1: Start with One or Two Beds, Not an Entire Farm
It’s easy to get inspired and sketch out a whole grid of raised beds, complete with gravel paths and a cute potting bench. Then reality shows up in the form of lumber receipts, soil deliveries, and all the planting and watering to keep up with. Many experienced gardeners recommend starting with just one or two beds the first season to learn your climate, your schedule, and your favorite crops. Once you know how much time and water you can realistically give, you can add more beds later without feeling overwhelmed.
Lesson 2: Don’t Underestimate the Weight of Soil
A single 4×8 bed that is 12 inches deep can easily hold close to a cubic yard of material, which can weigh well over a thousand pounds when wet. That’s why strong corners, good screws, and solid posts matter. Gardeners who rushed their first build with flimsy boards or too few fasteners often end up with sides that bow out or seams that split after a season or two. Building just a bit sturdier than you think you “need” usually pays off in fewer repairs later.
Lesson 3: Hardware Cloth is Cheaper Than Losing Your Crop
Plenty of raised-bed gardeners have a heartbreaking story of waking up to find their beets and carrots have mysteriously vanished, only to discover tunnels from burrowing animals. Lining the bottom of the bed with hardware cloth feels like an extra step when you’re eager to start planting, but it’s much easier than rebuilding a bed or replanting a season’s worth of crops. If you’ve ever dealt with gophers, moles, or voles, consider hardware cloth your underground insurance policy.
Lesson 4: Plan for How You’ll Reach Everything
Experienced gardeners quickly learn that paths are as important as beds. Tight pathways might look charming on paper, but if you can’t comfortably walk between beds with a watering can or wheelbarrow, you’ll dread maintenance. Many garden layout guides suggest leaving at least 18–24 inches between beds for foot traffic, and wider aisles if you’ll be using carts or have accessibility needs. A raised-bed garden that’s easy to navigate is one you’ll actually enjoy using.
Lesson 5: Expect to Tinker and Improve Over Time
A lot of gardeners will admit that their second or third raised bed is much better than their first. You might start with simple wooden boxes and later add trellises at the north side for beans and cucumbers. You may swap from hand watering to drip irrigation. You might even change bed depths when you learn which crops you love to grow most. That evolution is normal. Think of your first DIY raised bed as a solid, functional beginning, not a once-in-a-lifetime masterpiece.
And here’s the best part: once the frames are in, you get to focus on the fun stuffseedlings, harvest baskets, and that smug feeling when you tell friends, “Oh, these tomatoes? They’re from my raised beds.”
Wrapping It Up
Building a raised garden bed is one of those DIY projects that looks impressive but is totally doable with basic tools and a weekend of effort. Plan a good location, choose durable materials, build a strong frame, and invest in high-quality soil. Then let your raised beds do what they do best: make gardening easier, more productive, and a lot more enjoyable.


