Table of Contents >> Show >> Hide
- Step 1: Identify what you’re actually seeing (color, shadow, swellingor all three)
- Step 2: Prep like a pro (because concealer is not a personality trait)
- Step 3: Choose the right products (you need fewer than you think)
- Step 4: The step-by-step routine for crease-proof under-eye concealer
- How to conceal under-eye bags (the shadow problem, not the color problem)
- How to conceal dark circles (the color problem)
- Common mistakes that make under-eye makeup look worse (and quick fixes)
- Fast “I need help in 5 minutes” options
- Longer-term options (still optional, but good to know)
- When to check in with a healthcare professional
- Extra add-on (about ): Real-world experiences and what tends to work
- Scenario 1: “I slept fine… so why do I look puffy?”
- Scenario 2: “My concealer creases the moment I smile.”
- Scenario 3: “My dark circles are blue, but concealer turns gray.”
- Scenario 4: “I have darker skin and my circles look more brown/ashy.”
- Scenario 5: “I want a natural lookno makeup-makeup, but rested.”
- Conclusion: A simple plan that works on most days
Under-eye bags and dark circles are one of those weird human features that can show up after a late night, allergy season,
a long cry, a long Zoom, orrudeabsolutely nothing at all. If you’ve ever looked in the mirror and thought,
“Why do I look like I auditioned for the role of Exhausted Victorian Ghost #3?” you’re not alone.
Here’s the good news: you don’t need to “fix” your face (your face is fine). You just need a strategy. Concealing under-eye
bags and dark circles is mostly about optical illusions: controlling hydration, controlling texture, and controlling
where light hits. This guide walks you through exactly how to do thatwithout the cakey crease situation that makes you look older
than your Wi-Fi router.
Step 1: Identify what you’re actually seeing (color, shadow, swellingor all three)
“Under-eye issues” get lumped together, but the fix changes depending on the cause. Ask yourself: is it mostly color,
mostly puffiness, or mostly shadow?
Dark circles (a color problem)
- Blue/purple tone: often thin skin + visible blood vessels.
- Brown/gray tone: often pigmentation (especially if you tan easily or have post-inflammatory discoloration).
- Mixed tone: super commonyour under-eyes can be both vascular and pigmented.
Under-eye bags (a structure/fluid problem)
- Morning puffiness: fluid retention, sleep position, salt, allergies.
- Persistent “bag”: often genetics or age-related changes in the lower eyelid area.
Hollows/tear troughs (a shadow problem)
Sometimes the “dark circle” is literally a shadow from a hollow under the eye. That’s why piling on lighter concealer can backfire:
it highlights the wrong spot and makes the shadow look sharper.
Step 2: Prep like a pro (because concealer is not a personality trait)
The under-eye area has thin skin and moves constantly. If you skip prep, concealer will settle, crack, and crease like it’s auditioning for
a desert-dry clay mask. The goal is a smooth, lightly hydrated basenever greasy.
2-minute quick prep (works even on busy mornings)
- Cool it down: Use a cool compress for 30–60 seconds to reduce the look of puffiness.
- Hydrate lightly: Tap on a small amount of moisturizer or eye cream. Let it absorb.
- Optional: caffeine (topical): If puffiness is your main issue, caffeine-based eye products can help temporarily “de-puff” the look.
De-puffing tricks that aren’t nonsense
- Cold spoon, chilled cloth, or chilled eye patches: Cold can temporarily reduce swelling by constricting blood vessels.
- Chilled tea bags: Tea contains caffeine; applied topically, it may temporarily reduce the look of darkness/puffiness.
- Allergy control: If rubbing and watery eyes are part of the story, treating allergies helps more than any concealer ever will.
Don’t skip sunscreen (yes, even around the eyes)
Pigment can look darker over time if sun exposure keeps “re-inking” the area. Daily broad-spectrum sunscreen and sunglasses help prevent
discoloration from getting more noticeable. If you’re sensitive near the eyes, choose a formula designed for face/eye-area comfort and apply gently.
Step 3: Choose the right products (you need fewer than you think)
Great concealing is usually a two-product situation:
a color corrector (to neutralize discoloration) plus a skin-tone concealer (to match and finish).
If your circles are mild, you can sometimes skip corrector and go straight to concealerjust use less.
Color corrector: pick the “opposite” shade
Color correction works because complementary colors cancel each other out. Think of it like visual math: blue + orange = neutral.
- Peach/pink: best for light skin with blue/purple circles.
- Peach/orange: best for medium skin with blue/gray circles.
- Orange/red-orange: best for deeper skin tones or very strong blue/gray discoloration.
- Yellow: can help brighten purplish tones on light-to-medium complexions.
Concealer: formula matters more than “full coverage”
- Hydrating, flexible concealers tend to look better under eyes (especially if you crease).
- Matte, thick concealers can look heavy under eyesgreat for blemishes, risky for eye lines.
- Shade rule: match your skin for “invisible.” Go only slightly lighter for “brightened,” and avoid going too light (it can turn gray).
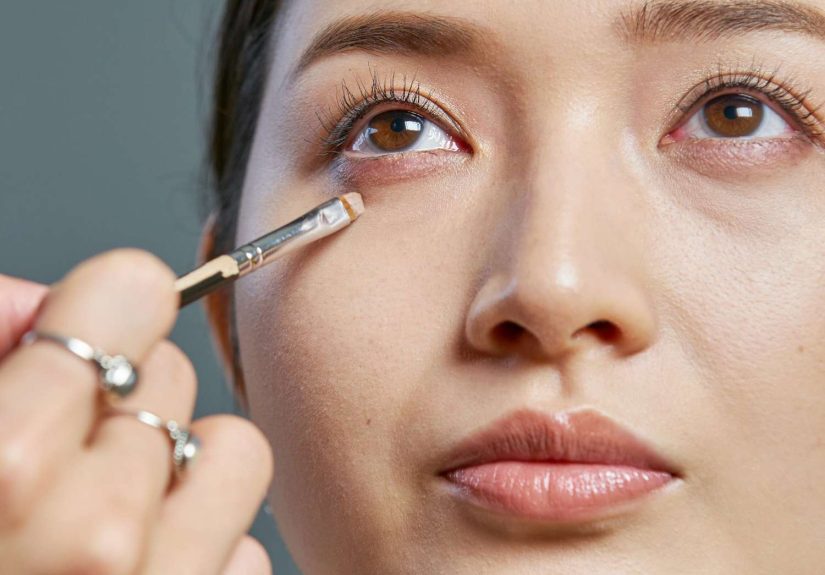
Tools: fingers vs brush vs sponge
- Ring finger: warms product and presses it in (great for minimal makeup).
- Small concealer brush: precise placement (great for tear trough shadow).
- Damp sponge: softens edges (great for natural finish).
Step 4: The step-by-step routine for crease-proof under-eye concealer
This is the routine that works for most faces because it respects three laws of under-eye makeup:
(1) place product only where needed, (2) build thin layers, (3) set strategically.
Step 4.1: Start with skincare, then base
If you wear foundation or tinted moisturizer, apply it first. Foundation can reduce the amount of concealer you’ll needespecially around the edges.
Less product under the eyes = fewer creases later.
Step 4.2: Apply corrector only on the discolored zones
- Use a tiny amount (seriously: pea-sized is too much for both eyes).
- Tap it on where the darkness is strongest (often inner corner and along the trough).
- Blend the edgedon’t spread it all over your entire under-eye.
Step 4.3: Concealer placement (the “not a triangle” method)
The classic giant triangle can look great on camera with studio lights… and look heavy in real life. Try this instead:
- Dot 1: inner corner (where darkness often concentrates).
- Dot 2: along the deepest shadow of the tear trough (not on the puffy part).
- Dot 3: outer corner only if you have darkness there.
Then press (don’t rub) the product into the skin. If you still see darkness, add a second thin layerdon’t try to win in one coat.
Step 4.4: Let it settle, then “micro-set”
Give concealer 15–30 seconds to settle, then look up and gently tap away any creasing with a clean finger.
Now set only where you crease.
- Use a tiny amount of finely-milled powder.
- Press it in with a small brush or spongeavoid sweeping (sweeping moves product).
- If you’re dry, set just the inner corner and the crease-prone line, not the whole under-eye.
How to conceal under-eye bags (the shadow problem, not the color problem)
Bags are tricky because the “bag” itself often catches light, while the area beneath it looks darker. If you brighten the puffy part,
you can accidentally make the bag look bigger. The move is to brighten the shadow, not the bump.
The bag-friendly technique
- Hydrate first so product doesn’t cling to texture.
- Use a shade that matches your skin (not a bright highlight shade).
- Place concealer in the trough/shadow just under the bag.
- Feather the edge upward slightly, but keep most product in the shadow zone.
- Optional: use a tiny touch of a light-reflecting product only at the inner corner (not across the whole bag).
If your bag is mainly morning puffiness, a 60-second cold compress before makeup can make this step dramatically easier.
How to conceal dark circles (the color problem)
Dark circles behave like a stain: if you cover them with skin-tone concealer alone, you may still see a “ghost” of blue/purple/gray underneath.
That’s what corrector is for. Neutralize first, then match.
Match your corrector to the undertone of your circles
- Blue/purple circles: peach/orange correctors tend to neutralize best.
- Brown/gray circles: you may need less “warmth” and more careful shade matching; focus on thin layers and sunscreen habits long-term.
- Mixed circles: correct the bluest area first (often inner corner), then blend out.
If your under-eye turns gray after concealer
This is usually one of three things: (1) the concealer is too light, (2) the undertone is too cool, or (3) you skipped correction and the blue is shining through.
Fix it by using a closer skin match and adding a thin warm corrector underneath.
Common mistakes that make under-eye makeup look worse (and quick fixes)
Mistake: Too much product
Under-eyes don’t need a blanket; they need a targeted patch. Start with less. You can always add.
Mistake: Setting powder everywhere
Powder is helpful, but only where you crease. If you set a dry under-eye wall-to-wall, it can emphasize fine lines.
Try “micro-setting” only the crease line.
Mistake: Using “strong” creams too close to the lash line
If you use active skincare (like retinoids), keep it conservative near the eye area unless a clinician has guided you.
Irritation can worsen the look of darkness and puffiness (and feels awful).
Mistake: Rubbing your eyes
Rubbing can irritate delicate skin and may make discoloration and swelling look more noticeable. If itching is frequent, addressing allergies helps
more than reapplying concealer all day.
Fast “I need help in 5 minutes” options
- Cold compress: quick de-puff before makeup.
- Chilled spoon: press gently for a minute (don’t use freezing objects directly on skin).
- Tea bags: chill, squeeze out excess liquid, rest on closed eyes for 10–15 minutes.
- Emergency makeup plan: corrector (thin) → concealer (thin) → press powder only where you crease.
What to skip: hacks that involve strong steroids or random creams not meant for the eye area. The skin here is sensitive, and “viral tricks”
can cause irritation or worse. Keep it boring. Boring works.
Longer-term options (still optional, but good to know)
Concealing is the quick fix, but if you’re curious about longer-term improvement, it helps to understand what can change the appearance over time.
Choose what fits your comfort leveland consult qualified clinicians for anything beyond basic skincare.
Skincare habits that support the under-eye area
- Sun protection: helps prevent pigment from deepening.
- Gentle hydration: improves how makeup sits and can reduce the look of crepiness.
- Retinoids/retinol (carefully): may support smoother-looking skin over time for some people, but can irritate if overused.
In-office options (talk to a qualified professional)
- Lasers/chemical peels: sometimes used for pigment and texture (not one-size-fits-all, especially by skin tone).
- Fillers: may help when hollows create shadow (needs an experienced injector because under-eyes are delicate).
- Eyelid surgery (blepharoplasty): may be considered for significant/persistent bags related to eyelid anatomy.
When to check in with a healthcare professional
Under-eye changes are usually harmless, but consider getting medical advice if you have
sudden swelling, swelling that’s mostly on one side, pain, redness, fever, vision changes,
or persistent puffiness that doesn’t match your usual pattern. If allergies or another condition is driving the look,
treating the cause is more effective than any concealer technique.
Extra add-on (about ): Real-world experiences and what tends to work
People often assume under-eye concealing is just “buy a better concealer.” In reality, most frustrations come from a mismatch between
what you’re trying to hide and how you’re applying product. Below are a few super-common real-life scenarios
(the kind that show up in bathrooms, car mirrors, and front-facing cameras everywhere) and the approach that typically works best.
Scenario 1: “I slept fine… so why do I look puffy?”
Morning puffiness can happen even after good sleep because fluid can pool around the eyes overnightespecially if you sleep flat or you’re dealing with
allergies or a salty dinner. The best “experience-based” fix isn’t more makeup; it’s a one-minute de-puff first. Cool compress, then a tiny amount
of moisturizer, then concealer placed only in the shadow beneath the bag. If you brighten the bag itself, it can look more pronounced in daylight.
Scenario 2: “My concealer creases the moment I smile.”
This is usually a product quantity problem, not a “your face is wrong” problem. Under-eyes crease because they movelike elbows, but cuter.
What tends to work is doing two whisper-thin layers instead of one thick layer, then waiting 20 seconds, tapping out the crease, and micro-setting
only the crease line. A heavy powder bake under the eyes often makes creasing more obvious later because it dries out the area.
Scenario 3: “My dark circles are blue, but concealer turns gray.”
Grayness is a classic sign that the blue is peeking through. People usually respond by adding more concealer, which can look cakey and still gray.
The experience-based fix: add a peach/orange corrector in the bluest zone (often inner corner), blend it thin, then use a concealer that matches your skin.
If you want extra brightness, go only a half-step lighternot three shades lighter like a 2016 YouTube tutorial.
Scenario 4: “I have darker skin and my circles look more brown/ashy.”
On deeper skin tones, under-eye discoloration can be a mix of pigment and shadow. What tends to work best is choosing a corrector with enough warmth
(often orange or red-orange) to neutralize ashiness, then using a concealer with a true skin match to avoid a chalky cast. Thin layers matter even more here:
if you pile on a too-light concealer, the under-eye can look flat in photos and ashy in natural light.
Scenario 5: “I want a natural lookno makeup-makeup, but rested.”
The easiest natural win is targeted placement. Most people don’t need to cover the entire under-eye; they need to soften the inner corner and the trough shadow.
A tiny dot of concealer, pressed in, can look more natural than a full under-eye sweep. Add mascara, a touch of blush, and suddenly your face reads “awake”
without looking “concealed.” The funny part? This is often the point where people realize their under-eyes were never the main thing anyone noticed
but the confidence boost still feels nice.
Conclusion: A simple plan that works on most days
If you remember nothing else, remember this: prep, correct (if needed), place strategically, set lightly.
Under-eye concealing isn’t about perfect skinit’s about controlling light and texture in a high-movement area.
And if some days you skip it entirely? Congratulations on being a human with better things to do.