
Table of Contents >> Show >> Hide
- Before You Cook: The Scallop Sanity Checklist
- Method #1: Pan-Seared Scallops with Brown Butter Lemon-Caper Sauce
- Method #2: Broiled Scallops with Parmesan-Panko Crunch
- Method #3: Grilled Scallop Skewers with Citrus-Herb Glaze
- Troubleshooting: Fix the Most Common Scallop Problems
- Make It a Meal: Fast Pairings That Feel Fancy
- of Real-Life Cooking Experiences (That You’ll Probably Relate To)
- Conclusion
Scallops are basically the “I totally have my life together” dinnersweet, buttery, restaurant-fancy… and somehow ready
faster than your group chat can decide where to eat. The best part? You don’t need fresh-from-the-boat scallops to pull
this off. Frozen scallops can be phenomenal if you thaw them safely, dry them like you mean it, and cook them quickly.
Below are three reliable, genuinely tasty methodspan-seared, broiled, and grilledwith
clear timing, troubleshooting, and frozen-friendly tips. No mystery. No rubbery seafood erasers. Just scallops that make
you feel like you should be wearing linen.
Before You Cook: The Scallop Sanity Checklist
1) Frozen vs. fresh: what matters (and what doesn’t)
Fresh scallops are great if they smell clean and briny (not “fishy”). Frozen scallops are also greatoften
frozen quickly after harvest, which can preserve quality surprisingly well. The real difference-maker is usually not
“fresh vs frozen,” but how much extra moisture is in the scallop.
-
Sea scallops (bigger) are best for searing and grilling because they’re thick enough to brown outside
without turning the inside into overcooked sadness. - Bay scallops (small) cook lightning-fast and are better for quick sautés, pastas, and broiling with a topping.
- If you can, look for “dry-packed” scallops (less added liquid). Extra-wet scallops tend to steam instead of sear.
2) Remove the side muscle (yes, that little tab)
Many scallops come with a small rectangular “tag” on the sidecalled the adductor muscle. It’s edible, but tougher
than the rest. If it’s attached, pinch it off. Your teeth will thank you.
3) How to thaw frozen scallops (without playing food-safety roulette)
For the best texture, thaw scallops slowly in the fridge. If you’re short on time, use cold waternever the countertop.
- Best method: Put frozen scallops in the refrigerator overnight in a covered container.
-
Fast method: Seal scallops in a leak-proof bag and submerge in a bowl of cold water. Change the water every
20–30 minutes until thawed.
After thawing, drain well. If they’re sitting in a puddle, they won’t brown. They’ll sulk.
4) Dry them like your dinner plans depend on it (because they do)
Browning needs a dry surface and a hot pan. Pat scallops thoroughly with paper towels. Then do one extra drying trick:
-
Quick “dry brine” option: Sprinkle lightly with salt and let sit 10 minutes on a paper towel–lined plate,
then blot again. You’re pulling surface moisture away and seasoning at the same time.
5) When are scallops done?
Scallops go from perfect to rubbery in about the time it takes to open the fridge “just to check.” You’re looking for:
opaque, pearly flesh that feels firm but springy. If you use a thermometer, seafood safety guidance commonly points to
145°Fbut many cooks pull scallops earlier for tenderness and let carryover heat finish the job.
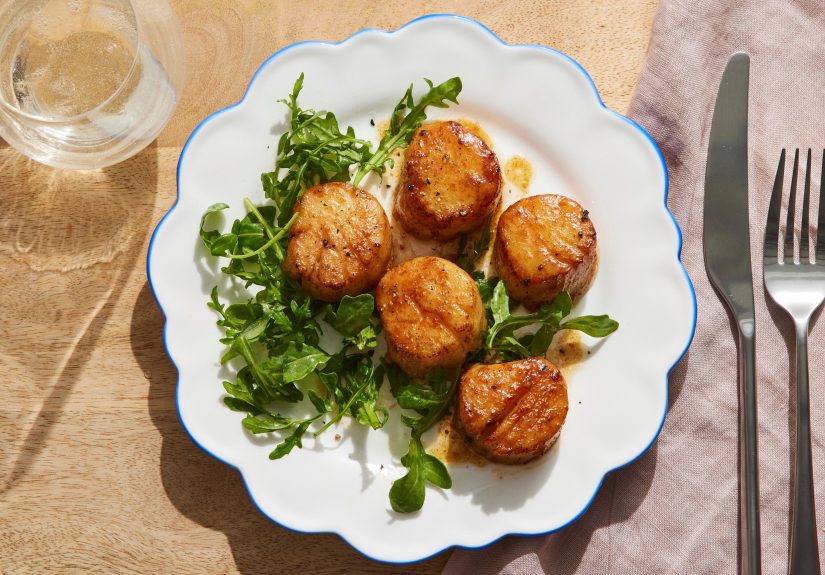
Method #1: Pan-Seared Scallops with Brown Butter Lemon-Caper Sauce
This is the classic: a deep golden crust, a tender center, and a sauce that tastes like a fancy restaurant decided to
be emotionally available. If you master one scallop method, make it this one.
What you’ll need
- 1 to 1½ pounds sea scallops (thawed if frozen)
- Kosher salt and black pepper
- 1–2 tablespoons neutral oil (avocado, grapeseed, or canola)
- 3 tablespoons butter
- 1 lemon (zest optional, juice required)
- 1–2 tablespoons capers (drained)
- Optional: 1 small garlic clove, thinly sliced; chopped parsley or basil
Step-by-step
- Dry + season: Pat scallops very dry. Season with salt and pepper right before cooking.
-
Heat the pan: Use a stainless steel or cast iron skillet. Heat over medium-high to high until it’s properly hot.
Add oil and swirl to coat. -
Sear, don’t shuffle: Place scallops in the pan with space between them. Leave them aloneno poking, no “just checking.”
Sear until a deep golden crust forms, usually 2–4 minutes depending on size and heat. -
Flip briefly: Flip and cook the second side until just opaque, typically 30–90 seconds.
Transfer scallops to a plate. -
Make the sauce: Lower heat to medium. Add butter. Let it foam and turn golden-brown and nutty.
Stir in capers, then squeeze in lemon juice (carefulit may sizzle dramatically, like it’s auditioning for a cooking show). - Finish: Return scallops to the pan for 10–20 seconds to coat (or spoon sauce over them). Add herbs if using.
Frozen scallop adjustments
- Expect more moisture: Thawed scallops often weep liquid. Blot once, wait 2 minutes, blot again.
- Batch-sear if needed: Overcrowding makes steam. Steam makes sadness. Cook in two rounds if your skillet looks crowded.
Easy serving ideas
- Over creamy polenta or mashed cauliflower with the brown butter sauce drizzled on top
- With pasta: toss hot pasta with a splash of pasta water, then spoon scallops and sauce over it
- With a crisp salad (arugula + shaved parmesan + lemony vinaigrette works beautifully)
Method #2: Broiled Scallops with Parmesan-Panko Crunch
Broiling is the “no, I don’t want to babysit a skillet” approach. It’s also very forgiving if your scallops aren’t
perfectly dry, because the topping brings texture and the broiler brings heat from abovefast.
What you’ll need
- 1 to 1½ pounds scallops (sea or bay; thawed if frozen)
- 2–3 tablespoons melted butter (or olive oil)
- ½ cup panko breadcrumbs
- ¼ cup grated parmesan
- 1 small garlic clove, finely grated (optional but encouraged)
- 1–2 teaspoons lemon zest
- Salt, pepper, and chopped parsley
Step-by-step
-
Prep the broiler: Set broiler to high. Position rack about 5–6 inches from the heat.
Line a sheet pan with foil for easy cleanup. - Dry + arrange: Pat scallops dry and arrange in a single layer. Season lightly.
-
Make the topping: Mix panko, parmesan, garlic, lemon zest, a pinch of salt and pepper, and melted butter until it looks like
buttery beach sand (the good kind). -
Top and broil: Sprinkle topping over scallops. Broil until scallops are opaque and topping is goldenoften
6–8 minutes (less for bay scallops; a bit more if very large). - Finish bright: Sprinkle parsley and squeeze lemon over the top.
Flavor variations (pick your personality)
- Italian-ish: Add a pinch of red pepper flakes and oregano.
- Coastal comfort: Swap parmesan for grated pecorino and add a tiny drizzle of honey (yes, honey).
- Herby: Mix chopped chives or tarragon into the topping right before broiling.
Method #3: Grilled Scallop Skewers with Citrus-Herb Glaze
Grilling scallops feels like summer bragging rights. Because scallops are small and quick-cooking, skewers are your best
friendno one wants to lose a $3 scallop to the barbecue abyss.
What you’ll need
- 1 to 1½ pounds large sea scallops (thawed if frozen)
- Neutral oil
- Salt and pepper
- Skewers (soak wooden skewers 30 minutes)
-
Quick glaze: 2 tablespoons olive oil, 1 tablespoon lemon or orange juice, 1 teaspoon honey, 1 small grated garlic clove,
chopped parsley or cilantro
Step-by-step
- Preheat the grill: Aim for medium-high to high heat. Clean and oil the grates.
-
Dry + skewer: Pat scallops dry. Thread onto skewers (double-skewering helps prevent spinning).
Brush lightly with oil and season. -
Grill fast: Grill scallops until opaque and lightly charred, usually 2–3 minutes per side.
Don’t wander off to “just grab something inside.” Scallops are not a slow-food situation. -
Glaze at the end: Brush glaze on during the last minute or spoon it over after grilling.
(Too early and sugars can burn.)
Frozen scallop adjustments
- Choose larger scallops: Small ones can overcook before they brown.
- Be extra diligent about drying: Moisture prevents charring and encourages sticking.
Troubleshooting: Fix the Most Common Scallop Problems
“My scallops won’t brown.”
- They’re too wet. Dry again, then dry some more.
- Pan isn’t hot enough. Preheat longer before adding scallops.
- You crowded the pan. Sear in batches so moisture can escape.
“They’re rubbery.”
- Overcooked. Next time, pull them when just opaque and still springy.
- Very small scallops cook in a blinkuse broiling or quick sautés instead of long sears.
“They stuck to the pan/grill.”
- Don’t flip too soon. When properly seared, scallops release more easily.
- Use enough oil and make sure the surface is hot.
- On the grill, oil grates and scallops; consider double skewers for control.
“They taste fishy.”
- Scallops should smell clean and mildly briny. Strong odor can signal age or mishandling.
- Brighten flavor with lemon, herbs, or a quick pan sauce.
Make It a Meal: Fast Pairings That Feel Fancy
- Starches: polenta, rice pilaf, couscous, crusty bread, or buttery noodles
- Vegetables: roasted asparagus, sautéed spinach, blistered cherry tomatoes, grilled zucchini
- Quick sauces: pesto, chimichurri, romesco, or a simple lemon-garlic butter
of Real-Life Cooking Experiences (That You’ll Probably Relate To)
Cooking scallops at home tends to happen in a few very recognizable scenariosnone of which involve a calm violin soundtrack
or a perfectly styled kitchen island. For example: it’s a weeknight, you open the freezer, and there they arefrozen scallops,
quietly judging your takeout habit. You remember someone once said scallops are “hard,” which is a dramatic lie told by
someone who didn’t own paper towels. You thaw them in cold water, pat them dry, and suddenly you’re 10 minutes away from a
dinner that looks like it cost triple digits.
Another classic moment: you’re trying to impress someone (a date, your in-laws, or your own tired self). Scallops feel like a
power move because they’re simple on paper but luxurious on the plate. That’s why method #1 is such a crowd-pleaserwhen you
get that golden crust and spoon brown butter over the top, people assume you learned this in culinary school. You don’t have to
correct them. Let the scallops do the talking.
Then there’s the “party appetizer panic.” You volunteered to bring something, and suddenly it’s two hours before guests arrive.
Broiled scallops save the day here. You can line them up, sprinkle a crunchy topping, and let the broiler do the heavy lifting.
The topping browns, the scallops turn opaque, and the whole tray looks like you planned it days ago. This is also when you learn
the most important scallop truth: walk away and they overcook. Stay nearby. Be present. Scallops reward mindfulness… or at
least hovering.
Grilled scallops have their own personality. They’re the “summer main character” versionskewered, lightly charred, finished with
citrus and herbs. People gather around a grill like it’s a campfire, and scallops cook so fast that you can serve them while
everyone is still complimenting your playlist. The only risk is treating them like chicken and leaving them too long. A couple
minutes per side is enough to get gorgeous color without turning them chewy.
And finally: the learning curve experience. Most home cooks overcook scallops exactly once. That one time is memorable because
the texture is… not ideal. But it’s also how you discover the fixpull them earlier. Scallops don’t need a long goodbye. They
need a quick sear, a quick finish, and a confident exit from the heat. After that, scallops become one of those “secret weapon”
dinners you can make on command: fast, impressive, and adaptable to whatever flavors you’re craving that week.
Conclusion
If you can thaw safely, dry thoroughly, and cook quickly, you can make scallops that taste like a restaurant splurge
whether they started fresh or frozen. Use pan-searing when you want a bold crust and a buttery sauce, broiling when you want
an easy, crispy topping, and grilling when you want smoky summer vibes on a stick. The rest is just lemon, butter,
and the confidence to stop cooking before the scallops start protesting.


