Table of Contents >> Show >> Hide
- Quick refresher: what conduction is (and what it isn’t)
- Safety first (because science is funnier when everyone keeps their eyebrows)
- Idea #1: The “Hot Spoons” Conduction Race (metal vs. wood vs. plastic)
- Idea #2: The Wax-and-Tacks “Heat Highway” (watch conduction travel)
- Idea #3: The Ice Cube Melt-Off (test conductors and insulators)
- How to write a strong conclusion for any conduction experiment (aka: “Don’t just say it melted”)
- Common variables to control (so your results don’t turn into a soap opera)
- Neat real-world connections (because conduction is everywhere)
- Wrap-up
- Experience Notes: What people usually notice (and what it teaches you)
Heat conduction sounds like something you’d need a lab coat, a grant, and a dramatic montage to understand. In reality, conduction is simply heat moving through a material by direct contactno swirling currents, no sunshine required, just molecules (and sometimes electrons) passing energy along like a well-organized relay team.
The best part? You can see conduction happen with everyday stuff: spoons, ice cubes, a candle, and a little curiosity. Below are three easy, budget-friendly heat conduction experiments that work for classrooms, science fairs, or a kitchen-table “STEM night.” Each idea includes clear steps, what to measure, and how to explain what’s going on without sounding like a textbook that forgot how to smile.
Quick refresher: what conduction is (and what it isn’t)
Conduction is heat transfer through direct contact. When a warmer object touches a cooler one, energy spreads from faster-moving particles to slower-moving particles until things become more even. Some materials pass that energy quickly (good conductors), while others resist it (insulators). Metals are usually speedy; wood, plastic, and foam usually move heat more slowly.
A classic “mind trick” is that metal can feel colder than wood even when both are the same temperature. That’s because metal pulls heat from your hand faster, so your skin cools quickly and your brain yells, “Brrr!”
Safety first (because science is funnier when everyone keeps their eyebrows)
- Adult supervision for any hot water, candles, or hot plates.
- Use safety goggles when handling hot water or heated objects.
- Keep hot water at a safe temperature for kids (warm-to-hot tap water is often enough).
- Use tongs, oven mitts, or clamps for heated metal.
- Work on a heat-safe surface and keep a cup of cool water nearby “just in case.”
Idea #1: The “Hot Spoons” Conduction Race (metal vs. wood vs. plastic)
This is the go-to heat conduction experiment because it’s simple, visual, and instantly settles the argument about which spoon is “braver.” The idea: put different spoons into hot water and track how fast heat travels up each handle.
What you’ll need
- 1 metal spoon, 1 wooden spoon, 1 plastic spoon (similar size helps)
- 3 heat-safe cups or beakers
- Hot water (not boiling for kid setups)
- Timer
- Optional but awesome: thermometer (or an infrared thermometer)
- Optional “wow factor”: butter or chocolate chips + a small piece of tape
Setup
- Fill each cup about 3/4 with the same amount of hot water.
- Place one spoon in each cup with the bowl end submerged and the handle sticking out.
- If using butter/chocolate: tape a tiny dab of butter (or a chocolate chip) at the same distance from the waterline on each spoon handle.
Run the experiment
- Start the timer as soon as all spoons are in place.
- Every 30–60 seconds, check the spoon handles (carefully).
- Record either:
- Handle temperature at a marked spot (best), or
- Time until butter/chocolate softens/melts (very visual), or
- “Touch test” notes (qualitativestill valid if you’re consistent and careful).
Simple data table you can copy
| Time (min) | Metal Spoon Temp/Observation | Wood Spoon Temp/Observation | Plastic Spoon Temp/Observation |
|---|---|---|---|
| 0 | |||
| 1 | |||
| 2 | |||
| 3 | |||
| 4 | |||
| 5 |
What’s happening (the explanation that actually makes sense)
Heat moves from the hot water into the spoon bowl, then travels through the spoon material up the handle. Metal conducts heat quickly, so its handle warms faster. Wood and plastic transfer heat more slowly, so their handles stay cooler longer. If you used butter/chocolate, the first one to soften is your fastest conductor.
Make it more “science fair” with one upgrade
- Control the start temperature: let all spoons sit in the same room for an hour first.
- Mark the measurement spot on each handle so you’re always checking the same location.
- Graph it: time on the x-axis, handle temperature on the y-axis. The steepest line wins.
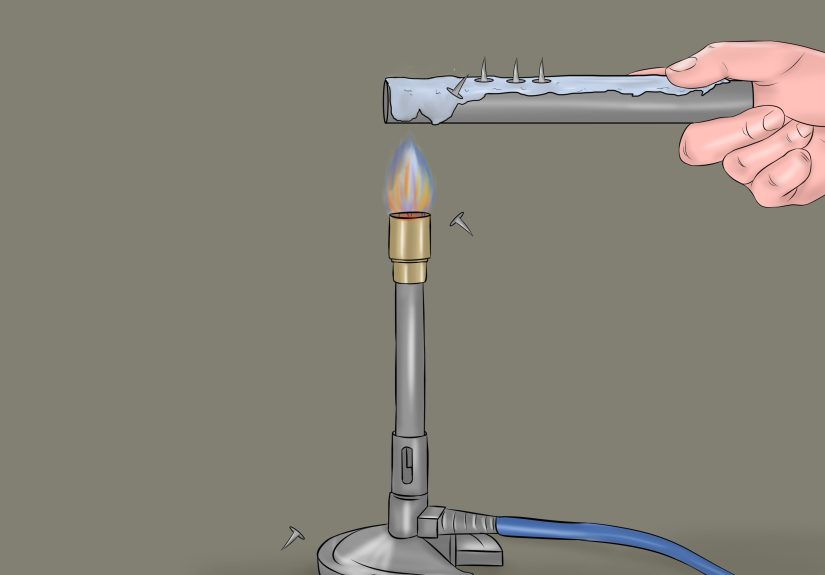
Idea #2: The Wax-and-Tacks “Heat Highway” (watch conduction travel)
If you want an experiment that looks like magic but is really physics, this is it. You attach small tacks (or paper clips) to a metal strip using wax. Heat one end, and the wax melts in order as heat conducts along the metal. The tacks drop one by one like a slow-motion victory parade.
What you’ll need
- A metal strip/rod (a metal ruler, a long metal spoon handle, or a safe lab strip)
- Small thumbtacks, paper clips, or small washers
- Candle wax (or petroleum jelly in some setups)
- A candle (or another safe heat source with adult supervision)
- Heat-resistant gloves/oven mitt + tongs or a clamp stand
- Ruler + marker
- Heat-safe mat or tray
Setup
- Mark spots along the metal strip at equal distances (for example, every 1 inch).
- Use tiny dots of wax to “glue” a tack/paper clip at each marked spot.
- Clamp the strip so it’s stable and horizontal, with one end safely exposed for heating.
Run the experiment
- Start the timer.
- Gently heat one end of the metal strip with the candle flame.
- Record the time when each tack/paper clip falls.
Data idea: turning “cool demo” into “real experiment”
Try two different metals (if available), or compare a thick strip vs. a thin strip. Keep the distance marks the same. Your question becomes: Which setup transfers heat faster along its length?
What’s happening
Heat enters the metal at the flame end and spreads through the strip by conduction. The wax melts when the metal beneath it gets warm enough, so each falling tack marks a “heat arrival time.” The order of falling tacks visually maps how heat moves through the solid.
Troubleshooting (because wax has opinions)
- If tacks fall immediately, you used too little wax or overheated too fast.
- If nothing falls, use smaller wax dots, increase heat slightly, or switch to a more conductive metal.
- Keep airflow lowstrong drafts can cool the strip and slow the effect.
Idea #3: The Ice Cube Melt-Off (test conductors and insulators)
This heat conduction experiment is wonderfully simple: put identical ice cubes on different materials and measure which melts fastest. The material that melts the ice quickest is transferring heat into the ice more efficiently. It’s also a great way to connect conduction to everyday lifelike why a stone countertop “eats ice” faster than a towel does.
What you’ll need
- Identical ice cubes (same tray = your best friend)
- Different material surfaces: metal baking sheet, ceramic plate, wood cutting board, plastic lid, foam plate, etc.
- Timer
- Paper towels (for the puddle aftermath)
- Optional: kitchen scale (to measure melt mass), thermometer
Setup
- Let all test surfaces sit in the same room for at least 30–60 minutes so they start at the same temperature.
- Label each surface so you don’t mix up your “metal” and your “mystery plastic lid of destiny.”
- Place one ice cube on each surface at the same time and start the timer.
What to measure
- Time-to-melt: record how long each ice cube takes to melt completely, or
- Mass change: weigh each ice cube at the start and again after a set time (like 10–15 minutes).
Make it more rigorous (without making it miserable)
- Use a “control” surface (like a standard plate) every time you repeat the test.
- Run 2–3 trials and average the results.
- Keep the cubes in the freezer until the moment you start so they’re equally cold.
What’s happening
Even though everything in the room might start at roughly the same temperature, different materials move heat differently. A good conductor transfers energy into the ice quickly, speeding melting. Insulators transfer heat slowly, so the ice hangs on longer. This experiment also pairs nicely with the “metal feels colder” idea: a surface can feel colder because it pulls heat away fastereven if it isn’t actually colder.
How to write a strong conclusion for any conduction experiment (aka: “Don’t just say it melted”)
A solid science conclusion has three ingredients:
- Claim: “The metal spoon conducted heat faster than wood and plastic.”
- Evidence: “The metal handle reached 95°F by minute 2, while the wooden handle stayed below 75°F until minute 5.”
- Reasoning: “Metals transfer heat efficiently, so thermal energy moved through the spoon quickly by conduction.”
Common variables to control (so your results don’t turn into a soap opera)
- Starting temperature of materials (let everything sit out together first)
- Same size/shape of spoons, rods, or surfaces when possible
- Equal amounts and temperature of hot water
- Identical ice cubes (same tray, same freezer time)
- Same distance from heat source (especially for the wax-and-tacks setup)
Neat real-world connections (because conduction is everywhere)
- Cooking: metal pans heat food quickly; wooden utensils protect your hands.
- Home insulation: materials that resist conduction help keep indoor temperatures stable.
- Winter survival: sitting on foam feels warmer than sitting on a metal bench because less heat escapes your body through conduction.
- Engineering: designers pick materials based on thermal conductivity when they want heat to move fast (heat sinks) or slow (insulation).
Wrap-up
If you can boil water, light a candle safely, or rescue ice cubes from the freezer, you can run a memorable heat conduction experiment. Start with the Hot Spoons Race for instant results, try the Wax-and-Tacks Heat Highway for the best visual “wow,” and use the Ice Cube Melt-Off when you want clean comparisons between conductors and insulators. Measure carefully, control your variables, and you’ll end up with results that are both fun and genuinely scientific.
Experience Notes: What people usually notice (and what it teaches you)
When you run these experiments with a groupstudents, kids, friends, or curious adults who “aren’t science people” until five minutes from nowthere are a few predictable moments that show up almost every time. They’re worth paying attention to, because these little reactions are basically the scientific method wearing a party hat.
First, the Hot Spoons Race tends to create instant confidence… followed by instant humility. Someone will predict the metal spoon gets warm fastest, because that’s what everyone has felt when they’ve left a spoon in soup. But then a second person will argue that plastic “must heat up faster” because it’s lighter. This is a great teaching moment: conduction isn’t about weight, it’s about how easily energy moves through the material. When the metal handle warms quickly, the group usually shifts from “I guess” to “Okay, prove it.” That’s your cue to introduce better measurementsmark a spot on each handle, use a thermometer if you have one, and record the temperature every minute. Suddenly, people realize they’re doing real data collection, not just playing with spoons (even though they totally are).
The butter or chocolate chip trick adds drama, but it also adds a lesson in fair testing. If one blob is bigger, or one chip is closer to the hot water, your results can look weird. That “weirdness” is not a failureit’s a clue. Groups learn quickly that experiments reward consistency: equal distances, equal water temperature, equal starting conditions. The best part is watching someone re-run the test because they don’t trust the first result. Congratulations: they have discovered repeatability.
The Wax-and-Tacks Heat Highway produces the loudest reactions, usually in the form of, “No waydid it just drop?” People love the one-by-one falling tacks because it makes conduction feel like something you can watch traveling down the metal. It also sparks smart questions: Why did the first tack fall quickly, but the later ones took longer? Why do the times between drops change? That opens the door to deeper thinking about how heat spreads, how the metal warms up over time, and why the temperature difference between “hot end” and “cool end” matters. Even without advanced math, you can guide the group to a clear insight: the farther heat has to travel, the longer it takes, and the rate can shift as the whole strip warms.
The Ice Cube Melt-Off is where people learn not to trust their senses blindly. Metal and stone often “feel” colder than wood or foam, so someone will assume they’re actually at a lower temperature. Then you reveal the twist: after everything sits in the same room, the surfaces can be the same temperature, yet the ice still melts faster on the metal. The takeaway is powerful: a good conductor moves heat quickly (from the room and the surface into the ice), so melting accelerates. The surface didn’t have to be colder; it just had to be better at transferring energy. Once people get that, they start spotting conduction in everyday lifewhy a metal bench feels icy in winter, why a towel makes a better potholder than a thin sheet of aluminum, and why insulation matters in homes.
Finally, the most useful “experience lesson” is this: the experiments that look simplest often teach the biggest habits. Label your materials. Start your timer the same way each trial. Write down numbers instead of trusting memory. And when your results surprise you, don’t panicask, “What changed?” That question is basically science in one sentence, and it’s the real win of any heat conduction experiment.