
Table of Contents >> Show >> Hide
- Why a Pineapple Is a Great Drawing Subject
- What You Need Before You Start
- How to Draw a Pineapple in 9 Steps
- Step 1: Draw the Main Body Shape
- Step 2: Mark the Top and Bottom Edges
- Step 3: Sketch the Center Leaves of the Crown
- Step 4: Add the Side Leaves to Build the Crown
- Step 5: Add the First Set of Diagonal Lines
- Step 6: Add the Second Set of Diagonal Lines
- Step 7: Draw the Pineapple “Eyes” Inside the Diamonds
- Step 8: Clean Up the Lines and Add Small Details
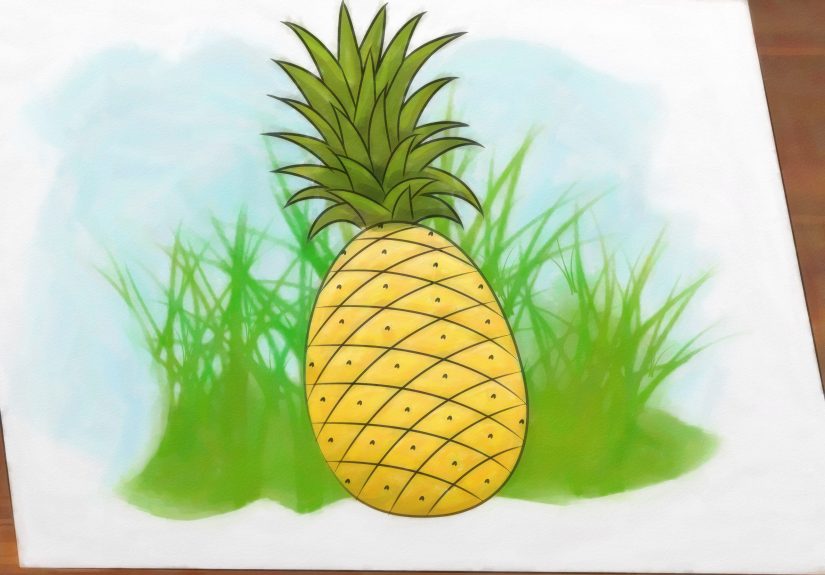
- Step 9: Shade and Color the Pineapple
- Tips to Make Your Pineapple Drawing Look Better
- Common Mistakes Beginners Make
- What Drawing a Pineapple Teaches You as an Artist
- Final Thoughts
- SEO Tags
If you have ever looked at a pineapple and thought, “That fruit seems both delicious and mildly confrontational,” you are not alone. A pineapple is one of the most fun fruits to draw because it has everything an artist could want: a bold silhouette, a dramatic leafy crown, tons of texture, and enough personality to keep your sketch from looking flat. It is basically the rock star of the produce aisle.
This easy pineapple drawing tutorial breaks the process into 9 simple steps, so you do not have to stare at a blank page like it has personally insulted you. Whether you are a beginner practicing fruit drawing, a student building confidence with pencil sketches, or someone who just wants a tropical doodle that looks better than a spiky potato, this guide will help. By the end, you will know how to draw the shape, place the crown, build the diamond pattern, add texture, and use shading to make your pineapple look more three-dimensional and polished.
The secret is simple: do not try to draw every tiny detail all at once. Start with the big shape, add structure, then layer in the texture little by little. That is how you turn chaos into a clean pineapple sketch instead of a fruit-based identity crisis.
Why a Pineapple Is a Great Drawing Subject
A pineapple is a fantastic subject for beginner drawing practice because it combines several important skills in one object. You get to practice proportion with the oval body, directional line work with the crown, repeated pattern with the outer skin, and light shading to create form. In other words, it is like a mini art workout, except nobody makes you do burpees.
It also helps that pineapples have a recognizable structure. The fruit body is usually oval or slightly cylindrical, the top crown fans upward in stiff pointed leaves, and the surface is divided into repeating “eyes” that create a textured pattern. Once you understand those major parts, the whole drawing becomes much less intimidating and much more manageable.
What You Need Before You Start
- A pencil
- An eraser
- Drawing paper or a sketchbook
- A black pen or marker if you want a clean outline
- Colored pencils, crayons, or markers if you want to add color
You do not need expensive supplies for this pineapple drawing. A basic pencil and a little patience will do the job just fine. Fancy tools are nice, but they will not save a crooked pineapple crown. Only your eyeballs can do that.
How to Draw a Pineapple in 9 Steps
Step 1: Draw the Main Body Shape
Start with a large vertical oval in the center of your page. This will be the body of the pineapple. Keep the bottom slightly rounded and the sides gently curved. You do not want a perfect geometric football here. A pineapple usually feels a bit fuller through the middle, so let the shape look organic rather than rigid.
Draw this outline lightly. Think of it as the scaffolding for your final sketch. If the oval looks too skinny, your pineapple may end up looking underfed. If it is too wide, it may resemble a tropical grenade. Aim for balance: tall enough to feel elegant, wide enough to look natural.
This first step matters more than people think. If your base shape feels right, everything else becomes easier. If the base is off, the crown, pattern, and shading will spend the rest of the drawing trying to recover from that bad decision.
Step 2: Mark the Top and Bottom Edges
Now lightly define where the crown will sit and where the base of the fruit ends. Add a short guideline across the top of the oval to show where the leafy crown begins. You can also flatten the very bottom just a little if you want the pineapple to look like it could sit on a table instead of rolling away to avoid being drawn.
This step helps separate the fruit from the leaves. Beginners often merge the crown directly into the fruit without a clear transition, which makes the whole thing feel messy. Giving the pineapple a visible top edge creates structure and makes the next steps feel more controlled.
Do not press hard yet. You are still mapping the drawing, not carving it into history.
Step 3: Sketch the Center Leaves of the Crown
At the top of the oval, draw two or three long pointed leaves rising upward from the center. These should be narrow, slightly curved, and sharp at the tips. Let them fan out a little instead of standing perfectly straight. Pineapple leaves are stiff, but they are not military recruits.
Vary the height of the leaves so the crown looks more natural. If every leaf is the exact same size and angle, the drawing will feel flat and overly planned. A little irregularity adds life. Think of the crown as a layered burst rather than a neat haircut.
These center leaves will help anchor the rest of the crown. Once they are in place, it becomes easier to build outward without losing the overall shape.
Step 4: Add the Side Leaves to Build the Crown
Next, draw more leaves on each side of the center ones. Some can tilt outward, some can overlap, and a few can curve slightly forward or backward. Let the crown feel full and spiky, but keep it readable. You are drawing a pineapple, not an explosion in a salad bar.
Overlap is important here. When one leaf crosses in front of another, the crown suddenly feels more dimensional. You do not need a jungle of detail, just enough layering to suggest depth. Keep the lines clean and pointed, and make sure the leaves attach near the top of the fruit rather than floating above it.
Take a moment to check the silhouette. A strong crown shape makes the pineapple instantly recognizable, even before you add the skin pattern.
Step 5: Add the First Set of Diagonal Lines
Now it is time for the pineapple’s signature texture. Draw a series of evenly spaced diagonal lines across the fruit body, slanting in one direction. Let the lines curve gently with the form of the oval so they wrap around the fruit instead of sitting on it like wallpaper.
This is where many drawings start to improve fast. The diagonal lines transform the blank oval into a pineapple body with structure. Keep the spacing fairly even, but do not stress over perfection. A little variation actually makes the fruit feel more natural.
Use a light hand and take your time. If the lines are too stiff, the pineapple can start to look flat. Slightly curved lines help communicate roundness, which is exactly what you want.
Step 6: Add the Second Set of Diagonal Lines
Draw a second set of diagonal lines crossing the first set in the opposite direction. This creates a grid of diamond shapes across the pineapple skin. Congratulations: your fruit has officially entered its textured era.
As before, let the lines follow the curve of the fruit. They should bend subtly around the oval, especially near the sides. Straight ruler-like lines can make the pineapple look pasted onto the page rather than existing as a three-dimensional object.
Once the crisscross pattern is in place, step back and look at the overall rhythm. The diamonds do not have to be mathematically perfect, but they should feel consistent enough that the eye reads them as a repeating surface pattern.
Step 7: Draw the Pineapple “Eyes” Inside the Diamonds
Inside each diamond shape, add a small pointed mark, curved notch, or tiny angled shape to suggest the pineapple’s eyes. These details give the rind that rough, layered surface people instantly recognize. Keep them simple. You are suggesting texture, not auditioning to draw every cell in the fruit.
The easiest way is to place a small V-shape, short arc, or little pointed dash inside each diamond. Make them follow the direction of the pattern so they feel integrated rather than random. You can darken some of these marks more than others to hint at depth.
This stage is where the pineapple starts to look convincingly real. Suddenly, the drawing has surface character. It is no longer just a fruit outline with ambition.
Step 8: Clean Up the Lines and Add Small Details
Erase any extra construction lines that are no longer needed. Refine the outline of the fruit and the crown. You can add a few thin lines inside the leaves to suggest veins or folds, but keep them subtle. Too many leaf lines can crowd the drawing and make the top look messy.
This is also a good time to strengthen the most important contours. Darken the outer edge of the fruit slightly, define the base of the crown, and clean up uneven areas in the pattern. Think of this step as grooming your pineapple before it makes its big public appearance.
If you are using pen or marker, trace only after you are happy with the pencil sketch. Ink has many wonderful qualities, but forgiveness is not one of them.
Step 9: Shade and Color the Pineapple
To finish, add shading that matches a clear light source. If the light is coming from the upper left, keep that side lighter and darken the lower right side and the areas under overlapping leaves. This small decision makes a huge difference because it gives the pineapple volume instead of leaving it looking flat.
For color, use yellow, golden orange, and touches of brown on the fruit. The leaves can be green with darker green or olive shadows. If you are working in pencil only, vary your pressure so the diamonds and eyes stay visible while the shading wraps around the form. Gentle cross-hatching, soft blending, or light contour shading all work well here.
Do not shade every section the same way. A pineapple has a rough, uneven surface, so a little variation makes it look more believable. Leave a few lighter spots for highlights, especially on the upper part of the fruit. That touch of contrast helps the drawing feel finished instead of merely completed.
Tips to Make Your Pineapple Drawing Look Better
Use light construction lines first
Start soft, then build darker lines later. This gives you room to fix proportions without battling heavy graphite scars across the page.
Let the texture follow the form
The crisscross pattern should curve with the body of the fruit. If the texture ignores the shape underneath, the pineapple will lose its roundness.
Do not over-detail the crown
The leaves should feel layered and lively, but they do not need endless stripes and outlines. A few well-placed details are more effective than a forest of frantic line work.
Keep your light source consistent
If your shadows go in five different directions, your pineapple will look like it is being interrogated under several lamps at once. Pick one light direction and stick with it.
Common Mistakes Beginners Make
One common mistake is drawing the crown too small. The leafy top should feel bold and noticeable, not like an apologetic tuft of grass. Another is making the body too narrow, which can throw off the whole tropical vibe. Pineapples are sturdy. Give them a little confidence.
Another issue is drawing the texture too early. If you jump straight into the diamond pattern before establishing the shape, the drawing can become confusing fast. Always build the big form first, then add the surface details.
Finally, many beginners outline everything equally dark. Real drawings usually look better when some lines are softer and some are stronger. Heavier edges can help bring attention to the outline and shadow areas, while lighter interior lines keep the drawing breathable and clean.
What Drawing a Pineapple Teaches You as an Artist
There is something surprisingly useful about drawing a pineapple over and over again. At first, it seems like a goofy little exercise. It is a fruit with a mohawk. How serious can it be? But after a few attempts, you start noticing that this subject quietly trains some of the most important drawing habits.
First, it teaches patience. A pineapple is not difficult because the shape is complicated; it is difficult because the details are repetitive. You have to stay focused through the diamond pattern, the little eyes, and the overlapping leaves. That repetition builds discipline, and discipline is what often separates a rushed sketch from a polished one.
Second, it helps you understand structure before texture. The best pineapple drawings do not begin with a million tiny marks. They begin with a strong oval, a clean crown shape, and a clear sense of proportion. Once you see that, it changes how you approach other subjects too. Suddenly, flowers, trees, shoes, and even faces become less intimidating because you know to look for the large shapes first.
Third, drawing a pineapple is great practice for learning how patterns wrap around a form. That outer grid is not flat. It bends across the rounded fruit, and your eye has to learn how to show that curve with line direction. This is a valuable skill that transfers to baskets, woven fabric, scales, bricks, and countless other textured surfaces.
It also gives you a safe way to experiment with shading. Because the fruit has obvious texture and a clear silhouette, even simple shadows make a visible difference. You can test hatching, blending, or stronger contrast without feeling overwhelmed. If you mess up, guess what? You still have a pineapple. It is a forgiving subject.
On a more personal level, drawing a pineapple can remind you that improvement usually looks boring before it looks impressive. The first sketch might be awkward. The second might be slightly less awkward. By the fourth or fifth try, though, you start placing the crown faster, curving the texture more naturally, and shading with more confidence. That is the real reward: not just one finished drawing, but proof that practice works.
And honestly, there is joy in that. A pineapple is cheerful. It is hard to be too gloomy while drawing something so unapologetically tropical. The process feels playful, which makes it easier to keep going. Sometimes that is exactly what an art practice needs: not pressure, not perfection, just one weird fruit and the willingness to draw it better than last time.
So if your first pineapple looks a little wonky, keep it. Draw another one tomorrow. Then another one next week. You may come for the fruit, but you will stay for the progress.
Final Thoughts
Learning how to draw a pineapple in 9 steps is a fun way to practice shape, texture, and shading without getting overwhelmed. The process is simple when you break it down: start with the body, build the crown, add the diagonal pattern, place the eyes, and finish with shading and color. That is it. No tropical magic required.
The best part is that this pineapple drawing tutorial works for almost any skill level. Kids can use it as a simple fruit sketch lesson, beginners can use it to practice clean line work, and more advanced artists can push it further with richer shading and realistic texture. However you approach it, the pineapple gives you plenty to learn from and just enough personality to keep the process fun.
In other words, this is one piece of fruit that absolutely deserves its moment in your sketchbook.


